User Guide for Mac
Page 2
... Started 1 Using the Formatting Tool 1 Preparing the Software Manually 4 Installing the Software 8 Managing Your Drives 14 Customizing the OneTouch Button 14 Running Diagnostics 17 Using RAID (OneTouch III Users 18 Updating Your Software 25 Backing Up & Restoring Folders 28 Creating Backup Plans 28 Using Simple Backup 28 Creating ... Sync 53 Checking Sync Status 53 Using Automatic Sync 54 Turning Off Automatic Sync 54 Synchronizing Manually 55 Using the Maxtor Synchronization Window 55 Using Automatic Overwrite 57 Managing Security 58 Using DrivePass 58 Maxtor OneTouch IV i
... Started 1 Using the Formatting Tool 1 Preparing the Software Manually 4 Installing the Software 8 Managing Your Drives 14 Customizing the OneTouch Button 14 Running Diagnostics 17 Using RAID (OneTouch III Users 18 Updating Your Software 25 Backing Up & Restoring Folders 28 Creating Backup Plans 28 Using Simple Backup 28 Creating ... Sync 53 Checking Sync Status 53 Using Automatic Sync 54 Turning Off Automatic Sync 54 Synchronizing Manually 55 Using the Maxtor Synchronization Window 55 Using Automatic Overwrite 57 Managing Security 58 Using DrivePass 58 Maxtor OneTouch IV i
User Guide for Mac
Page 3
Enabling DrivePass 58 Unlocking Your OneTouch Drive 60 Removing DrivePass 64 Changing Your DrivePass Password 66 If You Forget Your Password 67 Using Maxtor Encryption 72 Creating an Encrypted Folder 73 Encrypting Files and Folders 75 Managing the Encrypted Folder 78 Deleting an Encrypted Folder 81 From the Security View 81 From the Finder Window 84 Changing Your Encryption Password 85 From the Security View 85 From the Maxtor Encryption Window 87 Frequently Asked Questions 89 Index i 072407 Maxtor OneTouch IV ii
Enabling DrivePass 58 Unlocking Your OneTouch Drive 60 Removing DrivePass 64 Changing Your DrivePass Password 66 If You Forget Your Password 67 Using Maxtor Encryption 72 Creating an Encrypted Folder 73 Encrypting Files and Folders 75 Managing the Encrypted Folder 78 Deleting an Encrypted Folder 81 From the Security View 81 From the Finder Window 84 Changing Your Encryption Password 85 From the Security View 85 From the Maxtor Encryption Window 87 Frequently Asked Questions 89 Index i 072407 Maxtor OneTouch IV ii
User Guide for Mac
Page 4
... data • Sync to synchronize one location • A customized OneTouch button to password-protect both the OneTouch 4 Plus and OneTouch 4 Mini drives. Using the Formatting Tool The Mac OneTouch 4 Formatting Tool automatically prepares the Maxtor Manager software for the OneTouch 4 Mini drive as well. The New Volume Finder window opens: Maxtor OneTouch IV 1 The images in one or more folders between...
... data • Sync to synchronize one location • A customized OneTouch button to password-protect both the OneTouch 4 Plus and OneTouch 4 Mini drives. Using the Formatting Tool The Mac OneTouch 4 Formatting Tool automatically prepares the Maxtor Manager software for the OneTouch 4 Mini drive as well. The New Volume Finder window opens: Maxtor OneTouch IV 1 The images in one or more folders between...

User Guide for Mac
Page 5
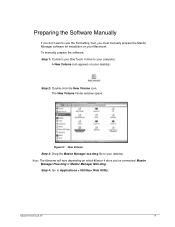
Figure 1: New Volume The New Volume Finder window contains the Mac OneTouch 4 Plus Formatting tool. Here's what the Formatting tool does, click Format to format your OneTouch 4 drive for a Macintosh. Step 3: Double-click the Mac OneTouch 4 Plus (or Mac OneTouch 4 Mini) icon. The Mac OneTouch 4 Plus Formatter window opens: Figure 2: Mac OneTouch 4 Formatter Step 4: After you see: • The New Volume drive is automatic. The remainder of what you 've read the description of the software preparation is dismounted and reformatted: Maxtor OneTouch IV 2
Figure 1: New Volume The New Volume Finder window contains the Mac OneTouch 4 Plus Formatting tool. Here's what the Formatting tool does, click Format to format your OneTouch 4 drive for a Macintosh. Step 3: Double-click the Mac OneTouch 4 Plus (or Mac OneTouch 4 Mini) icon. The Mac OneTouch 4 Plus Formatter window opens: Figure 2: Mac OneTouch 4 Formatter Step 4: After you see: • The New Volume drive is automatic. The remainder of what you 've read the description of the software preparation is dismounted and reformatted: Maxtor OneTouch IV 2

User Guide for Mac
Page 6
Figure 3: Formatting In Progress • When formatting is complete, the OneTouch icon refreshes to display the name of the drive: • The OneTouch 4 Plus.dmg file appears on your desktop: • The dmg file automatically creates a OneTouch 4 Plus installer: • The OneTouch 4 Plus installer Welcome window opens Figure 4: Welcome Maxtor OneTouch IV 3
Figure 3: Formatting In Progress • When formatting is complete, the OneTouch icon refreshes to display the name of the drive: • The OneTouch 4 Plus.dmg file appears on your desktop: • The dmg file automatically creates a OneTouch 4 Plus installer: • The OneTouch 4 Plus installer Welcome window opens Figure 4: Welcome Maxtor OneTouch IV 3
User Guide for Mac
Page 7
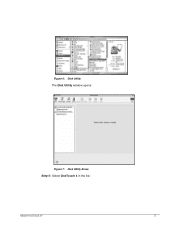
The New Volume Finder window opens: Figure 5: New Volume Step 3: Drag the Maxtor Manager xxx.dmg file to Applications > Utilities> Disk Utility: Maxtor OneTouch IV 4 Step 4: Go to your desktop. A New Volume icon appears on which Maxtor 4 drive you've connected: Maxtor Manager Plus.dmg or Maxtor Manager Mini.dmg. Note: The filename will vary depending on your desktop...
The New Volume Finder window opens: Figure 5: New Volume Step 3: Drag the Maxtor Manager xxx.dmg file to Applications > Utilities> Disk Utility: Maxtor OneTouch IV 4 Step 4: Go to your desktop. A New Volume icon appears on which Maxtor 4 drive you've connected: Maxtor Manager Plus.dmg or Maxtor Manager Mini.dmg. Note: The filename will vary depending on your desktop...
User Guide for Mac
Page 8
Figure 6: Disk Utility The Disk Utility window opens: Figure 7: Disk Utility Erase Step 5: Select OneTouch 4 in the list: Maxtor OneTouch IV 5
Figure 6: Disk Utility The Disk Utility window opens: Figure 7: Disk Utility Erase Step 5: Select OneTouch 4 in the list: Maxtor OneTouch IV 5
User Guide for Mac
Page 11
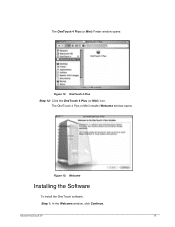
Maxtor OneTouch IV 8 The OneTouch 4 Plus (or Mini) Finder window opens: Figure 12: OneTouch 4 Plus Step 12: Click the OneTouch 4 Plus (or Mini) icon. The OneTouch 4 Plus or Mini Installer Welcome window opens Figure 13: Welcome Installing the Software To install the OneTouch software, Step 1: In the Welcome window, click Continue.
Maxtor OneTouch IV 8 The OneTouch 4 Plus (or Mini) Finder window opens: Figure 12: OneTouch 4 Plus Step 12: Click the OneTouch 4 Plus (or Mini) icon. The OneTouch 4 Plus or Mini Installer Welcome window opens Figure 13: Welcome Installing the Software To install the OneTouch software, Step 1: In the Welcome window, click Continue.

User Guide for Mac
Page 12
The Software License Agreement window opens: Figure 15: Software License Agreement Step 3: Click Continue. A sheet requires your agreement to continue the installation: Maxtor OneTouch IV 9 The Read Me window opens: Figure 14: Read Me Step 2: When you've read the information, click Continue.
The Software License Agreement window opens: Figure 15: Software License Agreement Step 3: Click Continue. A sheet requires your agreement to continue the installation: Maxtor OneTouch IV 9 The Read Me window opens: Figure 14: Read Me Step 2: When you've read the information, click Continue.

User Guide for Mac
Page 13
Note: The OneTouch 4 software can be installed only on the boot volume. The Installation Type window opens: Maxtor OneTouch IV 10 Figure 16: License Agreement sheet Step 4: Click Agree in the sheet to continue the installation. The Select a Destination window opens: Figure 17: Select a Destination Step 5: If it's not already selected, select your Macintosh hard drive and click Continue.
Note: The OneTouch 4 software can be installed only on the boot volume. The Installation Type window opens: Maxtor OneTouch IV 10 Figure 16: License Agreement sheet Step 4: Click Agree in the sheet to continue the installation. The Select a Destination window opens: Figure 17: Select a Destination Step 5: If it's not already selected, select your Macintosh hard drive and click Continue.

User Guide for Mac
Page 14
Figure 18: Installation Type Step 6: Click Install. A sheet warns that you informed as the installation proceeds: Maxtor OneTouch IV 11 A progress window keeps you 'll have to restart your computer: Figure 19: Restart Warning Step 7: Click Continue Installation in the sheet.
Figure 18: Installation Type Step 6: Click Install. A sheet warns that you informed as the installation proceeds: Maxtor OneTouch IV 11 A progress window keeps you 'll have to restart your computer: Figure 19: Restart Warning Step 7: Click Continue Installation in the sheet.

User Guide for Mac
Page 15
When your computer has restarted, a Maxtor Manager icon appears on your computer and complete the installation. Figure 20: Installing OneTouch 4 Plus When the installation is complete, a Restart window opens: Figure 21: Restart Step 8: Click Restart to restart your desktop: Maxtor OneTouch IV 12
When your computer has restarted, a Maxtor Manager icon appears on your computer and complete the installation. Figure 20: Installing OneTouch 4 Plus When the installation is complete, a Restart window opens: Figure 21: Restart Step 8: Click Restart to restart your desktop: Maxtor OneTouch IV 12
User Guide for Mac
Page 17
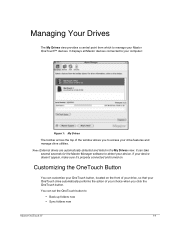
...It can take several seconds for the Maxtor Manager software to • Back up folders now • Sync folders now Maxtor OneTouch IV 14 Customizing the OneTouch Button You can set the OneTouch button to detect your device. You can customize your OneTouch button, located on . Managing Your Drives... and manage drive utilities. It displays all Maxtor devices connected to manage your device doesn't appear, make sure it's properly connected and turned on the front of your drive, so that your OneTouch drive automatically performs the action of the window allows you click the...
...It can take several seconds for the Maxtor Manager software to • Back up folders now • Sync folders now Maxtor OneTouch IV 14 Customizing the OneTouch Button You can set the OneTouch button to detect your device. You can customize your OneTouch button, located on . Managing Your Drives... and manage drive utilities. It displays all Maxtor devices connected to manage your device doesn't appear, make sure it's properly connected and turned on the front of your drive, so that your OneTouch drive automatically performs the action of the window allows you click the...
User Guide for Mac
Page 24
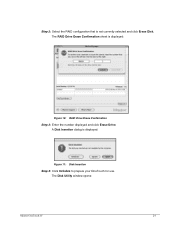
The RAID Drive Erase Confirmation sheet is displayed: Figure 11: Disk Insertion Step 4: Click Initialize to prepare your OneTouch for use. The Disk Utility window opens: Maxtor OneTouch IV 21 A Disk Insertion dialog is displayed: Figure 10: RAID Drive Erase Confirmation Step 3: Enter the number displayed and click Erase Drive. Step 2: Select the RAID configuration that is not currently selected and click Erase Disk.
The RAID Drive Erase Confirmation sheet is displayed: Figure 11: Disk Insertion Step 4: Click Initialize to prepare your OneTouch for use. The Disk Utility window opens: Maxtor OneTouch IV 21 A Disk Insertion dialog is displayed: Figure 10: RAID Drive Erase Confirmation Step 3: Enter the number displayed and click Erase Drive. Step 2: Select the RAID configuration that is not currently selected and click Erase Disk.
User Guide for Mac
Page 29
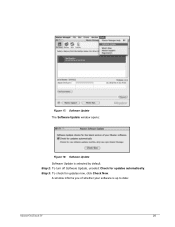
Step 3: To check for updates automatically. A window informs you of whether your software is selected by default. Figure 17: Software Update The Software Update window opens: Figure 18: Software Update Software Update is up to date: Maxtor OneTouch IV 26 Step 2: To turn off Software Update, unselect Check for updates now, click Check Now.
Step 3: To check for updates automatically. A window informs you of whether your software is selected by default. Figure 17: Software Update The Software Update window opens: Figure 18: Software Update Software Update is up to date: Maxtor OneTouch IV 26 Step 2: To turn off Software Update, unselect Check for updates now, click Check Now.
User Guide for Mac
Page 55
...asked which you want to sync the selected folders. You can connect the OneTouch drive to as many computers as you want to be asked where to put the synchronized folders on this computer. The Sync window opens: Figure 5: Enable Sync Step 3: Click Yes to sync manually using...it to another computer. Step 2: Connect the OneTouch drive to another computer on your OneTouch to a second computer to complete a Sync, you connect the drive to the computer. OR - The first time you connect your OneTouch drive each time a file changes. - Maxtor OneTouch IV 52 OR - Completing the Sync To ...
...asked which you want to sync the selected folders. You can connect the OneTouch drive to as many computers as you want to be asked where to put the synchronized folders on this computer. The Sync window opens: Figure 5: Enable Sync Step 3: Click Yes to sync manually using...it to another computer. Step 2: Connect the OneTouch drive to another computer on your OneTouch to a second computer to complete a Sync, you connect the drive to the computer. OR - The first time you connect your OneTouch drive each time a file changes. - Maxtor OneTouch IV 52 OR - Completing the Sync To ...

User Guide for Mac
Page 58
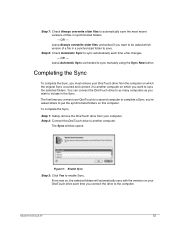
Maxtor OneTouch IV 55 Figure 8: Sync Step 2: Uncheck Automatic Sync. Synchronizing Manually To sync selected folders immediately, • Click Sync Now. Using the Maxtor Synchronization Window Use the Maxtor Synchronization window to manage your synchronized files: • Decide whether to overwrite existing file versions. • Add or delete files. • Resolve conflicts over which version of ...
Maxtor OneTouch IV 55 Figure 8: Sync Step 2: Uncheck Automatic Sync. Synchronizing Manually To sync selected folders immediately, • Click Sync Now. Using the Maxtor Synchronization Window Use the Maxtor Synchronization window to manage your synchronized files: • Decide whether to overwrite existing file versions. • Add or delete files. • Resolve conflicts over which version of ...
User Guide for Mac
Page 59
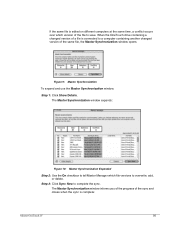
... another changed version of the same file, the Maxtor Synchronization window opens: Figure 9: Maxtor Synchronization To expand and use the Maxtor Synchronization window, Step 1: Click Show Details. Step 3: Click Sync Now to overwrite, add, or delete. When the OneTouch drive containing a changed version of a file is complete: Maxtor OneTouch IV 56 If the same file is edited on...
... another changed version of the same file, the Maxtor Synchronization window opens: Figure 9: Maxtor Synchronization To expand and use the Maxtor Synchronization window, Step 1: Click Show Details. Step 3: Click Sync Now to overwrite, add, or delete. When the OneTouch drive containing a changed version of a file is complete: Maxtor OneTouch IV 56 If the same file is edited on...
User Guide for Mac
Page 60
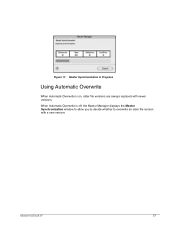
When Automatic Overwrite is on, older file versions are always replaced with a new version: Maxtor OneTouch IV 57 Figure 11: Maxtor Synchronization in Progress Using Automatic Overwrite When Automatic Overwrite is off, the Maxtor Manager displays the Maxtor Synchronization window to allow you to decide whether to overwrite an older file version with newer versions.
When Automatic Overwrite is on, older file versions are always replaced with a new version: Maxtor OneTouch IV 57 Figure 11: Maxtor Synchronization in Progress Using Automatic Overwrite When Automatic Overwrite is off, the Maxtor Manager displays the Maxtor Synchronization window to allow you to decide whether to overwrite an older file version with newer versions.
User Guide for Mac
Page 63
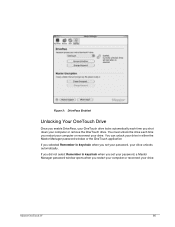
... in keychain when you restart your computer or reconnect your drive: Maxtor OneTouch IV 60 You can unlock your drive in either the Maxtor Manager password window or the OneTouch application If you selected Remember in keychain when you set your password, a Maxtor Manager password window opens when you set your password, your drive unlocks automatically. Figure...
... in keychain when you restart your computer or reconnect your drive: Maxtor OneTouch IV 60 You can unlock your drive in either the Maxtor Manager password window or the OneTouch application If you selected Remember in keychain when you set your password, a Maxtor Manager password window opens when you set your password, your drive unlocks automatically. Figure...


