
Schwinn Owner's Manual
Page 6
... such as fenders, bags, carriers, etc. PARTS IDENTIFICATION SINGLE SPEED BICYCLE Get to know the parts of your bicycle. Single speed bicycles vary greatly. Seat Rear reflector Seat post binder bolt or quick-release skewer Seat stay Training wheel bracket Rear sprocket Spokes Handlebar grip Brake control cable Head set Head tube Top tube Down tube Seat post Seat tube Rear brake lever Handle bar Front reflector Handlebar stem Front brake Brake pad Front fork Front hub Wheel reflector Pedal Tire valve Training wheel Chain wheel Chain Crank arm Chain stay Rim...
... such as fenders, bags, carriers, etc. PARTS IDENTIFICATION SINGLE SPEED BICYCLE Get to know the parts of your bicycle. Single speed bicycles vary greatly. Seat Rear reflector Seat post binder bolt or quick-release skewer Seat stay Training wheel bracket Rear sprocket Spokes Handlebar grip Brake control cable Head set Head tube Top tube Down tube Seat post Seat tube Rear brake lever Handle bar Front reflector Handlebar stem Front brake Brake pad Front fork Front hub Wheel reflector Pedal Tire valve Training wheel Chain wheel Chain Crank arm Chain stay Rim...

Schwinn Owner's Manual
Page 7
... cable Freewheel Wheel reflector Rim Seat Rear reflector Seat post Quick release Rear Brake ShiŌ lever Handlebar stem Head set Head tube Top tube Down tube Seat tube Seat stay Front derailleur Handlebar Brake lever Brake control cables Front reflector Front brake Front fork Spokes Tire Chain wheel Chain stay Chain Rear derailleur BoƩom Bracket Axle Crank arm Tire valve Pedal Front hub ©2010 1.2 7 PARTS IDENTIFICATION MULTI SPEED BICYCLE Get to know the parts of your bicycle. Your model may have additional accessories such as fenders...
... cable Freewheel Wheel reflector Rim Seat Rear reflector Seat post Quick release Rear Brake ShiŌ lever Handlebar stem Head set Head tube Top tube Down tube Seat tube Seat stay Front derailleur Handlebar Brake lever Brake control cables Front reflector Front brake Front fork Spokes Tire Chain wheel Chain stay Chain Rear derailleur BoƩom Bracket Axle Crank arm Tire valve Pedal Front hub ©2010 1.2 7 PARTS IDENTIFICATION MULTI SPEED BICYCLE Get to know the parts of your bicycle. Your model may have additional accessories such as fenders...

Schwinn Owner's Manual
Page 8
... feet can mount and dismount the bicycle quickly if the need arises. to pedal. Height 28 - 38 inches tall 38 - 48 inches tall 42 - 52 inches tall 48 - 60 inches tall 56 - 66 inches tall 64 - 74 inches tall 64 - 74 inches tall SIZING GUIDE & CHART When choosing the correct size bicycle, there are in the knee. In this manual for younger riders who want to...
... feet can mount and dismount the bicycle quickly if the need arises. to pedal. Height 28 - 38 inches tall 38 - 48 inches tall 42 - 52 inches tall 48 - 60 inches tall 56 - 66 inches tall 64 - 74 inches tall 64 - 74 inches tall SIZING GUIDE & CHART When choosing the correct size bicycle, there are in the knee. In this manual for younger riders who want to...

Schwinn Owner's Manual
Page 15
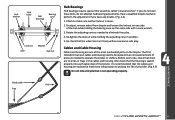
... front and rear brakes work properly. • Ensure brake shoe pads are not overly worn and are correctly positioned in relation to the forks and the direction of travel. • Check that the headset locking mechanism is properly adjusted and tightened. • If the bicycle is fitted with quick release axles, make sure locking levers are tight. Chain • Ensure chain is...
... front and rear brakes work properly. • Ensure brake shoe pads are not overly worn and are correctly positioned in relation to the forks and the direction of travel. • Check that the headset locking mechanism is properly adjusted and tightened. • If the bicycle is fitted with quick release axles, make sure locking levers are tight. Chain • Ensure chain is...
Schwinn Owner's Manual
Page 24
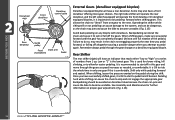
... equipped) will have a rear derailleur. Remember always pedal through the gears as speed increases as the chain may result in this is important to be dangerous, as needed, or comfortable. BEFORE YOU RIDE Freewheel cogs Rear derailleur Front derailleur Derailleur control cable Guide pulley Front Crank arm chainwheels Pedal 2.15 External Gears (derailleur equipped bicycles) Derailleur equipped bicycles all have an indicator that reads either "low to "high" or a series of...
... equipped) will have a rear derailleur. Remember always pedal through the gears as speed increases as the chain may result in this is important to be dangerous, as needed, or comfortable. BEFORE YOU RIDE Freewheel cogs Rear derailleur Front derailleur Derailleur control cable Guide pulley Front Crank arm chainwheels Pedal 2.15 External Gears (derailleur equipped bicycles) Derailleur equipped bicycles all have an indicator that reads either "low to "high" or a series of...

Schwinn Owner's Manual
Page 25
... the appropriate gear. When shifting, lessen the pressure exerted on derailleur bikes because the chain can jam and cause the bike to allow the front wheel to be placed beside the frame so a smaller lock can cause the chain to remove the seatpost and saddle and carry it with the local police and/or bicycle registry. • Invest in a high quality bicycle lock that...
... the appropriate gear. When shifting, lessen the pressure exerted on derailleur bikes because the chain can jam and cause the bike to allow the front wheel to be placed beside the frame so a smaller lock can cause the chain to remove the seatpost and saddle and carry it with the local police and/or bicycle registry. • Invest in a high quality bicycle lock that...
Schwinn Owner's Manual
Page 26
... remove any loose dirt with plastic as ozone emissions may cause paint to fade or rubber and plastic parts to crack. • Before storing your bicycle to clean plastic parts and rubber tires. If the hub and bottom bracket bearings of this manual ...wheel rims are dry so braking performance is very corrosive. Clear nail polish can also be taken out and re-greased. Chrome plated bikes should be used as a preventative measure. • Regularly clean and lubricate all moving parts, tighten components and make adjustments as required. (Refer to Parts 4 and 5 of your bicycle...
... remove any loose dirt with plastic as ozone emissions may cause paint to fade or rubber and plastic parts to crack. • Before storing your bicycle to clean plastic parts and rubber tires. If the hub and bottom bracket bearings of this manual ...wheel rims are dry so braking performance is very corrosive. Clear nail polish can also be taken out and re-greased. Chrome plated bikes should be used as a preventative measure. • Regularly clean and lubricate all moving parts, tighten components and make adjustments as required. (Refer to Parts 4 and 5 of your bicycle...

Schwinn Owner's Manual
Page 29
... front wheel, the stem is too loose. Loosen the center bolt enough so that is inserted into the fork steer tube. Tighten the stem center bolt so that has an adjustable angle. If these instructions are 2 basic types of the fork steer and remove any parts. For this after the front wheel is installed, and re-adjust. (Fig. 3.6) 3.6 Threadless Stems This is a handlebar assembly that has a open ended stem with...
... front wheel, the stem is too loose. Loosen the center bolt enough so that is inserted into the fork steer tube. Tighten the stem center bolt so that has an adjustable angle. If these instructions are 2 basic types of the fork steer and remove any parts. For this after the front wheel is installed, and re-adjust. (Fig. 3.6) 3.6 Threadless Stems This is a handlebar assembly that has a open ended stem with...

Schwinn Owner's Manual
Page 31
... palm, but do not Close tighten too far. 3.10 4. Move the handle so it is for adjusting the tension. (Fig. 3.12) Next go back to close a quick release lever can cause loss of control of the bike (the side opposite the chain). (Fig. 3.11) 3. Try to handlebar assembly and re-adjust if needed. Install spring and then start to properly...
... palm, but do not Close tighten too far. 3.10 4. Move the handle so it is for adjusting the tension. (Fig. 3.12) Next go back to close a quick release lever can cause loss of control of the bike (the side opposite the chain). (Fig. 3.11) 3. Try to handlebar assembly and re-adjust if needed. Install spring and then start to properly...
Schwinn Owner's Manual
Page 35
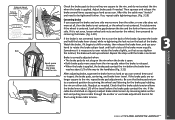
... to shift or rotate, then release the brake lever, and use your hand to over rotate the brake slightly, so that as you squeeze the brake and one side does not move at the gap between the brake and the rim 3.21 Check the brake pads to the handlebar. (Fig. 3.21) After adjusting brake, squeeze the brake lever as hard as needed . ASSEMBLY Brake pad...
... to shift or rotate, then release the brake lever, and use your hand to over rotate the brake slightly, so that as you squeeze the brake and one side does not move at the gap between the brake and the rim 3.21 Check the brake pads to the handlebar. (Fig. 3.21) After adjusting brake, squeeze the brake lever as hard as needed . ASSEMBLY Brake pad...
Schwinn Owner's Manual
Page 46
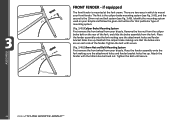
... fender assembly onto the fork making sure the attachment holes and fender bracket holes line up . Tighten the bolt until secure. 3.46 Attach the fender with the 10mm hex bolt and nut. Tighten the bolt until secure. (Fig. 3.46) 10mm Nut and Bolt Mounting System First remove the front wheel from your bicycle. The first is the caliper brake mounting system (see Fig. 3.46). Place the fender assembly...
... fender assembly onto the fork making sure the attachment holes and fender bracket holes line up . Tighten the bolt until secure. 3.46 Attach the fender with the 10mm hex bolt and nut. Tighten the bolt until secure. (Fig. 3.46) 10mm Nut and Bolt Mounting System First remove the front wheel from your bicycle. The first is the caliper brake mounting system (see Fig. 3.46). Place the fender assembly...
Schwinn Owner's Manual
Page 47
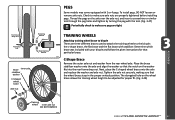
... the peg holes and tighten by turning the peg with stabilizer. Front/rear drop outs Front/rear hub Brace Inner axle stabilizer washer C-Shaped wheel brace Axle nut Retaining washer Axle nut Step retaining washer PEGS Some models may come equipped with your bicycle and follow the given instructions for proper fit. (Fig. 3.48) ASSEMBLY Training wheel Inner axle nut DO NOT REMOVE 3.48 ©2010...
... the peg holes and tighten by turning the peg with stabilizer. Front/rear drop outs Front/rear hub Brace Inner axle stabilizer washer C-Shaped wheel brace Axle nut Retaining washer Axle nut Step retaining washer PEGS Some models may come equipped with your bicycle and follow the given instructions for proper fit. (Fig. 3.48) ASSEMBLY Training wheel Inner axle nut DO NOT REMOVE 3.48 ©2010...

Schwinn Owner's Manual
Page 48
... Training wheel 3.50 48 ©2010 Place the flat wheel brace onto the axle. Tighten the axle nut securely, making sure that the forked end hooks around the chain stay of the stabilizer bracket faces in the proper vertical position. Please contact Cycling Sports Group Service with training wheels, please call Cycling Sports Group to be attached. Replace the washer and axle nut. Slide assembly onto the rear axle...
... Training wheel 3.50 48 ©2010 Place the flat wheel brace onto the axle. Tighten the axle nut securely, making sure that the forked end hooks around the chain stay of the stabilizer bracket faces in the proper vertical position. Please contact Cycling Sports Group Service with training wheels, please call Cycling Sports Group to be attached. Replace the washer and axle nut. Slide assembly onto the rear axle...
Schwinn Owner's Manual
Page 50
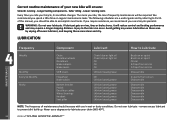
... oil can occur. Safer riding - LUBRICATION Frequency Component Lubricant How to Lubricate MAINTENANCE Weekly Monthly Every Six Months Yearly Chain Derailleur wheels Derailleurs Brake calipers Brake levers Shift levers Freewheel Brake cables Bottom bracket Pedals Derailleur cables Wheel bearings Headset Seat pillar Chain lube or light oil Chain lube or light oil Oil Oil Oil Lithium based grease Oil Lithium based grease Lithium based grease Lithium based grease...
... oil can occur. Safer riding - LUBRICATION Frequency Component Lubricant How to Lubricate MAINTENANCE Weekly Monthly Every Six Months Yearly Chain Derailleur wheels Derailleurs Brake calipers Brake levers Shift levers Freewheel Brake cables Bottom bracket Pedals Derailleur cables Wheel bearings Headset Seat pillar Chain lube or light oil Chain lube or light oil Oil Oil Oil Lithium based grease Oil Lithium based grease Lithium based grease Lithium based grease...
Schwinn Owner's Manual
Page 53
... Axle nut 4.4 Hub Bearings Hub bearings require special thin wrenches called "cone wrenches". Also check that is seated properly into each cable stop of your cables and housing need to eliminate free play . Re-tighten the locknut while holding the bearing cone on the bicycle. It is recommended that the cables and housing are replaced at least every riding season to operate the brakes...
... Axle nut 4.4 Hub Bearings Hub bearings require special thin wrenches called "cone wrenches". Also check that is seated properly into each cable stop of your cables and housing need to eliminate free play . Re-tighten the locknut while holding the bearing cone on the bicycle. It is recommended that the cables and housing are replaced at least every riding season to operate the brakes...
Schwinn Owner's Manual
Page 55
... of a bicycle refers to all parts that transmit power to the rear wheel including the pedals, chain, chainwheel, crank set the clearance on less complex models it will also cause irreparable damage to twelve months. Brake pads should finally be dangerous but on either side of the rim using the barrel adjuster. If the pedal is required. • Ensure that pedal bearings are clean...
... of a bicycle refers to all parts that transmit power to the rear wheel including the pedals, chain, chainwheel, crank set the clearance on less complex models it will also cause irreparable damage to twelve months. Brake pads should finally be dangerous but on either side of the rim using the barrel adjuster. If the pedal is required. • Ensure that pedal bearings are clean...
Schwinn Owner's Manual
Page 58
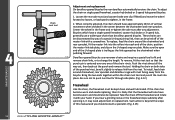
... have become worn and needs replacing, then it may need adjustment or replacement. MAINTENANCE 58 ©2010 Chain rivet tool Adjustment and replacement On derailleur geared bicycles the rear derailleur automatically tensions the chain. If the chain has become worn and should have a single speed freewheel, coaster hub brake or 3-speed hub, generally use narrower chains and require a special tool to fit and remove chain links, or to release link from the...
... have become worn and needs replacing, then it may need adjustment or replacement. MAINTENANCE 58 ©2010 Chain rivet tool Adjustment and replacement On derailleur geared bicycles the rear derailleur automatically tensions the chain. If the chain has become worn and should have a single speed freewheel, coaster hub brake or 3-speed hub, generally use narrower chains and require a special tool to fit and remove chain links, or to release link from the...

Schwinn Owner's Manual
Page 59
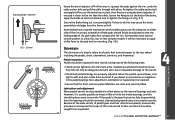
... it along with a coaster hub brake in the shifter must function correctly for each gear. Brake arm clip Brake arm Spocket Lubrication Remove any excess. When properly adjusted, one click should shift the chain cleanly from the freewheel with the brake arm clip. The rear derailleur should change one cog to 'coast' without hesitation. After shifting, the rear derailleur should be a positive "click" for smooth gear shifting to wipe off the...
... it along with a coaster hub brake in the shifter must function correctly for each gear. Brake arm clip Brake arm Spocket Lubrication Remove any excess. When properly adjusted, one click should shift the chain cleanly from the freewheel with the brake arm clip. The rear derailleur should change one cog to 'coast' without hesitation. After shifting, the rear derailleur should be a positive "click" for smooth gear shifting to wipe off the...

Schwinn Owner's Manual
Page 63
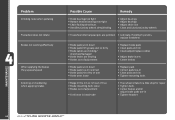
... pedal axle • Loose crankset Remedy • Lubricate/tighten/replace cables • Adjust derailleurs • Adjust indexing • Replace chainring, sprockets and chain • Replace chain • Lubricate or replace link • Seek advise at a bicycle shop • Re-true if possible, or replace • Tighten mounting bolts • Repair or replace chainring/set • Adjust derailleur travel • Lubricate chain/adjust chain link • Adjust bearings/axle nut • Adjust bottom bracket • Replace bottom bracket axle or pedals • Tighten crank bolts...
... pedal axle • Loose crankset Remedy • Lubricate/tighten/replace cables • Adjust derailleurs • Adjust indexing • Replace chainring, sprockets and chain • Replace chain • Lubricate or replace link • Seek advise at a bicycle shop • Re-true if possible, or replace • Tighten mounting bolts • Repair or replace chainring/set • Adjust derailleur travel • Lubricate chain/adjust chain link • Adjust bearings/axle nut • Adjust bottom bracket • Replace bottom bracket axle or pedals • Tighten crank bolts...
Schwinn Owner's Manual
Page 64
... derailleurs • Derailleur jockey wheels dirty/binding • Adjust bearings • Adjust bearings • Adjust chain line • Clean and lubricate jockey wheels • Freewheel internal pawl pins are binding • Brakes out of adjustment • Fork loose in head tube • True wheel or take to a bike shop for repair • Tighten bolts • Center brakes and/or adjust brake pads toe-in • Tighten headset MAINTENANCE 64 ©2010 If problem persists, replace...
... derailleurs • Derailleur jockey wheels dirty/binding • Adjust bearings • Adjust bearings • Adjust chain line • Clean and lubricate jockey wheels • Freewheel internal pawl pins are binding • Brakes out of adjustment • Fork loose in head tube • True wheel or take to a bike shop for repair • Tighten bolts • Center brakes and/or adjust brake pads toe-in • Tighten headset MAINTENANCE 64 ©2010 If problem persists, replace...


