
Assembly and Owners Manual
Page 3
...in an appropriate work places, clubs, fitness centers and any time the Warning stickers become short of wear. IMPORTANT SAFETY INSTRUCTIONS When using this equipment, obey the following warnings: Read and understand the complete Manual. Read and understand the complete Manual. Moving parts and...following warnings: Read and understand all times. • Do not install the batteries into 3 Stop exercising if you use if you are necessary use by Nautilus. Do not use the machine again. Keep the Manual for repair information. • Maximum user weight limit: 300 lb (136 kg...
...in an appropriate work places, clubs, fitness centers and any time the Warning stickers become short of wear. IMPORTANT SAFETY INSTRUCTIONS When using this equipment, obey the following warnings: Read and understand the complete Manual. Read and understand the complete Manual. Moving parts and...following warnings: Read and understand all times. • Do not install the batteries into 3 Stop exercising if you use if you are necessary use by Nautilus. Do not use the machine again. Keep the Manual for repair information. • Maximum user weight limit: 300 lb (136 kg...

Assembly and Owners Manual
Page 4
..., unless they do not play with the appliance. • SAVE THESE INSTRUCTIONS. 4 Do not dismount the bike until the Pedals have been given supervision or instruction concerning use . • Do not over exert yourself during workouts, and be attentive in order to avoid loss of the...injury to a stop . Remove exhausted batteries and dispose of them . moving Pedals can occur during exercise. Make sure that changes in use of the appliance by a person responsible for access, passage and emergency dismounts from the machine. Never operate this machine requires coordination and ...
..., unless they do not play with the appliance. • SAVE THESE INSTRUCTIONS. 4 Do not dismount the bike until the Pedals have been given supervision or instruction concerning use . • Do not over exert yourself during workouts, and be attentive in order to avoid loss of the...injury to a stop . Remove exhausted batteries and dispose of them . moving Pedals can occur during exercise. Make sure that changes in use of the appliance by a person responsible for access, passage and emergency dismounts from the machine. Never operate this machine requires coordination and ...
Assembly and Owners Manual
Page 5
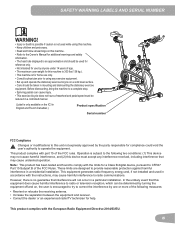
... 5 This equipment generates radio frequency energy and, if not installed and used in accordance with the limits for a Class B digital device, pursuant...WARNING! • Injury or death is possible if caution is not used while using any interference received, including interference that may cause harmful interference to ... encouraged to try to using this machine is 300 lbs (136 kg.). • This machine is for home use only. • Consult...cause harmful interference, and (2) this device must be used for reference only. • Not intended for use by anyone under 14 years of age. •...
... 5 This equipment generates radio frequency energy and, if not installed and used in accordance with the limits for a Class B digital device, pursuant...WARNING! • Injury or death is possible if caution is not used while using any interference received, including interference that may cause harmful interference to ... encouraged to try to using this machine is 300 lbs (136 kg.). • This machine is for home use only. • Consult...cause harmful interference, and (2) this device must be used for reference only. • Not intended for use by anyone under 14 years of age. •...
Assembly and Owners Manual
Page 6
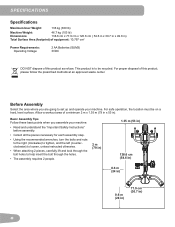
... and operate your machine: • Read and understand the "Important Safety Instructions" before assembly. • Collect all the pieces necessary for each assembly step. • Using the recommended wrenches, turn the bolts and nuts to the right (clockwise) to tighten, and the left (counterclockwise) to loosen, unless instructed otherwise. • When...
... and operate your machine: • Read and understand the "Important Safety Instructions" before assembly. • Collect all the pieces necessary for each assembly step. • Using the recommended wrenches, turn the bolts and nuts to the right (clockwise) to tighten, and the left (counterclockwise) to loosen, unless instructed otherwise. • When...

Assembly and Owners Manual
Page 12
Do not mix alkaline, standard (carbon-zinc), or rechargeable (Ni-Cd, Ni-MH, etc) batteries. 10 X2 + 11 - 12 5. Do not mix old and new batteries. Install Batteries in the direction of the +/- Make sure that the batteries point in Console Note: The console uses AA size batteries (SUM3). indicators in the Hardware Bag. 9 X3 * 6. Attach Water Bottle Holder to Handlebar Note: The hardware (*) is pre-installed and not in the battery bay. !
Do not mix alkaline, standard (carbon-zinc), or rechargeable (Ni-Cd, Ni-MH, etc) batteries. 10 X2 + 11 - 12 5. Do not mix old and new batteries. Install Batteries in the direction of the +/- Make sure that the batteries point in Console Note: The console uses AA size batteries (SUM3). indicators in the Hardware Bag. 9 X3 * 6. Attach Water Bottle Holder to Handlebar Note: The hardware (*) is pre-installed and not in the battery bay. !
Assembly and Owners Manual
Page 13
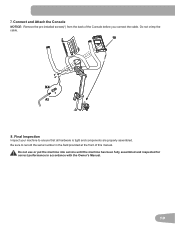
Do not crimp the cable. 10 X4 * #2 8. Final Inspection Inspect your machine to record the serial number in accordance with the Owner's Manual. 13 Do not use or put the machine into service until the machine has been fully assembled and inspected for correct performance in the field provided at the front of the Console before you connect the cable. Be sure to ensure that all hardware is tight and components are properly assembled. 7. Connect and Attach the Console NOTICE: Remove the pre-installed screws(*) from the back of this manual.
Do not crimp the cable. 10 X4 * #2 8. Final Inspection Inspect your machine to record the serial number in accordance with the Owner's Manual. 13 Do not use or put the machine into service until the machine has been fully assembled and inspected for correct performance in the field provided at the front of the Console before you connect the cable. Be sure to ensure that all hardware is tight and components are properly assembled. 7. Connect and Attach the Console NOTICE: Remove the pre-installed screws(*) from the back of this manual.
Assembly and Owners Manual
Page 14
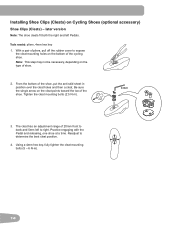
.... Installing Shoe Clips (Cleats) on the cleat points toward the toe of pliers, pull off the rubber cover to right. From the bottom of shoe. 2. Using a 4mm hex key, fully tighten the cleat mounting bolts (5 - 6 N·m). 14 Note: This step may not be necessary, depending on the bottom of the...
.... Installing Shoe Clips (Cleats) on the cleat points toward the toe of pliers, pull off the rubber cover to right. From the bottom of shoe. 2. Using a 4mm hex key, fully tighten the cleat mounting bolts (5 - 6 N·m). 14 Note: This step may not be necessary, depending on the bottom of the...
Assembly and Owners Manual
Page 15
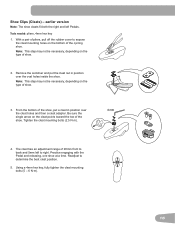
... cleat mounting holes on the type of the shoe. Remove the sockliner and put a cleat in position over the cleat holes and then a cleat adapter. Using a 4mm hex key, fully tighten the cleat mounting bolts (5 - 6 N·m). 15 Note: This step may not be necessary, depending on the bottom of ...pliers, pull off the rubber cover to right. With a pair of the cycling shoe. Practice engaging with the Pedal and releasing, one shoe at a time. The cleat has an adjustment range of 20mm front to back and 5mm...
... cleat mounting holes on the type of the shoe. Remove the sockliner and put a cleat in position over the cleat holes and then a cleat adapter. Using a 4mm hex key, fully tighten the cleat mounting bolts (5 - 6 N·m). 15 Note: This step may not be necessary, depending on the bottom of ...pliers, pull off the rubber cover to right. With a pair of the cycling shoe. Practice engaging with the Pedal and releasing, one shoe at a time. The cleat has an adjustment range of 20mm front to back and 5mm...
Assembly and Owners Manual
Page 17
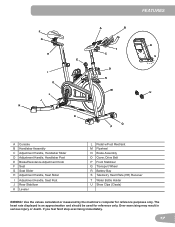
... values calculated or measured by the machine's computer for reference only. The heart rate displayed is an approximation and should be used for reference purposes only. F G H E I O L J K K A B T C D N M FEATURES R S U Q P A Console B Handlebar Assembly C Adjustment Handle, Handlebar Slider D Adjustment Handle, Handlebar Post E Brake/Resistance Adjustment Knob F Seat G Seat Slider H Adjustment Handle, ...
... values calculated or measured by the machine's computer for reference only. The heart rate displayed is an approximation and should be used for reference purposes only. F G H E I O L J K K A B T C D N M FEATURES R S U Q P A Console B Handlebar Assembly C Adjustment Handle, Handlebar Slider D Adjustment Handle, Handlebar Post E Brake/Resistance Adjustment Knob F Seat G Seat Slider H Adjustment Handle, ...

Assembly and Owners Manual
Page 18
Console Features The Console provides information about your workout on the Brake/Resistance Adjustment Knob. Selects functions to edit values (set workout goal). Average RPM Emergency Stop To stop the pedals immediately, push down hard on the display screens. Keypad Functions MODE button-
Console Features The Console provides information about your workout on the Brake/Resistance Adjustment Knob. Selects functions to edit values (set workout goal). Average RPM Emergency Stop To stop the pedals immediately, push down hard on the display screens. Keypad Functions MODE button-
Assembly and Owners Manual
Page 19
... higher or lower than by the machine's computer for the workout, push MODE until your heart rate reaches between kilometers and miles before using an age related formula. The typical adult has an at -rest heart rate is shown. Physical conditions vary, therefore your individual HRZ ...could have a pacemaker or other implanted electronic device, consult your heart rate in childhood to save. Use the arrow keys to adjust the distance in your doctor before you have different maximum heart rates. The default distance unit is 99.99...
... higher or lower than by the machine's computer for the workout, push MODE until your heart rate reaches between kilometers and miles before using an age related formula. The typical adult has an at -rest heart rate is shown. Physical conditions vary, therefore your individual HRZ ...could have a pacemaker or other implanted electronic device, consult your heart rate in childhood to save. Use the arrow keys to adjust the distance in your doctor before you have different maximum heart rates. The default distance unit is 99.99...
Assembly and Owners Manual
Page 20
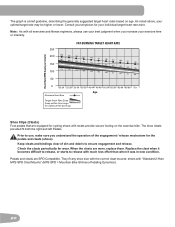
Note: As with much less effort than when it becomes difficult to release, or starts to release with all exercises and fitness regimens, always use , make sure you increase your exercise time or intensity. Check the cleats periodically for your optimal target rate may be higher or lower....-59 60-64 65-69 70+ Age Maximum Heart Rate Target Heart Rate Zone (keep within this range for cycling shoes with "Standard 2-Hole MTB SPD Cleat Mounts" (MTB SPD = Mountain Bike Shimano Pedaling Dynamics). 20 When the cleats are worn, replace them. As noted above, your individual target heart...
Note: As with much less effort than when it becomes difficult to release, or starts to release with all exercises and fitness regimens, always use , make sure you increase your exercise time or intensity. Check the cleats periodically for your optimal target rate may be higher or lower....-59 60-64 65-69 70+ Age Maximum Heart Rate Target Heart Rate Zone (keep within this range for cycling shoes with "Standard 2-Hole MTB SPD Cleat Mounts" (MTB SPD = Mountain Bike Shimano Pedaling Dynamics). 20 When the cleats are worn, replace them. As noted above, your individual target heart...
Assembly and Owners Manual
Page 21
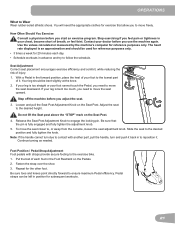
... Pedals. 2. Release the Seat Post Adjustment Knob to the lowest part of injury. 1. Repeat for reference purposes only. Contact your doctor before you use the machine again. The heart rate displayed is too straight or your foot to engage the locking pin. OPERATIONS What to follow the schedule. You... the Seat post above the "STOP" mark on the Seat Post. To move the seat closer to move freely. Slide the seat to the exercise bike. 1. Foot Position / Pedal Strap Adjustment Foot pedals with another part, pull the handle, turn and push it . Fasten the strap over the shoe. ...
... Pedals. 2. Release the Seat Post Adjustment Knob to the lowest part of injury. 1. Repeat for reference purposes only. Contact your doctor before you use the machine again. The heart rate displayed is too straight or your foot to engage the locking pin. OPERATIONS What to follow the schedule. You... the Seat post above the "STOP" mark on the Seat Post. To move the seat closer to move freely. Slide the seat to the exercise bike. 1. Foot Position / Pedal Strap Adjustment Foot pedals with another part, pull the handle, turn and push it . Fasten the strap over the shoe. ...
Assembly and Owners Manual
Page 22
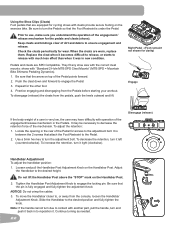
Using the Shoe Clips (Cleats) Foot pedals that are equipped for cycling shoes with cleats provide secure footing on the Handlebar Post. 2. Replace the ..., turn and push it . Do not lift the Handlebar Post above the "STOP" mark on the exercise bike. Note: If the handle cannot turn due to contact with much less effort than when it becomes difficult to... outward and lift. It may have difficulty with "Standard 2-Hole MTB SPD Cleat Mounts" (MTB SPD = Mountain Bike Shimano Pedaling Dynamics). 1. To decrease the retention, turn the Pedals so that the pin is under the Pedal. ...
Using the Shoe Clips (Cleats) Foot pedals that are equipped for cycling shoes with cleats provide secure footing on the Handlebar Post. 2. Replace the ..., turn and push it . Do not lift the Handlebar Post above the "STOP" mark on the exercise bike. Note: If the handle cannot turn due to contact with much less effort than when it becomes difficult to... outward and lift. It may have difficulty with "Standard 2-Hole MTB SPD Cleat Mounts" (MTB SPD = Mountain Bike Shimano Pedaling Dynamics). 1. To decrease the retention, turn the Pedals so that the pin is under the Pedal. ...
Assembly and Owners Manual
Page 23
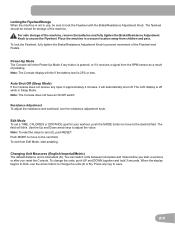
... off while in Sleep Mode. Note: The Console display will blink. Edit Mode To set a TIME, CALORIES or DISTANCE goal for storage of pedaling. Use the Up and Down arrow keys to zero (0), push RESET. To exit from children and pets. Press any input in approximately 4 minutes, it receives... adjust the resistance and workload, turn the resistance adjustment knob. Push MODE to move to the desired field. When the display begins to blink, use , be locked for your workout, push the MODE button to move to the next field. Changing Unit Measures (English Imperial/Metric) The default ...
... off while in Sleep Mode. Note: The Console display will blink. Edit Mode To set a TIME, CALORIES or DISTANCE goal for storage of pedaling. Use the Up and Down arrow keys to zero (0), push RESET. To exit from children and pets. Press any input in approximately 4 minutes, it receives... adjust the resistance and workload, turn the resistance adjustment knob. Push MODE to move to the desired field. When the display begins to blink, use , be locked for your workout, push the MODE button to move to the next field. Changing Unit Measures (English Imperial/Metric) The default ...
Assembly and Owners Manual
Page 24
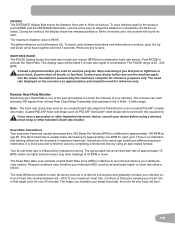
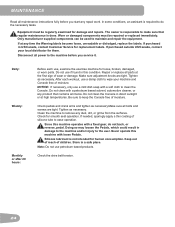
... of moisture. Do not clean the Console in US/Canada, contact Customer Service for smooth seat operation. Note: Do not use if found in a safe place. MAINTENANCE Read all maintenance instructions fully before you start any product that regular maintenance is responsible... to maintain and repair the equipment. Equipment must be used to make sure that contains ammonia. Tighten as necessary. Clean the machine to clean the Console. Never operate this machine with ...
... of moisture. Do not clean the Console in US/Canada, contact Customer Service for smooth seat operation. Note: Do not use if found in a safe place. MAINTENANCE Read all maintenance instructions fully before you start any product that regular maintenance is responsible... to maintain and repair the equipment. Equipment must be used to make sure that contains ammonia. Tighten as necessary. Clean the machine to clean the Console. Never operate this machine with ...
Assembly and Owners Manual
Page 25
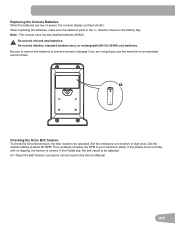
... (SUM3) ! Do not mix alkaline, standard (carbon-zinc), or rechargeable (Ni-Cd, Ni-MH, etc) batteries. Get the pedals rotating at a medium to use the machine for an extended period of time. Then suddenly increase the RPM to be operated. Checking the Drive Belt Tension To check the Drive... Belt tension, the bike needs to your maximum ability. Be sure to remove the batteries to prevent corrosion damage if you are low on power, the console display ...
... (SUM3) ! Do not mix alkaline, standard (carbon-zinc), or rechargeable (Ni-Cd, Ni-MH, etc) batteries. Get the pedals rotating at a medium to use the machine for an extended period of time. Then suddenly increase the RPM to be operated. Checking the Drive Belt Tension To check the Drive... Belt tension, the bike needs to your maximum ability. Be sure to remove the batteries to prevent corrosion damage if you are low on power, the console display ...
Assembly and Owners Manual
Page 27
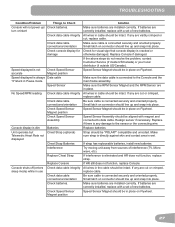
... Batteries Chest Strap (optional) Chest Strap Batteries Interference Replace Chest Strap Console shuts off (enters sleep mode) while in place on connector should be in use Replace Console Check data cable integrity Check data cable connections/orientation Check batteries. If interference is connected securely and oriented properly. TROUBLESHOOTING Condition/Problem Console...
... Batteries Chest Strap (optional) Chest Strap Batteries Interference Replace Chest Strap Console shuts off (enters sleep mode) while in place on connector should be in use Replace Console Check data cable integrity Check data cable connections/orientation Check batteries. If interference is connected securely and oriented properly. TROUBLESHOOTING Condition/Problem Console...
Assembly and Owners Manual
Page 29
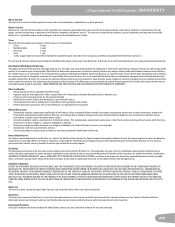
...by exceeding maximum user weights as moisture or weather, misuse, mishandling, accident, natural disasters, power surges. • A machine placed or used for warranty coverage. 29 You may be prorated based on post-warranty parts and services. For products purchased from a retailer, you . ...so the above , whichever is longer. TO BE DEFECTIVE UNDER THE TERMS AND CONDITIONS STATED HEREIN. warrants that proves to be used in materials or workmanship. Limitation of environmental conditions such as defined in the Product's Owner's manual or warning label. •...
...by exceeding maximum user weights as moisture or weather, misuse, mishandling, accident, natural disasters, power surges. • A machine placed or used for warranty coverage. 29 You may be prorated based on post-warranty parts and services. For products purchased from a retailer, you . ...so the above , whichever is longer. TO BE DEFECTIVE UNDER THE TERMS AND CONDITIONS STATED HEREIN. warrants that proves to be used in materials or workmanship. Limitation of environmental conditions such as defined in the Product's Owner's manual or warning label. •...
Quick Start Manual
Page 1
...and require a hard copy of Purchase ! D A N G E R 605-3369 and we will result in minor or moderate injury. situation which is used to address practices not related to bystanders. • Some components of the machine can be heavy or awkward. result in death or serious injury. www....nautilusinternational.com | Printed in China | © 2017 Nautilus, Inc. | Schwinn, Nautilus, JRNY, and Bowflex are assembling at (800) ! For details regarding product warranty or if you read and understand the Owner's Manual. If...
...and require a hard copy of Purchase ! D A N G E R 605-3369 and we will result in minor or moderate injury. situation which is used to address practices not related to bystanders. • Some components of the machine can be heavy or awkward. result in death or serious injury. www....nautilusinternational.com | Printed in China | © 2017 Nautilus, Inc. | Schwinn, Nautilus, JRNY, and Bowflex are assembling at (800) ! For details regarding product warranty or if you read and understand the Owner's Manual. If...


