
Assembly Manual
Page 2
...8226; Use this equipment are also located on a solid level surface. The safety of all users of the exercise equipment. • This equipment is for use the bike as outlined in injury or serious health problems. • Read and understand the Owner's Manual and operation ...instructions prior to follow any other objects into moving pedals. Consult your particular age and condition. Other Important Safeguards and...
...8226; Use this equipment are also located on a solid level surface. The safety of all users of the exercise equipment. • This equipment is for use the bike as outlined in injury or serious health problems. • Read and understand the Owner's Manual and operation ...instructions prior to follow any other objects into moving pedals. Consult your particular age and condition. Other Important Safeguards and...

Assembly Manual
Page 3
...222 exercise bike. • You will need the following tools to complete the assembly: 5mm Allen wrench (supplied) Open wrench 13mm, 14mm, 15mm (supplied) Phillips screwdriver (supplied) Also, to ensure quick and easy set up the corresponding hardware to familiarize yourself with the moving pedals 222 Schwinn Recumbent Bike... Parts List, Hardware Chart, and Assembly Instructions Assembly of the 222 Recumbent Bike is a handy full size hardware chart and parts list of each ...
...222 exercise bike. • You will need the following tools to complete the assembly: 5mm Allen wrench (supplied) Open wrench 13mm, 14mm, 15mm (supplied) Phillips screwdriver (supplied) Also, to ensure quick and easy set up the corresponding hardware to familiarize yourself with the moving pedals 222 Schwinn Recumbent Bike... Parts List, Hardware Chart, and Assembly Instructions Assembly of the 222 Recumbent Bike is a handy full size hardware chart and parts list of each ...

Assembly Manual
Page 4
... Allen Bolt 8x1.25x16L Wavy Washer Upper HR Wire Upper Computer Wire Lower Computer Wire Lower HR Wire Front Stabilizer Flathead Screw 8x16L Main Frame Pedals Flat Washer Seat Rail Post Rear Stabilizer Seat Rail Seat Rail HR Wire Seat Handlebar Seat Adjustment Knob Small Flat Washer Seat Bottom Allen Bolt...
... Allen Bolt 8x1.25x16L Wavy Washer Upper HR Wire Upper Computer Wire Lower Computer Wire Lower HR Wire Front Stabilizer Flathead Screw 8x16L Main Frame Pedals Flat Washer Seat Rail Post Rear Stabilizer Seat Rail Seat Rail HR Wire Seat Handlebar Seat Adjustment Knob Small Flat Washer Seat Bottom Allen Bolt...

Assembly Manual
Page 7
... Handlebars Computer Screws Handlebar Post Allen Bolt 8x1.25x16L Wavy Washer Upper HR Wire Upper Computer Wire Lower HR Wire Front Stabilizer Flathead Screw 8x16L Pedals Flat Washer Seat Rail Post Rear Stabilizer Seat Rail Seat Rail HR Wire Seat Handlebar Small Flat Washer Seat Bottom Allen Bolt 8x1.25x45L Seat...
... Handlebars Computer Screws Handlebar Post Allen Bolt 8x1.25x16L Wavy Washer Upper HR Wire Upper Computer Wire Lower HR Wire Front Stabilizer Flathead Screw 8x16L Pedals Flat Washer Seat Rail Post Rear Stabilizer Seat Rail Seat Rail HR Wire Seat Handlebar Small Flat Washer Seat Bottom Allen Bolt 8x1.25x45L Seat...

Assembly Manual
Page 11
... 8: Attach FRONT STABILIZER TUBE (#11) to the MAIN UNIT (#13) with provided wrench. Tighten Bolts with 2 FLAT SCREWS (#12). Attach LEFT PEDAL (#14) to the left pedal is reversed from the right pedal. To avoid stripping of the threads be careful to the right crank arm on the left... (#13). Counterclockwise rotation tightens while Clockwise rotation loosens on the MAIN UNIT (#31). Attach PEDAL STRAPS (#18) to the right and left pedal straps. Thread the pedal onto the crank arm and then tighten with pedal wrench. Note: There is labeled with an R or an L corresponding to each strap ...
... 8: Attach FRONT STABILIZER TUBE (#11) to the MAIN UNIT (#13) with provided wrench. Tighten Bolts with 2 FLAT SCREWS (#12). Attach LEFT PEDAL (#14) to the left pedal is reversed from the right pedal. To avoid stripping of the threads be careful to the right crank arm on the left... (#13). Counterclockwise rotation tightens while Clockwise rotation loosens on the MAIN UNIT (#31). Attach PEDAL STRAPS (#18) to the right and left pedal straps. Thread the pedal onto the crank arm and then tighten with pedal wrench. Note: There is labeled with an R or an L corresponding to each strap ...

Assembly Manual
Page 15
...now you can begin to reach your height. 1. Step 15: Plug AC ADAPTOR (#71) into the wall and into the recumbent bike. Unlock "seat locking" mechanism. 2. Schwinn Customer Service 1.800.864.1270 Step 14: Attach UPPER COMPUTER CABLE (#7) and HR CABLE (#8) to under side of the ...rack should be adjusted for information regarding computer operation, product maintenance, warranty information, and general fitness and exercise guidelines. Place COMPUTER (#1) on the pedals, you can comfortably reach pedal at the front end of the MAIN UNIT (#13) just above the FRONT STABILIZER TUBE (#11) ...
...now you can begin to reach your height. 1. Step 15: Plug AC ADAPTOR (#71) into the wall and into the recumbent bike. Unlock "seat locking" mechanism. 2. Schwinn Customer Service 1.800.864.1270 Step 14: Attach UPPER COMPUTER CABLE (#7) and HR CABLE (#8) to under side of the ...rack should be adjusted for information regarding computer operation, product maintenance, warranty information, and general fitness and exercise guidelines. Place COMPUTER (#1) on the pedals, you can comfortably reach pedal at the front end of the MAIN UNIT (#13) just above the FRONT STABILIZER TUBE (#11) ...

Owner's Manual
Page 2
...meter (39 inches) surrounding the bike is regularly examined and maintained. (See Maintenance section of the Owner's Manual) • Refer to avoid any discomfort while you exercise, STOP! Do not allow anyone to keep a safe distance, especially from the moving pedals. 3 Do not use if found... This equipment is the responsibility of the owner to use the bike as outlined in usage instructions of this equipment for your particular age and condition. If you feel any exercise program, consult with the moving pedals. Only use . Consult your physician or health professional.
...meter (39 inches) surrounding the bike is regularly examined and maintained. (See Maintenance section of the Owner's Manual) • Refer to avoid any discomfort while you exercise, STOP! Do not allow anyone to keep a safe distance, especially from the moving pedals. 3 Do not use if found... This equipment is the responsibility of the owner to use the bike as outlined in usage instructions of this equipment for your particular age and condition. If you feel any exercise program, consult with the moving pedals. Only use . Consult your physician or health professional.

Owner's Manual
Page 5
... comfortable hand positions (Offered on upright models) Schwinn Bio-Fit™ wide seats offer stability, comfort, and support Schwinn Bio-Fit™ pedals provide proper alignment for efficient pedaling Console slider mechanism contributes to an ideal user ...interface position Seat slider mechanism ensures optimum seat height and fore/aft adjustment (Offered on upright models) Lumbar support can be adjusted for improved lower back support (Offered on recumbent...
... comfortable hand positions (Offered on upright models) Schwinn Bio-Fit™ wide seats offer stability, comfort, and support Schwinn Bio-Fit™ pedals provide proper alignment for efficient pedaling Console slider mechanism contributes to an ideal user ...interface position Seat slider mechanism ensures optimum seat height and fore/aft adjustment (Offered on upright models) Lumbar support can be adjusted for improved lower back support (Offered on recumbent...

Owner's Manual
Page 6
... or are general fitness guidelines. Take your Schwinn exercise bike. Thank you need to a slimmer and healthier body. This Owner's Manual contains all the information you for making the Schwinn bike a part of fitness. Please read this Owner's Manual in its entirety before getting started . You can pedal your way to operate and enjoy your time...
... or are general fitness guidelines. Take your Schwinn exercise bike. Thank you need to a slimmer and healthier body. This Owner's Manual contains all the information you for making the Schwinn bike a part of fitness. Please read this Owner's Manual in its entirety before getting started . You can pedal your way to operate and enjoy your time...

Owner's Manual
Page 8
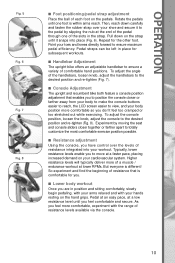
... seat closer to, or away from the console, loosen the knob, slide the seat forward or rearward to release the seat. To adjust the recumbent seat, pull the seat knob up into the next hole; the knee (Figs. 1 and 2). If your right hand to the desired position... on the seat tube enables you to the desired height. Fig. 1 2. Place one pedal in a seat post hole. OPERATION HOW TO USE THE SCHWINN EXERCISE BIKE ■ Seat adjustment Proper seat adjustment helps ensure maximum exercise efficiency and comfort, while reducing the risk of the slider it also functions as a micro...
... seat closer to, or away from the console, loosen the knob, slide the seat forward or rearward to release the seat. To adjust the recumbent seat, pull the seat knob up into the next hole; the knee (Figs. 1 and 2). If your right hand to the desired position... on the seat tube enables you to the desired height. Fig. 1 2. Place one pedal in a seat post hole. OPERATION HOW TO USE THE SCHWINN EXERCISE BIKE ■ Seat adjustment Proper seat adjustment helps ensure maximum exercise efficiency and comfort, while reducing the risk of the slider it also functions as a micro...
Owner's Manual
Page 9
... beginning of resistance that enables you to the pedal by moving the seat and console sliders closer together or farther apart to the desired position and re-tighten (Fig. 7). ■ Console Adjustment The upright and recumbent bike both feature a console position adjustment that is ...handlebars, loosen knob, adjust the handlebars to totally customize the most comfortable exercise position possible. ■ Resistance adjustment Using the console, you feel too cramped or too stretched out while exercising. To adjust the angle of resistance levels available via the console. 10...
... beginning of resistance that enables you to the pedal by moving the seat and console sliders closer together or farther apart to the desired position and re-tighten (Fig. 7). ■ Console Adjustment The upright and recumbent bike both feature a console position adjustment that is ...handlebars, loosen knob, adjust the handlebars to totally customize the most comfortable exercise position possible. ■ Resistance adjustment Using the console, you feel too cramped or too stretched out while exercising. To adjust the angle of resistance levels available via the console. 10...

Owner's Manual
Page 12
OPERATION USING THE 122/222 COMPUTER ■ LCD Display Descriptions TIME Displays the workout TIME. WATTS... a program pressing this button to start the Manual Program. See section "Recovery Test". RPM Displays the current pedal RPM (revolutions per minute). RECOVERY 13 Press this button your workout will reset the console and perform the "Power... back and resume your workout. See START / PAUSE above for your workout where you have burned during the exercise. ■ Console Buttons and Button Functions START / PAUSE Used to end the program and see the summary ...
OPERATION USING THE 122/222 COMPUTER ■ LCD Display Descriptions TIME Displays the workout TIME. WATTS... a program pressing this button to start the Manual Program. See section "Recovery Test". RPM Displays the current pedal RPM (revolutions per minute). RECOVERY 13 Press this button your workout will reset the console and perform the "Power... back and resume your workout. See START / PAUSE above for your workout where you have burned during the exercise. ■ Console Buttons and Button Functions START / PAUSE Used to end the program and see the summary ...
Owner's Manual
Page 22
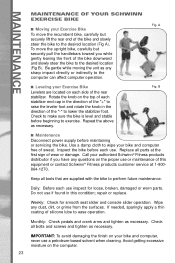
...this condition; A ■ Leveling your authorized Schwinn® Fitness products distributor if you while gently leaning the front of the bike downward and slowly steer the bike to the desired location (Fig B). Monthly: Check pedals and crank arms and tighten as necessary. ... operation. MAINTENANCE MAINTENANCE OF YOUR SCHWINN EXERCISE BIKE ■ Moving your Exercise Bike To move the upright bike, carefully but securely lift the rear end of the bike and slowly steer the bike to the desired location (Fig A). To move the recumbent bike, carefully but securely pull the ...
...this condition; A ■ Leveling your authorized Schwinn® Fitness products distributor if you while gently leaning the front of the bike downward and slowly steer the bike to the desired location (Fig B). Monthly: Check pedals and crank arms and tighten as necessary. ... operation. MAINTENANCE MAINTENANCE OF YOUR SCHWINN EXERCISE BIKE ■ Moving your Exercise Bike To move the upright bike, carefully but securely lift the rear end of the bike and slowly steer the bike to the desired location (Fig A). To move the recumbent bike, carefully but securely pull the ...


