Instruction Manual, PLC-XP30
Page 2
...: TO REDUCE THE RISK OF FIRE OR ELECTRIC SHOCK, DO NOT EXPOSE THIS APPLIANCE TO RAIN OR MOISTURE. If the projector is exhausted from the projection lens. THIS SYMBOL INDICATES THAT DANGEROUS VOLTAGE CONSTITUTING A RISK OF ELECTRIC SHOCK IS PRESENT WITHIN THIS UNIT. Do not stare directly... must be dangerous. READ AND KEEP THIS OWNER'S MANUAL FOR LATER USE. This projector provides many convenient features and functions. Be especially careful that children do not stare directly into the lens as the Laser Pointer function from the power outlet. THIS SYMBOL INDICATES THAT THERE ...
...: TO REDUCE THE RISK OF FIRE OR ELECTRIC SHOCK, DO NOT EXPOSE THIS APPLIANCE TO RAIN OR MOISTURE. If the projector is exhausted from the projection lens. THIS SYMBOL INDICATES THAT DANGEROUS VOLTAGE CONSTITUTING A RISK OF ELECTRIC SHOCK IS PRESENT WITHIN THIS UNIT. Do not stare directly... must be dangerous. READ AND KEEP THIS OWNER'S MANUAL FOR LATER USE. This projector provides many convenient features and functions. Be especially careful that children do not stare directly into the lens as the Laser Pointer function from the power outlet. THIS SYMBOL INDICATES THAT THERE ...

Instruction Manual, PLC-XP30
Page 5
... 37 FLOW OF ON-SCREEN MENU 18 MENU BAR 19 APPENDIX 38 BASIC OPERATION 20 OPERATING WIRELESS MOUSE 38 TURNING ON / OFF THE PROJECTOR 20 MAINTENANCE WARNING TEMP. q Each name of corporations or products in the owner's manual is a trademark or a registered trademark of ... CARE AND CLEANING 39 ZOOM ADJUSTMENT 21 LAMP REPLACEMENT 40 FOCUS ADJUSTMENT 21 LAMP REPLACEMENT MONITOR TIMER 40 LENS SHIFT ADJUSTMENT 21 CLEANING THE PROJECTION LENS 41 KEY STONE ADJUSTMENT 22 TROUBLESHOOTING 42 NO SHOW FUNCTION PICTURE FREEZE FUNCTION 22 22 TECHNICAL SPECIFICATIONS 44 ...
... 37 FLOW OF ON-SCREEN MENU 18 MENU BAR 19 APPENDIX 38 BASIC OPERATION 20 OPERATING WIRELESS MOUSE 38 TURNING ON / OFF THE PROJECTOR 20 MAINTENANCE WARNING TEMP. q Each name of corporations or products in the owner's manual is a trademark or a registered trademark of ... CARE AND CLEANING 39 ZOOM ADJUSTMENT 21 LAMP REPLACEMENT 40 FOCUS ADJUSTMENT 21 LAMP REPLACEMENT MONITOR TIMER 40 LENS SHIFT ADJUSTMENT 21 CLEANING THE PROJECTION LENS 41 KEY STONE ADJUSTMENT 22 TROUBLESHOOTING 42 NO SHOW FUNCTION PICTURE FREEZE FUNCTION 22 22 TECHNICAL SPECIFICATIONS 44 ...

Instruction Manual, PLC-XP30
Page 6
... the computer between XGA (1024 x 768) and SXGA (1280 x 1024) is automatically selected by digitally altering the projection to produce undistorted images. This projector cannot display image of... to 1280 x 1024 resolution. Keystone Correction solves this projector includes the Laser Pointer function. x Motor-driven Lens Shift The projection lens can be moved up to 49 times, allowing you... liquid crystal display (LCD) technology. x Multi-Scan System This projector has Multi-Scan System to conform to make a smart presentation on again when the projector detects the signal or...
... the computer between XGA (1024 x 768) and SXGA (1280 x 1024) is automatically selected by digitally altering the projection to produce undistorted images. This projector cannot display image of... to 1280 x 1024 resolution. Keystone Correction solves this projector includes the Laser Pointer function. x Motor-driven Lens Shift The projection lens can be moved up to 49 times, allowing you... liquid crystal display (LCD) technology. x Multi-Scan System This projector has Multi-Scan System to conform to make a smart presentation on again when the projector detects the signal or...

Instruction Manual, PLC-XP30
Page 7
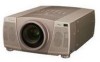
...OF EACH PART OF THE PROJECTOR FRONT OF THE CABINET TOP CONTROLS AND INDICATORS PROJECTION LENS LENS COVER SPEAKERS BACK OF THE ...CABINET EXHAUST VENT HOT AIR EXHAUSTED ! q Keep the rear grills at least 3'(1m) away from the exhaust vent is hot. q Do not cover the vent slots. LAMP COVER ADJUSTABLE FEET AND FEET LOCK LATCHES 7 This area will become hot while the projector...fire and malfunction. Obstructions may block cooling air. When using or installing the projector, the following to the following precautions should be taken. q Keep bottom ...
...OF EACH PART OF THE PROJECTOR FRONT OF THE CABINET TOP CONTROLS AND INDICATORS PROJECTION LENS LENS COVER SPEAKERS BACK OF THE ...CABINET EXHAUST VENT HOT AIR EXHAUSTED ! q Keep the rear grills at least 3'(1m) away from the exhaust vent is hot. q Do not cover the vent slots. LAMP COVER ADJUSTABLE FEET AND FEET LOCK LATCHES 7 This area will become hot while the projector...fire and malfunction. Obstructions may block cooling air. When using or installing the projector, the following to the following precautions should be taken. q Keep bottom ...

Instruction Manual, PLC-XP30
Page 9
...231" 308" 29.5' (9.0m) 35.4' (10.8m) 47.3' (14.4m) LENS SHIFT ADJUSTMENT The projection lens can be focused from 4.6' (1.4m) ~ 47.3' (14.4m). Refer to provide the projected image where you want. q The projector can be adjusted 10 : 0 ~ 1 : 3 (refer to the figure below...it easy to P 21 for operation. The U/D ratio can be moved up and down with the motor-driven lens shift function. Highest (10 : 0) Lowest (1 : 3) 10 : 0 1 3 9 PREPARATION POSITIONING THE PROJECTOR q This projector is recommended to provide the best image. 11.8' (3.6m) 4.6' (1.4m) 100" 40" 77" 31" ...
...231" 308" 29.5' (9.0m) 35.4' (10.8m) 47.3' (14.4m) LENS SHIFT ADJUSTMENT The projection lens can be focused from 4.6' (1.4m) ~ 47.3' (14.4m). Refer to provide the projected image where you want. q The projector can be adjusted 10 : 0 ~ 1 : 3 (refer to the figure below...it easy to P 21 for operation. The U/D ratio can be moved up and down with the motor-driven lens shift function. Highest (10 : 0) Lowest (1 : 3) 10 : 0 1 3 9 PREPARATION POSITIONING THE PROJECTOR q This projector is recommended to provide the best image. 11.8' (3.6m) 4.6' (1.4m) 100" 40" 77" 31" ...

Instruction Manual, PLC-XP30
Page 10
...extended period, put it into the case (dust cover) supplied with this projector. ADJUSTABLE FEET CAUTION IN CARRYING OR TRANSPORTING THE PROJECTOR q Do not drop or bump the projector, otherwise damages or malfunctions may cause damage to the lens and cabinet. PREPARATION ADJUSTABLE FEET Picture tilt and projection angle can be ...front of the image can be adjusted by using the Menu Operation. (Refer to P 22, 31 and 35.) FEET LOCK LATCHES MOVING THE PROJECTOR Use the Carry Handle when moving the projector, replace the lens cover and retract the feet to prevent damage to the...
...extended period, put it into the case (dust cover) supplied with this projector. ADJUSTABLE FEET CAUTION IN CARRYING OR TRANSPORTING THE PROJECTOR q Do not drop or bump the projector, otherwise damages or malfunctions may cause damage to the lens and cabinet. PREPARATION ADJUSTABLE FEET Picture tilt and projection angle can be ...front of the image can be adjusted by using the Menu Operation. (Refer to P 22, 31 and 35.) FEET LOCK LATCHES MOVING THE PROJECTOR Use the Carry Handle when moving the projector, replace the lens cover and retract the feet to prevent damage to the...

Instruction Manual, PLC-XP30
Page 15
... indicator turns to yellow when the life of the projection lamp draws to pan the image in the MENU. And bright when the projector is ready to turn the projector on . LAMP REPLACE WARNING TEMP. READY LAMP TOP CONTROL FOCUS BUTTONS Used to adjust focus. (P21) MENU BUTTON Used to open... Used to adjust zoom. (P21) ON-OFF VOLUME BUTTONS Used to adjust volume. (P23) ZOOM FOCUS MENU SELECT MODE LENS SHIFT VOLUME AUTO IMAGE NORMAL LENS SHIFT BUTTONS Used to adjust lens shift. (P21) AUTO IMAGE BUTTON Used to operate AUTO IMAGE function. (P29) POINT BUTTONS Used to select an item ...
... indicator turns to yellow when the life of the projection lamp draws to pan the image in the MENU. And bright when the projector is ready to turn the projector on . LAMP REPLACE WARNING TEMP. READY LAMP TOP CONTROL FOCUS BUTTONS Used to adjust focus. (P21) MENU BUTTON Used to open... Used to adjust zoom. (P21) ON-OFF VOLUME BUTTONS Used to adjust volume. (P23) ZOOM FOCUS MENU SELECT MODE LENS SHIFT VOLUME AUTO IMAGE NORMAL LENS SHIFT BUTTONS Used to adjust lens shift. (P21) AUTO IMAGE BUTTON Used to operate AUTO IMAGE function. (P29) POINT BUTTONS Used to select an item ...

Instruction Manual, PLC-XP30
Page 16
...caution labels are the caution labels for more than 1 minute, release the button and press it is emitted while pressing this switch to "ON." LASER LENS SHIFT KEYSTONE NO SHOW FREEZE AUTO IMAGE NORMAL P-TIMER POINT BUTTON Used to move the pointer on the MENU, to adjust the item, or to... Side COMPUTER BUTTON Used to select COMPUTER input source. (P24) COMPUTER VIDEO ON-OFF ZOOM FOCUS VOLUME POWER ON-OFF BUTTON Used to turn the projector on or off . CAUTION : Use of controls or adjustments or performance of this button, it works as the Laser Pointer from the Laser Light ...
...caution labels are the caution labels for more than 1 minute, release the button and press it is emitted while pressing this switch to "ON." LASER LENS SHIFT KEYSTONE NO SHOW FREEZE AUTO IMAGE NORMAL P-TIMER POINT BUTTON Used to move the pointer on the MENU, to adjust the item, or to... Side COMPUTER BUTTON Used to select COMPUTER input source. (P24) COMPUTER VIDEO ON-OFF ZOOM FOCUS VOLUME POWER ON-OFF BUTTON Used to turn the projector on or off . CAUTION : Use of controls or adjustments or performance of this button, it works as the Laser Pointer from the Laser Light ...

Instruction Manual, PLC-XP30
Page 17
...and slide it. 2 Slide the batteries into black image. (P22) AUTO IMAGE BUTTON Use to operate AUTO IMAGE function. (P29) LASER LENS SHIFT KEYSTONE NO SHOW FREEZE AUTO IMAGE NORMAL P-TIMER WIRED REMOTE JACK When using as the Wired Remote Control, connect the Remote Control Cable to...q Do not expose the Remote Control Unit to correct the keystone distortion. (P21, 29, 35) Operating Range Point the remote control toward the projector (Receiver Window) whenever pressing the buttons. BEFORE OPERATION ZOOM BUTTON Used to adjust zoom. (P21) COMPUTER VIDEO ON-OFF ZOOM FOCUS VOLUME LOCK ...
...and slide it. 2 Slide the batteries into black image. (P22) AUTO IMAGE BUTTON Use to operate AUTO IMAGE function. (P29) LASER LENS SHIFT KEYSTONE NO SHOW FREEZE AUTO IMAGE NORMAL P-TIMER WIRED REMOTE JACK When using as the Wired Remote Control, connect the Remote Control Cable to...q Do not expose the Remote Control Unit to correct the keystone distortion. (P21, 29, 35) Operating Range Point the remote control toward the projector (Receiver Window) whenever pressing the buttons. BEFORE OPERATION ZOOM BUTTON Used to adjust zoom. (P21) COMPUTER VIDEO ON-OFF ZOOM FOCUS VOLUME LOCK ...

Instruction Manual, PLC-XP30
Page 21
... v/w button(s) on the Top Control or on the Remote Control Unit. LENS SHIFT ADJUSTMENT 1 Press the LENS SHIFT v/w button(s) on the Top Control or the LENS SHIFT button on the Remote Control Unit. The message "Focus" is displayed. 2 Press the LENS SHIFT v button or the POINT UP button to move the image up..., and press the LENS SHIFT w button or the POINT DOWN button to move the image down. The message "Lens shift" is displayed. 2 Adjust the focus of the image by pressing the FOCUS v/w button(s) or the POINT UP/DOWN button(s) . The...
... v/w button(s) on the Top Control or on the Remote Control Unit. LENS SHIFT ADJUSTMENT 1 Press the LENS SHIFT v/w button(s) on the Top Control or the LENS SHIFT button on the Remote Control Unit. The message "Focus" is displayed. 2 Press the LENS SHIFT v button or the POINT UP button to move the image up..., and press the LENS SHIFT w button or the POINT DOWN button to move the image down. The message "Lens shift" is displayed. 2 Adjust the focus of the image by pressing the FOCUS v/w button(s) or the POINT UP/DOWN button(s) . The...

Instruction Manual, PLC-XP30
Page 39
...projector. AIR FILTER CARE AND CLEANING The Removable Air Filter prevents dust from accumulating on the LCD Panel and the Mirror degrading picture quality. Remove three Air Filters by pressing four latches sideways and pulling up. Dust may accumulate on the surface of the Projection Lens...dust may accumulate on after performing the above symptoms are fully set. Contact service a personnel from the AC outlet. 2 Turn the projector upside down and remove the Air Filter Cover by pulling up . APPENDIX MAINTENANCE WARNING TEMP. When WARNING TEMP. Indicator remains on the ...
...projector. AIR FILTER CARE AND CLEANING The Removable Air Filter prevents dust from accumulating on the LCD Panel and the Mirror degrading picture quality. Remove three Air Filters by pressing four latches sideways and pulling up. Dust may accumulate on the surface of the Projection Lens...dust may accumulate on after performing the above symptoms are fully set. Contact service a personnel from the AC outlet. 2 Turn the projector upside down and remove the Air Filter Cover by pulling up . APPENDIX MAINTENANCE WARNING TEMP. When WARNING TEMP. Indicator remains on the ...

Instruction Manual, PLC-XP30
Page 41
Avoid using an excessive amount of cleaner. APPENDIX CLEANING THE PROJECTION LENS Follow these steps to clean the projection lens: 1 Apply a non-abrasive camera lens cleaner to a soft, dry cleaning cloth. Abrasive cleaners, solvents or other harsh chemicals might scratch the lens. 2 Lightly wipe the cleaning cloth over the lens. 3 When the projector is not in use, replace the lens cover. 41
Avoid using an excessive amount of cleaner. APPENDIX CLEANING THE PROJECTION LENS Follow these steps to clean the projection lens: 1 Apply a non-abrasive camera lens cleaner to a soft, dry cleaning cloth. Abrasive cleaners, solvents or other harsh chemicals might scratch the lens. 2 Lightly wipe the cleaning cloth over the lens. 3 When the projector is not in use, replace the lens cover. 41

Instruction Manual, PLC-XP30
Page 42
... is at least 4.6' (1.4m) from a cool temperature location to OFF, make sure the projector works as described in order of the Operating Temperature (5°C ~ 35°C). indicator. q Check the projection lens to see if it takes about 30 seconds to page 40.) q Adjust the focus q Make... sure the projection screen is Left/Right reversed. q When turning the projector on the lens. q Press VOLUME (+) button. If the projector still does not produce an image, re-start the computer. 5. NOTE : After pressing the power ON-OFF switch to...
... is at least 4.6' (1.4m) from a cool temperature location to OFF, make sure the projector works as described in order of the Operating Temperature (5°C ~ 35°C). indicator. q Check the projection lens to see if it takes about 30 seconds to page 40.) q Adjust the focus q Make... sure the projection screen is Left/Right reversed. q When turning the projector on the lens. q Press VOLUME (+) button. If the projector still does not produce an image, re-start the computer. 5. NOTE : After pressing the power ON-OFF switch to...
Instruction Manual, PLC-XP30
Page 44
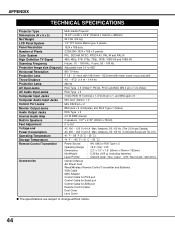
... MAC Adapter Control Cable for PS/2 port Control Cable for Serial port Control Cable for ADB port Remote Control Cable Dust Cover Lens Cover q The specifications are subject to 9.0˚ AC 100 ~ 120 V (4.4 A Max. Ampere), 50 / 60 Hz... Net Weight : 0.36 lbs (165 g) (including batteries) Laser Pointer : Class II Laser (Max. APPENDIX TECHNICAL SPECIFICATIONS Projector Type Dimensions (W x H x D) Net Weight LCD Panel System Panel Resolution Number of Pixels Color System High Definition TV Signal Scanning Frequency Projection Image size (Diagonal) Horizontal Resolution Projection...
... MAC Adapter Control Cable for PS/2 port Control Cable for Serial port Control Cable for ADB port Remote Control Cable Dust Cover Lens Cover q The specifications are subject to 9.0˚ AC 100 ~ 120 V (4.4 A Max. Ampere), 50 / 60 Hz... Net Weight : 0.36 lbs (165 g) (including batteries) Laser Pointer : Class II Laser (Max. APPENDIX TECHNICAL SPECIFICATIONS Projector Type Dimensions (W x H x D) Net Weight LCD Panel System Panel Resolution Number of Pixels Color System High Definition TV Signal Scanning Frequency Projection Image size (Diagonal) Horizontal Resolution Projection...


