Print Specs
Page 1
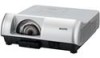
... as soon as you connect the power cord. NETWORKING CAPABILITY The PLC-WL2503 is equipped with SANYO's proprietary hybrid filter, composed of a lamp usually decreases over time and use large images even in infrared light pen while using a PC. 2500 LUMENS z WXGA z INTERACTIVE SHORT THROW PROJECTOR PLC-WL2503 WXGA INTERACTIVE SHORT THROW PROJECTOR Interactive pens ( 2 types included ) 3LCD...
... as soon as you connect the power cord. NETWORKING CAPABILITY The PLC-WL2503 is equipped with SANYO's proprietary hybrid filter, composed of a lamp usually decreases over time and use large images even in infrared light pen while using a PC. 2500 LUMENS z WXGA z INTERACTIVE SHORT THROW PROJECTOR PLC-WL2503 WXGA INTERACTIVE SHORT THROW PROJECTOR Interactive pens ( 2 types included ) 3LCD...

Owners Manual
Page 2
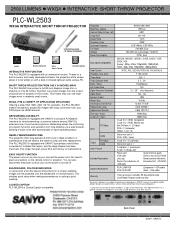
... be used as computer input or monitor output conveniently. (p.50) Power Management The Power management function reduces power consumption and maintains lamp life. (p.51) Auto Setup Function This function enables Input search and Auto PC adjustment by selecting the similar color to almost ...all computer output signals quickly. (p.29) Helpful Maintenance Functions Lamp and filter maintenance functions provide for portability, durability, and ease of use. You can expand the images approx. 16 times the ...
... be used as computer input or monitor output conveniently. (p.50) Power Management The Power management function reduces power consumption and maintains lamp life. (p.51) Auto Setup Function This function enables Input search and Auto PC adjustment by selecting the similar color to almost ...all computer output signals quickly. (p.29) Helpful Maintenance Functions Lamp and filter maintenance functions provide for portability, durability, and ease of use. You can expand the images approx. 16 times the ...

Owners Manual
Page 3
... the Filter 61 Resetting the Filter Counter 61 Attaching the Lens Cover 62 Cleaning the Projection Lens 62 Cleaning the Projector Cabinet 62 Lamp Replacement 63 Resetting the Lamp Counter 64 Appendix 65 Troubleshooting 65 Menu Tree 68 Indicators and Projector Condition 70 Compatible Computer Specifications 71 Technical Specifications 73 Optional Parts...
... the Filter 61 Resetting the Filter Counter 61 Attaching the Lens Cover 62 Cleaning the Projection Lens 62 Cleaning the Projector Cabinet 62 Lamp Replacement 63 Resetting the Lamp Counter 64 Appendix 65 Troubleshooting 65 Menu Tree 68 Indicators and Projector Condition 70 Compatible Computer Specifications 71 Technical Specifications 73 Optional Parts...

Owners Manual
Page 4
... condition for used electrical and electronic equipment, batteries and accumulators. READ AND KEEP THIS OWNER'S MANUAL FOR LATER USE. 4 NO USER SERVICEABLE PARTS INSIDE EXCEPT LAMP REPLACEMENT. If The projector comes in contact with high quality materials and components which can also be recycled and/or reused. If your projector, and...
... condition for used electrical and electronic equipment, batteries and accumulators. READ AND KEEP THIS OWNER'S MANUAL FOR LATER USE. 4 NO USER SERVICEABLE PARTS INSIDE EXCEPT LAMP REPLACEMENT. If The projector comes in contact with high quality materials and components which can also be recycled and/or reused. If your projector, and...
Owners Manual
Page 5
.... When replacement parts are provided for example, in the back and bottom of any kind into the projector. NOTE FOR CUSTOMERS IN THE US Hg LAMP(S) INSIDE THIS PRODUCT CONTAIN MERCURY AND MUST BE RECYCLED OR DISPOSED OF ACCORDING TO LOCAL, STATE OR FEDERAL LAWS. 5 Use only with the projector. Slots...
.... When replacement parts are provided for example, in the back and bottom of any kind into the projector. NOTE FOR CUSTOMERS IN THE US Hg LAMP(S) INSIDE THIS PRODUCT CONTAIN MERCURY AND MUST BE RECYCLED OR DISPOSED OF ACCORDING TO LOCAL, STATE OR FEDERAL LAWS. 5 Use only with the projector. Slots...

Owners Manual
Page 6
... projector. Keep the exhaust vent at least 3' (1 m) away from overheating, these openings must not be taken. - When not mounted properly, the projector may reduce the lamp life and cause fire hazard. Air Intake Vent Exhaust Vent (Hot air exhaust) Exhaust Vent (Hot air exhaust) Air Intake Vent Installing the Projector in...
... projector. Keep the exhaust vent at least 3' (1 m) away from overheating, these openings must not be taken. - When not mounted properly, the projector may reduce the lamp life and cause fire hazard. Air Intake Vent Exhaust Vent (Hot air exhaust) Exhaust Vent (Hot air exhaust) Air Intake Vent Installing the Projector in...

Owners Manual
Page 8
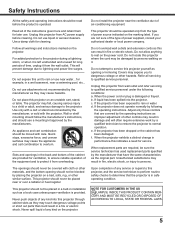
Part Names and Functions Front ② ① ⑤ ④ ③ ⑧ ⑥ ③ ⑦ Side ⑨ ⑭ ⑯ ⑮ Interactive Function ① Lamp Cover ② Top controls ③ Adjustable feet ④ Infrared Remote Receiver ⑤ Projection Lens ⑥ Speaker ⑦ Lens Cover CAUTION Do not turn on a projector ...
Part Names and Functions Front ② ① ⑤ ④ ③ ⑧ ⑥ ③ ⑦ Side ⑨ ⑭ ⑯ ⑮ Interactive Function ① Lamp Cover ② Top controls ③ Adjustable feet ④ Infrared Remote Receiver ⑤ Projection Lens ⑥ Speaker ⑦ Lens Cover CAUTION Do not turn on a projector ...

Owners Manual
Page 10
... mode. This also blinks red when the internal temperature of the projector exceeds the operating range. (pp. 60, 70) ③ LAMP REPLACE indicator Turn yellow when the life of the projection lamp draws to an end. (pp. 63, 70) Top controls ① ② ⑥ 10 ③ ④ ⑤ ① ON/STAND-BY...
... mode. This also blinks red when the internal temperature of the projector exceeds the operating range. (pp. 60, 70) ③ LAMP REPLACE indicator Turn yellow when the life of the projection lamp draws to an end. (pp. 63, 70) Top controls ① ② ⑥ 10 ③ ④ ⑤ ① ON/STAND-BY...
Owners Manual
Page 11
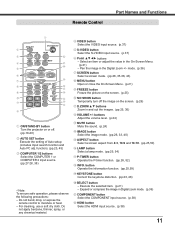
... button Select the image mode. (pp.26, 33, 40) ⑮ ASPECT button Select a screen aspect from 4:3, 16:9 and 16:10. (pp.25,50) ⑯ LAMP button Select a lamp mode. (pp.25, 54) ⑰ P-TIMER button Operate the P-timer function. (pp.26, 52) ⑱ INFO. Expand or compress the image in Digital zoom...
... button Select the image mode. (pp.26, 33, 40) ⑮ ASPECT button Select a screen aspect from 4:3, 16:9 and 16:10. (pp.25,50) ⑯ LAMP button Select a lamp mode. (pp.25, 54) ⑰ P-TIMER button Operate the P-timer function. (pp.26, 52) ⑱ INFO. Expand or compress the image in Digital zoom...

Owners Manual
Page 18
... the remote control or on the usage state of the projector. Selected Input Source and Lamp Control Video Lamp control status (See page 54 for Lamp control status.) Note: The Filter warning and Lamp replacement icons may appear on the screen depending on the top control. Is cable connected ...preparation display appears on the screen and the countdown starts. 4 After the countdown, the input source that was selected the last time and the lamp control status icon (see page 54) appear on the screen. (p.46) 18 Input signal guidance window No signal Current Input setting:RGB Is ...
... the remote control or on the usage state of the projector. Selected Input Source and Lamp Control Video Lamp control status (See page 54 for Lamp control status.) Note: The Filter warning and Lamp replacement icons may appear on the screen depending on the top control. Is cable connected ...preparation display appears on the screen and the countdown starts. 4 After the countdown, the input source that was selected the last time and the lamp control status icon (see page 54) appear on the screen. (p.46) 18 Input signal guidance window No signal Current Input setting:RGB Is ...

Owners Manual
Page 20
... from the wall outlet or turn on page 57.) At this time, you cannot restart the projector immediately after the POWER indicator turns red. The lamp remains high temperature and needs to the temperature inside the projector. • Do not put the projector in a case before the projector is cooled enough.... • If the WARNING indicator blinks or lights red, see "WARNING indicator" on page 60. • While the POWER indicator is blinking, the lamp is suddenly cut off ? Basic Operation Turning Off the Projector 1 Press the ON/STAND-BY button on the remote control or on .
... from the wall outlet or turn on page 57.) At this time, you cannot restart the projector immediately after the POWER indicator turns red. The lamp remains high temperature and needs to the temperature inside the projector. • Do not put the projector in a case before the projector is cooled enough.... • If the WARNING indicator blinks or lights red, see "WARNING indicator" on page 60. • While the POWER indicator is blinking, the lamp is suddenly cut off ? Basic Operation Turning Off the Projector 1 Press the ON/STAND-BY button on the remote control or on .

Owners Manual
Page 22
... Used to set the projector's operating configurations. (pp.44-58) ⑧ Information Display the input source information: Input , H-sync freq., V-sync freq., Screen, Language, Lamp status, Lamp counter, Power management, Key lock, PIN code lock and Remote control. (p.59) ⑨ Network See owner's manual of each menu, see "Menu Tree" on pages...
... Used to set the projector's operating configurations. (pp.44-58) ⑧ Information Display the input source information: Input , H-sync freq., V-sync freq., Screen, Language, Lamp status, Lamp counter, Power management, Key lock, PIN code lock and Remote control. (p.59) ⑨ Network See owner's manual of each menu, see "Menu Tree" on pages...

Owners Manual
Page 25
...of the buttons enables you to the D. zoom +/- button Display the input source information: Input, H-sync freq., V-sync freq., Screen, Language, Lamp status, Lamp counter, Power management, Key lock, PIN code lock and Remote control. (p.59) Note: See the next page for details. Normal....... ... press the FREEZE button again or press any other buttons. mode. Eco Lower brightness reduces the lamp power consumption and extends the lamp life. LAMP button Press the LAMP button on the remote control to release the Freeze function, the mute function can not be operated...
...of the buttons enables you to the D. zoom +/- button Display the input source information: Input, H-sync freq., V-sync freq., Screen, Language, Lamp status, Lamp counter, Power management, Key lock, PIN code lock and Remote control. (p.59) Note: See the next page for details. Normal....... ... press the FREEZE button again or press any other buttons. mode. Eco Lower brightness reduces the lamp power consumption and extends the lamp life. LAMP button Press the LAMP button on the remote control to release the Freeze function, the mute function can not be operated...

Owners Manual
Page 45
... control is pressed during Input search is set Off at the same time. • Fine sync, Total dots, Horizontal and Vertical positions of Input and Lamp are required (pp.31-32). 45 On 2....... and Input search functions can not be set to activate the Input search. Settings for those functions can...
... control is pressed during Input search is set Off at the same time. • Fine sync, Total dots, Horizontal and Vertical positions of Input and Lamp are required (pp.31-32). 45 On 2....... and Input search functions can not be set to activate the Input search. Settings for those functions can...

Owners Manual
Page 46
... wait ... ● Arrows for when no input signal is detected. Use this function when you want to project images after the lamp becomes bright enough. Keystone appears on the projector. Store...... Use this function when you want to project the image as early as possible... even when the lamp is not bright enough. Show the input image instead of the projected image. Project a black background. The factory default setting is...
... wait ... ● Arrows for when no input signal is detected. Use this function when you want to project images after the lamp becomes bright enough. Keystone appears on the projector. Store...... Use this function when you want to project the image as early as possible... even when the lamp is not bright enough. Show the input image instead of the projected image. Project a black background. The factory default setting is...

Owners Manual
Page 51
... can turn on the remote control is pressed. Eco Select Eco when you do not use the projector via network. In this condition, the projection lamp will be turned off . Use the Point ▲▼ buttons to the owner's manual of "Network Set-up and Operation". Note: ...the Timer (1~30Min). Note: Factory default is Ready: 5 Min. 51 Setting Power management For reducing power consumption as well as maintaining the lamp life, the Power management function turns off . The projector's network function will be turned on if the input signal is reconnected or any button ...
... can turn on the remote control is pressed. Eco Select Eco when you do not use the projector via network. In this condition, the projection lamp will be turned off . Use the Point ▲▼ buttons to the owner's manual of "Network Set-up and Operation". Note: ...the Timer (1~30Min). Note: Factory default is Ready: 5 Min. 51 Setting Power management For reducing power consumption as well as maintaining the lamp life, the Power management function turns off . The projector's network function will be turned on if the input signal is reconnected or any button ...

Owners Manual
Page 54
... code for the remote control: Press and hold both the projector and the remote control must be switched to Code 2. Eco Lower brightness reduces the lamp power consumption and extends the lamp life. Setting Lamp control This function allows you to change brightness of time, the remote control code will be reset. 54
... code for the remote control: Press and hold both the projector and the remote control must be switched to Code 2. Eco Lower brightness reduces the lamp power consumption and extends the lamp life. Setting Lamp control This function allows you to change brightness of time, the remote control code will be reset. 54

Owners Manual
Page 57
....1) will appear. 57 Set this function. Select this mode when using the projector in higher altitudes than Off mode. Normal operation L 2...... Lamp counter This function is used to Off when using the projector in high altitudes (about 1,200 meters or more above where the fans have... less cooling effect. When replacing the projection lamp, reset lamp counter. See "Resetting the Lamp Counter" on page 64. Note: The Lamp replacement icon (Fig.1) will appear on the screen when the end of Off or On. ...
....1) will appear. 57 Set this function. Select this mode when using the projector in higher altitudes than Off mode. Normal operation L 2...... Lamp counter This function is used to Off when using the projector in high altitudes (about 1,200 meters or more above where the fans have... less cooling effect. When replacing the projection lamp, reset lamp counter. See "Resetting the Lamp Counter" on page 64. Note: The Lamp replacement icon (Fig.1) will appear on the screen when the end of Off or On. ...

Owners Manual
Page 58
... will not turn off until the filter counter is executed, all setting values except for the User logo, PIN code lock, Logo PIN code lock, Lamp counter and Filter counter to "Resetting the Filter Counter" on the screen, notifying the replacing is used to set the timer. Select from (Off/ 2000H...
... will not turn off until the filter counter is executed, all setting values except for the User logo, PIN code lock, Logo PIN code lock, Lamp counter and Filter counter to "Resetting the Filter Counter" on the screen, notifying the replacing is used to set the timer. Select from (Off/ 2000H...

Owners Manual
Page 59
...Press the Point ▲▼ buttons to display the Information Menu. Input The selected input source is displayed. Lamp status The selected lamp mode is displayed. Power management Off, Ready, Shut down or Timer is displayed. button Information Menu 59 Language...the remote control to select the Information. H-sync freq. Numbers of the projector. HDMI Direct Operation Press the INFO. Lamp counter The cumulative lamp operating time is displayed. Information Input Source Information Display The Information Menu is used for displayed information. See below for ...
...Press the Point ▲▼ buttons to display the Information Menu. Input The selected input source is displayed. Lamp status The selected lamp mode is displayed. Power management Off, Ready, Shut down or Timer is displayed. button Information Menu 59 Language...the remote control to select the Information. H-sync freq. Numbers of the projector. HDMI Direct Operation Press the INFO. Lamp counter The cumulative lamp operating time is displayed. Information Input Source Information Display The Information Menu is used for displayed information. See below for ...


