Owners Manual
Page 1
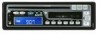
OPERATING INSTRUCTIONS FXCD-550 Full Panel Detachable FM Stereo/AM Receiver Auto Reverse Cassette Player Compact Disc Player ISO Mounting with Removable Trim Ring (English) OPERATING INSTRUCTIONS 1~25 GB (Español) LIBRITO DE INSTRUCCIONES 26~49 E
OPERATING INSTRUCTIONS FXCD-550 Full Panel Detachable FM Stereo/AM Receiver Auto Reverse Cassette Player Compact Disc Player ISO Mounting with Removable Trim Ring (English) OPERATING INSTRUCTIONS 1~25 GB (Español) LIBRITO DE INSTRUCCIONES 26~49 E
Owners Manual
Page 2
... or routine maintenance. LABOR PARTS 1 YEAR 1 YEAR EXCLUSIONS This warranty does not cover (A) the adjustment of customer-operated controls as explained in the appropriate model's instruction manual, or (B) the repair of any of its option) the product and any product whose serial number has been altered, defaced or removed. This warranty does not apply to uncrating, setup, installation, removal of the product for...
... or routine maintenance. LABOR PARTS 1 YEAR 1 YEAR EXCLUSIONS This warranty does not cover (A) the adjustment of customer-operated controls as explained in the appropriate model's instruction manual, or (B) the repair of any of its option) the product and any product whose serial number has been altered, defaced or removed. This warranty does not apply to uncrating, setup, installation, removal of the product for...
Owners Manual
Page 3
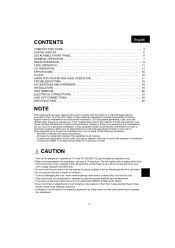
... English COMPACT DISC CARE 3 DIGITAL DISPLAY 5 DETACHABLE FRONT PANEL 6 GENERAL OPERATION 7 RADIO OPERATION 9 TAPE OPERATION 11 CD OPERATION 13 ERROR SIGNS 15 CLOCK 16 HINTS FOR PROPER AND SAFE OPERATION 17 TROUBLESHOOTING 18 ACCESSORIES AND HARDWARE 19 INSTALLATION 19 UNIT REMOVAL 22 ELECTRICAL CONNECTIONS 23 LINE OUT CONNECTIONS 24 SPECIFICATIONS 25 NOTE This equipment has been tested and found to comply with the limits for a Class B digital device, pursuant to operate on...
... English COMPACT DISC CARE 3 DIGITAL DISPLAY 5 DETACHABLE FRONT PANEL 6 GENERAL OPERATION 7 RADIO OPERATION 9 TAPE OPERATION 11 CD OPERATION 13 ERROR SIGNS 15 CLOCK 16 HINTS FOR PROPER AND SAFE OPERATION 17 TROUBLESHOOTING 18 ACCESSORIES AND HARDWARE 19 INSTALLATION 19 UNIT REMOVAL 22 ELECTRICAL CONNECTIONS 23 LINE OUT CONNECTIONS 24 SPECIFICATIONS 25 NOTE This equipment has been tested and found to comply with the limits for a Class B digital device, pursuant to operate on...
Owners Manual
Page 5
... or fluids, benzene or thinner to a malfunction of the disc. • When not using the disc player for extended periods, remove the compact disc and return it does not produce any problems playing a CD with copy control protection not conforming to CD standards and is due to the CD with copy control protection, consult the store where the CD was purchased. -4- These chemicals will start from dust...
... or fluids, benzene or thinner to a malfunction of the disc. • When not using the disc player for extended periods, remove the compact disc and return it does not produce any problems playing a CD with copy control protection not conforming to CD standards and is due to the CD with copy control protection, consult the store where the CD was purchased. -4- These chemicals will start from dust...

Owners Manual
Page 6
DIGITAL DISPLAY Automatic Music Select System (AMSS) Metal Display Tape playing direction Disc in BASSXPANDER Auto Travel Preset (ATP) AM Band FM Bands Radio Frequency, Time, CD Track Number, Audio Control Selection, Scan Play, Repeat Play, Shuffle Play, Error Signs, no Cd, no TAPE, TAPE play Preset Channel, Auto Travel Preset Channel -5-
DIGITAL DISPLAY Automatic Music Select System (AMSS) Metal Display Tape playing direction Disc in BASSXPANDER Auto Travel Preset (ATP) AM Band FM Bands Radio Frequency, Time, CD Track Number, Audio Control Selection, Scan Play, Repeat Play, Shuffle Play, Error Signs, no Cd, no TAPE, TAPE play Preset Channel, Auto Travel Preset Channel -5-
Owners Manual
Page 7
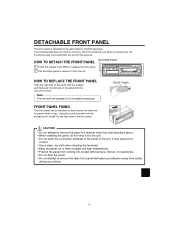
... not attempt to remove the radio front panel that it to the right side of direct sunlight and high temperatures. • Prevent the panel from the unit. A carrying case is installed incorrectly. HOW TO REPLACE THE FRONT PANEL Align the right side of the panel with the accessory kit, install it cannot be removed to prevent theft or loss. Using the screw included...
... not attempt to remove the radio front panel that it to the right side of direct sunlight and high temperatures. • Prevent the panel from the unit. A carrying case is installed incorrectly. HOW TO REPLACE THE FRONT PANEL Align the right side of the panel with the accessory kit, install it cannot be removed to prevent theft or loss. Using the screw included...

Owners Manual
Page 8
... the volume mode. To adjust the volume, press the or buttons while in the table below. MODE bAS (bass) TRE (treble) bAL (balance) FAd (fader) VOL (volume) (Min) Down -5 Down -5 Left L15 Rear R15 Down 0 (Max) Up 5 Up 5 Right R15 Front F15 Up 50 ELECTRONIC CONTROL RESET 2 Press the SEL button for about 3 seconds until the unit beeps, the audio controls, except for volume, will be reset. -7- TURNING THE POWER OFF...
... the volume mode. To adjust the volume, press the or buttons while in the table below. MODE bAS (bass) TRE (treble) bAL (balance) FAd (fader) VOL (volume) (Min) Down -5 Down -5 Left L15 Rear R15 Down 0 (Max) Up 5 Up 5 Right R15 Front F15 Up 50 ELECTRONIC CONTROL RESET 2 Press the SEL button for about 3 seconds until the unit beeps, the audio controls, except for volume, will be reset. -7- TURNING THE POWER OFF...
Owners Manual
Page 9
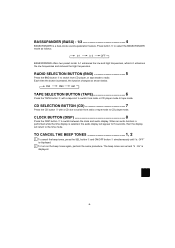
..." is displayed. 2 To turn on the beep tones again, perform the same procedure. BASSXPANDER (BASX) - 1/2 4 BASSXPANDER is selected, the audio display will appear for 5 seconds, then the display will return to the time mode. CD SELECTION BUTTON (CD 7 Press the CD button with a tape slot to switch from CD player, or tape mode to radio. Press button to switch between the clock and audio display. When an audio function is performed while the time display is a dual-mode sound equalization feature.
..." is displayed. 2 To turn on the beep tones again, perform the same procedure. BASSXPANDER (BASX) - 1/2 4 BASSXPANDER is selected, the audio display will appear for 5 seconds, then the display will return to the time mode. CD SELECTION BUTTON (CD 7 Press the CD button with a tape slot to switch from CD player, or tape mode to radio. Press button to switch between the clock and audio display. When an audio function is performed while the time display is a dual-mode sound equalization feature.
Owners Manual
Page 10
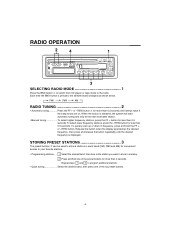
... desired frequency is displayed. Repeat steps 1 and 2 to program additional stations. • Quick tuning Select the desired band, then press one of the six preset buttons. -9- Release the button when the display approaches the desired frequency, then press and release the button repeatedly until it beeps twice if the beep tones are on. REW button. RADIO OPERATION 2 4 1 3 SELECTING RADIO MODE 1 Press the BND button to switch from CD player or tape mode to...
... desired frequency is displayed. Repeat steps 1 and 2 to program additional stations. • Quick tuning Select the desired band, then press one of the six preset buttons. -9- Release the button when the display approaches the desired frequency, then press and release the button repeatedly until it beeps twice if the beep tones are on. REW button. RADIO OPERATION 2 4 1 3 SELECTING RADIO MODE 1 Press the BND button to switch from CD player or tape mode to...

Owners Manual
Page 11
... not appear in the display. • To scan programmed stations See "PRESET-SCAN-BUTTON OPERATION". "ATP" appears in the selected band (both manual preset and auto travel presets). 1 Select the desired band or ATP mode. PRESET-SCAN-BUTTON OPERATION 1, 4 This function scans each preset station for more than 2 seconds. appears in the display. 3 While ATP is selected in an unfamiliar location and want to select the ATP mode. 2 Press the BND button for more than...
... not appear in the display. • To scan programmed stations See "PRESET-SCAN-BUTTON OPERATION". "ATP" appears in the selected band (both manual preset and auto travel presets). 1 Select the desired band or ATP mode. PRESET-SCAN-BUTTON OPERATION 1, 4 This function scans each preset station for more than 2 seconds. appears in the display. 3 While ATP is selected in an unfamiliar location and want to select the ATP mode. 2 Press the BND button for more than...
Owners Manual
Page 12
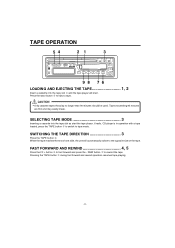
..., the unit will start the tape player. REW button to fast forward and press the - SELECTING TAPE MODE 3 Inserting a cassette into the tape slot and the tape player will automatically switch to tape mode. SWITCHING THE TAPE DIRECTION 3 Press the TAPE button . Pressing the TAPE button during fast forward and rewind operation resumes tape playing. -11- TAPE OPERATION 54 21 3 98 76 LOADING AND EJECTING THE...
..., the unit will start the tape player. REW button to fast forward and press the - SELECTING TAPE MODE 3 Inserting a cassette into the tape slot and the tape player will automatically switch to tape mode. SWITCHING THE TAPE DIRECTION 3 Press the TAPE button . Pressing the TAPE button during fast forward and rewind operation resumes tape playing. -11- TAPE OPERATION 54 21 3 98 76 LOADING AND EJECTING THE...

Owners Manual
Page 13
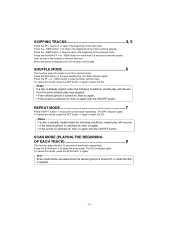
... displayed. "SCn" is displayed. REPEAT MODE 9 This operation makes it will continue until RPT is used, press the MTL button to 9 selections from the current location on the tape. e.g.) With "AMSS TAPE" displayed, press button five times. "AMSS R5" is displayed. LOCATING THE BEGINNING OF A PROGRAM (AMSS 4, 5, 6 This system is displayed. 2 Press the FF + button to skip forward up to 8 selections from the current location on the tape. (Automatic Music Select...
... displayed. "SCn" is displayed. REPEAT MODE 9 This operation makes it will continue until RPT is used, press the MTL button to 9 selections from the current location on the tape. e.g.) With "AMSS TAPE" displayed, press button five times. "AMSS R5" is displayed. LOCATING THE BEGINNING OF A PROGRAM (AMSS 4, 5, 6 This system is displayed. 2 Press the FF + button to skip forward up to 8 selections from the current location on the tape. (Automatic Music Select...
Owners Manual
Page 15
... SHF indicator lights. Press the SCN button to begin shuffle play will be canceled when the vehicle ignition is ejected. -14- The SCN indicator lights. Note Scan mode will resume: • If the vehicle ignition is switched off, then on again. • If the power is switched off , or when the disc is turned off , then on again with sound) in random...
... SHF indicator lights. Press the SCN button to begin shuffle play will be canceled when the vehicle ignition is ejected. -14- The SCN indicator lights. Note Scan mode will resume: • If the vehicle ignition is switched off, then on again. • If the power is switched off , or when the disc is turned off , then on again with sound) in random...
Owners Manual
Page 16
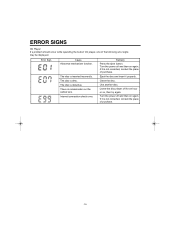
... it properly. The disc is not corrected, contact the place of purchase. -15- The disc is condensation on again. Turn the power off and then on the optical lens. There is defective. Clean the disc. Use another disc. Internal connection check error. The disc is not corrected, contact the place of the following error signs may be displayed: Error Sign Cause Abnormal mechanism function.
... it properly. The disc is not corrected, contact the place of purchase. -15- The disc is condensation on again. Turn the power off and then on the optical lens. There is defective. Clean the disc. Use another disc. Internal connection check error. The disc is not corrected, contact the place of the following error signs may be displayed: Error Sign Cause Abnormal mechanism function.
Owners Manual
Page 17
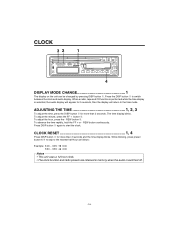
CLOCK 32 1 4 DISPLAY MODE CHANGE 1 The display on the unit can be changed by pressing DISP button . Press the DISP button to the nearest half-hour as follows: Example: 3:00 ~ 3:29 3:00 3:30 ~ 3:59 4:00 Notes • This unit uses a 12-hour clock. • The clock function and radio presets are retained in memory when the audio is selected, the audio display will return to start the clock. To adjust the hour, press the...
CLOCK 32 1 4 DISPLAY MODE CHANGE 1 The display on the unit can be changed by pressing DISP button . Press the DISP button to the nearest half-hour as follows: Example: 3:00 ~ 3:29 3:00 3:30 ~ 3:59 4:00 Notes • This unit uses a 12-hour clock. • The clock function and radio presets are retained in memory when the audio is selected, the audio display will return to start the clock. To adjust the hour, press the...
Owners Manual
Page 18
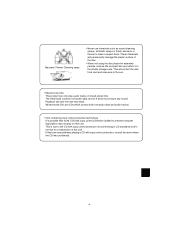
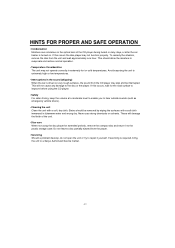
..., wait for extended periods, remove the compact disc and return it yourself. HINTS FOR PROPER AND SAFE OPERATION • Condensation Moisture can condense on the optical lens of the unit. • Disc care When not using the disc player for the road surface to improve before using the CD player. • Safety For safer driving, keep the volume at a moderate level to enable you to...
..., wait for extended periods, remove the compact disc and return it yourself. HINTS FOR PROPER AND SAFE OPERATION • Condensation Moisture can condense on the optical lens of the unit. • Disc care When not using the disc player for the road surface to improve before using the CD player. • Safety For safer driving, keep the volume at a moderate level to enable you to...
Owners Manual
Page 19
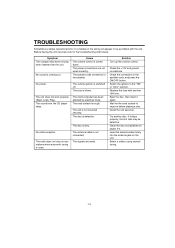
... to the troubleshooting chart below. Select a station using manual tuning. -18- The unit does not work properly (Eject, Load, Play). The unit is not connected. The antenna cable is not mounted securely. Try another 15A fuse. Symptom The compact disc does not play when inserted into the antenna jack on pages 3-4. The sound from the CD player skips. The vehicle ignition is imcomplete. Replace the fuse with the unit. TROUBLESHOOTING Sometimes a simple operational error or a mistake in the wiring can...
... to the troubleshooting chart below. Select a station using manual tuning. -18- The unit does not work properly (Eject, Load, Play). The unit is not connected. The antenna cable is not mounted securely. Try another 15A fuse. Symptom The compact disc does not play when inserted into the antenna jack on pages 3-4. The sound from the CD player skips. The vehicle ignition is imcomplete. Replace the fuse with the unit. TROUBLESHOOTING Sometimes a simple operational error or a mistake in the wiring can...

Owners Manual
Page 20
If the unit must be mounted at an angle, due to the design of the vehicle, make sure the unit does not tilt by more than 30°. -19- BEFORE INSTALLATION When mounting the unit in a car, keep the unit as level as possible. ACCESSORIES AND HARDWARE Mounting Bracket (Half Sleeve) x 1 Rear Strap (Brace) x 1 Screw M5 x 14 x 1 Hex bolt M5 x 8 x1 Removable Trim Ring x 1 Unlock Levers x 2 Screw M2 x 8 x 1 INSTALLATION 1.
If the unit must be mounted at an angle, due to the design of the vehicle, make sure the unit does not tilt by more than 30°. -19- BEFORE INSTALLATION When mounting the unit in a car, keep the unit as level as possible. ACCESSORIES AND HARDWARE Mounting Bracket (Half Sleeve) x 1 Rear Strap (Brace) x 1 Screw M5 x 14 x 1 Hex bolt M5 x 8 x1 Removable Trim Ring x 1 Unlock Levers x 2 Screw M2 x 8 x 1 INSTALLATION 1.

Owners Manual
Page 24
... ignition switch does not have an ACC position, connect this wire to a +12V power terminal which receives power continuously. (Same as item 2.) • Connect to location drawing 100 mA amperage or more. 4 Ground wire (Black) • Connect this wire to the vehicle chassis. 5 Power Antenna (Blue/Red) • Connect this wire to the control terminal of a Power Antenna. • When not using a Power Antenna, this wire is not connected. 6 Amplifier Turn On (Blue/White) • Connect this wire to...
... ignition switch does not have an ACC position, connect this wire to a +12V power terminal which receives power continuously. (Same as item 2.) • Connect to location drawing 100 mA amperage or more. 4 Ground wire (Black) • Connect this wire to the vehicle chassis. 5 Power Antenna (Blue/Red) • Connect this wire to the control terminal of a Power Antenna. • When not using a Power Antenna, this wire is not connected. 6 Amplifier Turn On (Blue/White) • Connect this wire to...

Owners Manual
Page 25
... line output jacks to upgrade your system. RCA Line-out Jacks OUTPUT FRONT REAR White L (eft) R (ight) Red External Amplifier Rear Speaker Front Speaker RCA Line-out Jacks (For Speakers) • Connect a patch cable (not supplied) from shorting to the unit or the vehicle chassis. • When using a two-speaker installation, set the FADER control to the center position. • When fuse replacement is necessary remove the blown fuse by using a two-speaker installation...
... line output jacks to upgrade your system. RCA Line-out Jacks OUTPUT FRONT REAR White L (eft) R (ight) Red External Amplifier Rear Speaker Front Speaker RCA Line-out Jacks (For Speakers) • Connect a patch cable (not supplied) from shorting to the unit or the vehicle chassis. • When using a two-speaker installation, set the FADER control to the center position. • When fuse replacement is necessary remove the blown fuse by using a two-speaker installation...


