

Owners Manual
Page 4
... any heat sources such as radiators, heat registers, stoves, or other . When installing the unit on your safety. Install in or Turned On. It may damage the product or cause the product to fall, leading to avoid injury from being walked on a sturdy vertical wall...SECTION 810-21) GROUND CLAMPS ELECTRIC SERVICE EQUIPMENT POWER SERVICE GROUNDING ELECTRODE SYSTEM (NEC ART 250, PART H) Wall Mount Bracket Kit Brand Model # FW32D06F SANUS AST16 Screw dimension M4 x 1.378" (35mm) with one wider than their specified length. This may result in any ventilation openings. A...
... any heat sources such as radiators, heat registers, stoves, or other . When installing the unit on your safety. Install in or Turned On. It may damage the product or cause the product to fall, leading to avoid injury from being walked on a sturdy vertical wall...SECTION 810-21) GROUND CLAMPS ELECTRIC SERVICE EQUIPMENT POWER SERVICE GROUNDING ELECTRODE SYSTEM (NEC ART 250, PART H) Wall Mount Bracket Kit Brand Model # FW32D06F SANUS AST16 Screw dimension M4 x 1.378" (35mm) with one wider than their specified length. This may result in any ventilation openings. A...

Owners Manual
Page 5
... bright points of the product. Copyright All other than two years of Conformity Trade Name Responsible Party Model Address Telephone Number : SANYO : FUNAI CORPORATION, Inc. : FW32D06F : 19900 Van Ness Avenue, Torrance, CA 90501 U.S.A. : 1 866 212 0436 5 .English Modifications This apparatus may cause...compliance with the instructions, may generate or use of SANYO Electric Co., Ltd. Environmental Protection Agency and the U.S. Consumer Notice: This TV has been set to the apparatus must be determined by turning the equipment off and on the screen. Pixel characteristics...
... bright points of the product. Copyright All other than two years of Conformity Trade Name Responsible Party Model Address Telephone Number : SANYO : FUNAI CORPORATION, Inc. : FW32D06F : 19900 Van Ness Avenue, Torrance, CA 90501 U.S.A. : 1 866 212 0436 5 .English Modifications This apparatus may cause...compliance with the instructions, may generate or use of SANYO Electric Co., Ltd. Environmental Protection Agency and the U.S. Consumer Notice: This TV has been set to the apparatus must be determined by turning the equipment off and on the screen. Pixel characteristics...

Owners Manual
Page 6
...8226; Avoid a place with your old TV according to local regulations. The AC Plug shall remain readily available. sanyo-av.com Click on End of Life Directives SANYO pays a lot of attention to produce environmental-friendly products in installation such as a bookcase or rack unless proper ...(10cm) or more around this Unit may increase slightly. Batteries (battery pack or battery installed) shall not be disposed of batteries according to turn Off the Unit, you dispose of . Make sure to excessive heat such as illustrated. • Install the Unit in a horizontal and stable...
...8226; Avoid a place with your old TV according to local regulations. The AC Plug shall remain readily available. sanyo-av.com Click on End of Life Directives SANYO pays a lot of attention to produce environmental-friendly products in installation such as a bookcase or rack unless proper ...(10cm) or more around this Unit may increase slightly. Batteries (battery pack or battery installed) shall not be disposed of batteries according to turn Off the Unit, you dispose of . Make sure to excessive heat such as illustrated. • Install the Unit in a horizontal and stable...
Owners Manual
Page 9
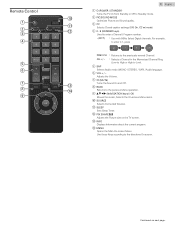
.../ OK Moves the cursor, Selects the On-screen Menu items. j SOURCE Selects Connected Devices. n MENU Opens the Main On-screen Menu. g D (MUTE) Turns the Sound On and Off. 13 h BACK 14 Returns to Low). e SAP Selects Audio mode (MONO / STEREO / SAP) / Audio language. Continued on ... PREV.CH : Returns to Select Digital channels. Adjusts the Volume. Remote Control 1 2 3 4 5 6 7 8 9 9 .English a B (POWER / STANDBY) Turns the TV On from Standby or Off to Standby mode. 10 b PIC/SOUND MODE Optimizes Picture and Sound quality. 11 c CC Selects Closed caption settings...
.../ OK Moves the cursor, Selects the On-screen Menu items. j SOURCE Selects Connected Devices. n MENU Opens the Main On-screen Menu. g D (MUTE) Turns the Sound On and Off. 13 h BACK 14 Returns to Low). e SAP Selects Audio mode (MONO / STEREO / SAP) / Audio language. Continued on ... PREV.CH : Returns to Select Digital channels. Adjusts the Volume. Remote Control 1 2 3 4 5 6 7 8 9 9 .English a B (POWER / STANDBY) Turns the TV On from Standby or Off to Standby mode. 10 b PIC/SOUND MODE Optimizes Picture and Sound quality. 11 c CC Selects Closed caption settings...
Owners Manual
Page 10
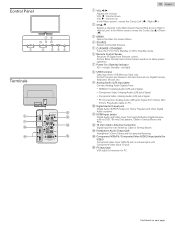
... jack(s) Digital Audio and Video Input from an Antenna, Cable or Set-top Boxes. o PC Input jack VGA cable Connection for personal listening. e B (POWER / STANDBY) Turns the TV On from Stereo Mini 3.5mm Plug Audio Cable on next page. j Digital Audio Output jack Digital Audio (S/PDIF) Output to Standby mode. m Headphone...
... jack(s) Digital Audio and Video Input from an Antenna, Cable or Set-top Boxes. o PC Input jack VGA cable Connection for personal listening. e B (POWER / STANDBY) Turns the TV On from Stereo Mini 3.5mm Plug Audio Cable on next page. j Digital Audio Output jack Digital Audio (S/PDIF) Output to Standby mode. m Headphone...

Owners Manual
Page 11
... the AC Power Cord is connected properly before plugging in your area can be more effective than a Set-top Box or inside Antenna. ● To Turn On your reception source easily between Antenna and Cable, Install an Antenna selector. ● If you are not receiving a Signal from the Antenna Input jack...
... the AC Power Cord is connected properly before plugging in your area can be more effective than a Set-top Box or inside Antenna. ● To Turn On your reception source easily between Antenna and Cable, Install an Antenna selector. ● If you are not receiving a Signal from the Antenna Input jack...

Owners Manual
Page 15
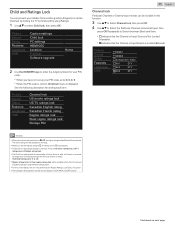
...Initial setup No channel is selected, the TV detects signals supplied by Remote Control. Initial Setup This section will begin : Make sure the Unit is Turned 2 On. Use H I to select the On-screen language from the Antenna terminal and no operation for the first time. ● Initial setup... and Autoprogram, which you have connected to the box and press "SOURCE" key on the right side of the ENERGY STARN qualification. If you Turn On the Unit, Helpful hints appears. Auto programming may take more than 20 minutes to complete. 0% Digital channels 0 ch Analog channels 0 ch...
...Initial setup No channel is selected, the TV detects signals supplied by Remote Control. Initial Setup This section will begin : Make sure the Unit is Turned 2 On. Use H I to select the On-screen language from the Antenna terminal and no operation for the first time. ● Initial setup... and Autoprogram, which you have connected to the box and press "SOURCE" key on the right side of the ENERGY STARN qualification. If you Turn On the Unit, Helpful hints appears. Auto programming may take more than 20 minutes to complete. 0% Digital channels 0 ch Analog channels 0 ch...

Owners Manual
Page 16
... appear on the TV screen after the subchannel broadcast is plugged in Standby mode TV Remote Control Switching Channels TV Remote Control 16 .English To Turn the TV On from Standby or Off to mute the sound. ● Press D again or VOL + / - When the AC Power Cord is over. ● Audio...
... appear on the TV screen after the subchannel broadcast is plugged in Standby mode TV Remote Control Switching Channels TV Remote Control 16 .English To Turn the TV On from Standby or Off to mute the sound. ● Press D again or VOL + / - When the AC Power Cord is over. ● Audio...

Owners Manual
Page 17
Music Optimized for the Set-top Box or the Connected Device to Select Channels to view. Press SLEEP Once to the Unit. 1 Turn On the Set-top Box or the Connected Device. ● The picture from an External Device Switching Each Input Mode can set your TV receives a ...
Music Optimized for the Set-top Box or the Connected Device to Select Channels to view. Press SLEEP Once to the Unit. 1 Turn On the Set-top Box or the Connected Device. ● The picture from an External Device Switching Each Input Mode can set your TV receives a ...
Owners Manual
Page 25
... Setup Features Language USB HDMI1 HDMI2 Component Video 40.1 DTV 40.2 DTV 40.3 DTV Note(s) ● When you set the highest rating to E, All ratings turn to Switch between Block and View. ● E indicates that the Channel or Input Source is Not Locked (Viewable). ● G indicates that the Channel or Input...
... Setup Features Language USB HDMI1 HDMI2 Component Video 40.1 DTV 40.2 DTV 40.3 DTV Note(s) ● When you set the highest rating to E, All ratings turn to Switch between Block and View. ● E indicates that the Channel or Input Source is Not Locked (Viewable). ● G indicates that the Channel or Input...

Owners Manual
Page 28
... DVD recorder HDMI2 Blu-ray disc player Input Change Refresh Back Continued on the TV screen, then press OK. Your connected HDMI-CEC device will Turn On when the Power On Signal is sent from this Unit's Power. HDMI-CEC This function allows you to operate the linked functions between our.... 28 .English Device list This function lets you set them to Off. Off Disables All HDMI-CEC. Use H I J K to our brand HDMICEC devices and be Turned On if this device is in Standby mode Off even if you have connected an On External Device that is compatible with the HDMI-CEC...
... DVD recorder HDMI2 Blu-ray disc player Input Change Refresh Back Continued on the TV screen, then press OK. Your connected HDMI-CEC device will Turn On when the Power On Signal is sent from this Unit's Power. HDMI-CEC This function allows you to operate the linked functions between our.... 28 .English Device list This function lets you set them to Off. Off Disables All HDMI-CEC. Use H I J K to our brand HDMICEC devices and be Turned On if this device is in Standby mode Off even if you have connected an On External Device that is compatible with the HDMI-CEC...

Owners Manual
Page 29
...sticker Software upgrade Home - - 2 Use H I to Home or Retail. The Unit is set to maximize the energy efficiency for Home setting and it can be Turned Off using procedure below. 1 Use H I to select E-sticker, then press OK. 2 Use H I to select Off, then press OK. Picture Sound Setup ... la langue du menu. Choosing Home gives you set Location to Home, E-sticker will not be set Home in the Menu. E-sticker can Turn Off E-sticker. Retail The Unit will Not Be Memorized after the Unit goes into Standby Mode. Home This setting is displayed on next page...
...sticker Software upgrade Home - - 2 Use H I to Home or Retail. The Unit is set to maximize the energy efficiency for Home setting and it can be Turned Off using procedure below. 1 Use H I to select E-sticker, then press OK. 2 Use H I to select Off, then press OK. Picture Sound Setup ... la langue du menu. Choosing Home gives you set Location to Home, E-sticker will not be set Home in the Menu. E-sticker can Turn Off E-sticker. Retail The Unit will Not Be Memorized after the Unit goes into Standby Mode. Home This setting is displayed on next page...

Owners Manual
Page 30
... displayed. Stop show Repeat Rotate Zoom Press 4 or OK to stop Playback and return to select USB, then press OK. ● The Highlighted Text will turn the picture clockwise by 90 degrees. Video Go to select the desired file, then press OK. Title:, Director:, Date: and Duration:. Picture Sound Setup Features...
... displayed. Stop show Repeat Rotate Zoom Press 4 or OK to stop Playback and return to select USB, then press OK. ● The Highlighted Text will turn the picture clockwise by 90 degrees. Video Go to select the desired file, then press OK. Title:, Director:, Date: and Duration:. Picture Sound Setup Features...

Owners Manual
Page 31
.../ DOS-formatted portable memory is completed, press B to set the Unit into Standby mode, then remove the USB Memory Stick and then press B again to Turn the Unit back On. ● The TV starts up with the Upgrade file to the USB Service Port on the clean formatted USB Memory Stick... select Software upgrade, then press OK. Start now 6 When the Software Upgrade is supported. ● Use only Software Upgrades that can be found on the SANYO website. 2 Press MENU and use H I to select Features, then press OK. 2 Use H I to select Upgrade, then press OK. 5 Read the On-screen instructions and ...
.../ DOS-formatted portable memory is completed, press B to set the Unit into Standby mode, then remove the USB Memory Stick and then press B again to Turn the Unit back On. ● The TV starts up with the Upgrade file to the USB Service Port on the clean formatted USB Memory Stick... select Software upgrade, then press OK. Start now 6 When the Software Upgrade is supported. ● Use only Software Upgrades that can be found on the SANYO website. 2 Press MENU and use H I to select Features, then press OK. 2 Use H I to select Upgrade, then press OK. 5 Read the On-screen instructions and ...

Owners Manual
Page 32
On this Unit, change the angle of the Device's infrared sensor or Turn Off the infrared communication function. Refer to Watching Channels from the Connected ● Check the Antenna, Cable or other Input Connection to Child and Ratings ... should I not watch some RF signal TV Programs? ● When Autoprogram is an obstacle between the infrared sensor window and the Remote Control. Why can I Turn ● Connect the RF Coaxial Cable directly to this Unit and run the Initial Setup. L p. 25 ● The Unit requires some channels will not be...
On this Unit, change the angle of the Device's infrared sensor or Turn Off the infrared communication function. Refer to Watching Channels from the Connected ● Check the Antenna, Cable or other Input Connection to Child and Ratings ... should I not watch some RF signal TV Programs? ● When Autoprogram is an obstacle between the infrared sensor window and the Remote Control. Why can I Turn ● Connect the RF Coaxial Cable directly to this Unit and run the Initial Setup. L p. 25 ● The Unit requires some channels will not be...

Owners Manual
Page 33
.... ● The Closed Captions Decoder cannot read the information of the Universal Remote Control for about 1 minute, then Plug the AC Power Cord and turn On the Unit again. ● Check whether the Connection of blue, green or red. L p. 29 (Otherwise, the settings you adjusted it. ...Closed Captions are depressed and move freely. Refer to Antenna Confirmation L p. 23. ● Unplug the AC Power Cord and wait for the SANYO code. The problem might be getting interference from the last time you are not the same (memorized) every time the Unit is Not available,...
.... ● The Closed Captions Decoder cannot read the information of the Universal Remote Control for about 1 minute, then Plug the AC Power Cord and turn On the Unit again. ● Check whether the Connection of blue, green or red. L p. 29 (Otherwise, the settings you adjusted it. ...Closed Captions are depressed and move freely. Refer to Antenna Confirmation L p. 23. ● Unplug the AC Power Cord and wait for the SANYO code. The problem might be getting interference from the last time you are not the same (memorized) every time the Unit is Not available,...


