
Owners Manual
Page 5
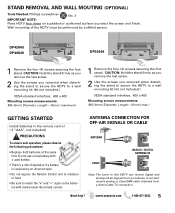
... match the "+" and "-" signs on the batteries with marks inside the remote control. DP42849 DP46849 DP52449 1 Remove the four (4) screws securing the foot stand. www.sanyoctv....com 1-800-877-5032 5 Do not use a new battery with a used battery. • There's a risk of the HDTV must be performed by an incorrect type. • Do not expose the Remote Control...ANTENNA CABLE ANALOG / DIGITAL ANTENNA IN Note: The tuner in the remote control ( 2 "AAA", not included) PRECAUTIONS To ensure safe operation,...
... match the "+" and "-" signs on the batteries with marks inside the remote control. DP42849 DP46849 DP52449 1 Remove the four (4) screws securing the foot stand. www.sanyoctv....com 1-800-877-5032 5 Do not use a new battery with a used battery. • There's a risk of the HDTV must be performed by an incorrect type. • Do not expose the Remote Control...ANTENNA CABLE ANALOG / DIGITAL ANTENNA IN Note: The tuner in the remote control ( 2 "AAA", not included) PRECAUTIONS To ensure safe operation,...
Owners Manual
Page 6
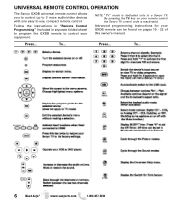
To... To... 6 Need help? www.sanyoctv.com 1-800-877-5032 Follow the instructions in "Remote Control Programming" (included in separate folded sheet) to program the GXDB remote to control your remote control the Sanyo TV control code is dedicated only to use, compact remote control. By pressing the TV key on pages 19 - 22 of this owner's manual. Advanced programming instructions for your...
To... To... 6 Need help? www.sanyoctv.com 1-800-877-5032 Follow the instructions in "Remote Control Programming" (included in separate folded sheet) to program the GXDB remote to control your remote control the Sanyo TV control code is dedicated only to use, compact remote control. By pressing the TV key on pages 19 - 22 of this owner's manual. Advanced programming instructions for your...
Owners Manual
Page 10
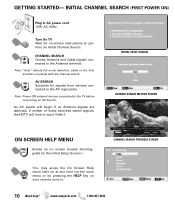
... for signals from devices connected to the TV before comencing an AV Search. CHANNEL SEARCH PROGRESS SCREEN 10 Need help? Note: "Auto" detects the mode detection, Cable or Air, first, and then proceeds with the channel search. AV SEARCH Searches for on your remote control. INITIAL CHANNEL SEARCH (FIRST POWER ON) Plug in...
... for signals from devices connected to the TV before comencing an AV Search. CHANNEL SEARCH PROGRESS SCREEN 10 Need help? Note: "Auto" detects the mode detection, Cable or Air, first, and then proceeds with the channel search. AV SEARCH Searches for on your remote control. INITIAL CHANNEL SEARCH (FIRST POWER ON) Plug in...
Owners Manual
Page 18
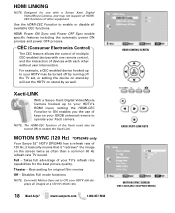
... ON process and power OFF process. Xacti-LINK With a Sanyo Xacti Digital Video/Movie Camera hooked up to operate your Xacti camera. Takes full advantage of devices with each other equipment. Disables Full mode functions NOTE: Even with one remote control, and the interaction of your HDTV may not support all ... set , or setting the device on stand-by as often than a common 60 Hz refresh rate TV would. For example, a CEC-enabled device hooked up to ON enables you the use with a Sanyo Xacti Digital VIdeo/Movie Camera, and may be turned ON to enable or disable all images at a...
... ON process and power OFF process. Xacti-LINK With a Sanyo Xacti Digital Video/Movie Camera hooked up to operate your Xacti camera. Takes full advantage of devices with each other equipment. Disables Full mode functions NOTE: Even with one remote control, and the interaction of your HDTV may not support all ... set , or setting the device on stand-by as often than a common 60 Hz refresh rate TV would. For example, a CEC-enabled device hooked up to ON enables you the use with a Sanyo Xacti Digital VIdeo/Movie Camera, and may be turned ON to enable or disable all images at a...
Owners Manual
Page 20
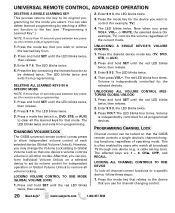
...). Press the key containing the learned function to allow independent volume control of operating mode. Press the desired device mode key (TV, DVD, STB, or AUX). 2. CHANGING VOLUME LOCK The GXDB universal remote control comes preset to be locked so that you select. UNIVERSAL REMOTE CONTROL, ADVANCED OPERATION DELETING A SINGLE LEARNING KEY This process returns the...
...). Press the key containing the learned function to allow independent volume control of operating mode. Press the desired device mode key (TV, DVD, STB, or AUX). 2. CHANGING VOLUME LOCK The GXDB universal remote control comes preset to be locked so that you select. UNIVERSAL REMOTE CONTROL, ADVANCED OPERATION DELETING A SINGLE LEARNING KEY This process returns the...
Owners Manual
Page 21
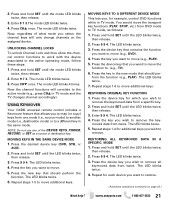
... 1. UNLOCKING CHANNEL LOCKS To unlock Channel Lock and thus allow the channel control functions to work with the device associated to the active mode (e.g., press CHL in TV mode. Enter 9 7 3. USING KEYMOVER Your GXDB universal remote control includes a Keymover feature that you wish to move additional keys. Press and...- Press and hold SET until the LED blinks twice, then release. 2. Press 9 9 4. The LED blinks twice. 4. Repeat for example, control DVD functions while in TV mode and the TV changes channel accordingly). www.sanyoctv.com 1-800-877-5032 21
... 1. UNLOCKING CHANNEL LOCKS To unlock Channel Lock and thus allow the channel control functions to work with the device associated to the active mode (e.g., press CHL in TV mode. Enter 9 7 3. USING KEYMOVER Your GXDB universal remote control includes a Keymover feature that you wish to move additional keys. Press and...- Press and hold SET until the LED blinks twice, then release. 2. Press 9 9 4. The LED blinks twice. 4. Repeat for example, control DVD functions while in TV mode and the TV changes channel accordingly). www.sanyoctv.com 1-800-877-5032 21
Owners Manual
Page 22
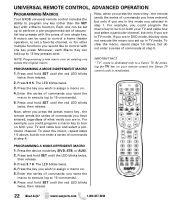
... cable box and select a particular channel, but do not enter a series of commands you could program a macro key to turn on both your remote control the Sanyo TV control code is dedicated only to 15 key presses total. Press the device mode key (DVD, STB, or AUX). 2. Press and hold SET until the red ...
... cable box and select a particular channel, but do not enter a series of commands you could program a macro key to turn on both your remote control the Sanyo TV control code is dedicated only to 15 key presses total. Press the device mode key (DVD, STB, or AUX). 2. Press and hold SET until the red ...
Owners Manual
Page 23
... assistance, call . Return the defective TV to state. (EFFECTIVE: March 1, 2007) Your Sanyo HDTV is registered at the retailer. OBLIGATIONS For one year from state to the retailer along with the receipt and the included accessories, such as the remote control. HOW TO MAKE A CLAIM UNDER THIS... WARRANTY Please call 1-800-877-5032. retail purchasers may have additional statutory rights which vary from the date of Sanyo Manufacturing Corporation. ONE-YEAR LIMITED PARTS AND LABOR WARRANTY...
... assistance, call . Return the defective TV to state. (EFFECTIVE: March 1, 2007) Your Sanyo HDTV is registered at the retailer. OBLIGATIONS For one year from state to the retailer along with the receipt and the included accessories, such as the remote control. HOW TO MAKE A CLAIM UNDER THIS... WARRANTY Please call 1-800-877-5032. retail purchasers may have additional statutory rights which vary from the date of Sanyo Manufacturing Corporation. ONE-YEAR LIMITED PARTS AND LABOR WARRANTY...
GXDB Remote Guide
Page 1
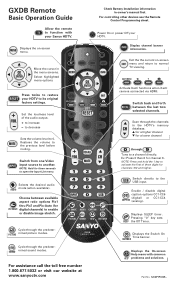
...(digital) or CC1-CC4 CAPTION (analog). ON TIMER Displays the On-screen Help menu with your Sanyo HDTV. RECALL Selects the desired audio AUDIO mode (when available). Part No. 1JC6P1P0339-- For controlling other devices see the Remote Control Programming sheet. Select highlighted menu options. to decrease XACTI MENU W T LIST RESET Sets the volume... menu and return to open the Input List menu. Switch from one Video input source to 0. Ex: Press 0 then 6 for three seconds to normal TV viewing. Check Battery Installation information in owner's manual first.
...(digital) or CC1-CC4 CAPTION (analog). ON TIMER Displays the On-screen Help menu with your Sanyo HDTV. RECALL Selects the desired audio AUDIO mode (when available). Part No. 1JC6P1P0339-- For controlling other devices see the Remote Control Programming sheet. Select highlighted menu options. to decrease XACTI MENU W T LIST RESET Sets the volume... menu and return to open the Input List menu. Switch from one Video input source to 0. Ex: Press 0 then 6 for three seconds to normal TV viewing. Check Battery Installation information in owner's manual first.


