Owners Manual
Page 2
......2 IMPORTANT SAFETY INSTRUCTIONS 3 FCC INFORMATION...5 PREPARATION FOR USE ...6 MAINTENANCE...6 BATTERY BACK-UP SYSTEM ...7 LOCATION OF CONTROLS & INDICATORS 9 REMOTE CONTROL ...11 OPERATING INSTRUCTIONS 12 CONNECTING EXTERNAL DEVICES 12 SETTING & BASIC OPERATION 13 RADIO OPERATION ...16 PRESETTING STATIONS IN THE TUNER MEMORY 18 SLEEP TIMER...20 ALARM SETTING ...21 iPod / iPhone OPERATION ...23 DOCK ADAPTOR COMPATIBILITY 25 iPod / iPhone OPERATION CONTROLS 26 TROUBLESHOOTING GUIDE...28 TECHNICAL SPECIFICATION 29 THE UNIT SUPPORTS THE LISTED iPods / iPhones 30 WARRANTY...31...
......2 IMPORTANT SAFETY INSTRUCTIONS 3 FCC INFORMATION...5 PREPARATION FOR USE ...6 MAINTENANCE...6 BATTERY BACK-UP SYSTEM ...7 LOCATION OF CONTROLS & INDICATORS 9 REMOTE CONTROL ...11 OPERATING INSTRUCTIONS 12 CONNECTING EXTERNAL DEVICES 12 SETTING & BASIC OPERATION 13 RADIO OPERATION ...16 PRESETTING STATIONS IN THE TUNER MEMORY 18 SLEEP TIMER...20 ALARM SETTING ...21 iPod / iPhone OPERATION ...23 DOCK ADAPTOR COMPATIBILITY 25 iPod / iPhone OPERATION CONTROLS 26 TROUBLESHOOTING GUIDE...28 TECHNICAL SPECIFICATION 29 THE UNIT SUPPORTS THE LISTED iPods / iPhones 30 WARRANTY...31...

Owners Manual
Page 3
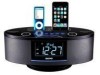
This digital music system comes with dual docks for choosing SANYO. INTRODUCTION Thank-you for playing and charging iPhone/iPod, an AM/FM stereo digital tuner with 40 presets, dual alarm clock function with wake to iPhone/iPod/radio/buzzer, jumbo backlit LCD display with six level dimmer control, two 2.5" speaker drivers, rear passive subwoofer, 10W system power and a full function remote control. 2
This digital music system comes with dual docks for choosing SANYO. INTRODUCTION Thank-you for playing and charging iPhone/iPod, an AM/FM stereo digital tuner with 40 presets, dual alarm clock function with wake to iPhone/iPod/radio/buzzer, jumbo backlit LCD display with six level dimmer control, two 2.5" speaker drivers, rear passive subwoofer, 10W system power and a full function remote control. 2

Owners Manual
Page 4
....) Keep the player clean and never store it out of data. 15.) Care required with dry cloth only. 9.) Disconnect the unit from tip-over. 5.) Use replacement parts as specified by the manufacturer. 6.) Do not install this unit in an extremely dry environment, as newspapers, table-cloths, curtains, etc. Keep it next to the product and loss of direct sunlight...
....) Keep the player clean and never store it out of data. 15.) Care required with dry cloth only. 9.) Disconnect the unit from tip-over. 5.) Use replacement parts as specified by the manufacturer. 6.) Do not install this unit in an extremely dry environment, as newspapers, table-cloths, curtains, etc. Keep it next to the product and loss of direct sunlight...

Owners Manual
Page 5
.... Household use . Servicing: • This unit contains no user serviceable parts. Wash hands after handling. The wide blade or the third prong is provided for sufficient ventilation. 30.) To be completely disconnected the power input, the mains plug of apparatus shall be drawn to the environmental aspects or battery disposal. 28.) This product is not intended for replacement of this product, will...
.... Household use . Servicing: • This unit contains no user serviceable parts. Wash hands after handling. The wide blade or the third prong is provided for sufficient ventilation. 30.) To be completely disconnected the power input, the mains plug of apparatus shall be drawn to the environmental aspects or battery disposal. 28.) This product is not intended for replacement of this product, will...

Owners Manual
Page 6
... has been tested and found to comply with the instructions, may cause undesired operation. If this equipment does cause harmful interference to radio or television reception, which can radiate radio frequency energy and, if not installed and used in accordance with the limits for compliance could void the user's authority to provide reasonable protection against harmful interference in...
... has been tested and found to comply with the instructions, may cause undesired operation. If this equipment does cause harmful interference to radio or television reception, which can radiate radio frequency energy and, if not installed and used in accordance with the limits for compliance could void the user's authority to provide reasonable protection against harmful interference in...

Owners Manual
Page 8
... installed in the illustration to reset the unit when the power is interrupted, the time, alarm, and preset memory stations will be necessary to begin using the unit for maintain the time and alarm settings and the preset tuner memories. PULL small mylar insulation tab Replacing The Back Up Battery When it's time to replace the battery the Low Battery lcon ( ) will be lost. Insert battery Battery Compartment Remove the battery...
... installed in the illustration to reset the unit when the power is interrupted, the time, alarm, and preset memory stations will be necessary to begin using the unit for maintain the time and alarm settings and the preset tuner memories. PULL small mylar insulation tab Replacing The Back Up Battery When it's time to replace the battery the Low Battery lcon ( ) will be lost. Insert battery Battery Compartment Remove the battery...
Owners Manual
Page 10
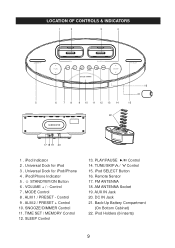
iPod Indicator 2 . Universal Dock for iPod/iPhone 4 . VOLUME + / - Control 9 . SNOOZE/DIMMER Control 11. TUNE/SKIP / Control 15. FM ANTENNA 18. PLAY/PAUSE / Control 14. iPod SELECT Button 16. LOCATION OF CONTROLS & INDICATORS 1 2 3 4 16 21 5 6 7 8 9 10 11 12 13 14 15 22 17 18 19 20 1 . MODE Control 8 . ALM 2 / PRESET + Control 10. TIME SET / MEMORY Control 12. Remote Sensor 17. iPod/iPhone Indicator 5 . SLEEP Control 13. DC IN Jack 21. iPod Holders (6 inserts) 9 AM ANTENNA Socket 19. AUX IN Jack 20. Back-Up Battery Compartment (On...
iPod Indicator 2 . Universal Dock for iPod/iPhone 4 . VOLUME + / - Control 9 . SNOOZE/DIMMER Control 11. TUNE/SKIP / Control 15. FM ANTENNA 18. PLAY/PAUSE / Control 14. iPod SELECT Button 16. LOCATION OF CONTROLS & INDICATORS 1 2 3 4 16 21 5 6 7 8 9 10 11 12 13 14 15 22 17 18 19 20 1 . MODE Control 8 . ALM 2 / PRESET + Control 10. TIME SET / MEMORY Control 12. Remote Sensor 17. iPod/iPhone Indicator 5 . SLEEP Control 13. DC IN Jack 21. iPod Holders (6 inserts) 9 AM ANTENNA Socket 19. AUX IN Jack 20. Back-Up Battery Compartment (On...
Owners Manual
Page 12
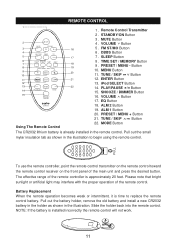
.... SNOOZE / DIMMER Button 16. MODE Button The CR2032 lithium battery is time to begin using the remote control. Battery Replacement When the remote operation becomes weak or intermittent, it is already installed in the remote control. STANDBY/ON Button 3 . DBBS Button 7 . SLEEP Button 8 . iPod SELECT Button 14. TUNE / SKIP Button 22. Slide the holder back into the remote control. MUTE Button 4 . FM ST/MO Button 6 . PRESET / MENU - ALM 1 Button 20. The effective range of the remote controller is installed incorrectly the remote control will not work...
.... SNOOZE / DIMMER Button 16. MODE Button The CR2032 lithium battery is time to begin using the remote control. Battery Replacement When the remote operation becomes weak or intermittent, it is already installed in the remote control. STANDBY/ON Button 3 . DBBS Button 7 . SLEEP Button 8 . iPod SELECT Button 14. TUNE / SKIP Button 22. Slide the holder back into the remote control. MUTE Button 4 . FM ST/MO Button 6 . PRESET / MENU - ALM 1 Button 20. The effective range of the remote controller is installed incorrectly the remote control will not work...
Owners Manual
Page 13
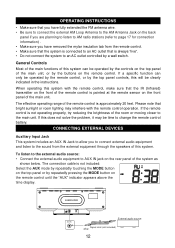
... by repeatedly pressing the MODE button on the remote control. General Controls Most of the main functions of the remote control is not included: Select the AUX mode by repeatedly touching the MODE button on the top panel or by the buttons on the remote control until the "AUX" indicator appears above the time display. External audio source plug Signal cord (not included) 12 If a specific function can be time to the main unit. The connection cable...
... by repeatedly pressing the MODE button on the remote control. General Controls Most of the main functions of the remote control is not included: Select the AUX mode by repeatedly touching the MODE button on the top panel or by the buttons on the remote control until the "AUX" indicator appears above the time display. External audio source plug Signal cord (not included) 12 If a specific function can be time to the main unit. The connection cable...
Owners Manual
Page 14
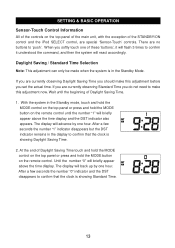
... number "0" indicator and the DST disappears to confirm that the clock is showing Daylight Saving Time. 2. Wait until the beginning of Daylight Saving Time touch and hold the MODE control on the top panel or press and hold the MODE button on the remote control until the number "1" will briefly appear above the time display and the DST indicator also appears. There are special 'Sensor-Touch' controls. SETTING & BASIC OPERATION Sensor-Touch Control...
... number "0" indicator and the DST disappears to confirm that the clock is showing Daylight Saving Time. 2. Wait until the beginning of Daylight Saving Time touch and hold the MODE control on the top panel or press and hold the MODE button on the remote control until the number "1" will briefly appear above the time display and the DST indicator also appears. There are special 'Sensor-Touch' controls. SETTING & BASIC OPERATION Sensor-Touch Control...
Owners Manual
Page 15
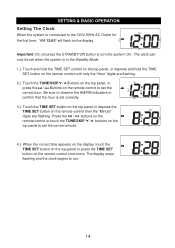
... Mode. 1.) Touch and hold the TIME SET control on the top panel, or depress and hold the TIME SET button on the display. The display stops flashing and the clock begins to the 120V 60Hz AC Outlet for the first time, "AM 12:00" will flash on the remote control until only the "Hour" digits are flashing. The clock can only be set when the system is set the correct hour. SETTING & BASIC OPERATION Setting The Clock...
... Mode. 1.) Touch and hold the TIME SET control on the top panel, or depress and hold the TIME SET button on the display. The display stops flashing and the clock begins to the 120V 60Hz AC Outlet for the first time, "AM 12:00" will flash on the remote control until only the "Hour" digits are flashing. The clock can only be set when the system is set the correct hour. SETTING & BASIC OPERATION Setting The Clock...
Owners Manual
Page 16
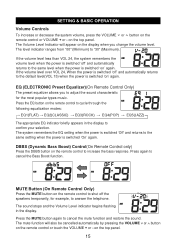
... Preset Equalizer)(On Remote Control Only) The preset equalizer allows you change the volume level. The system remembers the EQ setting when the power is switched 'on the display when you to adjust the sound characteristic for example, to answer the telephone. MUTE Button (On Remote Control Only) Press the MUTE button on the remote control or touch the VOLUME + or - The mute function will appear on ' again. The sound stops...
... Preset Equalizer)(On Remote Control Only) The preset equalizer allows you change the volume level. The system remembers the EQ setting when the power is switched 'on the display when you to adjust the sound characteristic for example, to answer the telephone. MUTE Button (On Remote Control Only) Press the MUTE button on the remote control or touch the VOLUME + or - The mute function will appear on ' again. The sound stops...
Owners Manual
Page 17
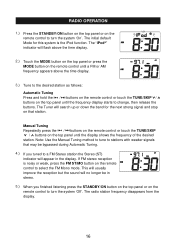
... be in the display. The "iPod®" indicator will search up or down the band for this system is noisy or weak, press the FM ST/MO button on the remote control to select the FM Mono mode. If FM stereo reception is the iPod function. The radio station frequency disappears from the display. 16 Note: Use the Manual Tuning method to tune to change, then release...
... be in the display. The "iPod®" indicator will search up or down the band for this system is noisy or weak, press the FM ST/MO button on the remote control to select the FM Mono mode. If FM stereo reception is the iPod function. The radio station frequency disappears from the display. 16 Note: Use the Manual Tuning method to tune to change, then release...
Owners Manual
Page 19
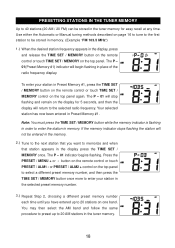
... any time. Use either the Automatic or Manual tuning methods described on the top panel again. The P - 01(Preset Memory #1) indicator will stop flashing and remain on the remote control or touch PRESET / ALM1 - Note: You must press the TIME SET / MEMORY button while the memory indicator is flashing in order to enter the station in place of the radio frequency display. To enter your station in the display...
... any time. Use either the Automatic or Manual tuning methods described on the top panel again. The P - 01(Preset Memory #1) indicator will stop flashing and remain on the remote control or touch PRESET / ALM1 - Note: You must press the TIME SET / MEMORY button while the memory indicator is flashing in order to enter the station in place of the radio frequency display. To enter your station in the display...

Owners Manual
Page 22
... adjusted. 7). The Hour digits stop flashing and the Minute digits begin flashing in the display. Press the or buttons on the remote control or touch the TUNE/SKIP or control on the top panel repeatedly to select the desired wake up Hour, AM or PM. 3). Note: if you selected the wake up to Buzzer alarm mode the volume level is in the standby mode, the default alarm time (AM6:00) and the default alarm mode (iPod...
... adjusted. 7). The Hour digits stop flashing and the Minute digits begin flashing in the display. Press the or buttons on the remote control or touch the TUNE/SKIP or control on the top panel repeatedly to select the desired wake up Hour, AM or PM. 3). Note: if you selected the wake up to Buzzer alarm mode the volume level is in the standby mode, the default alarm time (AM6:00) and the default alarm mode (iPod...

Owners Manual
Page 23
... press the SNOOZE / DIMMER button on the remote control. If you don't press SNOOZE / DIMMER button again, after one hour the alarm will turn 'On' again. At the selected wake-up time, the system will remain in the display during Snooze Timer operation." The SNOOZE indicator appears in the display indicating that you selected the wake to control the brightness of brightness that the alarm is in iPod or radio operation mode at any time. The display will turn 'On' again...
... press the SNOOZE / DIMMER button on the remote control. If you don't press SNOOZE / DIMMER button again, after one hour the alarm will turn 'On' again. At the selected wake-up time, the system will remain in the display during Snooze Timer operation." The SNOOZE indicator appears in the display indicating that you selected the wake to control the brightness of brightness that the alarm is in iPod or radio operation mode at any time. The display will turn 'On' again...
Owners Manual
Page 24
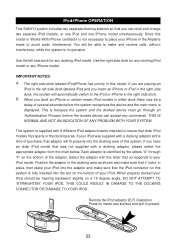
... iPod models in the Airplane mode to make and receive calls, without interference, while the system is displayed. Remote the iPod adaptor (E,F) illustration Press its inside rear surface and pull it 'locks' in place, then place your iPod was not supplied with a docking adaptor at the time of several seconds before the docked device can dock and charge two separate iPod models, or one iPod and one iPhone model...
... iPod models in the Airplane mode to make and receive calls, without interference, while the system is displayed. Remote the iPod adaptor (E,F) illustration Press its inside rear surface and pull it 'locks' in place, then place your iPod was not supplied with a docking adaptor at the time of several seconds before the docked device can dock and charge two separate iPod models, or one iPod and one iPhone model...
Owners Manual
Page 28
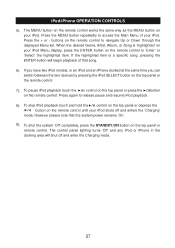
... your iPod Menu display, press the ENTER button on the remote control to access the Main Menu of that the system power remains 'On'. 9). The control panel lighting turns 'Off' and any iPod or iPhone in the docking area will begin playback of your iPod. When the desired Genre, Artist, Album, or Song is a specific song, pressing the ENTER button will shut off and enters the 'Charging' mode...
... your iPod Menu display, press the ENTER button on the remote control to access the Main Menu of that the system power remains 'On'. 9). The control panel lighting turns 'Off' and any iPod or iPhone in the docking area will begin playback of your iPod. When the desired Genre, Artist, Album, or Song is a specific song, pressing the ENTER button will shut off and enters the 'Charging' mode...
Owners Manual
Page 29
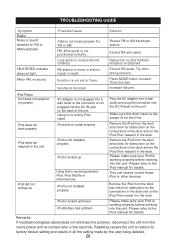
... strong stations. Resetting causes the unit to the iPod manual for details. Reposition so that the best reception is not set to the iPod manual for details. Increase Volume. iPod is not installed properly iPod is locked up /frozen iPod battery has problem Please make sure your iPod is the proper fit for FM or AM. Please make sure your iPod is not installed properly Remove the iPod from the dock and...
... strong stations. Resetting causes the unit to the iPod manual for details. Reposition so that the best reception is not set to the iPod manual for details. Increase Volume. iPod is not installed properly iPod is locked up /frozen iPod battery has problem Please make sure your iPod is the proper fit for FM or AM. Please make sure your iPod is not installed properly Remove the iPod from the dock and...
Owners Manual
Page 32
... 90 DAYS PARTS 90 DAYS For Product Purchased in Canada: Please visit ca.sanyo.com for up , installation, removal of the product for repair or reinstallation of Authorized Sanyo Service Centers may be delivered to and picked up from unauthorized service or parts, improper maintenance, operation contrary to furnished instructions, shipping or transit accidents, modifications or repair by the user, abuse, misuse, neglect, accident, incorrect power line voltage, fire...
... 90 DAYS PARTS 90 DAYS For Product Purchased in Canada: Please visit ca.sanyo.com for up , installation, removal of the product for repair or reinstallation of Authorized Sanyo Service Centers may be delivered to and picked up from unauthorized service or parts, improper maintenance, operation contrary to furnished instructions, shipping or transit accidents, modifications or repair by the user, abuse, misuse, neglect, accident, incorrect power line voltage, fire...


