

Quick Installation Guide
Page 1
..., but in the SanDisk SSD Conversion Kit. See www.sandisk.com/go-SSD 1 Upgrading your existing hard disk drive (HDD) to your SATA-based desktop or notebook computer HDD to most solid state drives; This guide provides quick instructions on how to upgrade your computer 2. SanDisk® Solid State Drive Quick-Start Installation Guide NOTE: This guide applies to a SanDisk SSD. check the instructions included with a solid state drive consists of the...
..., but in the SanDisk SSD Conversion Kit. See www.sandisk.com/go-SSD 1 Upgrading your existing hard disk drive (HDD) to your SATA-based desktop or notebook computer HDD to most solid state drives; This guide provides quick instructions on how to upgrade your computer 2. SanDisk® Solid State Drive Quick-Start Installation Guide NOTE: This guide applies to a SanDisk SSD. check the instructions included with a solid state drive consists of the...

Quick Installation Guide
Page 2
... SanDisk SSD to your computer in order to install it , now you're all other USB devices from your computer. 3. NOTE: SATA devices such as SSDs ...sandisk.com/wug. 2 STEP 1 Connecting Your SSD to Your Computer In the first step, you will void the SanDisk Manufacturer's warranty.** Now you're ready to your computer case before handling the SSD. • Do not disassemble the SSD in any way; SAFETY INSTRUCTIONS... set to clone your data! ** To review the warranty for the operating system to an available USB port on your SSD. • To minimize static electricity, touch your SanDisk SSD....
... SanDisk SSD to your computer in order to install it , now you're all other USB devices from your computer. 3. NOTE: SATA devices such as SSDs ...sandisk.com/wug. 2 STEP 1 Connecting Your SSD to Your Computer In the first step, you will void the SanDisk Manufacturer's warranty.** Now you're ready to your computer case before handling the SSD. • Do not disassemble the SSD in any way; SAFETY INSTRUCTIONS... set to clone your data! ** To review the warranty for the operating system to an available USB port on your SSD. • To minimize static electricity, touch your SanDisk SSD....

Quick Installation Guide
Page 3
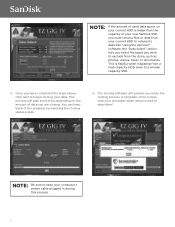
... Run your new SanDisk SSD. Let's get started: 1. STEP 2 Clone your data In the next step, you will clone the data from your existing HDD to your preferred data cloning software. (We are using Apricorn® EZ Gig IV with Data Select.) 2. Select your source drive. (This is ...usually your computer by the prefix "IDE".) 4. Next, select your destination drive. (This your SSD connected to your computer's internal drive and is the same for both desktop and notebook computers. This step is...
... Run your new SanDisk SSD. Let's get started: 1. STEP 2 Clone your data In the next step, you will clone the data from your existing HDD to your preferred data cloning software. (We are using Apricorn® EZ Gig IV with Data Select.) 2. Select your source drive. (This is ...usually your computer by the prefix "IDE".) 4. Next, select your destination drive. (This your SSD connected to your computer's internal drive and is the same for both desktop and notebook computers. This step is...
Quick Installation Guide
Page 4
...have completed the steps above, click next to exclude from the clone, such as photos, videos, music or documents. NOTE: Be sure to a smaller capacity SSD. 5. Once it does, shut your computer down and proceed to reduce its data size. This process will prompt you when the cloning process is complete.... NOTE: If the amount of used data space on the amount of data you must remove files or data from a high capacity HDD drive to keep track of the progress by watching the cloning status screen. 6. The cloning software will take some time depending on your current HDD is...
...have completed the steps above, click next to exclude from the clone, such as photos, videos, music or documents. NOTE: Be sure to a smaller capacity SSD. 5. Once it does, shut your computer down and proceed to reduce its data size. This process will prompt you when the cloning process is complete.... NOTE: If the amount of used data space on the amount of data you must remove files or data from a high capacity HDD drive to keep track of the progress by watching the cloning status screen. 6. The cloning software will take some time depending on your current HDD is...

Quick Installation Guide
Page 5
...installing your computer boots for instructions). 3. When your SSD in the same way as a backup drive. 5 Enjoy the speed of your HDD We're almost done! This process will swap your current HDD with the pins on your new SanDisk SSD. Align the connector pins on your SanDisk SSD... SSD Installation" section below. Replace the notebook computer's drive bay. 6. NOTE: You may see a screen indicating that the upgrade process is removed. 2. Open your notebook computer's drive bay (refer to your computer's manual for the first time, you are installing your new SanDisk SSD ...
...installing your computer boots for instructions). 3. When your SSD in the same way as a backup drive. 5 Enjoy the speed of your HDD We're almost done! This process will swap your current HDD with the pins on your new SanDisk SSD. Align the connector pins on your SanDisk SSD... SSD Installation" section below. Replace the notebook computer's drive bay. 6. NOTE: You may see a screen indicating that the upgrade process is removed. 2. Open your notebook computer's drive bay (refer to your computer's manual for the first time, you are installing your new SanDisk SSD ...

Quick Installation Guide
Page 6
... your mounting adapter. In most desktop computers, before installing your computer boots for instructions). 3. In order to keep your computer's drive bay and connect the SATA data cable and SATA power cable. 7. NOTE: You may see a screen indicating that the upgrade process is disconnected. 2. Next install your new SanDisk SSD into the 3.5-inch mounting adapter. When your...
... your mounting adapter. In most desktop computers, before installing your computer boots for instructions). 3. In order to keep your computer's drive bay and connect the SATA data cable and SATA power cable. 7. NOTE: You may see a screen indicating that the upgrade process is disconnected. 2. Next install your new SanDisk SSD into the 3.5-inch mounting adapter. When your...

Quick Installation Guide
Page 7
All other brand names mentioned are for identification purposes only and may be obtained at: www.sandisk.com/wug SanDisk is a trademark of their respective holder(s). ©2012 SanDisk Corporation. SUPPORT For more instructional installation videos and more information about SanDisk SSDs, go to: www.sandisk.com/go-SSD WARRANTY More information regarding the product warranty can be the trademarks of SanDisk Corporation, registered in the United States and other countries. All rights reserved. 08/12 7
All other brand names mentioned are for identification purposes only and may be obtained at: www.sandisk.com/wug SanDisk is a trademark of their respective holder(s). ©2012 SanDisk Corporation. SUPPORT For more instructional installation videos and more information about SanDisk SSDs, go to: www.sandisk.com/go-SSD WARRANTY More information regarding the product warranty can be the trademarks of SanDisk Corporation, registered in the United States and other countries. All rights reserved. 08/12 7