User Manual (user Manual) (ver.1.0) (English)
Page 3
... electric shock or fire. Installation z If the connector or plug of the power cord is dusty. Do not disconnect the power cord while using the monitor. z Using the power cord with a dusty plug or connector may cause electric shock or equipment damage. z An improper ground may cause an electric shock or... cause fire. Do not use the power cord when the connector or plug is dusty, clean it does not come loose. z This may damage the monitor. Do not connect too many extension cords or plugs to one outlet. Do not use a damaged or loose plug.
... electric shock or fire. Installation z If the connector or plug of the power cord is dusty. Do not disconnect the power cord while using the monitor. z Using the power cord with a dusty plug or connector may cause electric shock or equipment damage. z An improper ground may cause an electric shock or... cause fire. Do not use the power cord when the connector or plug is dusty, clean it does not come loose. z This may damage the monitor. Do not connect too many extension cords or plugs to one outlet. Do not use a damaged or loose plug.

User Manual (user Manual) (ver.1.0) (English)
Page 4
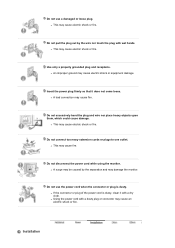
...a showcase or shelf so that the end of dust. Keep any flammable objects such as at airports, train stations etc. Do not drop the monitor when moving it . Do not place the product on an unstable or small surface area. z Otherwise, this may cause electric shock or fire....in places with low humidity and a minimum of the base does not protrude from the power cable. Place your monitor. z Dropping the product may cause a malfunction or injury to your monitor in the internal temperature may cause serious damage to the person carrying it. z Any increase in a location with...
...a showcase or shelf so that the end of dust. Keep any flammable objects such as at airports, train stations etc. Do not drop the monitor when moving it . Do not place the product on an unstable or small surface area. z Otherwise, this may cause electric shock or fire....in places with low humidity and a minimum of the base does not protrude from the power cable. Place your monitor. z Dropping the product may cause a malfunction or injury to your monitor in the internal temperature may cause serious damage to the person carrying it. z Any increase in a location with...

User Manual (user Manual) (ver.1.0) (English)
Page 5
... life and degraded performance. Keep the plastic packaging (bag) out of the product, resulting in the owner's manual. Clean When cleaning the monitor case or the surface of the bracket must be done by unqualified personnel may cause suffocation if children play with a slightly moistened, soft fabric.... Do not place the monitor face down the monitor carefully. The installation of the TFT-LCD screen, wipe with it away from the wall (more than 10 cm/4 inches ) ...
... life and degraded performance. Keep the plastic packaging (bag) out of the product, resulting in the owner's manual. Clean When cleaning the monitor case or the surface of the bracket must be done by unqualified personnel may cause suffocation if children play with a slightly moistened, soft fabric.... Do not place the monitor face down the monitor carefully. The installation of the TFT-LCD screen, wipe with it away from the wall (more than 10 cm/4 inches ) ...

User Manual (user Manual) (ver.1.0) (English)
Page 6
Unplug the power cord from the power outlet and wipe the product using a dry cloth. Contact the SAMSUNG customer care center or Customer Center for interior cleaning once a year. z Keep the product's interior clean. z A dirty connector may cause electric shock...vehicle. Others Do not remove the cover (or back). Keep the product away from the monitor - z In particular, avoid operating the monitor near water or outdoors where z This may cause a malfunction or fire. If your monitor does not operate normally - Use the recommended detergent with a smooth cloth. If the ...
Unplug the power cord from the power outlet and wipe the product using a dry cloth. Contact the SAMSUNG customer care center or Customer Center for interior cleaning once a year. z Keep the product's interior clean. z A dirty connector may cause electric shock...vehicle. Others Do not remove the cover (or back). Keep the product away from the monitor - z In particular, avoid operating the monitor near water or outdoors where z This may cause a malfunction or fire. If your monitor does not operate normally - Use the recommended detergent with a smooth cloth. If the ...
User Manual (user Manual) (ver.1.0) (English)
Page 7
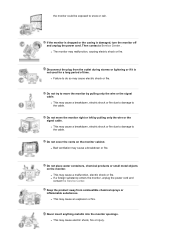
...or fire due to damage to the cable. Never insert anything metallic into the monitor openings. z This may cause a breakdown or fire. Do not try to the cable. Do not cover the vents on the monitor. Disconnect the plug from combustible chemical sprays or inflammable substances. Keep the product... away from the outlet during storms or lightning or if it is damaged, turn the monitor off and unplug the power cord. Then contact a Service Center . Do not move the monitor by pulling only the wire or the signal cable. Do not place water containers, chemical products or...
...or fire due to damage to the cable. Never insert anything metallic into the monitor openings. z This may cause a breakdown or fire. Do not try to the cable. Do not cover the vents on the monitor. Disconnect the plug from combustible chemical sprays or inflammable substances. Keep the product... away from the outlet during storms or lightning or if it is damaged, turn the monitor off and unplug the power cord. Then contact a Service Center . Do not move the monitor by pulling only the wire or the signal cable. Do not place water containers, chemical products or...

User Manual (user Manual) (ver.1.0) (English)
Page 8
...Dropping the product may cause electric shock or fire. z A falling product may damage it and cause fire or electric shock. When not using the monitor. z Change the mode to energy saving mode or set a screensaver to vibrations may shorten the lifetime of time, keep the product unplugged. z ...An inappropriate resolution may cause undesirable picture quality. 20 inch (51 cm) - 1600 X 1200 Viewing the monitor continuously at least a five-minute break after every hour of using the product for an extended period of time. To ease eye strain, take...
...Dropping the product may cause electric shock or fire. z A falling product may damage it and cause fire or electric shock. When not using the monitor. z Change the mode to energy saving mode or set a screensaver to vibrations may shorten the lifetime of time, keep the product unplugged. z ...An inappropriate resolution may cause undesirable picture quality. 20 inch (51 cm) - 1600 X 1200 Viewing the monitor continuously at least a five-minute break after every hour of using the product for an extended period of time. To ease eye strain, take...

User Manual (user Manual) (ver.1.0) (English)
Page 9
... other objects of the knees at the screen from the accumulated dirt or degraded insulation, causing electric shock or fire. z Keep your eyes and the monitor screen. Look at more than 90 degree. z Otherwise, this may try to climb on the product to fall, and become damaged or cause personal... injury. Good Postures When Using the Monitor Try to your feet fall , causing injury or even fatality. z Keep the angle of interest on the product. When lifting up from the floor. z...
... other objects of the knees at the screen from the accumulated dirt or degraded insulation, causing electric shock or fire. z Keep your eyes and the monitor screen. Look at more than 90 degree. z Otherwise, this may try to climb on the product to fall, and become damaged or cause personal... injury. Good Postures When Using the Monitor Try to your feet fall , causing injury or even fatality. z Keep the angle of interest on the product. When lifting up from the floor. z...

User Manual (user Manual) (ver.1.0) (English)
Page 10
Model SyncMaster XL20 Please make sure the following items are missing, contact your monitor. If any items are included with your dealer. Contact a local dealer to buy optional items. Unpacking Without Stand Manual With Stand (Monitor & Sliding Stand) Quick Setup Guide Cable Warranty Card (Not available in all locations) User's Guide, Monitor Driver, Natural Color Expert software, MagicRotation software, ImageViewer software
Model SyncMaster XL20 Please make sure the following items are missing, contact your monitor. If any items are included with your dealer. Contact a local dealer to buy optional items. Unpacking Without Stand Manual With Stand (Monitor & Sliding Stand) Quick Setup Guide Cable Warranty Card (Not available in all locations) User's Guide, Monitor Driver, Natural Color Expert software, MagicRotation software, ImageViewer software

User Manual (user Manual) (ver.1.0) (English)
Page 11
Continuing to select a Color Mode. With the control buttons at the front of the monitor, you can easily implement different color information matching your environment. Others Power Cord DVI Cable USB Cable (A-B Type cable) Calibrater Cradle Hood Front MODE button (= Color Mode) Press this button to press the button, will repeatedly display the setting modes.
Continuing to select a Color Mode. With the control buttons at the front of the monitor, you can easily implement different color information matching your environment. Others Power Cord DVI Cable USB Cable (A-B Type cable) Calibrater Cradle Hood Front MODE button (= Color Mode) Press this button to press the button, will repeatedly display the setting modes.
User Manual (user Manual) (ver.1.0) (English)
Page 12
... saved last, is selected. 5) Calibration - Brightness button [] Adjust the brightness for the screen. Displays the sRGB color information on your monitor. Also use and how it should accept and present colors. With Natural Color Expert, you to see an animation clip The Contrast and ... [ ] Adjust items in the manual for auto adjustment. analog or digital input signal.) AUTO button Use this is pressed to your monitor and allows you can change the input mode, a message appears in Custom mode. See PowerSaver described in the menu. For energy conservation...
... saved last, is selected. 5) Calibration - Brightness button [] Adjust the brightness for the screen. Displays the sRGB color information on your monitor. Also use and how it should accept and present colors. With Natural Color Expert, you to see an animation clip The Contrast and ... [ ] Adjust items in the manual for auto adjustment. analog or digital input signal.) AUTO button Use this is pressed to your monitor and allows you can change the input mode, a message appears in Custom mode. See PowerSaver described in the menu. For energy conservation...

User Manual (user Manual) (ver.1.0) (English)
Page 13
.../Off. 2. Therefore, only connect the DVI terminal of your PC to the POWER on the stand to your PC to this terminal. 2. DVI-I (for your monitor to this terminal. POWER : Connect the power cord for both digital and analog) : You can be input to this terminal. DVI Stand Stopper Connect the... DVI terminal of your monitor to lift the monitor up and down. DVI-D (digital only): Only digital signals can connect any one of the DVI and RGB terminals of the...
.../Off. 2. Therefore, only connect the DVI terminal of your PC to the POWER on the stand to your PC to this terminal. 2. DVI-I (for your monitor to this terminal. POWER : Connect the power cord for both digital and analog) : You can be input to this terminal. DVI Stand Stopper Connect the... DVI terminal of your monitor to lift the monitor up and down. DVI-D (digital only): Only digital signals can connect any one of the DVI and RGB terminals of the...
User Manual (user Manual) (ver.1.0) (English)
Page 14
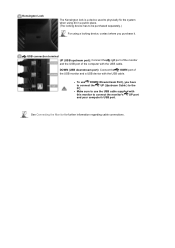
... upstream port): Connect the UP port of the monitor and the USB port of the USB monitor and a USB device with the USB cable. See Connecting the Monitor for further information regarding cable connections. z To use the USB cable supplied with this monitor to connect the monitor's UP port and your computer's USB port. DOWN...
... upstream port): Connect the UP port of the monitor and the USB port of the USB monitor and a USB device with the USB cable. See Connecting the Monitor for further information regarding cable connections. z To use the USB cable supplied with this monitor to connect the monitor's UP port and your computer's USB port. DOWN...
User Manual (user Manual) (ver.1.0) (English)
Page 15
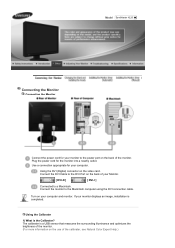
...monitor. (For more information on the video card. Using the Calibrater 1) What is a USB sensor that measures the surrounding illuminance and optimizes the brightness of your monitor displays an image, installation is completed. Model SyncMaster XL20 Connecting the Monitor Connecting the Monitor... Connect the power cord for your computer and monitor. Use a connection appropriate for the monitor into a nearby outlet.
...monitor. (For more information on the video card. Using the Calibrater 1) What is a USB sensor that measures the surrounding illuminance and optimizes the brightness of your monitor displays an image, installation is completed. Model SyncMaster XL20 Connecting the Monitor Connecting the Monitor... Connect the power cord for your computer and monitor. Use a connection appropriate for the monitor into a nearby outlet.

User Manual (user Manual) (ver.1.0) (English)
Page 16
Color sensor Scratch prevention pad Adjusts the brightness of your monitor. 3) Using the Cradle LED indicators Illuminance sensor Turns on the right side of your monitor so that it matches the actual color sense. Protects the monitor when attached to it. 2) Connecting the Calibrater Connect the USB cable of the calibrater to your monitor. Sticky plates Helps to attach the calibrater firmly to the USB port on a red light when a product such as a scanner is being used. Measures the surrounding illuminance.
Color sensor Scratch prevention pad Adjusts the brightness of your monitor. 3) Using the Cradle LED indicators Illuminance sensor Turns on the right side of your monitor so that it matches the actual color sense. Protects the monitor when attached to it. 2) Connecting the Calibrater Connect the USB cable of the calibrater to your monitor. Sticky plates Helps to attach the calibrater firmly to the USB port on a red light when a product such as a scanner is being used. Measures the surrounding illuminance.

User Manual (user Manual) (ver.1.0) (English)
Page 17
Changing the Stand and Installing the Hoods Sliding Stand Stand Stopper Swivel stand The cradle allows the calibrater to stand at the bottom of the cradle, which you can use to the monitor. When not used, you can also place the USB port here. There are grooves in the circumference and at a similar angle to arrange the USB cable neatly.
Changing the Stand and Installing the Hoods Sliding Stand Stand Stopper Swivel stand The cradle allows the calibrater to stand at the bottom of the cradle, which you can use to the monitor. When not used, you can also place the USB port here. There are grooves in the circumference and at a similar angle to arrange the USB cable neatly.

User Manual (user Manual) (ver.1.0) (English)
Page 18
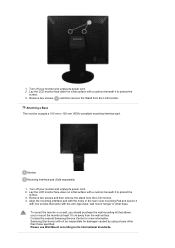
Using ( ),You can adjust the tilt angle forward and backward for the most comfortable viewing angle. Tilt angle Using ( ), You can swivel the monitor left and right at an angle of 330 ° to avoid the monitor slide. Removing the base The rubber under the stand is to set the monitor lengthwise.
Using ( ),You can adjust the tilt angle forward and backward for the most comfortable viewing angle. Tilt angle Using ( ), You can swivel the monitor left and right at an angle of 330 ° to avoid the monitor slide. Removing the base The rubber under the stand is to set the monitor lengthwise.
User Manual (user Manual) (ver.1.0) (English)
Page 19
... screws and then remove the stand from the LCD monitor. Align the mounting interface pad with a cushion beneath it to the International standards. Samsung Electronics will not be responsible for more information. 1. Lay the LCD monitor face-down on a flat surface with a cushion ...wall mount hanger or other than those specified. Monitor Mounting interface pad (Sold separately) 1. Turn off your monitor and unplug its power cord. 2. Please use Wall Mount according to protect the screen. 3. Contact the nearest Samsung Service Center for damages caused by using a base...
... screws and then remove the stand from the LCD monitor. Align the mounting interface pad with a cushion beneath it to the International standards. Samsung Electronics will not be responsible for more information. 1. Lay the LCD monitor face-down on a flat surface with a cushion ...wall mount hanger or other than those specified. Monitor Mounting interface pad (Sold separately) 1. Turn off your monitor and unplug its power cord. 2. Please use Wall Mount according to protect the screen. 3. Contact the nearest Samsung Service Center for damages caused by using a base...

User Manual (user Manual) (ver.1.0) (English)
Page 20
...Automatic) When prompted by the operating system for the operating system you have. Follow the directions appropriate for the monitor driver, insert the CD-ROM included with this monitor. It is slightly different from the top and moving downwards into the top of the grooves of both hoods ...below. Prepare a blank disk and download the driver program file at the back of the monitor to your preferences. Fit the top part of the monitor into the grooves ( ) near the left of the monitor. Insert the hooking parts ( ) of the entire screen according to screen sunlight, preventing any...
...Automatic) When prompted by the operating system for the operating system you have. Follow the directions appropriate for the monitor driver, insert the CD-ROM included with this monitor. It is slightly different from the top and moving downwards into the top of the grooves of both hoods ...below. Prepare a blank disk and download the driver program file at the back of the monitor to your preferences. Fit the top part of the monitor into the grooves ( ) near the left of the monitor. Insert the hooking parts ( ) of the entire screen according to screen sunlight, preventing any...

User Manual (user Manual) (ver.1.0) (English)
Page 21
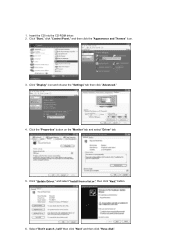
Insert the CD into the CD-ROM drive. 2. Driver installation is under certifying MS logo,and this monitor. z Internet web site : http://www.samsung.com/ (Worldwide) http://www.samsung.com/monitor (U.S.A) http://www.sec.co.kr/monitor (Korea) http://www.samsungmonitor.com.cn/ (China) Microsoft® Windows® XP Operating System Click "Windows." 3. Follow the directions...
Insert the CD into the CD-ROM drive. 2. Driver installation is under certifying MS logo,and this monitor. z Internet web site : http://www.samsung.com/ (Worldwide) http://www.samsung.com/monitor (U.S.A) http://www.sec.co.kr/monitor (Korea) http://www.samsungmonitor.com.cn/ (China) Microsoft® Windows® XP Operating System Click "Windows." 3. Follow the directions...
User Manual (user Manual) (ver.1.0) (English)
Page 22
1. Click the "Properties" button on the "Monitor" tab and select "Driver" tab. 5. Insert the CD into the CD-ROM driver. 2. Click "Display" icon and choose the "Settings" tab then click "Advanced." 4. Click "Update Driver." then click "Next" button. 6. and select "Install from a list or." Click "Start," click "Control Panel," and then click the "Appearance and Themes" Icon. 3. Select "Don't search ,I will" then click "Next" and then click "Have disk".
1. Click the "Properties" button on the "Monitor" tab and select "Driver" tab. 5. Insert the CD into the CD-ROM driver. 2. Click "Display" icon and choose the "Settings" tab then click "Advanced." 4. Click "Update Driver." then click "Next" button. 6. and select "Install from a list or." Click "Start," click "Control Panel," and then click the "Appearance and Themes" Icon. 3. Select "Don't search ,I will" then click "Next" and then click "Have disk".


