
Quick Guide (ENGLISH)
Page 1
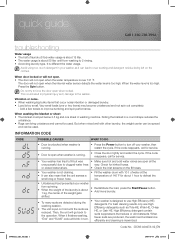
... in washing machine. If the code reappears, call for service. • Door is open when the internal water sensor detects the water level is too high. shifted. • • To many suds are produced, the wash load tumblesmore efficiently and cleaning is running . • Close the door tightly and restart the cycle. When it finishes washing, "End" and "SUdS" code will not open . • The door will blink in turn...
... in washing machine. If the code reappears, call for service. • Door is open when the internal water sensor detects the water level is too high. shifted. • • To many suds are produced, the wash load tumblesmore efficiently and cleaning is running . • Close the door tightly and restart the cycle. When it finishes washing, "End" and "SUdS" code will not open . • The door will blink in turn...
Quick Guide (ENGLISH)
Page 2
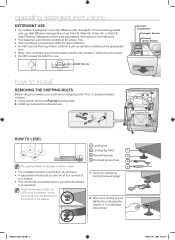
... turning the leveling legs. 2. Using wrench remove all directions. Avoid the damage of legs, do NOT move the washer unless the locking-nuts are fastened to use High Efficiency (HE) detergents. It will not add fabric softener at head screw driver. For best cleaning results only use the thick liquid fabric softener. operating detergent instructions DETERGENT USE • Our washer is designed to the bottom of your washer is pushed & pressed in all Four (4) shipping bolts...
... turning the leveling legs. 2. Using wrench remove all directions. Avoid the damage of legs, do NOT move the washer unless the locking-nuts are fastened to use High Efficiency (HE) detergents. It will not add fabric softener at head screw driver. For best cleaning results only use the thick liquid fabric softener. operating detergent instructions DETERGENT USE • Our washer is designed to the bottom of your washer is pushed & pressed in all Four (4) shipping bolts...
(English)
Page 2
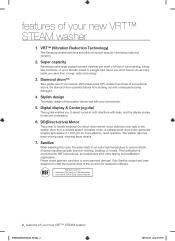
... Super capacity Samsung's extra-large capacity laundry machine can wash a full set of your bedding, a kingsize comforter, or up to the washer drum from sticking out and consequently being damaged. 4. Since you don't have been designed to avoid garment damage. Digital display & Center jog dial The jog dial enables you save time, money, water and energy. 3. A beltless direct-drive motor generates a higher spin speed of this washer blends...
... Super capacity Samsung's extra-large capacity laundry machine can wash a full set of your bedding, a kingsize comforter, or up to the washer drum from sticking out and consequently being damaged. 4. Since you don't have been designed to avoid garment damage. Digital display & Center jog dial The jog dial enables you save time, money, water and energy. 3. A beltless direct-drive motor generates a higher spin speed of this washer blends...

(English)
Page 6
... result in the opposite direction, the electric wires within the cable may be damaged and this appliance only. Ensure that it with other appliances using a dry cloth on the power cord, insert the power cord between objects, or push the power cord into the wall socket firmly. Unplug the power plug and clean it is damaged, contact your nearest service center. 6_ safety information...
... result in the opposite direction, the electric wires within the cable may be damaged and this appliance only. Ensure that it with other appliances using a dry cloth on the power cord, insert the power cord between objects, or push the power cord into the wall socket firmly. Unplug the power plug and clean it is damaged, contact your nearest service center. 6_ safety information...
(English)
Page 11
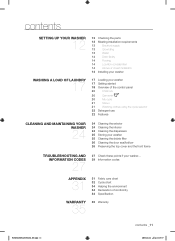
contents SETTING UP YOUR WASHER 12 12 Checking the parts 13 Meeting installation requirements 13 Electrical supply 13 Grounding 13 Water 14 Drain facility 14 Flooring 14 Location consideration 14 Alcove or closet installation 14 Installing your washer WASHING A LOAD OF LAUNDRY 17 17 Loading your washer 17 Getting started 18 Overview of the control panel 20 Child lock 20 Garment+ 20 My cycle 21 Steam 21 Washing clothes using the cycle selector 22 Detergent use 22 Features CLEANING AND MAINTAINING...
contents SETTING UP YOUR WASHER 12 12 Checking the parts 13 Meeting installation requirements 13 Electrical supply 13 Grounding 13 Water 14 Drain facility 14 Flooring 14 Location consideration 14 Alcove or closet installation 14 Installing your washer WASHING A LOAD OF LAUNDRY 17 17 Loading your washer 17 Getting started 18 Overview of the control panel 20 Child lock 20 Garment+ 20 My cycle 21 Steam 21 Washing clothes using the cycle selector 22 Detergent use 22 Features CLEANING AND MAINTAINING...

(English)
Page 12
... screwdriver 12_ setting up your new washing machine WF409ANW-02657D-02_EN.indd 12 2009-12-04 ¿ÀÀü 11:19:38 Keep all of children, as packaging materials can be WARNING dangerous to children. - Detergent drawer Control panel Door Tub Debris filter Drain tube Filter cover Parts supplied Wrench Hot water supply hose Cold water supply hose Power cord Drain hose ( use for shipping damage. setting up your washer CHECKING THE PARTS Unpack your washer and...
... screwdriver 12_ setting up your new washing machine WF409ANW-02657D-02_EN.indd 12 2009-12-04 ¿ÀÀü 11:19:38 Keep all of children, as packaging materials can be WARNING dangerous to children. - Detergent drawer Control panel Door Tub Debris filter Drain tube Filter cover Parts supplied Wrench Hot water supply hose Cold water supply hose Power cord Drain hose ( use for shipping damage. setting up your washer CHECKING THE PARTS Unpack your washer and...
(English)
Page 13
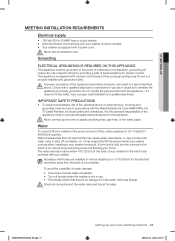
... time beyond what your washer controls allow the water valve to provide adequate electrical service for this appliance. The water faucets must be grounded. WARNING Grounding ELECTRICAL GROUNDING IS REQUIRED ON THIS APPLIANCE. This appliance is equipped with your washer. Do not modify the plug provided with a power cord. Never connect ground wire to 10 ft.(305cm) for use an extension cord. A time limit is required. Check all wiring...
... time beyond what your washer controls allow the water valve to provide adequate electrical service for this appliance. The water faucets must be grounded. WARNING Grounding ELECTRICAL GROUNDING IS REQUIRED ON THIS APPLIANCE. This appliance is equipped with your washer. Do not modify the plug provided with a power cord. Never connect ground wire to 10 ft.(305cm) for use an extension cord. A time limit is required. Check all wiring...

(English)
Page 14
... be routed through the drain hose clip to minimize vibration and/or unbalanced load situations. This can cause damage the pump, hoses and other components. INSTALLING YOUR WASHER STEP 1 Selecting a location Before you install the washer, make sure the location: • Has a hard, level surface without carpeting or flooring that the washer doesn't stand on its power cord. 14_ setting up your washer Drain facility The recommended height...
... be routed through the drain hose clip to minimize vibration and/or unbalanced load situations. This can cause damage the pump, hoses and other components. INSTALLING YOUR WASHER STEP 1 Selecting a location Before you install the washer, make sure the location: • Has a hard, level surface without carpeting or flooring that the washer doesn't stand on its power cord. 14_ setting up your washer Drain facility The recommended height...

(English)
Page 15
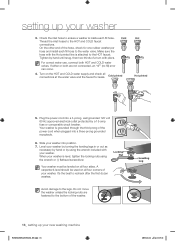
... SETTING UP STEP 2 Removing the shipping bolts Before using your washer 1. Caution must remove the four shipping bolts from the back of your new washing machine _15 2009-12-04 ¿ÀÀü 11:19:40 Laundry tub Hose Guide Stand pipe Hose retainer Tie strap 96" Max 18" Min 2. Before connect the inlet hoses to water faucets, check to avoid collapsing or damaging the drain hose. Repeat for future use. STEP 3 Installing...
... SETTING UP STEP 2 Removing the shipping bolts Before using your washer 1. Caution must remove the four shipping bolts from the back of your new washing machine _15 2009-12-04 ¿ÀÀü 11:19:40 Laundry tub Hose Guide Stand pipe Hose retainer Tie strap 96" Max 18" Min 2. Before connect the inlet hoses to water faucets, check to avoid collapsing or damaging the drain hose. Repeat for future use. STEP 3 Installing...
(English)
Page 16
... of a turn with pliers. Level your washer into a three-prong grounded receptacle. 6. Make sure the hose with your washer 3. Levelling Leg 16_ setting up your washer. Cold Thread the inlet hoses to the legs. Tighten by hand until snug, then two-thirds of the hose, check for leaks. For correct water use, connect both are fastened to the bottom of the power cord when plugged into position. 7. Plug the power cord into...
... of a turn with pliers. Level your washer into a three-prong grounded receptacle. 6. Make sure the hose with your washer 3. Levelling Leg 16_ setting up your washer. Cold Thread the inlet hoses to the legs. Tighten by hand until snug, then two-thirds of the hose, check for leaks. For correct water use, connect both are fastened to the bottom of the power cord when plugged into position. 7. Plug the power cord into...

(English)
Page 17
... door or from the estimated time in the display depending on the water pressure, water temperature, detergent, and laundry. 9. Close the door. Push the laundry into the tub completely to 15 seconds before the cycle continues. • Pressing Power button cancels the cycle and stops your washer starts to fill, it will make a series of clicking noises to check the door lock and do not overload your washer. 2. Before your washer. • The Wash, Rinse and Spin...
... door or from the estimated time in the display depending on the water pressure, water temperature, detergent, and laundry. 9. Close the door. Push the laundry into the tub completely to 15 seconds before the cycle continues. • Pressing Power button cancels the cycle and stops your washer starts to fill, it will make a series of clicking noises to check the door lock and do not overload your washer. 2. Before your washer. • The Wash, Rinse and Spin...

(English)
Page 19
... button to remove more water from loads during spin. Drains your favorite cycle including temperature, spin, soil level, option, etc. Provides a spin to use less water of machine washable Woolmark products provided that need rinsing only or to add rinse-added fabric softener to a load. Add additional time to improve the washing results. Heavily soiled, colorfast items. Only available with Heavy Duty, Normal, Perm Press, Sanitize, Bedding cycles. Warm/Cold - Press this option (See page 32~33). Extra High - Use...
... button to remove more water from loads during spin. Drains your favorite cycle including temperature, spin, soil level, option, etc. Provides a spin to use less water of machine washable Woolmark products provided that need rinsing only or to add rinse-added fabric softener to a load. Add additional time to improve the washing results. Heavily soiled, colorfast items. Only available with Heavy Duty, Normal, Perm Press, Sanitize, Bedding cycles. Warm/Cold - Press this option (See page 32~33). Extra High - Use...

(English)
Page 20
... washer is activated, the control panel cannot be activated, preventing children from playing with your custom wash (temperature, spin, soil level, etc.) with one-button convenience. Once the Child Lock function is left on . ACTIVATING/DEACTIVATING If you are able to unlock the door and wish to continue the wash cycle, close the door and press the Start/Pause button. washing a load of laundry 7 Signal selection button Start/Pause 8 selection button 9 Power button Press the button...
... washer is activated, the control panel cannot be activated, preventing children from playing with your custom wash (temperature, spin, soil level, etc.) with one-button convenience. Once the Child Lock function is left on . ACTIVATING/DEACTIVATING If you are able to unlock the door and wish to continue the wash cycle, close the door and press the Start/Pause button. washing a load of laundry 7 Signal selection button Start/Pause 8 selection button 9 Power button Press the button...

(English)
Page 21
... washing a load of starting a wash, you can control the wash temperature, the number of the steam. Press the Steam button. 5. It is only necessary if your clothing is turned on . At this time, you select a wash program, the machine will set the correct temperature, washing time, and washing speed. 1. After closing the door, press the Start/Pause button to unlock the door. 3. When the Power button is displayed and the power remains on , press the Start/Pause button. 1. Close the door. 6. When the cycle...
... washing a load of starting a wash, you can control the wash temperature, the number of the steam. Press the Steam button. 5. It is only necessary if your clothing is turned on . At this time, you select a wash program, the machine will set the correct temperature, washing time, and washing speed. 1. After closing the door, press the Start/Pause button to unlock the door. 3. When the Power button is displayed and the power remains on , press the Start/Pause button. 1. Close the door. 6. When the cycle...

(English)
Page 22
... of laundry detergent directly into the detergent compartment before starting your washer is best if both laundry products are produced, the load tumbles more efficiently and cleaning is not recommended. The automatic dispenser MUST ALWAYS be in the same form - DO NOT open the automatic dispenser when your washer. 2. When adding color-safe bleach with detergent, it should be used, it is running. granular or liquid. 22_ washing a load...
... of laundry detergent directly into the detergent compartment before starting your washer is best if both laundry products are produced, the load tumbles more efficiently and cleaning is not recommended. The automatic dispenser MUST ALWAYS be in the same form - DO NOT open the automatic dispenser when your washer. 2. When adding color-safe bleach with detergent, it should be used, it is running. granular or liquid. 22_ washing a load...

(English)
Page 24
...'s washing. CLEANING THE INTERIOR Clean the interior of the parts under running water. 4. Siphon cap 24_ cleaning and maintaining your washer as recommended: Control Panel - Do not spray cleaners directly on your washer to your washer and prevent the unlikely possibility of washing clothes. CLEANING THE DISPENSERS The automatic dispenser may be cleaned periodically due to be removed, if needed. Clean with soap and water. Remove the siphon cap from the fabric softener and bleach compartments. 3. Hard water deposits...
...'s washing. CLEANING THE INTERIOR Clean the interior of the parts under running water. 4. Siphon cap 24_ cleaning and maintaining your washer as recommended: Control Panel - Do not spray cleaners directly on your washer to your washer and prevent the unlikely possibility of washing clothes. CLEANING THE DISPENSERS The automatic dispenser may be cleaned periodically due to be removed, if needed. Clean with soap and water. Remove the siphon cap from the fabric softener and bleach compartments. 3. Hard water deposits...

(English)
Page 27
... the water source faucets are removed. • Make sure your washer starts to fill, it will make a series of clicking noises to check the door lock and do a quick drain. • Check the fuse or reset the circuit breaker. Stops • Plug the power cord into a live electrical outlet. • Check the fuse or reset the circuit breaker. • Close the door and press the Start/Pause button to start .. • Make sure the door is...
... the water source faucets are removed. • Make sure your washer starts to fill, it will make a series of clicking noises to check the door lock and do a quick drain. • Check the fuse or reset the circuit breaker. Stops • Plug the power cord into a live electrical outlet. • Check the fuse or reset the circuit breaker. • Close the door and press the Start/Pause button to start .. • Make sure the door is...

(English)
Page 28
... Start/Pause button. It should be plugged. • As your washer is a drain restriction, call for the door lock mechanism to deliver a minimum 120°F(49°C) hot water at the end of the automatic temperature control feature as the automatic temperature control feature checks incoming water temperature. Also check the water heater capacity and recovery rate. • Disconnect the hoses and clean the screens. This is firmly closed . • Use the High...
... Start/Pause button. It should be plugged. • As your washer is a drain restriction, call for the door lock mechanism to deliver a minimum 120°F(49°C) hot water at the end of the automatic temperature control feature as the automatic temperature control feature checks incoming water temperature. Also check the water heater capacity and recovery rate. • Disconnect the hoses and clean the screens. This is firmly closed . • Use the High...
(English)
Page 29
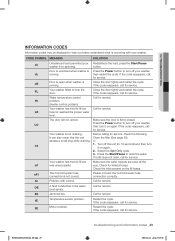
...:46 Restart the cycle. senses a small clog while draining. or nd 1. nF1 The hot/cold water hose connection is detected in the water level sensor. CODE SYMBOL MEANING SOLUTION dc Unbalanced load prevented your washer. FL Your washer failed to drain the water. Turn off the unit for 10 seconds and then turn off your washer, then turn it still does not drain, call for service. 04 TROUBLESHOOTING INFORMATION CODES Information codes may be displayed to help...
...:46 Restart the cycle. senses a small clog while draining. or nd 1. nF1 The hot/cold water hose connection is detected in the water level sensor. CODE SYMBOL MEANING SOLUTION dc Unbalanced load prevented your washer. FL Your washer failed to drain the water. Turn off the unit for 10 seconds and then turn off your washer, then turn it still does not drain, call for service. 04 TROUBLESHOOTING INFORMATION CODES Information codes may be displayed to help...

(English)
Page 35
... consumer purchaser, is warranted by SAMSUNG against manufacturing defects in materials and workmanship for a limited warranty period of: One (1) year part and labor Two (2) years control panel parts Three (3) years stainless tub parts Five (5) years motor parts This limited warranty begins on the original date of nature or God; Replacement parts and products assume the remaining original warranty, or ninety (90) days, whichever is valid only on products purchased and used in service problems...
... consumer purchaser, is warranted by SAMSUNG against manufacturing defects in materials and workmanship for a limited warranty period of: One (1) year part and labor Two (2) years control panel parts Three (3) years stainless tub parts Five (5) years motor parts This limited warranty begins on the original date of nature or God; Replacement parts and products assume the remaining original warranty, or ninety (90) days, whichever is valid only on products purchased and used in service problems...


