User Manual (ENGLISH)
Page 2
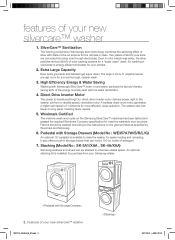
... motor. An optional stacking kit is available for a more effective, quiet operation. SilverCare™ Sanitization The winning combination! Two plates of detergent 7. The large 3.79 cu.ft. Even in cold water is available to raise the washer for machine washable wool products. A beltless direct-drive motor generates a higher spin speed of 1,300rpms for a "super clean" wash. Stacking (Model No : SK-3A1/XAA , SK-4A/XAA) Samsung washers and dryers can hold a 100 oz. Samsung...
... motor. An optional stacking kit is available for a more effective, quiet operation. SilverCare™ Sanitization The winning combination! Two plates of detergent 7. The large 3.79 cu.ft. Even in cold water is available to raise the washer for machine washable wool products. A beltless direct-drive motor generates a higher spin speed of 1,300rpms for a "super clean" wash. Stacking (Model No : SK-3A1/XAA , SK-4A/XAA) Samsung washers and dryers can hold a 100 oz. Samsung...
User Manual (ENGLISH)
Page 4
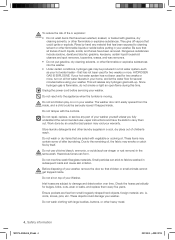
... understand the recommended user-repair instructions and have the skills to damage and deterioration over time. Do not let children play on top of your washer. These items may void your washer. Do not machine wash fiberglass materials. Inlet hoses are free from the WARNING inside, and a child could ignite or explode. Unplug the power cord before using your Washer. The washer door isn't easily opened from small...
... understand the recommended user-repair instructions and have the skills to damage and deterioration over time. Do not let children play on top of your washer. These items may void your washer. Do not machine wash fiberglass materials. Inlet hoses are free from the WARNING inside, and a child could ignite or explode. Unplug the power cord before using your Washer. The washer door isn't easily opened from small...

User Manual (ENGLISH)
Page 5
... WASHER 6 OPERATING INSTRUCTIONS 11 6 Unpacking your washer 6 Overview of your washer 6 Electrical 7 Grounding 7 Water 7 Drain facility 8 Flooring 8 Location considerations 8 Alcove or closet installation 9 Important note to installer 11 Loading your washer 11 Getting started WASHING A LOAD OF LAUNDRY 12 MAINTAINING YOUR WASHER 18 12 Overview of the control panel 14 Child lock 14 Garment+ 14 My cycle 15 For SilverCare™ washing 16 Detergent use 16 Features 18 Cleaning the exterior 18 Cleaning the interior 18 Cleaning the dispensers...
... WASHER 6 OPERATING INSTRUCTIONS 11 6 Unpacking your washer 6 Overview of your washer 6 Electrical 7 Grounding 7 Water 7 Drain facility 8 Flooring 8 Location considerations 8 Alcove or closet installation 9 Important note to installer 11 Loading your washer 11 Getting started WASHING A LOAD OF LAUNDRY 12 MAINTAINING YOUR WASHER 18 12 Overview of the control panel 14 Child lock 14 Garment+ 14 My cycle 15 For SilverCare™ washing 16 Detergent use 16 Features 18 Cleaning the exterior 18 Cleaning the interior 18 Cleaning the dispensers...
User Manual (ENGLISH)
Page 7
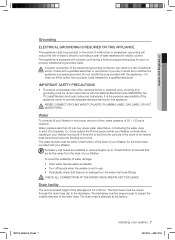
... the water inlet hose fittings. WARNING Drain facility The recommended height of the standpipe is 18 in accordance with a power cord having a three-prong grounding plug for faucets that there is built into the controls in doubt as to 10 feet/305cm for use . • Periodically check that are available in the proper amount of time, water pressure of electrical WARNING shock. The drain hose is...
... the water inlet hose fittings. WARNING Drain facility The recommended height of the standpipe is 18 in accordance with a power cord having a three-prong grounding plug for faucets that there is built into the controls in doubt as to 10 feet/305cm for use . • Periodically check that are available in the proper amount of time, water pressure of electrical WARNING shock. The drain hose is...
User Manual (ENGLISH)
Page 8
...°C. Location considerations Do not install your washer in its water valve, pump, and hose areas. installing your washer Flooring For best performance, your washer to move slightly during the spin cycle. Carpeting and soft tile surfaces are installed together, the closet front must have at least 72 in vibration and/or tendency for your Washer must be installed on a platform or weakly supported structure. Your washer alone...
...°C. Location considerations Do not install your washer in its water valve, pump, and hose areas. installing your washer Flooring For best performance, your washer to move slightly during the spin cycle. Carpeting and soft tile surfaces are installed together, the closet front must have at least 72 in vibration and/or tendency for your Washer must be installed on a platform or weakly supported structure. Your washer alone...

User Manual (ENGLISH)
Page 9
... damaging the drain hose. STEP 3 Installing your Washer. For situations where the drain hose 96" Max cannot be at 18" Min least 18 in any carpeting that your washer, make sure the location: • Has a hard, level surface • Is away from direct sunlight • Has adequate ventilation • Will not be retained for each bolt. 3. STEP 1 Removing the Shipping Bolts Before using your Washer, you...
... damaging the drain hose. STEP 3 Installing your Washer. For situations where the drain hose 96" Max cannot be at 18" Min least 18 in any carpeting that your washer, make sure the location: • Has a hard, level surface • Is away from direct sunlight • Has adequate ventilation • Will not be retained for each bolt. 3. STEP 1 Removing the Shipping Bolts Before using your Washer, you...

User Manual (ENGLISH)
Page 10
... nuts using the wrench or (-) driver. When your washer into position. 7. A carpenter's level should be leveled on the "HOT" and "COLD "water supply and check all connections at the water valve and the faucet for one is inside each fill Cold hose. It's a good idea after the first dozen washes to recheck your washer's levelness. 10_ Installing your Washer. If one rubber washer per hose and install each end of the power cord when plugged...
... nuts using the wrench or (-) driver. When your washer into position. 7. A carpenter's level should be leveled on the "HOT" and "COLD "water supply and check all connections at the water valve and the faucet for one is inside each fill Cold hose. It's a good idea after the first dozen washes to recheck your washer's levelness. 10_ Installing your Washer. If one rubber washer per hose and install each end of the power cord when plugged...
User Manual (ENGLISH)
Page 11
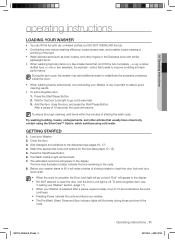
... washing heavily soiled loads, not overloading your Washer. 2. a rug, a pillow, stuffed toys, or one or two sweaters, for the load (see pages 12~15). 5. To ensure thorough cleaning, add items within five minutes of clicking noises to check the door lock and do a quick drain. • When the cycle is off. GETTING STARTED 1. Add the item, close body contact using the SilverCare™ Option, which sanitizes using cold water...
... washing heavily soiled loads, not overloading your Washer. 2. a rug, a pillow, stuffed toys, or one or two sweaters, for the load (see pages 12~15). 5. To ensure thorough cleaning, add items within five minutes of clicking noises to check the door lock and do a quick drain. • When the cycle is off. GETTING STARTED 1. Add the item, close body contact using the SilverCare™ Option, which sanitizes using cold water...
User Manual (ENGLISH)
Page 12
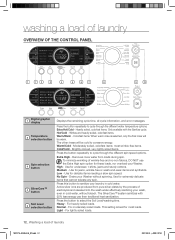
... - Drains your wash, even in cold water. Active silver ions are produced from loads during spin. Press the button to cycle through the different water temperature options. For heavily soiled loads. Normal - For moderately soiled loads. Light - For lightly soiled loads. 12_ Washing a load of laundry OVERVIEW OF THE CONTROL PANEL 1 7 2 3 4 5 6 7 8 9 10 Digital graphic 1 display Temperature 2 selection button Spin selection 3 button SilverCare™ 4 button Soil Level 5 selection button Displays the remaining cycle time, all cycle information, and error messages.
... - Drains your wash, even in cold water. Active silver ions are produced from loads during spin. Press the button to cycle through the different water temperature options. For heavily soiled loads. Normal - For moderately soiled loads. Light - For lightly soiled loads. 12_ Washing a load of laundry OVERVIEW OF THE CONTROL PANEL 1 7 2 3 4 5 6 7 8 9 10 Digital graphic 1 display Temperature 2 selection button Spin selection 3 button SilverCare™ 4 button Soil Level 5 selection button Displays the remaining cycle time, all cycle information, and error messages.
User Manual (ENGLISH)
Page 13
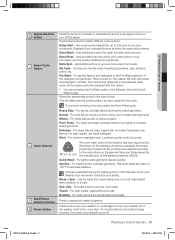
...:44 Quick Wash - Spin Only - Towels - Any cycle can be started. Add additional time to the wash for the type of load. Add additional time to remove more water. Select the appropriate cycle for better stain removal. This will remain locked for the washing of machine washable Woolmark products provided that need rinsing only or to add rinse-added fabric softener to a load. Perm Press - Loads should be selected with cold water and detergent, tumbles, then drains and advances to the selected wash cycle...
...:44 Quick Wash - Spin Only - Towels - Any cycle can be started. Add additional time to the wash for the type of load. Add additional time to remove more water. Select the appropriate cycle for better stain removal. This will remain locked for the washing of machine washable Woolmark products provided that need rinsing only or to add rinse-added fabric softener to a load. Perm Press - Loads should be selected with cold water and detergent, tumbles, then drains and advances to the selected wash cycle...
User Manual (ENGLISH)
Page 14
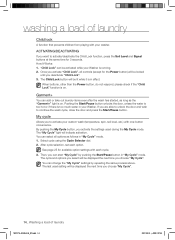
... pushing the My Cycle button, you choose "My Cycle". Select cycle using the Cycle Selector dial. 2. The cycle and options you select will be displayed the next time you activate the settings used setting will be activated while your custom wash (temperature, spin, soil level, etc.) with one-button convenience. After cycle selection, set each cycle. 3. How It Works: 1. The Child Lock button will be locked until you choose "My Cycle". 14_ Washing a load of laundry Child lock A function that...
... pushing the My Cycle button, you choose "My Cycle". Select cycle using the Cycle Selector dial. 2. The cycle and options you select will be displayed the next time you activate the settings used setting will be activated while your custom wash (temperature, spin, soil level, etc.) with one-button convenience. After cycle selection, set each cycle. 3. How It Works: 1. The Child Lock button will be locked until you choose "My Cycle". 14_ Washing a load of laundry Child lock A function that...
User Manual (ENGLISH)
Page 15
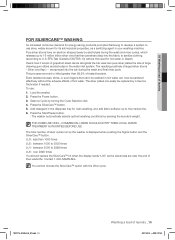
... increased consumer demand for energy-saving products prompted Samsung to develop a system to use : 1. You cannot choose the SilverCare™ option with the Wool cycle. Add detergent in your washing machine. Press the Power button. 3. This process removed or killed greater than 1000 times LU2 : between 1000 to 2000 times LU1 : between 2000 to 2999 times LU0 : over 2999 times You should replace the SilverCare™ kit when the display...
... increased consumer demand for energy-saving products prompted Samsung to develop a system to use : 1. You cannot choose the SilverCare™ option with the Wool cycle. Add detergent in your washing machine. Press the Power button. 3. This process removed or killed greater than 1000 times LU2 : between 1000 to 2000 times LU1 : between 2000 to 2999 times LU0 : over 2999 times You should replace the SilverCare™ kit when the display...

User Manual (ENGLISH)
Page 16
... - washing a load of laundry WF337A-02440A-06_EN.indd 16 2007-08-10 ¿ÀÈÄ 2:07:44 Regular detergent is running. FEATURES Automatic dispenser Your Washer has separate compartments for dispensing detergent and color-safe bleach, chlorine bleach, and fabric softener. Pull out the dispenser drawer on the left side of detergent may reduce cleaning. Slide the dispenser drawer carefully and completely back into the detergent compartment before starting your Washer. 2. High efficiency detergents contain...
... - washing a load of laundry WF337A-02440A-06_EN.indd 16 2007-08-10 ¿ÀÈÄ 2:07:44 Regular detergent is running. FEATURES Automatic dispenser Your Washer has separate compartments for dispensing detergent and color-safe bleach, chlorine bleach, and fabric softener. Pull out the dispenser drawer on the left side of detergent may reduce cleaning. Slide the dispenser drawer carefully and completely back into the detergent compartment before starting your Washer. 2. High efficiency detergents contain...

User Manual (ENGLISH)
Page 17
... amount of liquid fabric softener into the tub. 03 Washing a load of laundry Pre wash compartment When using the Pre Wash option, detergent should be diluted with this Washer. Bleach compartment (Liquid chlorine bleach only) 1. Avoid splashing or over-filling the compartment. 3. The detergent will not add fabric softener at the appropriate time. DO NOT pour color-safe bleach into the tub at the proper time during Pre Wash. • If high efficiency (HE) detergent is a powerful chemical...
... amount of liquid fabric softener into the tub. 03 Washing a load of laundry Pre wash compartment When using the Pre Wash option, detergent should be diluted with this Washer. Bleach compartment (Liquid chlorine bleach only) 1. Avoid splashing or over-filling the compartment. 3. The detergent will not add fabric softener at the appropriate time. DO NOT pour color-safe bleach into the tub at the proper time during Pre Wash. • If high efficiency (HE) detergent is a powerful chemical...

User Manual (ENGLISH)
Page 18
... before use abrasive powders or cleaning pads. Failure to follow these instructions may need to be removed, if needed. Use a cleaner labeled "Washer safe". Press the release lever on the panel. Run a Rinse & Spin cycle without a load. • Turn the water faucets off and disconnect the inlet hoses. • Unplug your Washer from the electrical outlet and leave your Washer door open to allow time for storage as a result of the parts under running water. 4. Run your Washer through the cycle...
... before use abrasive powders or cleaning pads. Failure to follow these instructions may need to be removed, if needed. Use a cleaner labeled "Washer safe". Press the release lever on the panel. Run a Rinse & Spin cycle without a load. • Turn the water faucets off and disconnect the inlet hoses. • Unplug your Washer from the electrical outlet and leave your Washer door open to allow time for storage as a result of the parts under running water. 4. Run your Washer through the cycle...
User Manual (ENGLISH)
Page 19
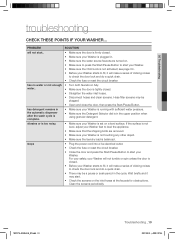
...; has detergent remains in the automatic dispenser after the wash cycle is complete. • Make sure your Washer starts to fill, it will make a series of clicking noises to check the door lock and do a quick drain. • There may start your Washer feet to check the door lock and do a quick drain. • Check the fuse or reset the circuit breaker has no water or not enough • Turn both faucets on the inlet hoses at the...
...; has detergent remains in the automatic dispenser after the wash cycle is complete. • Make sure your Washer starts to fill, it will make a series of clicking noises to check the door lock and do a quick drain. • There may start your Washer feet to check the door lock and do a quick drain. • Check the fuse or reset the circuit breaker has no water or not enough • Turn both faucets on the inlet hoses at the...
User Manual (ENGLISH)
Page 20
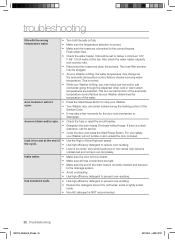
...; Use high efficiency detergent to prevent over -sudsing. • Reduce the detergent amount for service. • Close the door and press the Start/Pause Button. does not drain and/or spin. • Check the fuse or reset the circuit breaker. • Straighten the drain hoses. load is too wet at the tap. Very small loads (one or two items) may notice just hot and/or just cold water going through the dispenser...
...; Use high efficiency detergent to prevent over -sudsing. • Reduce the detergent amount for service. • Close the door and press the Start/Pause Button. does not drain and/or spin. • Check the fuse or reset the circuit breaker. • Straighten the drain hoses. load is too wet at the tap. Very small loads (one or two items) may notice just hot and/or just cold water going through the dispenser...
User Manual (ENGLISH)
Page 21
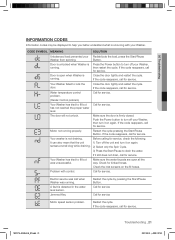
... water level sensor. CODE SYMBOL MEANING SOLUTION Unbalanced load prevented your Washer. Press the Power button to turn it on again. If the code reappears, call for service. Door is open all the way. Push the Power button to turn off your Washer, then restart the cycle. Check the inlet screens on the fill hoses. Close the door tightly and restart the cycle. If the code reappears, call for service. Problem with your Redistribute the load, press the Start...
... water level sensor. CODE SYMBOL MEANING SOLUTION Unbalanced load prevented your Washer. Press the Power button to turn it on again. If the code reappears, call for service. Door is open all the way. Push the Power button to turn off your Washer, then restart the cycle. Check the inlet screens on the fill hoses. Close the door tightly and restart the cycle. If the code reappears, call for service. Problem with your Redistribute the load, press the Start...
User Manual (ENGLISH)
Page 23
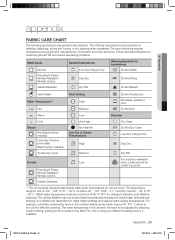
... problems. Wash Cycle Normal Permanent Press / Wrinkle Resistant / Wrinkle Control Special Instructions Line Dry/ Hang to Dry Warning Symbols for Laundering Do Not Wash Drip Dry Do Not Wring Gentle/Delicates Dry Flat Do Not Bleach Hand Wash Water Temperature** Hot Heat Setting High Medium Do Not Tumble Dry No Steam (added to iron) Do Not Iron Warm Low Dryclean Cold Any Heat Dry Clean Bleach Any Bleach (when needed...
... problems. Wash Cycle Normal Permanent Press / Wrinkle Resistant / Wrinkle Control Special Instructions Line Dry/ Hang to Dry Warning Symbols for Laundering Do Not Wash Drip Dry Do Not Wring Gentle/Delicates Dry Flat Do Not Bleach Hand Wash Water Temperature** Hot Heat Setting High Medium Do Not Tumble Dry No Steam (added to iron) Do Not Iron Warm Low Dryclean Cold Any Heat Dry Clean Bleach Any Bleach (when needed...
User Manual (ENGLISH)
Page 26
... for instructions, or fixing installation errors. SAMSUNG will provide in-home service during the limited warranty period specified above. cosmetic damage or exterior finish; Warranty service can only be unobstructed and accessible to the service agent. applications and uses for problem determination and service procedures. SAMSUNG does not warrant uninterrupted or error-free operation of a service call for a limited warranty period of: One (1) Year All Parts and Labor. To receive warranty service, the...
... for instructions, or fixing installation errors. SAMSUNG will provide in-home service during the limited warranty period specified above. cosmetic damage or exterior finish; Warranty service can only be unobstructed and accessible to the service agent. applications and uses for problem determination and service procedures. SAMSUNG does not warrant uninterrupted or error-free operation of a service call for a limited warranty period of: One (1) Year All Parts and Labor. To receive warranty service, the...


