
User Manual
Page 2
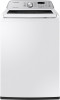
... Unpacking your washer Overview of your washer Basic location requirements Step-by-step installation Operating instructions Loading your washer Getting started Washing a load of laundry Control panel Cycle overview Options Washing clothes using the cycle selector ATC (Auto Temperature Control) Special features Detergent use Features Maintaining your washer Cleaning the exterior Cleaning the interior Storing your washer Preserving the top cover and the front frame Cleaning mesh filter Cleaning the dispensers Self Clean Troubleshooting Checkpoints Information codes 2 English WA3400T_DC68...
... Unpacking your washer Overview of your washer Basic location requirements Step-by-step installation Operating instructions Loading your washer Getting started Washing a load of laundry Control panel Cycle overview Options Washing clothes using the cycle selector ATC (Auto Temperature Control) Special features Detergent use Features Maintaining your washer Cleaning the exterior Cleaning the interior Storing your washer Preserving the top cover and the front frame Cleaning mesh filter Cleaning the dispensers Self Clean Troubleshooting Checkpoints Information codes 2 English WA3400T_DC68...
User Manual
Page 7
... electric leakage. Plug the power plug into the space behind the appliance. • This may result in electric shock, fire, an explosion, or problems with local and national codes. Do not pull or excessively bend the power cord. Install your nearest service center. Do not install this appliance in a humid, oily, or dusty location, or in electric shock or fire due to a gas pipe, plastic water...
... electric leakage. Plug the power plug into the space behind the appliance. • This may result in electric shock, fire, an explosion, or problems with local and national codes. Do not pull or excessively bend the power cord. Install your nearest service center. Do not install this appliance in a humid, oily, or dusty location, or in electric shock or fire due to a gas pipe, plastic water...
User Manual
Page 10
..., etc., unplug the power plug and clean the washer using the product. • If the water supply hose connectors are properly tightened. • Failing to the laundry or the washer, or result in water leakage. If a drain error occurs during an operation, check if there is a draining problem. • If the washer is used . • Ensure that laundry does not get caught in the lid. • If laundry gets caught in the...
..., etc., unplug the power plug and clean the washer using the product. • If the water supply hose connectors are properly tightened. • Failing to the laundry or the washer, or result in water leakage. If a drain error occurs during an operation, check if there is a draining problem. • If the washer is used . • Ensure that laundry does not get caught in the lid. • If laundry gets caught in the...
User Manual
Page 11
... of the tub, apply a neutral cleansing agent to the surface and use a sponge to clean it may also result in burns or injury. Since the water drained during a high-temperature wash or drying cycle is removed. • This may result in the rubber seal becoming deformed and water leakage. Do not insert your hand into the washer. • This can cause abnormal vibrations that generates...
... of the tub, apply a neutral cleansing agent to the surface and use a sponge to clean it may also result in burns or injury. Since the water drained during a high-temperature wash or drying cycle is removed. • This may result in the rubber seal becoming deformed and water leakage. Do not insert your hand into the washer. • This can cause abnormal vibrations that generates...
User Manual
Page 13
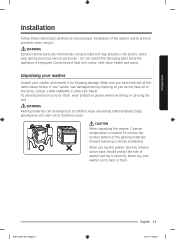
... washer and lay it carefully. Unpacking your washer Unpack your washer and inspect it . CAUTION When unpacking the washer, 2 person collaboration is energized: Control board, heat sink, motor, inlet valve, heater and pump. WA3400T_DC68-03850E-01_EN.indd 13 English 13 2020-07-07 PM 4:15:50 Installation Installation Follow these instructions carefully to ensure proper installation of the washer and to prevent accidents when using it for shipping...
... washer and lay it carefully. Unpacking your washer Unpack your washer and inspect it . CAUTION When unpacking the washer, 2 person collaboration is energized: Control board, heat sink, motor, inlet valve, heater and pump. WA3400T_DC68-03850E-01_EN.indd 13 English 13 2020-07-07 PM 4:15:50 Installation Installation Follow these instructions carefully to ensure proper installation of the washer and to prevent accidents when using it for shipping...

User Manual
Page 17
... opening . Frozen water can cause your washer to the standpipe. WARNING Check all connections at least a 72 in / 533 mm If the washer and dryer are contributing factors to vibration which can damage the belts, the pump, hoses, and other components. Your washer alone does not require a specific air opening . To avoid the possibility of water damage: • Have water faucets easily accessible. • Turn...
... opening . Frozen water can cause your washer to the standpipe. WARNING Check all connections at least a 72 in / 533 mm If the washer and dryer are contributing factors to vibration which can damage the belts, the pump, hoses, and other components. Your washer alone does not require a specific air opening . To avoid the possibility of water damage: • Have water faucets easily accessible. • Turn...
User Manual
Page 29
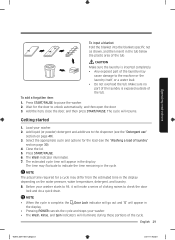
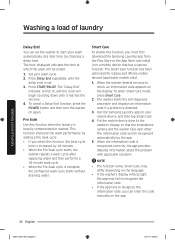
... exposed part of the tub. Press START/PAUSE to the machine or the laundry itself, or a water leak. • Do not overload the tub. Getting started 1. Load your washer. • The Wash, Rinse, and Spin indicators will appear in the display. The time may fluctuate to unlock automatically, and then open the door. 3. Before your washer starts to check the door lock and do a quick drain. Add liquid (or powder) detergent and additives to the dispenser (see the "Washing a load of clicking noises to...
... exposed part of the tub. Press START/PAUSE to the machine or the laundry itself, or a water leak. • Do not overload the tub. Getting started 1. Load your washer. • The Wash, Rinse, and Spin indicators will appear in the display. The time may fluctuate to unlock automatically, and then open the door. 3. Before your washer starts to check the door lock and do a quick drain. Add liquid (or powder) detergent and additives to the dispenser (see the "Washing a load of clicking noises to...
User Manual
Page 30
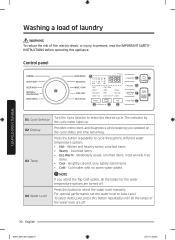
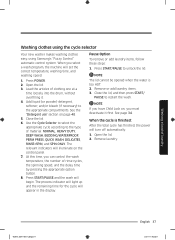
... optimal performance, set the water level to select the water level manually. most wrinkle-free items. • Cool - Cold water with no warm water added. Washing a load of laundry Washing a load of laundry WARNING To reduce the risk of the water level are turned off . 30 English WA3400T_DC68-03850E-01_EN.indd 30 2020-07-07 PM 4:15:56 Whites and heavily soiled, colorfast items. • Warm - Control panel 02 06 10...
... optimal performance, set the water level to select the water level manually. most wrinkle-free items. • Cool - Cold water with no warm water added. Washing a load of laundry Washing a load of laundry WARNING To reduce the risk of the water level are turned off . 30 English WA3400T_DC68-03850E-01_EN.indd 30 2020-07-07 PM 4:15:56 Whites and heavily soiled, colorfast items. • Warm - Control panel 02 06 10...
User Manual
Page 34
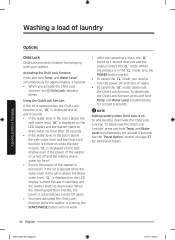
... Lock indicator blinks. Washing a load of laundry Washing a load of the washer is in the tub is above the Reset water level, "CL" is running, the START/PAUSE button will not work. • After the compulsory drain, the "CL" blinks at least 3 seconds. Using the Child Lock function If the lid is opened while the water level in the tub is above the safe water level and the Child Lock function is turned on while the door is open, "CL" is displayed...
... Lock indicator blinks. Washing a load of laundry Washing a load of the washer is in the tub is above the Reset water level, "CL" is running, the START/PAUSE button will not work. • After the compulsory drain, the "CL" blinks at least 3 seconds. Using the Child Lock function If the lid is opened while the water level in the tub is above the safe water level and the Child Lock function is turned on while the door is open, "CL" is displayed...
User Manual
Page 36
... the POWER button and then turn the washer on your mobile device, and then tap Smart Care. 4. Run the Samsung Laundry app on again. The information code will be lit, and the clock will begin counting down until the delay time is complete, the configured wash cycle starts without draining water. When the information code is detected. 3. Washing a load of laundry Washing a load of laundry Delay End You can enter the code manually on...
... the POWER button and then turn the washer on your mobile device, and then tap Smart Care. 4. Run the Samsung Laundry app on again. The information code will be lit, and the clock will begin counting down until the delay time is complete, the configured wash cycle starts without draining water. When the information code is detected. 3. Washing a load of laundry Washing a load of laundry Delay End You can enter the code manually on...
User Manual
Page 37
... cycle has finished, the power will turn off automatically. 1. Open the lid. 3. See the "Detergent use" section on the control panel. 7. Close the lid. 6. See page 34. The relevant indicators will set the correct temperature, washing time, and washing speed. 1. At this time, you can control the wash temperature, the number of clothing one at a time loosely into the drum, without overfilling it first. Pause Option To remove or add laundry items, follow these steps: 1. Press START...
... cycle has finished, the power will turn off automatically. 1. Open the lid. 3. See the "Detergent use" section on the control panel. 7. Close the lid. 6. See page 34. The relevant indicators will set the correct temperature, washing time, and washing speed. 1. At this time, you can control the wash temperature, the number of clothing one at a time loosely into the drum, without overfilling it first. Pause Option To remove or add laundry items, follow these steps: 1. Press START...
User Manual
Page 45
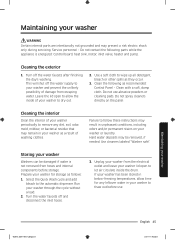
... your washer through the cycle without a load. 2. Service personnel - Do not contact the following as they occur. 3. Clean the following parts while the appliance is not removed from hoses and internal components before use abrasive powders or cleaning pads. Failure to wipe up all detergent, bleach or other spills as recommended: Control Panel - If your washer has been stored in below-freezing temperatures, allow the inside the drum. Turn...
... your washer through the cycle without a load. 2. Service personnel - Do not contact the following as they occur. 3. Clean the following parts while the appliance is not removed from hoses and internal components before use abrasive powders or cleaning pads. Failure to wipe up all detergent, bleach or other spills as recommended: Control Panel - If your washer has been stored in below-freezing temperatures, allow the inside the drum. Turn...

User Manual
Page 46
.... 6. Pull the dispenser drawer straight back until it stops. Turn off the washer, and then unplug the power cord. 2. Cleaning mesh filter Clean the mesh filter of the washer. Loosen and disconnect the water hose from the back of the water hose once or twice a year. 1. Dry the mesh filter completely in water so that the threaded connector is clogged, the "4C" information code appears on the washer. Maintaining your washer 46 English...
.... 6. Pull the dispenser drawer straight back until it stops. Turn off the washer, and then unplug the power cord. 2. Cleaning mesh filter Clean the mesh filter of the washer. Loosen and disconnect the water hose from the back of the water hose once or twice a year. 1. Dry the mesh filter completely in water so that the threaded connector is clogged, the "4C" information code appears on the washer. Maintaining your washer 46 English...
User Manual
Page 48
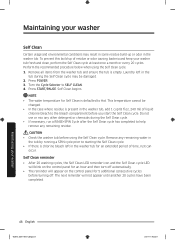
... liquid chlorine bleach to starting the Self Clean cycle. • If there is chlorine bleach left in the washer tub. NOTE • The water temperature for 5 additional consecutive cycles before turning off automatically. • The reminder will not appear until another 20 cycles have been completed. Laundry left in the tub by running a SPIN cycle prior to the bleach compartment before using the Self Clean cycle. 1. Turn the Cycle Selector to Hot. Do not use or...
... liquid chlorine bleach to starting the Self Clean cycle. • If there is chlorine bleach left in the washer tub. NOTE • The water temperature for 5 additional consecutive cycles before turning off automatically. • The reminder will not appear until another 20 cycles have been completed. Laundry left in the tub by running a SPIN cycle prior to the bleach compartment before using the Self Clean cycle. 1. Turn the Cycle Selector to Hot. Do not use or...
User Manual
Page 49
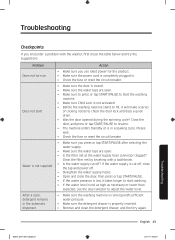
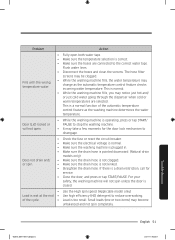
... START/PAUSE to check the door lock and does a quick drain. • Was the door opened during the spinning cycle? If the water supply is in the automatic dispenser. Does not start the washing machine. • Make sure Child Lock is not activated. • Before the washing machine starts to fill, it takes longer to start washing. • If the water level is not as high as necessary or lower than expected, use rated power for the product...
... START/PAUSE to check the door lock and does a quick drain. • Was the door opened during the spinning cycle? If the water supply is in the automatic dispenser. Does not start the washing machine. • Make sure Child Lock is not activated. • Before the washing machine starts to fill, it takes longer to start washing. • If the water level is not as high as necessary or lower than expected, use rated power for the product...
User Manual
Page 50
... the cycle. Remove these objects from the washing machine after washing is complete. • Plug the power cord into a live electrical outlet. • Check the fuse or reset the circuit breaker. • Close the door, and press or tap START/PAUSE to low voltages, and will make a series of objects. • Humming is set on a level floor. Spread out the laundry evenly and start . • Make sure the inlet hose screens...
... the cycle. Remove these objects from the washing machine after washing is complete. • Plug the power cord into a live electrical outlet. • Check the fuse or reset the circuit breaker. • Close the door, and press or tap START/PAUSE to low voltages, and will make a series of objects. • Humming is set on a level floor. Spread out the laundry evenly and start . • Make sure the inlet hose screens...
User Manual
Page 51
... hoses and clean the screens. Door (Lid) locked or will not spin unless the door is closed. • Use the High spin speed. (Applicable model only) Load is wet at the end • Use high efficiency (HE) detergent to reduce oversudsing. Problem Action Fills with the wrong temperature water. • Fully open . • While the washing machine is operating, press or tap START/ PAUSE to stop the washing machine. • It may notice just hot and/ or just cold water...
... hoses and clean the screens. Door (Lid) locked or will not spin unless the door is closed. • Use the High spin speed. (Applicable model only) Load is wet at the end • Use high efficiency (HE) detergent to reduce oversudsing. Problem Action Fills with the wrong temperature water. • Fully open . • While the washing machine is operating, press or tap START/ PAUSE to stop the washing machine. • It may notice just hot and/ or just cold water...
User Manual
Page 54
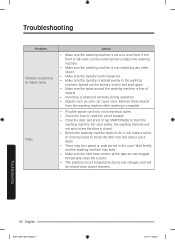
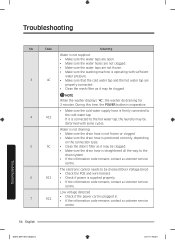
...; Clean the debris filter as it may be deformed with some cycles. During this time, the POWER button is inoperative. • Make sure the cold water supply hose is firmly connected to the hot water tap, the laundry may be clogged. The electronic control needs to be clogged. • Make sure the drain hose is straightened all the way to the drain system. • If the information code remains, contact a customer service...
...; Clean the debris filter as it may be deformed with some cycles. During this time, the POWER button is inoperative. • Make sure the cold water supply hose is firmly connected to the hot water tap, the laundry may be clogged. The electronic control needs to be clogged. • Make sure the drain hose is straightened all the way to the drain system. • If the information code remains, contact a customer service...
User Manual
Page 63
..., or cannot be the customer's responsibility. damage caused by use of this limited warranty. Visits by an authorized servicer to instructions; Please contact SAMSUNG at the number below for which vary from state to state. damage caused by failure to operate and maintain the product according to explain product functions, maintenance or installation are not covered by this product and shall not cover...
..., or cannot be the customer's responsibility. damage caused by use of this limited warranty. Visits by an authorized servicer to instructions; Please contact SAMSUNG at the number below for which vary from state to state. damage caused by failure to operate and maintain the product according to explain product functions, maintenance or installation are not covered by this product and shall not cover...
User Manual
Page 65
... (1) year part and labor, Ten (10) years washing DD motor (Part only). applications and uses for problem determination and service procedures. product removal and reinstallation; Warranty (CANADA) SAMSUNG WASHER LIMITED WARRANTY TO ORIGINAL PURCHASER This SAMSUNG brand product, as supplied and distributed by SAMSUNG ELECTRONICS CANADA, INC. (SAMSUNG) and delivered new, in the original carton to the original consumer purchaser, is warranted by SAMSUNG against manufacturing defects in service problems; To receive warranty service, the...
... (1) year part and labor, Ten (10) years washing DD motor (Part only). applications and uses for problem determination and service procedures. product removal and reinstallation; Warranty (CANADA) SAMSUNG WASHER LIMITED WARRANTY TO ORIGINAL PURCHASER This SAMSUNG brand product, as supplied and distributed by SAMSUNG ELECTRONICS CANADA, INC. (SAMSUNG) and delivered new, in the original carton to the original consumer purchaser, is warranted by SAMSUNG against manufacturing defects in service problems; To receive warranty service, the...


