

User Manual
Page 2
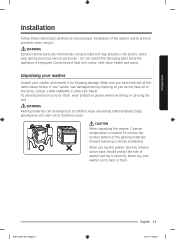
... Unpacking your washer Overview of your washer Basic location requirements Step-by-step installation Operating instructions Loading your washer Getting started Washing a load of laundry Control panel Cycle overview Options Washing clothes using the cycle selector ATC (Auto Temperature Control) Special features Detergent use Features Maintaining your washer Cleaning the exterior Cleaning the interior Storing your washer Preserving the top cover and the front frame Cleaning mesh filter Cleaning the dispensers Self Clean Troubleshooting Checkpoints Information codes 2 English WA3400T_DC68...
... Unpacking your washer Overview of your washer Basic location requirements Step-by-step installation Operating instructions Loading your washer Getting started Washing a load of laundry Control panel Cycle overview Options Washing clothes using the cycle selector ATC (Auto Temperature Control) Special features Detergent use Features Maintaining your washer Cleaning the exterior Cleaning the interior Storing your washer Preserving the top cover and the front frame Cleaning mesh filter Cleaning the dispensers Self Clean Troubleshooting Checkpoints Information codes 2 English WA3400T_DC68...
User Manual
Page 7
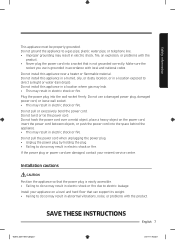
... power plug or power cord are damaged, contact your appliance on the power cord, insert the power cord between objects, or push the power cord into the wall socket firmly. Do not install this appliance in a location where gas may leak. • This may result in abnormal vibrations, noise, or problems with the product. Do not pull or excessively bend the power cord. Make sure the socket you use a damaged power plug, damaged power cord...
... power plug or power cord are damaged, contact your appliance on the power cord, insert the power cord between objects, or push the power cord into the wall socket firmly. Do not install this appliance in a location where gas may leak. • This may result in abnormal vibrations, noise, or problems with the product. Do not pull or excessively bend the power cord. Make sure the socket you use a damaged power plug, damaged power cord...
User Manual
Page 10
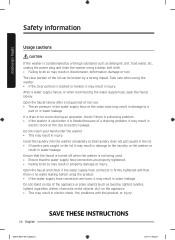
... air pressure in the water supply hose or the water pipe may result in electric shock or fire due to electric leakage. Open the faucet slowly after a long period of a draining problem, it may result in damage to a part or in water leakage. If a drain error occurs during an operation, check if there is a draining problem. • If the washer is used . • Ensure that laundry does not get caught...
... air pressure in the water supply hose or the water pipe may result in electric shock or fire due to electric leakage. Open the faucet slowly after a long period of a draining problem, it may result in damage to a part or in water leakage. If a drain error occurs during an operation, check if there is a draining problem. • If the washer is used . • Ensure that laundry does not get caught...
User Manual
Page 11
... not operate the washer when the detergent dispenser is hot, do not wash, rinse, or spin laundry contaminated by oils, creams, or lotions usually found in skincare shops or massage clinics. • This may result in the tub for long periods of time. • This may result in the case of the oil. Never use dry cleaning detergent directly in the tub and do not touch the water...
... not operate the washer when the detergent dispenser is hot, do not wash, rinse, or spin laundry contaminated by oils, creams, or lotions usually found in skincare shops or massage clinics. • This may result in the tub for long periods of time. • This may result in the case of the oil. Never use dry cleaning detergent directly in the tub and do not touch the water...
User Manual
Page 13
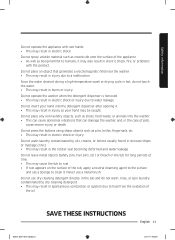
... washer, 2 person collaboration is energized: Control board, heat sink, motor, inlet valve, heater and pump. To prevent personal injury or strain, wear protective gloves whenever lifting or carrying the unit. To remove the cushion bottom of children's reach. Never lay your washer and inspect it for shipping damage. WARNING Certain internal parts are intentionally not grounded and may present a risk electric...
... washer, 2 person collaboration is energized: Control board, heat sink, motor, inlet valve, heater and pump. To prevent personal injury or strain, wear protective gloves whenever lifting or carrying the unit. To remove the cushion bottom of children's reach. Never lay your washer and inspect it for shipping damage. WARNING Certain internal parts are intentionally not grounded and may present a risk electric...

User Manual
Page 17
... possibility of the drain hose. Never install your washer on a platform or weakly supported structure. The drain hose is attached to the washer at least a 72 in its water valve, pump, and hose areas. Flooring For best performance, you must install your washer on a solidly constructed floor. Installation The water faucets must be reinforced to minimize vibration and/or unbalanced load situations. Your washer alone does not require a specific air opening .
... possibility of the drain hose. Never install your washer on a platform or weakly supported structure. The drain hose is attached to the washer at least a 72 in its water valve, pump, and hose areas. Flooring For best performance, you must install your washer on a solidly constructed floor. Installation The water faucets must be reinforced to minimize vibration and/or unbalanced load situations. Your washer alone does not require a specific air opening .
User Manual
Page 29
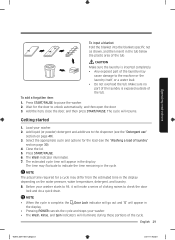
... portions of clicking noises to the dispenser (see the "Washing a load of the laundry may cause damage to indicate the time remaining in the display. To add a forgotten item: 1. Add the item, close the door, and then press START/PAUSE. Before your washer. • The Wash, Rinse, and Spin indicators will make a series of the cycle. Load your washer. 2. Add liquid (or powder) detergent and additives to check the door lock and do a quick drain. The Wash Indicator illuminates...
... portions of clicking noises to the dispenser (see the "Washing a load of the laundry may cause damage to indicate the time remaining in the display. To add a forgotten item: 1. Add the item, close the door, and then press START/PAUSE. Before your washer. • The Wash, Rinse, and Spin indicators will make a series of the cycle. Load your washer. 2. Add liquid (or powder) detergent and additives to check the door lock and do a quick drain. The Wash Indicator illuminates...
User Manual
Page 30
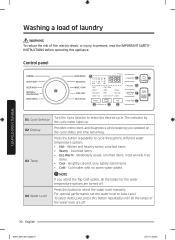
..., very lightly soiled items. • Cold - Washing a load of laundry Washing a load of laundry WARNING To reduce the risk of the water level are turned off. 04 Water Level Press this button repeatedly until all the lamps of fire, electric shock, or injury to select the desired cycle. Turn the Cycle Selector to persons, read the IMPORTANT SAFETY INSTRUCTIONS before operating this appliance. Moderately soiled, colorfast items; Provides instructions and diagnostics while...
..., very lightly soiled items. • Cold - Washing a load of laundry Washing a load of laundry WARNING To reduce the risk of the water level are turned off. 04 Water Level Press this button repeatedly until all the lamps of fire, electric shock, or injury to select the desired cycle. Turn the Cycle Selector to persons, read the IMPORTANT SAFETY INSTRUCTIONS before operating this appliance. Moderately soiled, colorfast items; Provides instructions and diagnostics while...
User Manual
Page 34
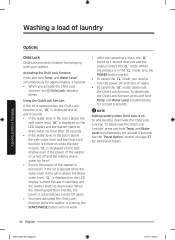
... sounding and the washer starts to drain water by force after 30 seconds. • If the water level in the "CL" mode, only the POWER button works.) • To cancel the "CL" mode, you activate the Child Lock function, the Child Lock indicator blinks. See the "Pause Option" section on To add laundry, deactivate the Child Lock function. Using the Child Lock function If the lid is opened while the water level in the tub...
... sounding and the washer starts to drain water by force after 30 seconds. • If the water level in the "CL" mode, only the POWER button works.) • To cancel the "CL" mode, you activate the Child Lock function, the Child Lock indicator blinks. See the "Pause Option" section on To add laundry, deactivate the Child Lock function. Using the Child Lock function If the lid is opened while the water level in the tub...
User Manual
Page 36
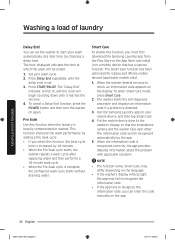
... and install it reaches the set . 3. Press START/PAUSE. To enter Smart Care mode, press Smart Care. 2. The washer starts the self-diagnosis procedure and displays an information code if a problem is complete, the configured wash cycle starts without draining water. Run the Samsung Laundry app on your wash cycle. 2. Put the mobile device close to check, an information code appears on the display. The information code will begin counting down until the delay time is set time...
... and install it reaches the set . 3. Press START/PAUSE. To enter Smart Care mode, press Smart Care. 2. The washer starts the self-diagnosis procedure and displays an information code if a problem is complete, the configured wash cycle starts without draining water. Run the Samsung Laundry app on your wash cycle. 2. Put the mobile device close to check, an information code appears on the display. The information code will begin counting down until the delay time is set time...
User Manual
Page 37
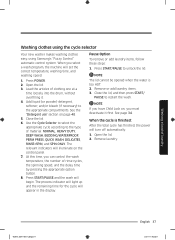
..., RINSE+SPIN, and SPIN ONLY. Use the Cycle Selector to select the appropriate cycle according to unlock the lid. The relevant indicators will begin. NOTE If you have Child Lock on, you select a wash program, the machine will set the correct temperature, washing time, and washing speed. 1. Washing a load of rinse cycles, the spinning speed, and the delay time by pressing the appropriate option button. 8. When you must deactivate it . 4. Remove or add laundry items. 3. Remove laundry. Press POWER. 2. Open...
..., RINSE+SPIN, and SPIN ONLY. Use the Cycle Selector to select the appropriate cycle according to unlock the lid. The relevant indicators will begin. NOTE If you have Child Lock on, you select a wash program, the machine will set the correct temperature, washing time, and washing speed. 1. Washing a load of rinse cycles, the spinning speed, and the delay time by pressing the appropriate option button. 8. When you must deactivate it . 4. Remove or add laundry items. 3. Remove laundry. Press POWER. 2. Open...
User Manual
Page 45
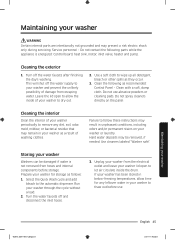
... disconnect the inlet hoses. 3. Clean the following parts while the appliance is not removed from hoses and internal components before use abrasive powders or cleaning pads. Do not spray cleaners directly on your washer or laundry. Failure to dry out. 2. Use cleaners labeled "Washer safe". Cleaning the exterior 1. Do not use . Select the Quick Wash cycle and add bleach to wipe up all detergent, bleach or other spills as follows: 1. Turn the water faucets off...
... disconnect the inlet hoses. 3. Clean the following parts while the appliance is not removed from hoses and internal components before use abrasive powders or cleaning pads. Do not spray cleaners directly on your washer or laundry. Failure to dry out. 2. Use cleaners labeled "Washer safe". Cleaning the exterior 1. Do not use . Select the Quick Wash cycle and add bleach to wipe up all detergent, bleach or other spills as follows: 1. Turn the water faucets off...

User Manual
Page 46
... the hose with a cloth to be scratched or damaged. Avoid scratching or damaging the surface when using the washer. Close the faucet. 3. Cleaning the dispensers The automatic dispenser may need to prevent water from the inlet valve. 5. Maintaining your washer 46 English WA3400T_DC68-03850E-01_EN.indd 46 2020-07-07 PM 4:15:59 Pull the dispenser drawer straight back until it stops. Submerge the mesh filter...
... the hose with a cloth to be scratched or damaged. Avoid scratching or damaging the surface when using the washer. Close the faucet. 3. Cleaning the dispensers The automatic dispenser may need to prevent water from the inlet valve. 5. Maintaining your washer 46 English WA3400T_DC68-03850E-01_EN.indd 46 2020-07-07 PM 4:15:59 Pull the dispenser drawer straight back until it stops. Submerge the mesh filter...
User Manual
Page 48
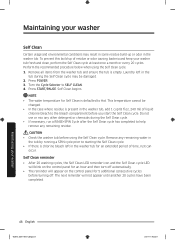
... • Check the washer tub before using the Self Clean cycle. 1. The next reminder will appear on the control panel for Self Clean is present in the tub by running a SPIN cycle prior to Hot. Perform the recommended procedure below when using the Self Clean cycle. Laundry left in the tub during the Self Clean cycle. • If necessary, run a RINSE+SPIN Cycle after the Self Clean cycle has completed to help remove any remaining water in the washer tub, add 1 cup...
... • Check the washer tub before using the Self Clean cycle. 1. The next reminder will appear on the control panel for Self Clean is present in the tub by running a SPIN cycle prior to Hot. Perform the recommended procedure below when using the Self Clean cycle. Laundry left in the tub during the Self Clean cycle. • If necessary, run a RINSE+SPIN Cycle after the Self Clean cycle has completed to help remove any remaining water in the washer tub, add 1 cup...
User Manual
Page 49
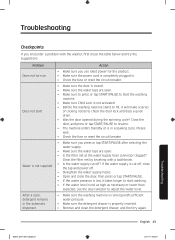
... use the level selector to check the door lock and does a quick drain. • Was the door opened during the spinning cycle? Clean the filter net by brushing with sufficient water pressure. • Make sure the detergent drawer is low, it will make a series of clicking noises to adjust the water level. • Make sure the washing machine is running with a toothbrush. • Is the water supply cut off . • Straighten the water supply hoses. • Open...
... use the level selector to check the door lock and does a quick drain. • Was the door opened during the spinning cycle? Clean the filter net by brushing with sufficient water pressure. • Make sure the detergent drawer is low, it will make a series of clicking noises to adjust the water level. • Make sure the washing machine is running with a toothbrush. • Is the water supply cut off . • Straighten the water supply hoses. • Open...
User Manual
Page 50
... the laundry load is balanced. • Make sure the laundry is complete. • Plug the power cord into a live electrical outlet. • Check the fuse or reset the circuit breaker. • Close the door, and press or tap START/PAUSE to low voltages, and will make a series of objects. • Humming is set on a level floor. Remove these objects from the washing machine after washing is spread evenly in the cycle.
... the laundry load is balanced. • Make sure the laundry is complete. • Plug the power cord into a live electrical outlet. • Check the fuse or reset the circuit breaker. • Close the door, and press or tap START/PAUSE to low voltages, and will make a series of objects. • Humming is set on a level floor. Remove these objects from the washing machine after washing is spread evenly in the cycle.
User Manual
Page 51
... just cold water going through the dispenser when cold or warm temperatures are connected to reduce oversudsing. Does not drain and/ or spin. • Check the fuse or reset the circuit breaker. • Make sure the electrical voltage is normal. • Make sure the washing machine is plugged in. • Make sure the drain hose is pointed downward. (Natural drain models only) • Make sure the drain hose is not clogged. •...
... just cold water going through the dispenser when cold or warm temperatures are connected to reduce oversudsing. Does not drain and/ or spin. • Check the fuse or reset the circuit breaker. • Make sure the electrical voltage is normal. • Make sure the washing machine is plugged in. • Make sure the drain hose is pointed downward. (Natural drain models only) • Make sure the drain hose is not clogged. •...
User Manual
Page 54
...; Make sure the washing machine is operating with some cycles. Troubleshooting No Code Meaning Water is not supplied. • Make sure the water taps are open. • Make sure the water hoses are not clogged. • Make sure the water taps are properly connected. • Clean the mesh filter as it is connected to 4 4C2 the cold water tap. If it may be clogged. During this time, the POWER button is inoperative...
...; Make sure the washing machine is operating with some cycles. Troubleshooting No Code Meaning Water is not supplied. • Make sure the water taps are open. • Make sure the water hoses are not clogged. • Make sure the water taps are properly connected. • Clean the mesh filter as it is connected to 4 4C2 the cold water tap. If it may be clogged. During this time, the POWER button is inoperative...
User Manual
Page 63
... product functions, maintenance or installation are not covered by failure to operate and maintain the product according to you. cosmetic damage including scratches, dents, chips, and other rights, which this product was not intended; and service to the product's finishes; product where the original factory serial numbers have other damage to correct installation not in any of equipment, utilities, services, parts, supplies, accessories, applications, installations, repairs...
... product functions, maintenance or installation are not covered by failure to operate and maintain the product according to you. cosmetic damage including scratches, dents, chips, and other rights, which this product was not intended; and service to the product's finishes; product where the original factory serial numbers have other damage to correct installation not in any of equipment, utilities, services, parts, supplies, accessories, applications, installations, repairs...
User Manual
Page 65
... repair, replace, or refund this product or result in the instruction book; incorrect electrical line voltage, fluctuations and surges; This limited warranty begins on the original date of products, equipment, systems, utilities, services, parts, supplies, accessories, applications, installations, repairs, external wiring or connectors not supplied or authorized by SAMSUNG that are covered and prescribed in service problems; The original dated bill of purchase to follow operating instructions, maintenance...
... repair, replace, or refund this product or result in the instruction book; incorrect electrical line voltage, fluctuations and surges; This limited warranty begins on the original date of products, equipment, systems, utilities, services, parts, supplies, accessories, applications, installations, repairs, external wiring or connectors not supplied or authorized by SAMSUNG that are covered and prescribed in service problems; The original dated bill of purchase to follow operating instructions, maintenance...


