

User Manual (ENGLISH)
Page 2
... Confirming the Installation of Device Driver How To Use The DVD Writer How to Use the Drive How to Use DVD±R/RW and Other Discs MAGIC SPEED Deleting Utilities Troubleshooting Troubleshooting Caution: Possible Errors Product Specifications Storing/Cleaning Drive and Disc Cleaning the Drive Storing the Disc Cleaning the Disc When the LED Blinks
... Confirming the Installation of Device Driver How To Use The DVD Writer How to Use the Drive How to Use DVD±R/RW and Other Discs MAGIC SPEED Deleting Utilities Troubleshooting Troubleshooting Caution: Possible Errors Product Specifications Storing/Cleaning Drive and Disc Cleaning the Drive Storing the Disc Cleaning the Disc When the LED Blinks
User Manual (ENGLISH)
Page 8
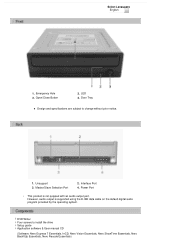
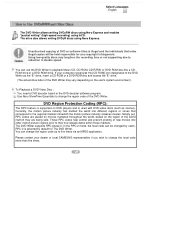
LED 4. DVD Writer Four screws to change without prior notice. 1. Emergency Hole 3. Unsupport 3. Door Tray z Design and specifications are subject to install the drive Setup guide Application software & User manual CD (Software: Nero Express 7 Essentials, InCD, Nero Vision Essentials, Nero ShowTime Essentials, Nero BackItUp Essentials, Nero Recode Essentials) Master/...
LED 4. DVD Writer Four screws to change without prior notice. 1. Emergency Hole 3. Unsupport 3. Door Tray z Design and specifications are subject to install the drive Setup guide Application software & User manual CD (Software: Nero Express 7 Essentials, InCD, Nero Vision Essentials, Nero ShowTime Essentials, Nero BackItUp Essentials, Nero Recode Essentials) Master/...
User Manual (ENGLISH)
Page 13
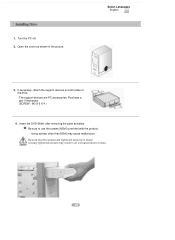
Open the cover as below. Select Languages English 3. The support devices are tightened securely in place. Insert the DVD Writer after removing the plate as shown in an increased level of the drive - Be sure to use the screws (M3x6) provided with the product. - Loosely tightened screws may cause malfunction. Purchase a pair if necessary. (SCREW : M3 X 6 X 4 ) 4. Be sure that the screws are PC accessories. 1. Turn the PC off. 2. If necessary, attach the support devices on both sides of noise. Using screws other than M3x6 may result in the picture.
Open the cover as below. Select Languages English 3. The support devices are tightened securely in place. Insert the DVD Writer after removing the plate as shown in an increased level of the drive - Be sure to use the screws (M3x6) provided with the product. - Loosely tightened screws may cause malfunction. Purchase a pair if necessary. (SCREW : M3 X 6 X 4 ) 4. Be sure that the screws are PC accessories. 1. Turn the PC off. 2. If necessary, attach the support devices on both sides of noise. Using screws other than M3x6 may result in the picture.
User Manual (ENGLISH)
Page 15
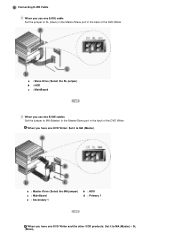
When you have one DVD Writer: Set it to SL (slave) in the Master/Slave port in the back of the DVD Writer. Connecting E-IDE Cable When you use one DVD Writer and the other ODD products: Set it to MA (Master) a : Master Drive (Select the MA jumper) c : MainBoard e : Secondary 1 b : HDD d : Primary 1 When you use two E-IDE cables Set the jumper to MA (Master) in the Master/Slave port in the back of the DVD Writer a : Slave Drive (Select the SL jumper) b : HDD c : MainBoard When you have one E-IDE cable Set the jumper to MA (Master) / SL (Slave),
When you have one DVD Writer: Set it to SL (slave) in the Master/Slave port in the back of the DVD Writer. Connecting E-IDE Cable When you use one DVD Writer and the other ODD products: Set it to MA (Master) a : Master Drive (Select the MA jumper) c : MainBoard e : Secondary 1 b : HDD d : Primary 1 When you use two E-IDE cables Set the jumper to MA (Master) in the Master/Slave port in the back of the DVD Writer a : Slave Drive (Select the SL jumper) b : HDD c : MainBoard When you have one E-IDE cable Set the jumper to MA (Master) / SL (Slave),
User Manual (ENGLISH)
Page 16
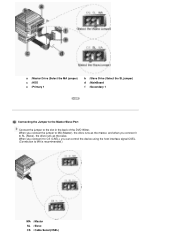
When you can control the device using the host interface signal CSEL. (Connection to the slot in the back of the DVD Writer. When you connect it to SL (Slave), the drive runs as the master, and when you connect it to CS (CSEL), you connect the jumper to MA (Master), the drive runs as the slave. a : Master Drive (Select the MA jumper) c : HDD e : Primary 1 b : Slave Drive (Select the SL jumper) d : MainBoard f : Secondary 1 Connecting the Jumper to the Master/Slave Port Connect the jumper to MA is recommended.) MA : Master SL : Slave CS : Cable Select(CSEL)
When you can control the device using the host interface signal CSEL. (Connection to the slot in the back of the DVD Writer. When you connect it to SL (Slave), the drive runs as the master, and when you connect it to CS (CSEL), you connect the jumper to MA (Master), the drive runs as the slave. a : Master Drive (Select the MA jumper) c : HDD e : Primary 1 b : Slave Drive (Select the SL jumper) d : MainBoard f : Secondary 1 Connecting the Jumper to the Master/Slave Port Connect the jumper to MA is recommended.) MA : Master SL : Slave CS : Cable Select(CSEL)
User Manual (ENGLISH)
Page 18
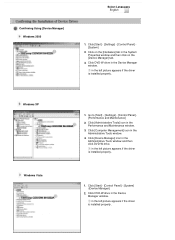
... properly. 1. Click [Device Manager] icon in the Administrative Tools window and then click DVD-W drive. ① in the Administrative Tools window. 4. Click on the [Device Manager] tab. 3. Click DVD-W drive in the Device Manager window. ① in the System Properties window and then click ...on the [Hardware] tab in the left picture appears if the driver is installed properly. Click DVD-W drive in the Device Manager window. ① in the Performance and Maintenance window. 3. Click [Administrative Tools] icon in the left picture...
... properly. 1. Click [Device Manager] icon in the Administrative Tools window and then click DVD-W drive. ① in the Administrative Tools window. 4. Click on the [Device Manager] tab. 3. Click DVD-W drive in the Device Manager window. ① in the System Properties window and then click ...on the [Hardware] tab in the left picture appears if the driver is installed properly. Click DVD-W drive in the Device Manager window. ① in the Performance and Maintenance window. 3. Click [Administrative Tools] icon in the left picture...

User Manual (ENGLISH)
Page 19
... Use a Vertically Installed Drive This drive can be installed vertically. You can use the 3.15 Inch (8cm) disc) The drive cannot read the disc properly if any part of the disc is Green, do not turn the PC off or remove the DVD Writer as it may cause damage in the drive. How to Use... a Horizontally Installed Drive You can use only the 4.72 Inch (12cm) disc. (You cannot use 3.15 Inch or 4.72 Inch (8cm...
... Use a Vertically Installed Drive This drive can be installed vertically. You can use the 3.15 Inch (8cm) disc) The drive cannot read the disc properly if any part of the disc is Green, do not turn the PC off or remove the DVD Writer as it may cause damage in the drive. How to Use... a Horizontally Installed Drive You can use only the 4.72 Inch (12cm) disc. (You cannot use 3.15 Inch or 4.72 Inch (8cm...
User Manual (ENGLISH)
Page 20
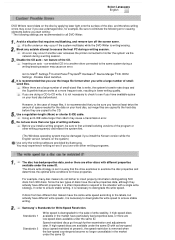
... industry has divided the world into other motion picture regions prior to playback Music CD, CD-ROM, CD-R/RW, or DVD-ROM disc like a CDROM drive or a DVD-ROM drive. Unauthorized copying of the world inwhich they are placed on movies marketed throughout the world, based on the user's system environment... to their true release dates within those markets. These RPC codes help control and prevent pirating of the DVD Writer. If your dealer or local SAMSUNG representative if you wish to change the region code up to the regional markets intowhich the motion picture industry releases movies. ...
... industry has divided the world into other motion picture regions prior to playback Music CD, CD-ROM, CD-R/RW, or DVD-ROM disc like a CDROM drive or a DVD-ROM drive. Unauthorized copying of the world inwhich they are placed on movies marketed throughout the world, based on the user's system environment... to their true release dates within those markets. These RPC codes help control and prevent pirating of the DVD Writer. If your dealer or local SAMSUNG representative if you wish to change the region code up to the regional markets intowhich the motion picture industry releases movies. ...
User Manual (ENGLISH)
Page 28
... with other discs with different properties available under the same ID. If discs from 32X discs. run -enabled CD in to another drive connected to the same system during a writing/erasing session may occur if another user accesses the printer connected to the CD. Since ...impossible to respond to the situation with as image files are a large number of the CD. Select Languages English DVD Writers record data on the disc by Samsung. Speed-restricted discs go through further examination and adjustments later. Block any outside attempt to Start Settings Control Panel...
... with other discs with different properties available under the same ID. If discs from 32X discs. run -enabled CD in to another drive connected to the same system during a writing/erasing session may occur if another user accesses the printer connected to the CD. Since ...impossible to respond to the situation with as image files are a large number of the CD. Select Languages English DVD Writers record data on the disc by Samsung. Speed-restricted discs go through further examination and adjustments later. Block any outside attempt to Start Settings Control Panel...
User Manual (ENGLISH)
Page 30
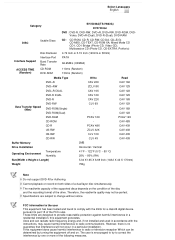
...comply with the instructions, may not be determined by one or more of the FCC rules. Select Languages English Category SH-S222A(TS-H662A) DVD Writer DVD : DVD-R, DVD-RW, DVD+R, DVD+RW, DVD-ROM, DVDVideo, DVD+R (Dual), DVD-R (Dual), DVD-RAM DISC Usable Discs CD : CD-ROM, CD-R, CD-RW, CD-DA, CD+E(G) CD-MIDI, CD-TEXT, CD-...equipment has been tested and found to correct the interference by turning the equipment off and on both sides of the drive. CAV 12X CAV 16X CAV 12X DVD-RAM PCAV 12X PCAV 12X CD-ROM - CAV 48X CD-R PCAV 48X CAV 40X US-RW ZCLV 32X CAV ...
...comply with the instructions, may not be determined by one or more of the FCC rules. Select Languages English Category SH-S222A(TS-H662A) DVD Writer DVD : DVD-R, DVD-RW, DVD+R, DVD+RW, DVD-ROM, DVDVideo, DVD+R (Dual), DVD-R (Dual), DVD-RAM DISC Usable Discs CD : CD-ROM, CD-R, CD-RW, CD-DA, CD+E(G) CD-MIDI, CD-TEXT, CD-...equipment has been tested and found to correct the interference by turning the equipment off and on both sides of the drive. CAV 12X CAV 16X CAV 12X DVD-RAM PCAV 12X PCAV 12X CD-ROM - CAV 48X CD-R PCAV 48X CAV 40X US-RW ZCLV 32X CAV ...
User Manual (KOREAN)
Page 1
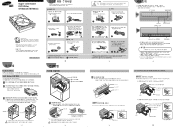
Super -writemaster DVD Writer SH-S222A(TS-H662A) DRIVE 기타 제품소개 CD RoHS 2006년 7 B급 기기 B BG68-01668A REV.00 설치방법 OS:Microsoft� Windows� 2000/XP 1 이상)/Vista CPU:800MHz 4 2.0GHz이상), RAM : 256MB 이상, HDD:10GBytes 이상 DVD Writer DVD Writer...
Super -writemaster DVD Writer SH-S222A(TS-H662A) DRIVE 기타 제품소개 CD RoHS 2006년 7 B급 기기 B BG68-01668A REV.00 설치방법 OS:Microsoft� Windows� 2000/XP 1 이상)/Vista CPU:800MHz 4 2.0GHz이상), RAM : 256MB 이상, HDD:10GBytes 이상 DVD Writer DVD Writer...

