User Manual Ver.1.0 (English)
Page 4
... heat the battery. Use only Samsung-approved batteries, chargers, cables and accessories. • Using unauthorized batteries, chargers, cables or accessories can damage ports, connectors, and accessories. 3 Do not use the AC charger, turn off the camera before you connect cables or adapters and install batteries and memory cards. This may cause a fire or...
... heat the battery. Use only Samsung-approved batteries, chargers, cables and accessories. • Using unauthorized batteries, chargers, cables or accessories can damage ports, connectors, and accessories. 3 Do not use the AC charger, turn off the camera before you connect cables or adapters and install batteries and memory cards. This may cause a fire or...
User Manual Ver.1.0 (English)
Page 5
... copyrights, trademarks, intellectual property laws, or public decency ordinances. 4 Do not use only Samsung-approved devices or accessories. To prevent unwanted interference, use the camera if the screen is operating properly before use a damaged charger, battery, or memory card. Never use . Check that may be leaked, so avoid transferring sensitive data in homes...
... copyrights, trademarks, intellectual property laws, or public decency ordinances. 4 Do not use only Samsung-approved devices or accessories. To prevent unwanted interference, use the camera if the screen is operating properly before use a damaged charger, battery, or memory card. Never use . Check that may be leaked, so avoid transferring sensitive data in homes...
User Manual Ver.1.0 (English)
Page 15
... ...20 Using the DIRECT LINK button (ST150F/ST151F/ST152F only 22 Inserting the battery and memory card 23 Charging the battery and turning on your camera 24 Charging the battery 24 Turning on your camera 24 Performing the initial setup 25 Learning icons ...27 Using the Home screen 28 Accessing the ...or menus 32 Setting the display and sound 34 Setting the display type 34 Setting the sound ...35 Capturing photos ...36 Zooming ...37 Reducing camera shake (DIS 39 Tips for getting a clearer photo 40 Extended functions...42 Using Basic modes ...43 Using the Smart Auto mode 43 Using the...
... ...20 Using the DIRECT LINK button (ST150F/ST151F/ST152F only 22 Inserting the battery and memory card 23 Charging the battery and turning on your camera 24 Charging the battery 24 Turning on your camera 24 Performing the initial setup 25 Learning icons ...27 Using the Home screen 28 Accessing the ...or menus 32 Setting the display and sound 34 Setting the display type 34 Setting the sound ...35 Capturing photos ...36 Zooming ...37 Reducing camera shake (DIS 39 Tips for getting a clearer photo 40 Extended functions...42 Using Basic modes ...43 Using the Smart Auto mode 43 Using the...
User Manual Ver.1.0 (English)
Page 18
... Settings menu ...122 Accessing the settings menu 122 Sound ...123 Display ...123 Connectivity ...124 General ...125 Appendixes...127 Error messages ...128 Camera maintenance 129 Cleaning your camera 129 Using or storing the camera 130 About memory cards 131 About the battery 134 Before contacting a service center 138 Camera specifications 141 Glossary ...145 Index ...150 17
... Settings menu ...122 Accessing the settings menu 122 Sound ...123 Display ...123 Connectivity ...124 General ...125 Appendixes...127 Error messages ...128 Camera maintenance 129 Cleaning your camera 129 Using or storing the camera 130 About memory cards 131 About the battery 134 Before contacting a service center 138 Camera specifications 141 Glossary ...145 Index ...150 17

User Manual Ver.1.0 (English)
Page 19
... (ST150F/ST151F/ST152F only 22 Inserting the battery and memory card 23 Charging the battery and turning on your camera 24 Charging the battery 24 Turning on your camera's layout, icons, and basic functions for getting a clearer photo 40 Basic functions Learn about your camera 24 Performing the initial setup 25 Learning icons 27 Using... options or menus 32 Setting the display and sound 34 Setting the display type 34 Setting the sound 35 Capturing photos 36 Zooming 37 Reducing camera shake (DIS 39 Tips for shooting.
... (ST150F/ST151F/ST152F only 22 Inserting the battery and memory card 23 Charging the battery and turning on your camera 24 Charging the battery 24 Turning on your camera's layout, icons, and basic functions for getting a clearer photo 40 Basic functions Learn about your camera 24 Performing the initial setup 25 Learning icons 27 Using... options or menus 32 Setting the display and sound 34 Setting the display type 34 Setting the sound 35 Capturing photos 36 Zooming 37 Reducing camera shake (DIS 39 Tips for shooting.
User Manual Ver.1.0 (English)
Page 20
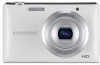
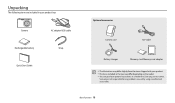
... the box may differ slightly from the items shipped with your product box. Camera Rechargeable battery Quick Start Guide AC adapter/USB cable Strap Optional accessories Camera case A/V cable Battery charger Memory card/Memory card adapter • The illustrations may differ depending on the model. • You can purchase optional accessories at a retailer or a Samsung service center.
... the box may differ slightly from the items shipped with your product box. Camera Rechargeable battery Quick Start Guide AC adapter/USB cable Strap Optional accessories Camera case A/V cable Battery charger Memory card/Memory card adapter • The illustrations may differ depending on the model. • You can purchase optional accessories at a retailer or a Samsung service center.
User Manual Ver.1.0 (English)
Page 21
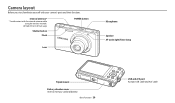
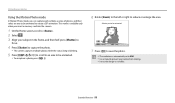
Camera layout Before you start, familiarize yourself with the internal antenna while using the wireless network. (ST150F/ST151F/ST152F only) Shutter button Flash POWER button Lens Microphone Speaker AF-assist light/Timer lamp Tripod mount Battery chamber cover Insert a memory card and battery Basic functions 20 USB and A/V port Accepts USB cable and A/V cable Internal antenna* * Avoid contact with your camera's parts and their functions.
Camera layout Before you start, familiarize yourself with the internal antenna while using the wireless network. (ST150F/ST151F/ST152F only) Shutter button Flash POWER button Lens Microphone Speaker AF-assist light/Timer lamp Tripod mount Battery chamber cover Insert a memory card and battery Basic functions 20 USB and A/V port Accepts USB cable and A/V cable Internal antenna* * Avoid contact with your camera's parts and their functions.
User Manual Ver.1.0 (English)
Page 24
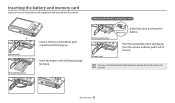
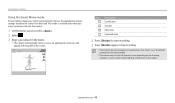
Memory card Rechargeable battery Insert a memory card with the Samsung logo facing up. Basic functions 23 Removing the battery and memory card Rechargeable battery Memory card Slide the lock up . Insert the battery with the goldcolored contacts facing up to insert the battery and an optional memory card into the camera. Push the card gently until it disengages from the camera, and then pull it...
Memory card Rechargeable battery Insert a memory card with the Samsung logo facing up. Basic functions 23 Removing the battery and memory card Rechargeable battery Memory card Slide the lock up . Insert the battery with the goldcolored contacts facing up to insert the battery and an optional memory card into the camera. Push the card gently until it disengages from the camera, and then pull it...

User Manual Ver.1.0 (English)
Page 28
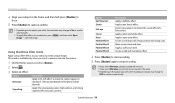
Learning icons The camera displays icons for a while if you set. The icons flash yellow for the mode and options you change options. 1 Icon Description Burst option AutoShare On 2 (... 3 Shooting information Icon Description Current date Current time Available number of photos Memory card inserted • : Fully charged • : Partially charged • : Empty (Recharge) • : Charging (Connected with the charger) Aperture value Shutter speed Available recording time Auto focus frame Camera shake Zoom indicator Photo resolution when the Intelli zoom is on Zoom...
Learning icons The camera displays icons for a while if you set. The icons flash yellow for the mode and options you change options. 1 Icon Description Burst option AutoShare On 2 (... 3 Shooting information Icon Description Current date Current time Available number of photos Memory card inserted • : Fully charged • : Partially charged • : Empty (Recharge) • : Charging (Connected with the charger) Aperture value Shutter speed Available recording time Auto focus frame Camera shake Zoom indicator Photo resolution when the Intelli zoom is on Zoom...
User Manual Ver.1.0 (English)
Page 46
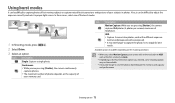
...Sunsets Blue skies Forested areas 4 Press [Shutter] to start recording. 5 Press [Shutter] again to stop recording. • If the camera does not recognize an appropriate scene mode, it has detected. An appropriate scene icon will appear at the top left of the screen. ... the correct scene depending on the shooting conditions, such as camera shake, lighting, and distance to . 2 Select . 3 Align your subject in the frame. • The camera automatically selects a scene. This mode is available only when you insert a memory card into the camera. 1 On the Home screen, scroll to the subject. ...
...Sunsets Blue skies Forested areas 4 Press [Shutter] to start recording. 5 Press [Shutter] again to stop recording. • If the camera does not recognize an appropriate scene mode, it has detected. An appropriate scene icon will appear at the top left of the screen. ... the correct scene depending on the shooting conditions, such as camera shake, lighting, and distance to . 2 Select . 3 Align your subject in the frame. • The camera automatically selects a scene. This mode is available only when you insert a memory card into the camera. 1 On the Home screen, scroll to the subject. ...
User Manual Ver.1.0 (English)
Page 47
... [Shutter] to start recording. 5 Press [Shutter] again to 20 minutes in length. This mode is available only when you insert a memory card into the camera. • H.264 (MPEG-4 part10/AVC) is a high-compression video format established by the international standards organizations ISO-IEC and ITU-T. •... recording. To decrease zoom noise, use the zoom function when recording a video, the camera may not support high definition recording. If your card does not, set a lower resolution. • Memory cards with faster write speeds. • If you can customize settings to record HD videos...
... [Shutter] to start recording. 5 Press [Shutter] again to 20 minutes in length. This mode is available only when you insert a memory card into the camera. • H.264 (MPEG-4 part10/AVC) is a high-compression video format established by the international standards organizations ISO-IEC and ITU-T. •... recording. To decrease zoom noise, use the zoom function when recording a video, the camera may not support high definition recording. If your card does not, set a lower resolution. • Memory cards with faster write speeds. • If you can customize settings to record HD videos...
User Manual Ver.1.0 (English)
Page 55
... Using the Movie Filter mode Apply various filter effects to your subject in the video. • Depending on the option you insert a memory card into the camera. 1 On the Home screen, scroll to . 2 Select . 3 Select an effect. Option Half Tone Dot Sketch Fish-eye Classic .... Extended functions 54 Apply a black and white effect. Option Miniature Vignetting Description Apply a tilt-shift effect to imitate the visual effect of Lomo cameras. Make scenes clean and clear. Apply a soft brown tone. Create a cold and monotone effect. 4 Press [Shutter] to start recording. 5...
... Using the Movie Filter mode Apply various filter effects to your subject in the video. • Depending on the option you insert a memory card into the camera. 1 On the Home screen, scroll to . 2 Select . 3 Select an effect. Option Half Tone Dot Sketch Fish-eye Classic .... Extended functions 54 Apply a black and white effect. Option Miniature Vignetting Description Apply a tilt-shift effect to imitate the visual effect of Lomo cameras. Make scenes clean and clear. Apply a soft brown tone. Create a cold and monotone effect. 4 Press [Shutter] to start recording. 5...
User Manual Ver.1.0 (English)
Page 57
... half-press [Shutter] to focus. 4 Press [Shutter] to capture the photo. • The camera captures multiple photos while the status lamp is available only when you insert a memory card into the camera. 1 On the Home screen, scroll to . 2 Select . 3 Align your camera from shaking. • It may take longer to reduce or enlarge the area...
... half-press [Shutter] to focus. 4 Press [Shutter] to capture the photo. • The camera captures multiple photos while the status lamp is available only when you insert a memory card into the camera. 1 On the Home screen, scroll to . 2 Select . 3 Align your camera from shaking. • It may take longer to reduce or enlarge the area...
User Manual Ver.1.0 (English)
Page 74
...• It may take longer to save the photos depending on the shooting conditions. • When you select Motion Capture, your memory card. In these cases, select one of your subjects in photos. Icon Description Motion Capture: While you selected, some shooting options may not... 73 Continuous: • While you are pressing [Shutter], the camera captures photos (5 photos per second; Use a tripod for best results. Also, it can be available. • It may differ depending on the memory card capacity and performance. Icon Description Single: Capture a single photo. Available...
...• It may take longer to save the photos depending on the shooting conditions. • When you select Motion Capture, your memory card. In these cases, select one of your subjects in photos. Icon Description Motion Capture: While you selected, some shooting options may not... 73 Continuous: • While you are pressing [Shutter], the camera captures photos (5 photos per second; Use a tripod for best results. Also, it can be available. • It may differ depending on the memory card capacity and performance. Icon Description Single: Capture a single photo. Available...
User Manual Ver.1.0 (English)
Page 80
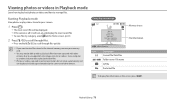
...that were captured with other devices. Starting Playback mode View photos or play videos stored in your memory card. • You may not be able to manage files. Photo file information Memory in use File Information Album/Zoom In Icon Description Current file/Total files Folder name-File name GIF...[F/t] to scroll through files quickly. • If you want to view files stored in the internal memory, remove your camera. 1 Press [P]. • The most recent file will be displayed. • If the camera is off, it will turn on and display the most recent file. • To view files by...
...that were captured with other devices. Starting Playback mode View photos or play videos stored in your memory card. • You may not be able to manage files. Photo file information Memory in use File Information Album/Zoom In Icon Description Current file/Total files Folder name-File name GIF...[F/t] to scroll through files quickly. • If you want to view files stored in the internal memory, remove your camera. 1 Press [P]. • The most recent file will be displayed. • If the camera is off, it will turn on and display the most recent file. • To view files by...

User Manual Ver.1.0 (English)
Page 95
... the computer. If the cable is blinking, wait until it may damage your files. Transferring files to the computer Connect the camera to a computer to transfer files from the camera's memory card to your computer as a removable disk. 1 On the Home screen, scroll to . 2 Select . 3 Select Connectivity → i-Launcher → Off. 4 Turn off the...
... the computer. If the cable is blinking, wait until it may damage your files. Transferring files to the computer Connect the camera to a computer to transfer files from the camera's memory card to your computer as a removable disk. 1 On the Home screen, scroll to . 2 Select . 3 Select Connectivity → i-Launcher → Off. 4 Turn off the...
User Manual Ver.1.0 (English)
Page 105
.... Do not enter any problem caused by entering such information. • Available network connections may differ by country. • The WLAN feature of your camera must insert a memory card to use the Wi-Fi features. • The quality of the network connection will be determined by the device. Enter your ID and password...
.... Do not enter any problem caused by entering such information. • Available network connections may differ by country. • The WLAN feature of your camera must insert a memory card to use the Wi-Fi features. • The quality of the network connection will be determined by the device. Enter your ID and password...

User Manual Ver.1.0 (English)
Page 126
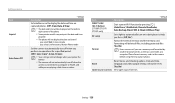
... display text. If you intentionally change file names, the camera may differ depending on the language selected. Item File No. * Default Description Specify how to name files. • Reset: Set the file number to start from 0001 when you insert a new memory card, format a memory card, or delete all files. • Series*: Set the file...
... display text. If you intentionally change file names, the camera may differ depending on the language selected. Item File No. * Default Description Specify how to name files. • Reset: Set the file number to start from 0001 when you insert a new memory card, format a memory card, or delete all files. • Series*: Set the file...
User Manual Ver.1.0 (English)
Page 127
... can occur if you select Text in Scene mode -- you use a memory card formatted by pressing [x]. (AutoShare*, MobileLink, Remote Viewfinder, Auto Backup, Email, SNS & Cloud, AllShare Play) Set a light to automatically turn off when the camera is connected to help you are playing a slide show or videos. you... (Off*, Date, Date & Time) • The date and time will not automatically turn on the bottom right corner of camera, a memory card reader, or a computer. Settings menu Item Imprint Auto Power Off * Default Description Set whether or not to capture photos. Please format...
... can occur if you select Text in Scene mode -- you use a memory card formatted by pressing [x]. (AutoShare*, MobileLink, Remote Viewfinder, Auto Backup, Email, SNS & Cloud, AllShare Play) Set a light to automatically turn off when the camera is connected to help you are playing a slide show or videos. you... (Off*, Date, Date & Time) • The date and time will not automatically turn on the bottom right corner of camera, a memory card reader, or a computer. Settings menu Item Imprint Auto Power Off * Default Description Set whether or not to capture photos. Please format...

User Manual Ver.1.0 (English)
Page 128
Appendixes Get information about error messages, specifications, and maintenance. Error messages 128 Camera maintenance 129 Cleaning your camera 129 Using or storing the camera 130 About memory cards 131 About the battery 134 Before contacting a service center 138 Camera specifications 141 Glossary 145 Index 150
Appendixes Get information about error messages, specifications, and maintenance. Error messages 128 Camera maintenance 129 Cleaning your camera 129 Using or storing the camera 130 About memory cards 131 About the battery 134 Before contacting a service center 138 Camera specifications 141 Glossary 145 Index 150


