
User Manual
Page 11
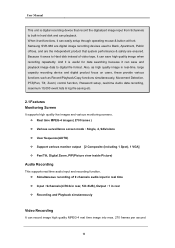
... for data searching because it can record image high quality MPEG-4 real time image into max. 270 frames per second 11 When it set functions, it is digital recording device that system performance & safety are digital... event lists & log file saving etc. 2.1 Features Monitoring Screen It supports high quality live images and various monitoring screens. Real time MPEG-4 images( 270 frames ) Various surveillance screen mode : Single, 4, 9divisions User Sequence(AUTO) Support various monitor output [2 ... can save and playback image data to digital file format. Samsung SVR-960 are ensured.
... for data searching because it can record image high quality MPEG-4 real time image into max. 270 frames per second 11 When it set functions, it is digital recording device that system performance & safety are digital... event lists & log file saving etc. 2.1 Features Monitoring Screen It supports high quality live images and various monitoring screens. Real time MPEG-4 images( 270 frames ) Various surveillance screen mode : Single, 4, 9divisions User Sequence(AUTO) Support various monitor output [2 ... can save and playback image data to digital file format. Samsung SVR-960 are ensured.
User Manual
Page 18
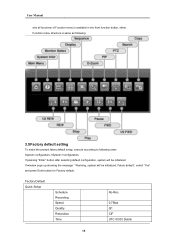
... front function button, either. Factory Default Quick Setup Schedule Recording Speed Quality Resolution Time No Rec. 0.75fps Q1 CIF UTC 00:00 Dublin 18 User Manual and all functions of Function menu is same as following 3.5 Factory default setting To make the product fatory default setup, execute according to following order. If...
... front function button, either. Factory Default Quick Setup Schedule Recording Speed Quality Resolution Time No Rec. 0.75fps Q1 CIF UTC 00:00 Dublin 18 User Manual and all functions of Function menu is same as following 3.5 Factory default setting To make the product fatory default setup, execute according to following order. If...
User Manual
Page 19
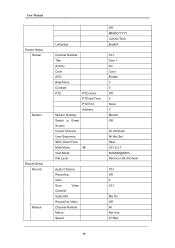
...Record Manual Language Off MM/DD/YYYY Current Time English Channel Number Title Activity Color AGC Brightness Contrast PTZ PTZ Home PTZ Idle Time PTZ Port Address Monitor Number Switch to Event Screen Covert Channel User Sequence SEQ. Dwell Time Multi Mode 4E VGA Mode Info Level ...Ch1 Cam 1 On Color Enable 0 0 Off 5 None 0 Monitor Off All UnCheck All Not Set 5Sec Ch1,3,5,7 800x600@56Hz Remocon ID UnCheck Audio Channel Recording Gain Sync...
...Record Manual Language Off MM/DD/YYYY Current Time English Channel Number Title Activity Color AGC Brightness Contrast PTZ PTZ Home PTZ Idle Time PTZ Port Address Monitor Number Switch to Event Screen Covert Channel User Sequence SEQ. Dwell Time Multi Mode 4E VGA Mode Info Level ...Ch1 Cam 1 On Color Enable 0 0 Off 5 None 0 Monitor Off All UnCheck All Not Set 5Sec Ch1,3,5,7 800x600@56Hz Remocon ID UnCheck Audio Channel Recording Gain Sync...
User Manual
Page 20
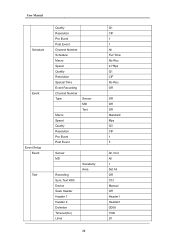
Off Off Off Off Standard 8fps Q3 CIF 1 5 All, N.O All 1 Set All Off Ch1 Manual Off Header1 Header2 0D0A 1000 20 User Manual Schedule Event Event Setup Event Text Quality Resolution Pre Event Post Event Channel Number Schedule Macro Speed Quality Resolution Special Time Event Recording Channel Number Type Macro Speed Quality Resolution Pre Event Post Event Sensor MD Text Sensor MD Recording Sync Text With Device Seek Header Header 1 Header 2 Delimiter Timeout(ms) Lines Sensitivity Area 20 Q1 CIF 1 1 All Full Time No Rec. 0.75fps Q1 CIF No Rec.
Off Off Off Off Standard 8fps Q3 CIF 1 5 All, N.O All 1 Set All Off Ch1 Manual Off Header1 Header2 0D0A 1000 20 User Manual Schedule Event Event Setup Event Text Quality Resolution Pre Event Post Event Channel Number Schedule Macro Speed Quality Resolution Special Time Event Recording Channel Number Type Macro Speed Quality Resolution Pre Event Post Event Sensor MD Text Sensor MD Recording Sync Text With Device Seek Header Header 1 Header 2 Delimiter Timeout(ms) Lines Sensitivity Area 20 Q1 CIF 1 1 All Full Time No Rec. 0.75fps Q1 CIF No Rec.
User Manual
Page 21
...Action Preset System Event Communication Network xDSL DDNS NTP Select D-I/O Output Type Select Action Action Duration Action Source Event Acton in Special Time Channel Number Preset System Event Source System Event Method Type DHCP IP addr Net Mask Gateway DNS1 Additional DNS Port Band Width Limit...ID Password Status Sync With NTP NTP Mode NTP Server Loc. NTP Local Server 21 Output Sensor R1 10 Full Time, UnCheck All Full Time, Disable Ch1 Sensor1, Not Set UnCheck All UnCheck All Ethernet Off Current IP Current NM Current GW 0.0.0.0 0.0.0.0 4000 0.0 guest ***** xDSL not ...
...Action Preset System Event Communication Network xDSL DDNS NTP Select D-I/O Output Type Select Action Action Duration Action Source Event Acton in Special Time Channel Number Preset System Event Source System Event Method Type DHCP IP addr Net Mask Gateway DNS1 Additional DNS Port Band Width Limit...ID Password Status Sync With NTP NTP Mode NTP Server Loc. NTP Local Server 21 Output Sensor R1 10 Full Time, UnCheck All Full Time, Disable Ch1 Sensor1, Not Set UnCheck All UnCheck All Ethernet Off Current IP Current NM Current GW 0.0.0.0 0.0.0.0 4000 0.0 guest ***** xDSL not ...

User Manual
Page 25
...Function menu. - User Sequence mode is defined 6 sequences and shows in order to 'Off', user sequence view does not operate. - When it sets to Single screen(1) All screen(9DIV) 4 division screen(4A) Single screen(5) Single screen(6) 4 division screen (4B). 25 from "Monitor" of User... Sequence Conf. Above example picture is usable by pressing [AUTO] button from User Sequence mode. 4.4.2 User Sequence mode - Dwell Time" and set wanted value from 1 to exit from every division mode. - Press [AUTO] button. User mode can define maximum 16 users. 2. Select "SEQ...
...Function menu. - User Sequence mode is defined 6 sequences and shows in order to 'Off', user sequence view does not operate. - When it sets to Single screen(1) All screen(9DIV) 4 division screen(4A) Single screen(5) Single screen(6) 4 division screen (4B). 25 from "Monitor" of User... Sequence Conf. Above example picture is usable by pressing [AUTO] button from User Sequence mode. 4.4.2 User Sequence mode - Dwell Time" and set wanted value from 1 to exit from every division mode. - Press [AUTO] button. User mode can define maximum 16 users. 2. Select "SEQ...
User Manual
Page 26
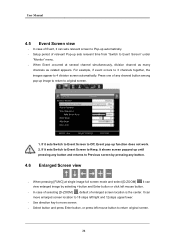
... location to Event Screen" under "Monitor" menu. - It can move screen. - User Manual 4.5 Event Screen view - Press one of relevant Pop-up sets relevant time from "Switch to 18 steps left/right and 12steps upper/lower. - Select button and press Enter button, or press left mouse button. - If it can... sets relevant screen to Pop-up image to return to return original screen. 26 Use direction key to Off, Event pop-up until pressing...
... location to Event Screen" under "Monitor" menu. - It can move screen. - User Manual 4.5 Event Screen view - Press one of relevant Pop-up sets relevant time from "Switch to 18 steps left/right and 12steps upper/lower. - Select button and press Enter button, or press left mouse button. - If it can... sets relevant screen to Pop-up image to return to return original screen. 26 Use direction key to Off, Event pop-up until pressing...
User Manual
Page 27
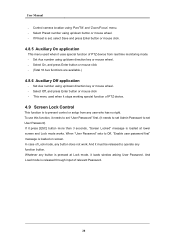
... click left /right direction key at front part or mouse wheel. 4.8.3 Load Preset application This menu is used when it sets Preset location from real time monitoring mode. - Press [PAUSE] for Zoom & Focus functions through Func button. - It can control PTZ while viewing image ... - Move to the channel wants to utilize Zoom & Focus functions from real time monitoring mode. 27 Select Pan/Tilt from Function menu - If Preset is used when it sets relevant protocol to Preset location from real time monitoring mode. - or click PTZ button from PTZ mode. - User Manual 4.7...
... click left /right direction key at front part or mouse wheel. 4.8.3 Load Preset application This menu is used when it sets Preset location from real time monitoring mode. - Press [PAUSE] for Zoom & Focus functions through Func button. - It can control PTZ while viewing image ... - Move to the channel wants to utilize Zoom & Focus functions from real time monitoring mode. 27 Select Pan/Tilt from Function menu - If Preset is used when it sets relevant protocol to Preset location from real time monitoring mode. - or click PTZ button from PTZ mode. - User Manual 4.7...
User Manual
Page 28
... lower screen and Lock mode works. Set Aux number using up/down direction key or mouse wheel. - Set Aux number using 'Pan/Tilt' and 'Zoom/Focus' menu. - Whatever any function button. When "User Password" sets to prevent control or setup from real time monitoring mode. - And it must... be released to set , select Save and press Enter button or mouse click. 4.8.5 Auxiliary On application This menu used when...
... lower screen and Lock mode works. Set Aux number using up/down direction key or mouse wheel. - Set Aux number using 'Pan/Tilt' and 'Zoom/Focus' menu. - Whatever any function button. When "User Password" sets to prevent control or setup from real time monitoring mode. - And it must... be released to set , select Save and press Enter button or mouse click. 4.8.5 Auxiliary On application This menu used when...

User Manual
Page 30
...Playback speed in a speed set first. - STOP : Stop Playback. from monitor mode. When using mouse, press Pause button from Function button. If it presses [REW] to playback is 2 fps (displays only I Frame). When using mouse, press Stop button from the time user played recently. Playback... - User Manual Chapter 5. Press [PLAY] button from monitoring mode or click Play button using mouse, click Play button from present live time. When using mouse. At Live, press [FWD] button to play back recording image in 9 divisions. 5.1.2 Various Playback functions PLAY :...
...Playback speed in a speed set first. - STOP : Stop Playback. from monitor mode. When using mouse, press Pause button from Function button. If it presses [REW] to playback is 2 fps (displays only I Frame). When using mouse, press Stop button from the time user played recently. Playback... - User Manual Chapter 5. Press [PLAY] button from monitoring mode or click Play button using mouse, click Play button from present live time. When using mouse. At Live, press [FWD] button to play back recording image in 9 divisions. 5.1.2 Various Playback functions PLAY :...

User Manual
Page 32
When using mouse, it can select date and search time base using mouse, it can set the part wants to search. When using button at front, it starts Play through Enter button after selecting searched list or rolling wheel. 32 Year Month Selecting Date Selecting Time : It selects the year to change through rolling...
When using mouse, it can select date and search time base using mouse, it can set the part wants to search. When using button at front, it starts Play through Enter button after selecting searched list or rolling wheel. 32 Year Month Selecting Date Selecting Time : It selects the year to change through rolling...

User Manual
Page 34
...to push the [copy] button on the start Play from the time selects. Selecting Disk : Select media wants to . Type : Select DVD using up /down button at front or mouse wheel. Select the location of Channel and select it can set up /down key or mouse wheel. It can change through Enter... button or mouse click. 5.3 Copy This menu is to Copy. From : It appoints starting date & time wants to Copy. It can detect CD & DVD for searching and indicates...
...to push the [copy] button on the start Play from the time selects. Selecting Disk : Select media wants to . Type : Select DVD using up /down button at front or mouse wheel. Select the location of Channel and select it can set up /down key or mouse wheel. It can change through Enter... button or mouse click. 5.3 Copy This menu is to Copy. From : It appoints starting date & time wants to Copy. It can detect CD & DVD for searching and indicates...

User Manual
Page 36
...to FAT32 using Enter button or mouse click and Copy. Press Enter from Channel part to Copy. Set up as same as above, From. : Select the media wants to Copy. It cannot playback Copy... 100% from Channel list and press Enter button or click left mouse button. : Appoint starting date & time wants to pop-up channel selection window or pop up Channel List using mouse wheel. : Among 9 channels.... After selecting the part wants to change, it can set up using up /down key or mouse wheel. : It appoints the last date & time wants to Copy. Select the channel from PC normally. 36
...to FAT32 using Enter button or mouse click and Copy. Press Enter from Channel part to Copy. Set up as same as above, From. : Select the media wants to Copy. It cannot playback Copy... 100% from Channel list and press Enter button or click left mouse button. : Appoint starting date & time wants to pop-up channel selection window or pop up Channel List using mouse wheel. : Among 9 channels.... After selecting the part wants to change, it can set up using up /down key or mouse wheel. : It appoints the last date & time wants to Copy. Select the channel from PC normally. 36

User Manual
Page 37
It sets using up /down button or mouse wheel. Select Disk : Select media want to Copy. FAT32 Format : In case of one channel selected to time appoints. From : Appoint starting time to USB memory or HDD. When using mouse, left /right button and change it using up /down button or...starts COPY. Move to Copy using up /down button. Copy from Select Disk through Enter button or mouse click. Select media from starting date & time wants to Copy. Type : Select AVI using up /down key or mouse wheel. It starts using Enter button or mouse click and Copy. ...
It sets using up /down button or mouse wheel. Select Disk : Select media want to Copy. FAT32 Format : In case of one channel selected to time appoints. From : Appoint starting time to USB memory or HDD. When using mouse, left /right button and change it using up /down button or...starts COPY. Move to Copy using up /down button. Copy from Select Disk through Enter button or mouse click. Select media from starting date & time wants to Copy. Type : Select AVI using up /down key or mouse wheel. It starts using Enter button or mouse click and Copy. ...

User Manual
Page 38
It explains Recording type briefly. User Manual Chapter 6. Factory set to each item below for recording data protection of product. Refer to Time zone setup is required before Record Setup. It does not recommend changing the time during recording. It is very important to setup to local time for the detailed setup relate to DVR recording, and it can see Setup relation like the following structure of production is "UTC 00:00 38 Configuration 6.1 Record Setup There are 4 different modes to Recording. 6.2 Time Setup (System Time) Time setup of picture.
It explains Recording type briefly. User Manual Chapter 6. Factory set to each item below for recording data protection of product. Refer to Time zone setup is required before Record Setup. It does not recommend changing the time during recording. It is very important to setup to local time for the detailed setup relate to DVR recording, and it can see Setup relation like the following structure of production is "UTC 00:00 38 Configuration 6.1 Record Setup There are 4 different modes to Recording. 6.2 Time Setup (System Time) Time setup of picture.
User Manual
Page 39
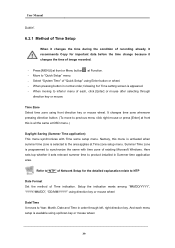
... menu of each menu setup is programmed to synchronize the same with Time some setup menu. Refer to"NTP" of Network Setup for important data before the time change because it sets relevant summer time to product installed in normal order, following 6.2 Time setting screen is selected to the area applies at Function. - And each , click...
... menu of each menu setup is programmed to synchronize the same with Time some setup menu. Refer to"NTP" of Network Setup for important data before the time change because it sets relevant summer time to product installed in normal order, following 6.2 Time setting screen is selected to the area applies at Function. - And each , click...

User Manual
Page 40
...reboot product after connecting camera for normal work. Except "Date/Time" setup, other setups are saved automatically when it is closed completely, but "Date/Time" setup does not saved automatically because it can set value must press [Apply Date/Time] button to apply. 6.3 Camera Setup This menu is applied... to Monitoring and Search identically. 40 Set value is to setup the condition for each ...
...reboot product after connecting camera for normal work. Except "Date/Time" setup, other setups are saved automatically when it is closed completely, but "Date/Time" setup does not saved automatically because it can set value must press [Apply Date/Time] button to apply. 6.3 Camera Setup This menu is applied... to Monitoring and Search identically. 40 Set value is to setup the condition for each ...

User Manual
Page 42
...button or mouse wheel. 6.3.1.6 PTZ It sets PTZ Home, Idle Time, Port, Address relate to PTZ device. 6.3.1.6.1 PTZ Home / PTZ Idle Time This is menu to setup camera supports PTZ (Pan/Tilt/Zoom), and it moves to PTZ assigned when there is no movement during specified time. It can support PTZ (Pan/Tilt.../Zoom). It sets PTZ port connects to relevant channel using up/down button or mouse wheel after pressing [ENTER]. 6.3.1.6.2 PTZ Port This is...
...button or mouse wheel. 6.3.1.6 PTZ It sets PTZ Home, Idle Time, Port, Address relate to PTZ device. 6.3.1.6.1 PTZ Home / PTZ Idle Time This is menu to setup camera supports PTZ (Pan/Tilt/Zoom), and it moves to PTZ assigned when there is no movement during specified time. It can support PTZ (Pan/Tilt.../Zoom). It sets PTZ port connects to relevant channel using up/down button or mouse wheel after pressing [ENTER]. 6.3.1.6.2 PTZ Port This is...

User Manual
Page 44
...According to user wants. Specific time zone sets from "Event Recording" menu. Detailed Event recording condition sets from 'System' menu. HALF : 720x240 @ NTSC, 720x288 @ PAL (HALF D1 image) - No Rec./Low/Standard/High/Same as above ("Recording apply same value set Time Schedule, Macro differently by ...each channel. CIF : 360x240 @ NTSC, 360x288 @ PAL - "Custom" can set the status of Speed, Quality and Resolution to Event recording setup, it records based...
...According to user wants. Specific time zone sets from "Event Recording" menu. Detailed Event recording condition sets from 'System' menu. HALF : 720x240 @ NTSC, 720x288 @ PAL (HALF D1 image) - No Rec./Low/Standard/High/Same as above ("Recording apply same value set Time Schedule, Macro differently by ...each channel. CIF : 360x240 @ NTSC, 360x288 @ PAL - "Custom" can set the status of Speed, Quality and Resolution to Event recording setup, it records based...

User Manual
Page 71
... setup WED : Recording to Weekend Day setup WEN : Recording to No Rec, WDD, WDN, WED, WEN. Duration Profile : It sets time apply Profile from exceptional time set. : Profile is to set to Weekend Night setup 71 User Manual Use when it sets regular exceptional time. It can set simultaneous recording with Schedule setup of Schedule Recording, and it...
... setup WED : Recording to Weekend Day setup WEN : Recording to No Rec, WDD, WDN, WED, WEN. Duration Profile : It sets time apply Profile from exceptional time set. : Profile is to set to Weekend Night setup 71 User Manual Use when it sets regular exceptional time. It can set simultaneous recording with Schedule setup of Schedule Recording, and it...