
User Manual (ENGLISH)
Page 1
.... Also, parts can take this device must partition and format for recognizing the drive's own capacity, the other household wastes at least one of all homogeneous materials in the parts is easy to formatting and partitioning of its own configurations. Check the External case's Grounding External case's Grounding prevents HDD malfunction form ESD. One is the general jumper setting for recognizing the new drive in the Windows Explorer. Q5 Although my drive supports up...
.... Also, parts can take this device must partition and format for recognizing the drive's own capacity, the other household wastes at least one of all homogeneous materials in the parts is easy to formatting and partitioning of its own configurations. Check the External case's Grounding External case's Grounding prevents HDD malfunction form ESD. One is the general jumper setting for recognizing the new drive in the Windows Explorer. Q5 Although my drive supports up...
User Manual (ENGLISH)
Page 2
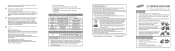
... manual or system manual for Win-XP: www.microsoft.com/WindowsXP/pro/downloads/servicepacks/sp1/default.asp Making Computer Detect the New Device Note: Run the CMOS (BIOS) set the HDD Mode to SATA 1.5Gb/s speed with a software which Windows2000 and Windows XP do not support 48 bit LBA.The other cable connections before turning on the hard disk drive. For descriptive details of the hard disk drive may damage the hard disk drive. PATA Installation Configuring your Hard Disk Drive (Master, Slave) Regular Pin Setting: Set as Master (AB) Set as Slave Select Cable...
... manual or system manual for Win-XP: www.microsoft.com/WindowsXP/pro/downloads/servicepacks/sp1/default.asp Making Computer Detect the New Device Note: Run the CMOS (BIOS) set the HDD Mode to SATA 1.5Gb/s speed with a software which Windows2000 and Windows XP do not support 48 bit LBA.The other cable connections before turning on the hard disk drive. For descriptive details of the hard disk drive may damage the hard disk drive. PATA Installation Configuring your Hard Disk Drive (Master, Slave) Regular Pin Setting: Set as Master (AB) Set as Slave Select Cable...

User Manual (KOREAN)
Page 1
... Sector HDD MR Head Head Head VN@faq@@@ Q1 CMOS에서 HDD Jumper Jumper CMOS Setup Q2 CMOS Windows OS Fdisk OS Q3 137GB 이상의 HDD 137GB Hardware Mainboard 137GB 137GB BIOS를 Upgrade하 거나 137GB Mainboard 48 Bit LBA addressing Add-on card (UDMA-133 Card Software 137GB OS는 Windows 2000과 Windows XP 니다. H UDMA-100(UDMA mode 5) - Win 2000 Service...
... Sector HDD MR Head Head Head VN@faq@@@ Q1 CMOS에서 HDD Jumper Jumper CMOS Setup Q2 CMOS Windows OS Fdisk OS Q3 137GB 이상의 HDD 137GB Hardware Mainboard 137GB 137GB BIOS를 Upgrade하 거나 137GB Mainboard 48 Bit LBA addressing Add-on card (UDMA-133 Card Software 137GB OS는 Windows 2000과 Windows XP 니다. H UDMA-100(UDMA mode 5) - Win 2000 Service...
User Manual (ENGLISH)
Page 1
BF68-00160B REV 03 Additional information can be obtained at www.samsunghdd.com SAMSUNG ELECTRONICS CO.,LTD STORAGE SYSTEM DIVISION HEAD OFFICE : 94-1, IM SOO-DONG, GUMI-CITY KYUNG BUK, KOREA 730-350
BF68-00160B REV 03 Additional information can be obtained at www.samsunghdd.com SAMSUNG ELECTRONICS CO.,LTD STORAGE SYSTEM DIVISION HEAD OFFICE : 94-1, IM SOO-DONG, GUMI-CITY KYUNG BUK, KOREA 730-350

User Manual (ENGLISH)
Page 2
This manual will guide you for selecting the Samsung hard disk drive. SAMSUNG HARD DISK DRIVE INSTALLATION GUIDE Thank you through the installation process. * Samsung does NOT guarantee any data on your drive, please always BACK-UP your precious data.
This manual will guide you for selecting the Samsung hard disk drive. SAMSUNG HARD DISK DRIVE INSTALLATION GUIDE Thank you through the installation process. * Samsung does NOT guarantee any data on your drive, please always BACK-UP your precious data.
User Manual (ENGLISH)
Page 3
... 2 Setting the jumper pin 3 Installing the hard disk drive 5 Setting the system BIOS 7 Partitioning and formatting 8 Installing the operating system(OS) 8 This marking shown on the product or its literature, indicates that it responsibly to the environment or human health from uncontrolled waste disposal, please separate this item for disposal. Household users should contact either the retailer where they can take this from other types of...
... 2 Setting the jumper pin 3 Installing the hard disk drive 5 Setting the system BIOS 7 Partitioning and formatting 8 Installing the operating system(OS) 8 This marking shown on the product or its literature, indicates that it responsibly to the environment or human health from uncontrolled waste disposal, please separate this item for disposal. Household users should contact either the retailer where they can take this from other types of...
User Manual (ENGLISH)
Page 4
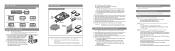
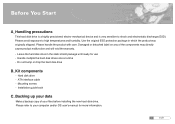
... care. Mounting screws - Installation guide book C_Backing up your data Make a backup copy of the components may directly cause product malfunction and will void the warranty. - Hard disk drive - ATA interface cable - Before You Start A_Handling precautions This hard disk drive is a highly precisioned electro-mechanical device and is very sensitive to your computer and/or OS user's manual for use - Do not bump or drop the hard disk drive B_Kit components - Please refer...
... care. Mounting screws - Installation guide book C_Backing up your data Make a backup copy of the components may directly cause product malfunction and will void the warranty. - Hard disk drive - ATA interface cable - Before You Start A_Handling precautions This hard disk drive is a highly precisioned electro-mechanical device and is very sensitive to your computer and/or OS user's manual for use - Do not bump or drop the hard disk drive B_Kit components - Please refer...
User Manual (ENGLISH)
Page 5
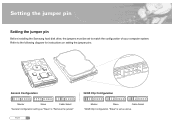
General Configuration Master Slave Cable Select *General configuration setting as "Slave" is "Remove the jumper" English 3 32GB Clip Configuration Master Slave Cable Select *32GB Clip Configuration "Slave" is set to the following diagram for instructions on setting the jumper pins. Refer to match the configuration of your computer system. Setting the jumper pin Setting the jumper pin Before installing the Samsung hard disk drive, the jumpers must be set as above
General Configuration Master Slave Cable Select *General configuration setting as "Slave" is "Remove the jumper" English 3 32GB Clip Configuration Master Slave Cable Select *32GB Clip Configuration "Slave" is set to the following diagram for instructions on setting the jumper pins. Refer to match the configuration of your computer system. Setting the jumper pin Setting the jumper pin Before installing the Samsung hard disk drive, the jumpers must be set as above
User Manual (ENGLISH)
Page 6
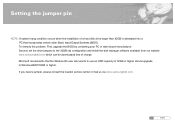
... Input-Output Systems (BIOS). If you need a jumper, please contact the nearest service center or mail us via www.samsunghdd.com. 4 English Second, set the drive jumpers to the 32GB clip configuration and install the disk manager software available from our website www.samsunghdd.com which can be downloaded free of 32GB or higher should upgrade to use an HDD capacity of charge. Setting the jumper pin NOTE: A system hang...
... Input-Output Systems (BIOS). If you need a jumper, please contact the nearest service center or mail us via www.samsunghdd.com. 4 English Second, set the drive jumpers to the 32GB clip configuration and install the disk manager software available from our website www.samsunghdd.com which can be downloaded free of 32GB or higher should upgrade to use an HDD capacity of charge. Setting the jumper pin NOTE: A system hang...
User Manual (ENGLISH)
Page 7
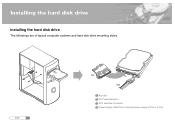
English 5 Red Red Key Slot DC Power Receptor ATA Interface Connector Power Supply Cable from computer power supply (3-Pin or 4-Pin) Installing the hard disk drive Installing the hard disk drive The followings are of typical computer systems and hard disk drive mounting styles.
English 5 Red Red Key Slot DC Power Receptor ATA Interface Connector Power Supply Cable from computer power supply (3-Pin or 4-Pin) Installing the hard disk drive Installing the hard disk drive The followings are of typical computer systems and hard disk drive mounting styles.

User Manual (ENGLISH)
Page 8
... computer b_Unplug the external power cables to the computer. c_Open the cover of your Computer Cover opening mechanism and the location of your computer and secure it to the chassis using the provided screws. Installing the hard disk drive a_Turn off the power of the hard disk drive may vary from one way. 3.Check all other cable connections before turning on your computer. The connector is keyed...
... computer b_Unplug the external power cables to the computer. c_Open the cover of your Computer Cover opening mechanism and the location of your computer and secure it to the chassis using the provided screws. Installing the hard disk drive a_Turn off the power of the hard disk drive may vary from one way. 3.Check all other cable connections before turning on your computer. The connector is keyed...
User Manual (ENGLISH)
Page 9
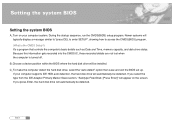
... computer is the CMOS Setup?) It's a program that controls the computer's basic details such as Date and Time, memory capacity, and disk drive status. C_To make the computer detect the hard disk drive, select the "auto-detect" option then save and exit the BIOS set up. English 7 During the startup sequence, run the CMOS(BIOS) setup program. If your computer supports IDE HDD auto detection, the hard disk drive will appear on...
... computer is the CMOS Setup?) It's a program that controls the computer's basic details such as Date and Time, memory capacity, and disk drive status. C_To make the computer detect the hard disk drive, select the "auto-detect" option then save and exit the BIOS set up. English 7 During the startup sequence, run the CMOS(BIOS) setup program. If your computer supports IDE HDD auto detection, the hard disk drive will appear on...
User Manual (ENGLISH)
Page 10
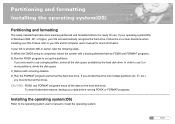
... install the operating system. 8 English CAUTION!: FDISK and FORMAT programs erase all the data on screen directions when installing your OS is ready for more partitions, divide the disk space. To avoid inadvertent erasure, backup your OS will automatically recognize the hard drive. In order to set up the partitions. C_Reboot with a booting diskette that has FDISK and FORMAT programs. B_Run the FDISK program to use a single partition, select...
... install the operating system. 8 English CAUTION!: FDISK and FORMAT programs erase all the data on screen directions when installing your OS is ready for more partitions, divide the disk space. To avoid inadvertent erasure, backup your OS will automatically recognize the hard drive. In order to set up the partitions. C_Reboot with a booting diskette that has FDISK and FORMAT programs. B_Run the FDISK program to use a single partition, select...

User Manual (ENGLISH)
Page 39
Dutch 5 Red Red Key Slot DC Power Receptor ATA Interface Connector Power Supply Cable from computer power supply (3-Pin or 4-Pin) Installatie van de hard disk drive Installatie van de hard disk drive Ga als volgt te werk bij de meeste computersystemen en hard disk drive inbouwtypes.
Dutch 5 Red Red Key Slot DC Power Receptor ATA Interface Connector Power Supply Cable from computer power supply (3-Pin or 4-Pin) Installatie van de hard disk drive Installatie van de hard disk drive Ga als volgt te werk bij de meeste computersystemen en hard disk drive inbouwtypes.
User Manual (ENGLISH)
Page 59
Thank you through the installation process. This manual will guide you for selecting the Samsung hard disk drive.
Thank you through the installation process. This manual will guide you for selecting the Samsung hard disk drive.


