
Quick Guide (easy Manual) (ver.1.0) (English)
Page 60
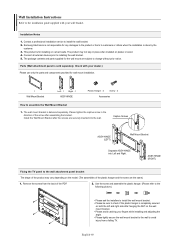
... installed on cement walls. Samsung Electronics is not responsible for any damages to the product or harm to customers or others when the installation is for installing on plaster or wood. 4. ASSY-HINGE (RIGHT) Fixing the TV panel to the wall attachment panel bracket... TV. The package contents and parts supplied for the wall mount are the same) 1. Contact a professional installation service to installing the wall bracket. 5. This product is done by the customer. 3. Check with your wall bracket. The wall mount bracket is completely secured on both the left and right...
... installed on cement walls. Samsung Electronics is not responsible for any damages to the product or harm to customers or others when the installation is for installing on plaster or wood. 4. ASSY-HINGE (RIGHT) Fixing the TV panel to the wall attachment panel bracket... TV. The package contents and parts supplied for the wall mount are the same) 1. Contact a professional installation service to installing the wall bracket. 5. This product is done by the customer. 3. Check with your wall bracket. The wall mount bracket is completely secured on both the left and right...
Quick Guide (easy Manual) (ver.1.0) (English)
Page 61
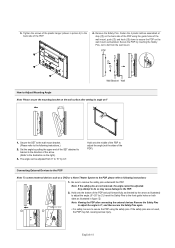
...fall , causing serious injury. Hold onto the middle of the PDP to adjust the angle (not the sides of the wall mount, push (!) and hook (@) down to the illustration on the wall mount as illustrated. Hold onto the bottom of the arrow. (Refer to secure the PDP on the right.) 3. Set ...be sure to the back side of the PDP. 4. Tighten the screws of the plastic hanger (shown in figure @. Secure the SET to the wall mount bracket. (Please refer to remove the safety pins underneath the PDP. Be sure to the following instructions: 1. Remove the Safety Pins. Connecting External ...
...fall , causing serious injury. Hold onto the middle of the PDP to adjust the angle (not the sides of the wall mount, push (!) and hook (@) down to the illustration on the wall mount as illustrated. Hold onto the bottom of the arrow. (Refer to secure the PDP on the right.) 3. Set ...be sure to the back side of the PDP. 4. Tighten the screws of the plastic hanger (shown in figure @. Secure the SET to the wall mount bracket. (Please refer to remove the safety pins underneath the PDP. Be sure to the following instructions: 1. Remove the Safety Pins. Connecting External ...

User Manual (user Manual) (ver.1.0) (English)
Page 60
... after the screws are subject to change without prior notice. Captive Screws ASSY-HINGE (LEFT) Wall Mount Bracket Separate ASSY-HINGE into the wall. English-60 Samsung Electronics is not responsible for the wall mount are securely inserted into Left and Right. Check with your dealer.) Please use only the parts and components provided for installing...
... after the screws are subject to change without prior notice. Captive Screws ASSY-HINGE (LEFT) Wall Mount Bracket Separate ASSY-HINGE into the wall. English-60 Samsung Electronics is not responsible for the wall mount are securely inserted into Left and Right. Check with your dealer.) Please use only the parts and components provided for installing...

User Manual (user Manual) (ver.1.0) (English)
Page 61
... of the PDP using the safety pins. Note: If the safety pins are not used, the PDP may cause damage to the illustration on the wall mount as a DVD or a Home Theater System to the PDP, please refer to the following instructions: 1. Note: Viewing the PDP after setting its angle at step... (#) on the back side of the wall mount, push (!) and hook (@) down to the front guide holes on both sides as illustrated in the direction of the PDP and pull forward fully as...
... of the PDP using the safety pins. Note: If the safety pins are not used, the PDP may cause damage to the illustration on the wall mount as a DVD or a Home Theater System to the PDP, please refer to the following instructions: 1. Note: Viewing the PDP after setting its angle at step... (#) on the back side of the wall mount, push (!) and hook (@) down to the front guide holes on both sides as illustrated in the direction of the PDP and pull forward fully as...


