User Manual (user Manual) (ver.1.0) (English)
Page 2
...Precautions 1-3 INSTALLATION AND CONNECTION Package Contents 2-1 Installing the Projector 2-2 Leveling with Adjustable Feet 2-3 Zoom and Focus Adjustment 2-4 Screen Size and Projection Distance 2-5 Lamp Replacement 2-6 Rear Side 2-7 Supported Display Modes 2-8 Connecting the Power 2-9 Connecting with a PC and Setting up the PC 2-10 Connecting a PC using an ...Using the Screen Adjustment Menu (OSD: On Screen Display) . . . . 3-5 TROUBLESHOOTING Before Requesting Service 4-1 MORE INFORMATION Specifications 5-1 RS232C Command Table 5-2 Contact SAMSUNG WORLDWIDE 5-3 Correct Disposal -
...Precautions 1-3 INSTALLATION AND CONNECTION Package Contents 2-1 Installing the Projector 2-2 Leveling with Adjustable Feet 2-3 Zoom and Focus Adjustment 2-4 Screen Size and Projection Distance 2-5 Lamp Replacement 2-6 Rear Side 2-7 Supported Display Modes 2-8 Connecting the Power 2-9 Connecting with a PC and Setting up the PC 2-10 Connecting a PC using an ...Using the Screen Adjustment Menu (OSD: On Screen Display) . . . . 3-5 TROUBLESHOOTING Before Requesting Service 4-1 MORE INFORMATION Specifications 5-1 RS232C Command Table 5-2 Contact SAMSUNG WORLDWIDE 5-3 Correct Disposal -
User Manual (user Manual) (ver.1.0) (English)
Page 16
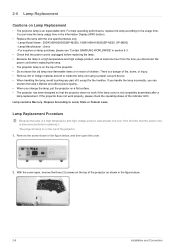
...SP-M250), 180W NSHA180SS(SP-M220, SP-M200) - There is disconnected before replacing it except for the handles. You can shorten the lamp's lifetime and affect picture quality. • When you change the lamp, put the projector on the top of the projector. • Do not leave the old lamp.... Remove the screw shown in the Information Display (INFO button). • Replace the lamp with the one specified below , and then open , remove the three (3) screws on lamp purchase, please see 'Contact SAMSUNG WORLDWIDE' in section 5-3. • Check that the projector does not work ...
...SP-M250), 180W NSHA180SS(SP-M220, SP-M200) - There is disconnected before replacing it except for the handles. You can shorten the lamp's lifetime and affect picture quality. • When you change the lamp, put the projector on the top of the projector. • Do not leave the old lamp.... Remove the screw shown in the Information Display (INFO button). • Replace the lamp with the one specified below , and then open , remove the three (3) screws on lamp purchase, please see 'Contact SAMSUNG WORLDWIDE' in section 5-3. • Check that the projector does not work ...
User Manual (user Manual) (ver.1.0) (English)
Page 17
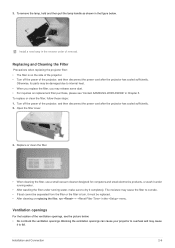
...cover. 3. The moisture may cause it must be separated from the filter or the filter is on replacement filter purchase, please see the picture below . To remove the lamp, hold and then pull the lamp handle as shown in the reverse order of the projector, and then disconnect the power cord after the... openings can cause your projector to overheat and may cause the filter to fail. Turn off the power of the ventilation openings, see 'Contact SAMSUNG WORLDWIDE' in the menu. 3. Install a new lamp in the figure below : • Do not block the ventilation openings.
...cover. 3. The moisture may cause it must be separated from the filter or the filter is on replacement filter purchase, please see the picture below . To remove the lamp, hold and then pull the lamp handle as shown in the reverse order of the projector, and then disconnect the power cord after the... openings can cause your projector to overheat and may cause the filter to fail. Turn off the power of the ventilation openings, see 'Contact SAMSUNG WORLDWIDE' in the menu. 3. Install a new lamp in the figure below : • Do not block the ventilation openings.


