SP-M220 Lamp - Samsung
SP-M220 Lamp
Related Manual Pages


Similar Questions


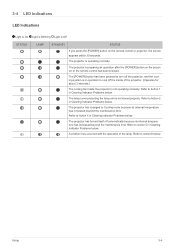
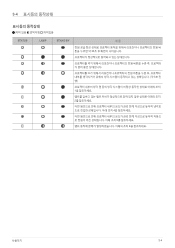
The Three Leds Is Illuminated: Stand By, Lamp, Status.
is not image some. The video beam has 185 hours of use. Thank you for their collaboration. The video...
is not image some. The video beam has 185 hours of use. Thank you for their collaboration. The video...
(Posted by leoparra691 11 years ago)

Why Dose My Samsung Spa400bcx/edc Go To Standby Then Lamp Then Off Help
(Posted by helenrch 11 years ago)