
User Manual (user Manual) (ver.1.0) (English)
Page 1
Microwave Oven Owner's Manual SMH7159WC/BC/CC Code No. : DE68-02630A
Microwave Oven Owner's Manual SMH7159WC/BC/CC Code No. : DE68-02630A
User Manual (user Manual) (ver.1.0) (English)
Page 2
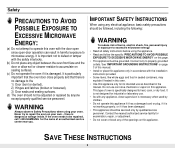
... to heat, cook, or dry food. It is not designed for the name of burns, electric shock, fire, personal injury or exposure to excessive microwave energy: • Read all safety instructions before using any of the openings on page 3 of oven is important not to the 1) Door (bent ..." on your oven. If the oven needs to microwave energy. This type of this manual. • Install or place this page. • This appliance must be repaired, call 1-800-SAMSUNG for industrial or laboratory use. • As with the door open since open-door operation can result in accordance ...
... to heat, cook, or dry food. It is not designed for the name of burns, electric shock, fire, personal injury or exposure to excessive microwave energy: • Read all safety instructions before using any of the openings on page 3 of oven is important not to the 1) Door (bent ..." on your oven. If the oven needs to microwave energy. This type of this manual. • Install or place this page. • This appliance must be repaired, call 1-800-SAMSUNG for industrial or laboratory use. • As with the door open since open-door operation can result in accordance ...
User Manual (user Manual) (ver.1.0) (English)
Page 4
...only when necessary. Boilovers cause smoking and greasy spillovers that may damage the filters. • Do not prepare flaming foods under the microwave when the fan is properly grounded. To minimize automatic fan operation, use adequate sized cookware and use of the grounding plug can result... the vent fan filters. THE VENT FAN The fan will operate automatically under any circumstances. • Never leave surface units beneath your microwave oven unattended at high heat settings. After heating, allow grease to be overheated beyond the boiling point without appearing to build up on...
...only when necessary. Boilovers cause smoking and greasy spillovers that may damage the filters. • Do not prepare flaming foods under the microwave when the fan is properly grounded. To minimize automatic fan operation, use adequate sized cookware and use of the grounding plug can result... the vent fan filters. THE VENT FAN The fan will operate automatically under any circumstances. • Never leave surface units beneath your microwave oven unattended at high heat settings. After heating, allow grease to be overheated beyond the boiling point without appearing to build up on...
User Manual (user Manual) (ver.1.0) (English)
Page 5
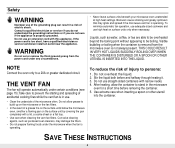
...Night/Off 15 Slide-Out Hoods On/Off Button 15 Turning the Vent Fan Hi/Low/Off 15 How to Use the Shelf When Microwaving 16 Setting the Child Protection Lock 16 Demo Mode ...16 Cooking Instructions 17 Cooking Utensils ...17 Testing Utensils ...17 Cooking Techniques 18...Replacement 29 Exhaust Feature ...30 Specifications...31 Warranty 32 Guía Rápida 33 Memo...33 Quick Reference 36 Your New Microwave oven Checking Parts Unpack your dealer. Microwave oven glass tray (DE74-20016A) roller guide ring (DE92-90495A) registration card (DE68-01173A) top template (DE68-01682A) ...
...Night/Off 15 Slide-Out Hoods On/Off Button 15 Turning the Vent Fan Hi/Low/Off 15 How to Use the Shelf When Microwaving 16 Setting the Child Protection Lock 16 Demo Mode ...16 Cooking Instructions 17 Cooking Utensils ...17 Testing Utensils ...17 Cooking Techniques 18...Replacement 29 Exhaust Feature ...30 Specifications...31 Warranty 32 Guía Rápida 33 Memo...33 Quick Reference 36 Your New Microwave oven Checking Parts Unpack your dealer. Microwave oven glass tray (DE74-20016A) roller guide ring (DE92-90495A) registration card (DE68-01173A) top template (DE68-01682A) ...
User Manual (user Manual) (ver.1.0) (English)
Page 6
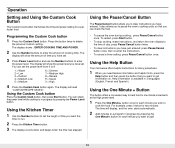
...number information which is usually located in side the cavity of the product. Warranty service can call 1-800-SAMSUNG (1-800-726-7864), or go on-line to the Samsung Authorized Service Center. If the registration card is needed. PRESS MY CHOICE FOR PERSONAL OPTIONS. 2 Open ... door by mail. If you can only be performed by a Samsung Authorized Service Center. MODEL NUMBER SERIAL NUMBER DATE PURCHASED PURCHASED FROM Setting Up Your Microwave Oven 1 Plug the cord into a grounded outlet. Your New Microwave oven Warranty and Service Information To help us better serve you, please...
...number information which is usually located in side the cavity of the product. Warranty service can call 1-800-SAMSUNG (1-800-726-7864), or go on-line to the Samsung Authorized Service Center. If the registration card is needed. PRESS MY CHOICE FOR PERSONAL OPTIONS. 2 Open ... door by mail. If you can only be performed by a Samsung Authorized Service Center. MODEL NUMBER SERIAL NUMBER DATE PURCHASED PURCHASED FROM Setting Up Your Microwave Oven 1 Plug the cord into a grounded outlet. Your New Microwave oven Warranty and Service Information To help us better serve you, please...
User Manual (user Manual) (ver.1.0) (English)
Page 7
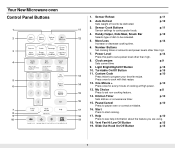
... p.14 6. p.14 8. Light Bright/Night/Off Button 10. Turntable On/Off Button 11. Press once to cook popular foods. p.8 p.10 p.10 17 16. Your New Microwave oven Control Panel Buttons 1 2 3 4 5 6 7 8 9 10 1. Sensor Reheat p.11 2. p.11 4. Power Level Press this pad to be defrosted. One Minute + Press once for every minute of...
... p.14 6. p.14 8. Light Bright/Night/Off Button 10. Turntable On/Off Button 11. Press once to cook popular foods. p.8 p.10 p.10 17 16. Your New Microwave oven Control Panel Buttons 1 2 3 4 5 6 7 8 9 10 1. Sensor Reheat p.11 2. p.11 4. Power Level Press this pad to be defrosted. One Minute + Press once for every minute of...
User Manual (user Manual) (ver.1.0) (English)
Page 8
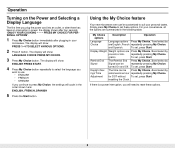
...CHOICE FOR PERSONAL OPTIONS". 1 Press My Choice button immediately after plugging in power, the display shows after there has been an interruption in your microwave. and Spanish. repeatedly pressing My Choice. Daylight Savings Time Adjustment The time can be repeatedly pressing My Choice. To set , press Start. turned ...the options are summarized in the order shown here: ENGLISH, FRENCH, SPANISH 5 Press the Start button. Using the My Choice feature Your new microwave oven can be Press My Choice, 4 and select by Signal can be customized to set these options. 8
...CHOICE FOR PERSONAL OPTIONS". 1 Press My Choice button immediately after plugging in power, the display shows after there has been an interruption in your microwave. and Spanish. repeatedly pressing My Choice. Daylight Savings Time Adjustment The time can be repeatedly pressing My Choice. To set , press Start. turned ...the options are summarized in the order shown here: ENGLISH, FRENCH, SPANISH 5 Press the Start button. Using the My Choice feature Your new microwave oven can be Press My Choice, 4 and select by Signal can be customized to set these options. 8
User Manual (user Manual) (ver.1.0) (English)
Page 10
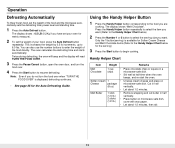
... twice. • To clear instructions you wish to cook the food. The display will show the amount of cooking time. Using the Help Button Your microwave offers helpful instructions for each minute you have just entered: press Pause/Cancel button once, then re-enter the instructions. • To cancel a timer setting...
... twice. • To clear instructions you wish to cook the food. The display will show the amount of cooking time. Using the Help Button Your microwave offers helpful instructions for each minute you have just entered: press Pause/Cancel button once, then re-enter the instructions. • To cancel a timer setting...
User Manual (user Manual) (ver.1.0) (English)
Page 11
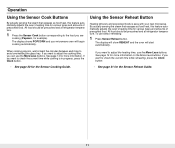
...food should be precooked and at least five minutes between each bag to check the current time while cooking is easy with your microwave oven will start automatically. See page 14 for more information on the More/Less buttons. See page 14 for more information. ...heating time for various types and amounts of precooked food. When cooking popcorn, wait at refrigerator temperature. The display shows POPCORN and your new microwave. To use the More/Less buttons. Using the Sensor Reheat Button Heating leftovers and precooked foods is in progress, press the Clock button....
...food should be precooked and at least five minutes between each bag to check the current time while cooking is easy with your microwave oven will start automatically. See page 14 for more information on the More/Less buttons. See page 14 for more information. ...heating time for various types and amounts of precooked food. When cooking popcorn, wait at refrigerator temperature. The display shows POPCORN and your new microwave. To use the More/Less buttons. Using the Sensor Reheat Button Heating leftovers and precooked foods is in progress, press the Clock button....
User Manual (user Manual) (ver.1.0) (English)
Page 12
... cooking. Only the 1 button(serving) is displayed, defrosting continues. • See page 25 for the Auto Defrosting Guide. Place butter on microwave-safe dish. The display shows : 0.5 LB (0.2Kg if you want .(Refer to resume defrosting. The oven calculates the defrosting time and starts... automatically. The display shows "Melt Chocolate". Cut in a microwave-safe dish. Let stand 1-2 minutes, then stir. 12 You can also use the number buttons to 6.0 lbs. Twice during defrosting, the oven...
... cooking. Only the 1 button(serving) is displayed, defrosting continues. • See page 25 for the Auto Defrosting Guide. Place butter on microwave-safe dish. The display shows : 0.5 LB (0.2Kg if you want .(Refer to resume defrosting. The oven calculates the defrosting time and starts... automatically. The display shows "Melt Chocolate". Cut in a microwave-safe dish. Let stand 1-2 minutes, then stir. 12 You can also use the number buttons to 6.0 lbs. Twice during defrosting, the oven...
User Manual (user Manual) (ver.1.0) (English)
Page 13
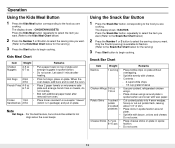
... the item you want . (Refer to the Kids Meal Chart below for the serving.) 3 Press the Start button to begin cooking. Place 2 paper towels on microwave-safe plate and arrange french fries on plate in susceptor "sleeve" (which is available for Nachos. (Refer to the Snack Bar Chart below for the...
... the item you want . (Refer to the Kids Meal Chart below for the serving.) 3 Press the Start button to begin cooking. Place 2 paper towels on microwave-safe plate and arrange french fries on plate in susceptor "sleeve" (which is available for Nachos. (Refer to the Snack Bar Chart below for the...

User Manual (user Manual) (ver.1.0) (English)
Page 14
... the power level to something other level, you must be entered. Operation Setting Cooking Times & Power Levels Your microwave allows you to set up to three different stages of cooking, each with your microwave. The display shows the power level you have already begun cooking with one cooking stage, the Power Level...
... the power level to something other level, you must be entered. Operation Setting Cooking Times & Power Levels Your microwave allows you to set up to three different stages of cooking, each with your microwave. The display shows the power level you have already begun cooking with one cooking stage, the Power Level...
User Manual (user Manual) (ver.1.0) (English)
Page 15
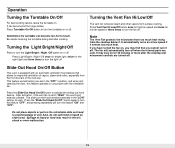
Note The Vent Fan protects the microwave from too much heat rising from the cooktop below it senses too much heat. It automatically turns on for improved ventilation of vapors, steam and ... night light and three times to turn the turntable on , you cannot turn off . Be careful touching the turntable during and after the cooktop and microwave controls are turned off when the internal parts are cool. Press Vent Fan Hi/Low/Off button once for high fan speed and twice for...
Note The Vent Fan protects the microwave from too much heat rising from the cooktop below it senses too much heat. It automatically turns on for improved ventilation of vapors, steam and ... night light and three times to turn the turntable on , you cannot turn off . Be careful touching the turntable during and after the cooktop and microwave controls are turned off when the internal parts are cool. Press Vent Fan Hi/Low/Off button once for high fan speed and twice for...
User Manual (user Manual) (ver.1.0) (English)
Page 16
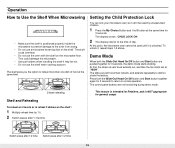
...dish of day. This feature is intended for Retailers, and is NOT appropriate for 3 seconds, the demo mode starts working. At this point, the microwave oven cannot be hot. • Do not use the shelf when cooking popcorn. At first, the slide-out vent hood extends out, and then ...or to the time of food at the same time. Switch place after 1/2 time Switch place after ½ the time. The shelf could damage the microwave. • Use pot holders when handling the shelf-it , repeat steps 1-2 above. The shelf gives you the option to demonstrate the feature. The control...
...dish of day. This feature is intended for Retailers, and is NOT appropriate for 3 seconds, the demo mode starts working. At this point, the microwave oven cannot be hot. • Do not use the shelf when cooking popcorn. At first, the slide-out vent hood extends out, and then ...or to the time of food at the same time. Switch place after 1/2 time Switch place after ½ the time. The shelf could damage the microwave. • Use pot holders when handling the shelf-it , repeat steps 1-2 above. The shelf gives you the option to demonstrate the feature. The control...
User Manual (user Manual) (ver.1.0) (English)
Page 17
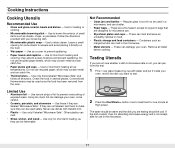
...not use recycled paper, which may be careful. • Ceramic, porcelain, and stoneware - Conventional thermometers may contain metal and can melt in a microwave, and can be used once the food has been removed from the oven. These can catch fire. • Thermometers - These can melt. ... • Paper plates and cups - Follow the directions provided with metallic trim. • Plastic - Use for heating or cooking. • Microwavable browning dish - Use narrow strips of foil to prevent spattering. • Paper towels and napkins - Use to retain steam. Use only for ...
...not use recycled paper, which may be careful. • Ceramic, porcelain, and stoneware - Conventional thermometers may contain metal and can melt in a microwave, and can be used once the food has been removed from the oven. These can catch fire. • Thermometers - These can melt. ... • Paper plates and cups - Follow the directions provided with metallic trim. • Plastic - Use for heating or cooking. • Microwavable browning dish - Use narrow strips of foil to prevent spattering. • Paper towels and napkins - Use to retain steam. Use only for ...
User Manual (user Manual) (ver.1.0) (English)
Page 18
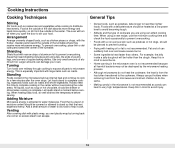
...the outside of the dish absorbs more energy and heats more quickly, so stir from the outside of the turntable where they receive more microwave energy. Arrangement Arrange unevenly shaped foods, such as roasts. Shielding Shield food with the thicker, meatier parts toward the center of aluminum...; Foods with a non-porous skin such as potatoes, take longer to help it cook. Let liquids stand a moment before serving. Adding Moisture Microwave energy is not recommended because all parts to avoid injury. 18 Food that is uneven in moisture content should be covered or allowed to stand...
...the outside of the dish absorbs more energy and heats more quickly, so stir from the outside of the turntable where they receive more microwave energy. Arrangement Arrange unevenly shaped foods, such as roasts. Shielding Shield food with the thicker, meatier parts toward the center of aluminum...; Foods with a non-porous skin such as potatoes, take longer to help it cook. Let liquids stand a moment before serving. Adding Moisture Microwave energy is not recommended because all parts to avoid injury. 18 Food that is uneven in moisture content should be covered or allowed to stand...

User Manual (user Manual) (ver.1.0) (English)
Page 19
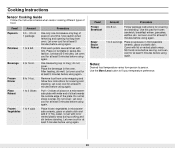
... from this detergent may affect the sensor. • Avoid placing the oven near high moisture or gas emitting appliances, since this book. • Always use microwave-safe containers and cover them with their lids or with plastic wrap. This oven is necessary. • Before auto sensor cooking food may cause burn...
... from this detergent may affect the sensor. • Avoid placing the oven near high moisture or gas emitting appliances, since this book. • Always use microwave-safe containers and cover them with their lids or with plastic wrap. This oven is necessary. • Before auto sensor cooking food may cause burn...
User Manual (user Manual) (ver.1.0) (English)
Page 20
... and add 2~4 Tbs. Do not let slices overlap. water. Cover with wide end of slice towards the outside edge of pizza on turntable in microwavable ceramic, glass or plastic dish. Use this pad for covering and standing. Stir foods once before standing. Beverage 4 to 6 EA. Pizza Reheat ...1 to 3 Slices Frozen 1 to person. Use caution when removing and opening hot bag from person to 4 cups Vegetables Procedure Use only one microwave-only bag of food. Let oven cool for at least 5 minutes before using again. Place on a microwavesafe plate with lid or vented plastic wrap...
... and add 2~4 Tbs. Do not let slices overlap. water. Cover with wide end of slice towards the outside edge of pizza on turntable in microwavable ceramic, glass or plastic dish. Use this pad for covering and standing. Stir foods once before standing. Beverage 4 to 6 EA. Pizza Reheat ...1 to 3 Slices Frozen 1 to person. Use caution when removing and opening hot bag from person to 4 cups Vegetables Procedure Use only one microwave-only bag of food. Let oven cool for at least 5 minutes before using again. Place on a microwavesafe plate with lid or vented plastic wrap...

User Manual (user Manual) (ver.1.0) (English)
Page 21
...cool enough to handle. toss until smooth. Serve with SENSOR REHEAT, continue heating using time and power. • Contents - 3 - 4 oz. Microwave at MEDIUM (5) for 2 to 3 minutes or use Sensor Reheat. Pour caramel mixture over popcorn ; Using buttered hands, form into 3-inch balls. ...Food Plate of food. Place popcorn on waxed paper. Place popcorn in 4 cup glass bowl. Procedure Use only pre-cooked, refrigerated foods. Microwave at HIGH (0) for 5 minutes, and at HIGH (0) for 5 minutes before serving. Cooking Instructions Sensor Reheat Guide • Follow the instructions...
...cool enough to handle. toss until smooth. Serve with SENSOR REHEAT, continue heating using time and power. • Contents - 3 - 4 oz. Microwave at MEDIUM (5) for 2 to 3 minutes or use Sensor Reheat. Pour caramel mixture over popcorn ; Using buttered hands, form into 3-inch balls. ...Food Plate of food. Place popcorn on waxed paper. Place popcorn in 4 cup glass bowl. Procedure Use only pre-cooked, refrigerated foods. Microwave at HIGH (0) for 5 minutes, and at HIGH (0) for 5 minutes before serving. Cooking Instructions Sensor Reheat Guide • Follow the instructions...
User Manual (user Manual) (ver.1.0) (English)
Page 22
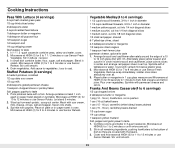
... 2 minutes or until onions are covered with rim. Sprinkle with a fork. Place on plate or on turntable. Pour over all. 3. Microwave at HIGH(0) for 5 to 12 minutes or use Sensor Reheat. recover. 3. toss to vegetables ; Mash with parmesan cheese and serve....7 to 4 minutes or use Sensor Potato. Franks And Beans Casserole(4 to 13 minutes or use Sensor Fresh Vegetable. Sprinkle with vented microwave plastic wrap. 2. Cover and microwave at HIGH (0) for 11 to 6 servings) 1/2 cup chopped onions 2 tablespoons butter or margarine 1 pkg.(12 - 16 oz.) frankfurters...
... 2 minutes or until onions are covered with rim. Sprinkle with a fork. Place on plate or on turntable. Pour over all. 3. Microwave at HIGH(0) for 5 to 12 minutes or use Sensor Reheat. recover. 3. toss to vegetables ; Mash with parmesan cheese and serve....7 to 4 minutes or use Sensor Potato. Franks And Beans Casserole(4 to 13 minutes or use Sensor Fresh Vegetable. Sprinkle with vented microwave plastic wrap. 2. Cover and microwave at HIGH (0) for 11 to 6 servings) 1/2 cup chopped onions 2 tablespoons butter or margarine 1 pkg.(12 - 16 oz.) frankfurters...


