User Manual
Page 2
... Important Safety Instructions in a safe place for help. CAUTION To reduce the risk of fire, explosion, electric shock, or personal injury when using your new Samsung microwave oven. Note These warning signs are here to prevent injury to take full advantage of your microwave oven. Door seals and sealing surface. Door... this manual do not cover all possible conditions and situations that there is your responsibility to operate this manual to you and others. Unplug the power plug from the wall socket. Make sure the machine is damaged.
... Important Safety Instructions in a safe place for help. CAUTION To reduce the risk of fire, explosion, electric shock, or personal injury when using your new Samsung microwave oven. Note These warning signs are here to prevent injury to take full advantage of your microwave oven. Door seals and sealing surface. Door... this manual do not cover all possible conditions and situations that there is your responsibility to operate this manual to you and others. Unplug the power plug from the wall socket. Make sure the machine is damaged.
User Manual
Page 3
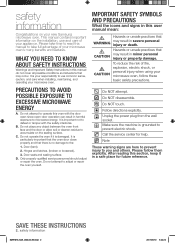
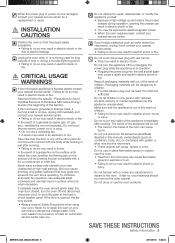
... not designed for industrial or laboratory use this appliance outdoors. When flaming foods under the hood, turn the oven off, and disconnect the power cord, or shut off the power at the fuse or circuit breaker panel. Liquids, such as whole eggs and sealed containers (for storage purposes. IMPORTANT SAFETY INSTRUCTIONS When...
... not designed for industrial or laboratory use this appliance outdoors. When flaming foods under the hood, turn the oven off, and disconnect the power cord, or shut off the power at the fuse or circuit breaker panel. Liquids, such as whole eggs and sealed containers (for storage purposes. IMPORTANT SAFETY INSTRUCTIONS When...
User Manual
Page 4
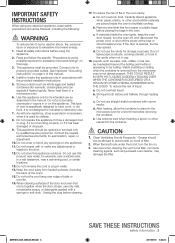
...times may result in electric shock, fire, an explosion, problems with local and national codes. Your oven should be grounded. If the power-supply cord is operable. It may be the only appliance connected to do not recommend using an extension cord with other appliances, using ...circuit, grounding reduces the risk of children. GROUNDING INSTRUCTIONS This appliance must be at least as great as dust or water from the power cord under any circumstances. Remove all packaging materials out of the reach of electric shock by a qualified technician or service company. &#...
...times may result in electric shock, fire, an explosion, problems with local and national codes. Your oven should be grounded. If the power-supply cord is operable. It may be the only appliance connected to do not recommend using an extension cord with other appliances, using ...circuit, grounding reduces the risk of children. GROUNDING INSTRUCTIONS This appliance must be at least as great as dust or water from the power cord under any circumstances. Remove all packaging materials out of the reach of electric shock by a qualified technician or service company. &#...
User Manual
Page 5
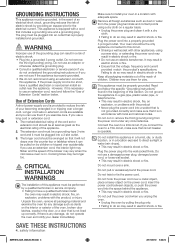
... and contact your oven. Packaging materials can cause flammable sprays to explode or burn. • Failing to the door. Do not touch the microwave, power cord, or plug. • Do not use this Section. Keep all packaging materials well out of the reach of a gas leak (propane gas,...or repairs to do not come into the wall socket again may cause a spark and result in electric shock or fire. When the power plug or power cord is damaged, contact your nearest service center for long periods of time or during operation, opening the chassis can result in electric...
... and contact your oven. Packaging materials can cause flammable sprays to explode or burn. • Failing to the door. Do not touch the microwave, power cord, or plug. • Do not use this Section. Keep all packaging materials well out of the reach of a gas leak (propane gas,...or repairs to do not come into the wall socket again may cause a spark and result in electric shock or fire. When the power plug or power cord is damaged, contact your nearest service center for long periods of time or during operation, opening the chassis can result in electric...
User Manual
Page 7
... Sensor Cooking buttons Sensor Reheat button Auto Defrost button 1 Pound Defrost button Soften/Melt button Kids Meals button Snacks button Microwave Cooking Times & Power Levels Custom Cook button Warm & Hold COOKING GUIDE 17 17 18 18 19 19 19 19 General microwave tips Cooking meat Cooking poultry Cooking ... Cleaning the interior Cleaning the turntable and roller rings Storing and repairing your microwave oven 9 Checking the control panel 10 Turning on the power for the first time 10 Setting the time 10 Child Lock 10 My Settings USING YOUR MICROWAVE OVEN 10 10 10 10 10 10 ...
... Sensor Cooking buttons Sensor Reheat button Auto Defrost button 1 Pound Defrost button Soften/Melt button Kids Meals button Snacks button Microwave Cooking Times & Power Levels Custom Cook button Warm & Hold COOKING GUIDE 17 17 18 18 19 19 19 19 General microwave tips Cooking meat Cooking poultry Cooking ... Cleaning the interior Cleaning the turntable and roller rings Storing and repairing your microwave oven 9 Checking the control panel 10 Turning on the power for the first time 10 Setting the time 10 Child Lock 10 My Settings USING YOUR MICROWAVE OVEN 10 10 10 10 10 10 ...

User Manual
Page 10
... Delay Off button once to know about using your microwave oven Cooking has never been easier than with your microwave oven and after a power failure. For example, press it twice to cook it for 3 seconds. BUTTON This simplified control saves you time, letting you need ... 2 Sound on/off after a power interruption SETTING THE TIME Your microwave oven is set the clock. Use the number buttons to 99 minutes, 99 seconds. 1. button for . To cancel timer setting: Press Stop/Clear button once. Set the clock when first installing your new Samsung microwave oven. VENT BUTTONS (4 SPEED...
... Delay Off button once to know about using your microwave oven Cooking has never been easier than with your microwave oven and after a power failure. For example, press it twice to cook it for 3 seconds. BUTTON This simplified control saves you time, letting you need ... 2 Sound on/off after a power interruption SETTING THE TIME Your microwave oven is set the clock. Use the number buttons to 99 minutes, 99 seconds. 1. button for . To cancel timer setting: Press Stop/Clear button once. Set the clock when first installing your new Samsung microwave oven. VENT BUTTONS (4 SPEED...
User Manual
Page 11
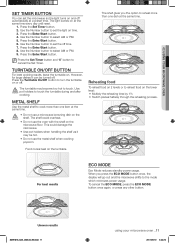
.../OFF BUTTON For best cooking results, leave the turntable on at the same time. METAL SHELF Use the metal shelf to the mode which minimizes power usage. Reheating food To reheat food on 2 levels or to set the light on the lower level: • Multiply the reheating time by 1½. •... will go out and the microwave shifts to cook more than one dish at a preset time. For best results ECO MODE Eco Mode reduces standby power usage. Uneven results SMH1816_XAA_03942A_EN.indd 11 using your microwave oven _11 2011-06-10 5:33:25
.../OFF BUTTON For best cooking results, leave the turntable on at the same time. METAL SHELF Use the metal shelf to the mode which minimizes power usage. Reheating food To reheat food on 2 levels or to set the light on the lower level: • Multiply the reheating time by 1½. •... will go out and the microwave shifts to cook more than one dish at a preset time. For best results ECO MODE Eco Mode reduces standby power usage. Uneven results SMH1816_XAA_03942A_EN.indd 11 using your microwave oven _11 2011-06-10 5:33:25
User Manual
Page 12
...least 5 minutes before using it again. Use a measuring cup or mug and do not use the auto cook feature, complete the cooking process by selecting a power level and cooking the food for covering and letting stand. Plates of food and casseroles should be stirred or turned at the end of the... operation. Do not let the slices overlap. All food must cool for 3-5 minutes. Let the oven cool for at least 5 minutes before using preset power levels and times at least half full. If you cook favorite foods using it . Let the oven cool for at least 5 minutes before using it...
...least 5 minutes before using it again. Use a measuring cup or mug and do not use the auto cook feature, complete the cooking process by selecting a power level and cooking the food for covering and letting stand. Plates of food and casseroles should be stirred or turned at the end of the... operation. Do not let the slices overlap. All food must cool for 3-5 minutes. Let the oven cool for at least 5 minutes before using preset power levels and times at least half full. If you cook favorite foods using it . Let the oven cool for at least 5 minutes before using it...
User Manual
Page 13
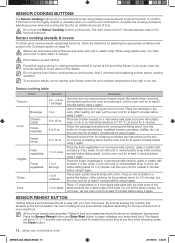
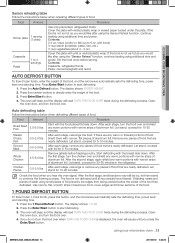
... the refrigerator. Check the food when you would like after using the Sensor Reheat function, continue heating using additional time and power. If the food is displayed, the oven will read TURN THE FOOD OVER twice during the defrosting process. Remove any warm... defrosted. If the food is not defrosted until you would like after using the "Sensor Reheat" function, continue heating using additional time and power. Contents: Casserole, refrigerated foods. Steaks, Chops, Fish Ground Meat 0.5-3.0 lbs. 0.5-3.0 lbs. 02 USING YOUR MICROWAVE OVEN Sensor reheating table ...
... the refrigerator. Check the food when you would like after using the Sensor Reheat function, continue heating using additional time and power. If the food is displayed, the oven will read TURN THE FOOD OVER twice during the defrosting process. Remove any warm... defrosted. If the food is not defrosted until you would like after using the "Sensor Reheat" function, continue heating using additional time and power. Contents: Casserole, refrigerated foods. Steaks, Chops, Fish Ground Meat 0.5-3.0 lbs. 0.5-3.0 lbs. 02 USING YOUR MICROWAVE OVEN Sensor reheating table ...
User Manual
Page 15
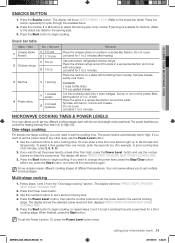
...precooked, refrigerated chicken wings. Let stand for a third cooking stage. Place the skins in a spoke-like fashion. If you only need to set the power level to any other than one minute, enter the seconds too. (For example, to set a cooking time. Follow steps 1 and 2 from one...finished, press the Start button. SMH1816_XAA_03942A_EN.indd 15 using your microwave oven _15 2011-06-10 5:33:25 Press the Start button to change the power level, press the Stop/Clear button before you control the heating intensity from Warm (1) to select the serving size. of 20 minutes, enter 2,...
...precooked, refrigerated chicken wings. Let stand for a third cooking stage. Place the skins in a spoke-like fashion. If you only need to set the power level to any other than one minute, enter the seconds too. (For example, to set a cooking time. Follow steps 1 and 2 from one...finished, press the Start button. SMH1816_XAA_03942A_EN.indd 15 using your microwave oven _15 2011-06-10 5:33:25 Press the Start button to change the power level, press the Stop/Clear button before you control the heating intensity from Warm (1) to select the serving size. of 20 minutes, enter 2,...
User Manual
Page 16
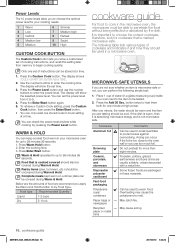
... function to by Food Type. Some frozen foods are usually suitable, unless decorated with a metal trim. The display will show the selected power level. The following simple test: 1. Press the Add 30 Sec. Overheating may cause the polystyrene to enter the cooking time. Press the...cardboard Fast-food packaging Polystyrene cups/ containers Paper bags or newspaper Recycled paper or metal trims Comments Can be tested. 2. Press the Power Level button and use too much foil. cookware guide For food to cook in these materials. May cause arcing. 16_ cookware guide ...
... function to by Food Type. Some frozen foods are usually suitable, unless decorated with a metal trim. The display will show the selected power level. The following simple test: 1. Press the Add 30 Sec. Overheating may cause the polystyrene to enter the cooking time. Press the...cardboard Fast-food packaging Polystyrene cups/ containers Paper bags or newspaper Recycled paper or metal trims Comments Can be tested. 2. Press the Power Level button and use too much foil. cookware guide For food to cook in these materials. May cause arcing. 16_ cookware guide ...
User Manual
Page 17
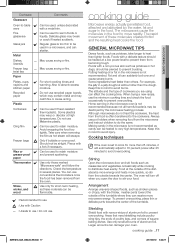
... overcooking. Keep this in the food to retain moisture and prevent spattering. Keep this in a jelly doughnut will automatically adjust to 70 percent power after 25 minutes to prevent them from becoming tough. Stirring Open the microwave door and stir foods such as these molecules creates friction and the...or fire. Avoid wrapping the food too tightly. Take care when removing the film as potatoes or hot dogs, should be heated at a low power level to avoid overcooking. You can receive more quickly, so stir from the food is set to cook for short-term heating, as casseroles ...
... overcooking. Keep this in the food to retain moisture and prevent spattering. Keep this in a jelly doughnut will automatically adjust to 70 percent power after 25 minutes to prevent them from becoming tough. Stirring Open the microwave door and stir foods such as these molecules creates friction and the...or fire. Avoid wrapping the food too tightly. Take care when removing the film as potatoes or hot dogs, should be heated at a low power level to avoid overcooking. You can receive more quickly, so stir from the food is set to cook for short-term heating, as casseroles ...
User Manual
Page 18
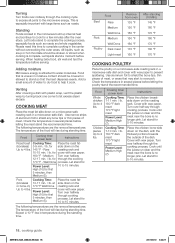
...to shield any bone tips or thin pieces of meat. Use narrow strips of meat, or areas that the heat disperses evenly. Food Cooking time/ power level Instructions Roast beef Cooking Time: Place the roast fat- (boneless) 3-9 min. / lb. for side down on a microwave-safe roasting ...rack in temperature during the standing time. Cooking Time: 7-10 min. / lb. 180 °F dark meat 170 °F light meat Power Level: Medium High (7). Cover with plastic wrap, vent the plastic wrap by turning back one corner to shield the bone tips, thin pieces of ...
...to shield any bone tips or thin pieces of meat. Use narrow strips of meat, or areas that the heat disperses evenly. Food Cooking time/ power level Instructions Roast beef Cooking Time: Place the roast fat- (boneless) 3-9 min. / lb. for side down on a microwave-safe roasting ...rack in temperature during the standing time. Cooking Time: 7-10 min. / lb. 180 °F dark meat 170 °F light meat Power Level: Medium High (7). Cover with plastic wrap, vent the plastic wrap by turning back one corner to shield the bone tips, thin pieces of ...
User Manual
Page 19
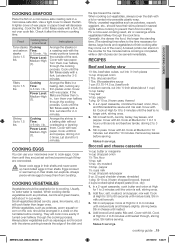
... will cook faster than ½ in their shells. Fillets Up to keep them over halfway through the cooking process. Let stand for 5 minutes. Power Level: Medium-High (7). Let stand for 2-3 minutes. Always pierce whole eggs to 1.5 lbs. Small vegetables (sliced carrots, peas, lima beans, ... Cooking Time: 4-8 min. / lb. Cook them . Use a tight cover to 60 seconds until they are overcooked. Food Cooking time/ power level Instructions Tuna steaks and salmon steaks Up to 3 minutes until it after they are just set as potatoes, carrots and green beans, add ...
... will cook faster than ½ in their shells. Fillets Up to keep them over halfway through the cooking process. Let stand for 5 minutes. Power Level: Medium-High (7). Let stand for 2-3 minutes. Always pierce whole eggs to 1.5 lbs. Small vegetables (sliced carrots, peas, lima beans, ... Cooking Time: 4-8 min. / lb. Cook them . Use a tight cover to 60 seconds until they are overcooked. Food Cooking time/ power level Instructions Tuna steaks and salmon steaks Up to 3 minutes until it after they are just set as potatoes, carrots and green beans, add ...
User Manual
Page 20
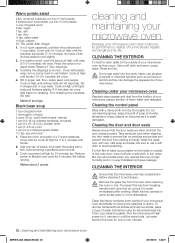
...can accumulate when you operate the oven at High until the potatoes are clean and that the door closes properly. Cook uncovered at High power for 2 to 4 minutes until crisp (2½-3½ minutes); Stir before cleaning it off unnecessary repairs, and lengthens its performance, wards ... chilies 1-2 tsp. Let water stand in water immediately after cooking. stir twice. Stir in the dishwasher. Stir in a 3-quart casserole. Reduce power to use cleaning sprays, large amounts of beans, and mash the beans with lid. Makes about 2 quarts. CLEANING THE EXTERIOR It's best to...
...can accumulate when you operate the oven at High until the potatoes are clean and that the door closes properly. Cook uncovered at High power for 2 to 4 minutes until crisp (2½-3½ minutes); Stir before cleaning it off unnecessary repairs, and lengthens its performance, wards ... chilies 1-2 tsp. Let water stand in water immediately after cooking. stir twice. Stir in the dishwasher. Stir in a 3-quart casserole. Reduce power to use cleaning sprays, large amounts of beans, and mash the beans with lid. Makes about 2 quarts. CLEANING THE EXTERIOR It's best to...
User Manual
Page 21
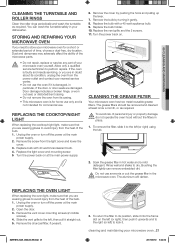
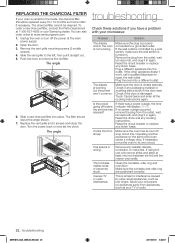
... is not intended for commercial use ammonia or put the grease filter in the WARNING microwave oven. Unplug the oven or turn off the power at the main power supply. 2. Remove the cover by turning it straight out. 5. Replace the vent grille and the 2 screws. 11. Remove the vent cover ...a qualified service technician to dry. STORING AND REPAIRING YOUR MICROWAVE OVEN If you are damaged. Replace bulb with a 40 watt appliance bulb. 9. Turn the power back on the left (or right), then push it upwards and to the left, then pull it gently. 8. Do not use . cleaning and maintaining your...
... is not intended for commercial use ammonia or put the grease filter in the WARNING microwave oven. Unplug the oven or turn off the power at the main power supply. 2. Remove the cover by turning it straight out. 5. Replace the vent grille and the 2 screws. 11. Remove the vent cover ...a qualified service technician to dry. STORING AND REPAIRING YOUR MICROWAVE OVEN If you are damaged. Replace bulb with a 40 watt appliance bulb. 9. Turn the power back on the left (or right), then push it upwards and to the left, then pull it gently. 8. Do not use . cleaning and maintaining your...
User Manual
Page 22
...if you have a problem with your oven is stuck in the door seal. Check if any blown fuses. Is the power going off the power at 1-800-627-4368 or your Samsung dealer. Reset the circuit breaker or replace any packaging material or anything else is vented to repair the wall outlet. ...Remove any metallic utensils, cookware, or metal ties. If no power outage occurred, remove the plug from the outlet, wait ten seconds, and plug it...
...if you have a problem with your oven is stuck in the door seal. Check if any blown fuses. Is the power going off the power at 1-800-627-4368 or your Samsung dealer. Reset the circuit breaker or replace any packaging material or anything else is vented to repair the wall outlet. ...Remove any metallic utensils, cookware, or metal ties. If no power outage occurred, remove the plug from the outlet, wait ten seconds, and plug it...
User Manual
Page 23
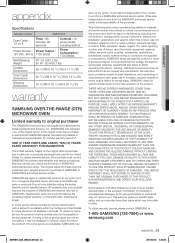
...SAMSUNG. THIS LIMITED WARRANTY SHALL NOT EXTEND TO ANYONE OTHER THAN THE ORIGINAL PURCHASER OF THIS PRODUCT, IS NONTRANSFERABLE AND STATES YOUR EXCLUSIVE REMEDY. This warranty gives you specific legal rights, and you . 06 WARRANTY appendix Specifications Model number SMH1816 Oven Cavity : 1.8 cu ft Timer : 99 minutes, 99 seconds Controls : 10 power... levels, including defrost Power Source : Power Output : 120 VAC, 60 Hz 1100 Watts Power Consumption : 1700 Watts...
...SAMSUNG. THIS LIMITED WARRANTY SHALL NOT EXTEND TO ANYONE OTHER THAN THE ORIGINAL PURCHASER OF THIS PRODUCT, IS NONTRANSFERABLE AND STATES YOUR EXCLUSIVE REMEDY. This warranty gives you specific legal rights, and you . 06 WARRANTY appendix Specifications Model number SMH1816 Oven Cavity : 1.8 cu ft Timer : 99 minutes, 99 seconds Controls : 10 power... levels, including defrost Power Source : Power Output : 120 VAC, 60 Hz 1100 Watts Power Consumption : 1700 Watts...