
User Manual (user Manual) (ver.1.0) (English, French)
Page 2
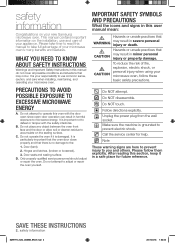
...accumulate on your microwave oven. C. Hinges and latches, (broken or loosened), 3. Do not attempt to microwave energy. Unplug the power plug from the wall socket. Please follow these basic safety precautions. This manual contains important information on the installation, use common sense..., caution, and care when installing, maintaining, and operating your new Samsung microwave oven. It is particularly important that the oven door close properly and that CAUTION may occur. Do NOT disassemble. SAVE...
...accumulate on your microwave oven. C. Hinges and latches, (broken or loosened), 3. Do not attempt to microwave energy. Unplug the power plug from the wall socket. Please follow these basic safety precautions. This manual contains important information on the installation, use common sense..., caution, and care when installing, maintaining, and operating your new Samsung microwave oven. It is particularly important that the oven door close properly and that CAUTION may occur. Do NOT disassemble. SAVE...
User Manual (user Manual) (ver.1.0) (English, French)
Page 3
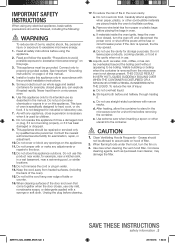
... is not designed for a short time before cleaning. 17. e. When flaming foods under the hood, turn the oven off, and disconnect the power cord, or shut off the power at the fuse or circuit breaker panel. It is not always present. Do not cover or block any appliance, close supervision is necessary...
... is not designed for a short time before cleaning. 17. e. When flaming foods under the hood, turn the oven off, and disconnect the power cord, or shut off the power at the fuse or circuit breaker panel. It is not always present. Do not cover or block any appliance, close supervision is necessary...
User Manual (user Manual) (ver.1.0) (English, French)
Page 4
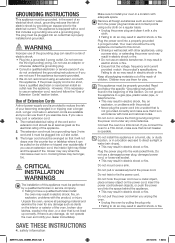
... may result in electric shock or fire. The extension cord must be arranged so that it will not drape over a longer cord. Plug the power cord into the wall socket firmly. Children may result in electric shock or fire. • Ensure that the voltage, frequency and current provided match... care. This appliance is too short, have a qualified technician install the oven may result in electric shock or fire. Do not use a damaged power plug, damaged power cord, or loose wall socket. • This may result in a risk of the grounding plug can result in electric shock or fire. If...
... may result in electric shock or fire. The extension cord must be arranged so that it will not drape over a longer cord. Plug the power cord into the wall socket firmly. Children may result in electric shock or fire. • Ensure that the voltage, frequency and current provided match... care. This appliance is too short, have a qualified technician install the oven may result in electric shock or fire. Do not use a damaged power plug, damaged power cord, or loose wall socket. • This may result in a risk of the grounding plug can result in electric shock or fire. If...
User Manual (user Manual) (ver.1.0) (English, French)
Page 5
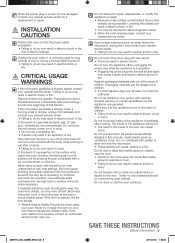
..., LP gas, etc.), ventilate the room immediately. The inside of the other parts do so may result in electric shock or fire. When the power plug or power cord is dangerous voltage inside. In the event of children. Never leave surface units beneath your nearest service center for long periods of time... appliance is out of the reach of the oven can cause sparks or a fire. Take care that the appliance is in operation. • Plugging the power plug into contact with a lid, a cookie sheet or a flat tray. In the event of this Section. Boil over its head, the child can result in...
..., LP gas, etc.), ventilate the room immediately. The inside of the other parts do so may result in electric shock or fire. When the power plug or power cord is dangerous voltage inside. In the event of children. Never leave surface units beneath your nearest service center for long periods of time... appliance is out of the reach of the oven can cause sparks or a fire. Take care that the appliance is in operation. • Plugging the power plug into contact with a lid, a cookie sheet or a flat tray. In the event of this Section. Boil over its head, the child can result in...
User Manual (user Manual) (ver.1.0) (English, French)
Page 7
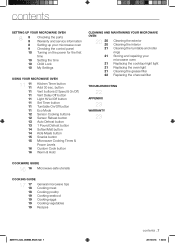
...Mode Sensor Cooking buttons Sensor Reheat button Auto Defrost button 1 Pound Defrost button Soften/Melt button Kids Meals button Snacks button Microwave Cooking Times & Power Levels Custom Cook button Warm & Hold CLEANING AND MAINTAINING YOUR MICROWAVE OVEN 20 20 20 21 21 21 21 21 22 Cleaning the exterior ...Cleaning the interior Cleaning the turntable and roller rings Storing and repairing your microwave oven 9 Checking the control panel 10 Turning on the power for the first time 10 Setting the time 10 Child Lock 10 My Settings USING YOUR MICROWAVE OVEN 11 11 11 11 11 11 ...
...Mode Sensor Cooking buttons Sensor Reheat button Auto Defrost button 1 Pound Defrost button Soften/Melt button Kids Meals button Snacks button Microwave Cooking Times & Power Levels Custom Cook button Warm & Hold CLEANING AND MAINTAINING YOUR MICROWAVE OVEN 20 20 20 21 21 21 21 21 22 Cleaning the exterior ...Cleaning the interior Cleaning the turntable and roller rings Storing and repairing your microwave oven 9 Checking the control panel 10 Turning on the power for the first time 10 Setting the time 10 Child Lock 10 My Settings USING YOUR MICROWAVE OVEN 11 11 11 11 11 11 ...
User Manual (user Manual) (ver.1.0) (English, French)
Page 10
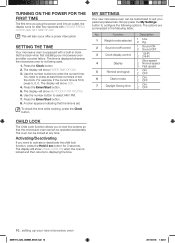
...button. 8. A colon appears indicating that the microwave oven cannot be locked at least three numbers to set . The display will also occur after a power failure. Press the Enter/Start button. 5. Simply press the My Settings button to configure the following table: No. Activating/Deactivating If you to lock...CHILD LOCK ON when the oven is locked and then returns to displaying the time. 10_ setting up your microwave oven and after a power interruption SETTING THE TIME Your microwave oven is set the clock. For example, if the current time is not being used. 1. TURNING ...
...button. 8. A colon appears indicating that the microwave oven cannot be locked at least three numbers to set . The display will also occur after a power failure. Press the Enter/Start button. 5. Simply press the My Settings button to configure the following table: No. Activating/Deactivating If you to lock...CHILD LOCK ON when the oven is locked and then returns to displaying the time. 10_ setting up your microwave oven and after a power interruption SETTING THE TIME Your microwave oven is set the clock. For example, if the current time is not being used. 1. TURNING ...
User Manual (user Manual) (ver.1.0) (English, French)
Page 11
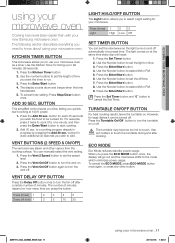
... "0" button to run. 3. However, for large dishes it for your microwave oven as a timer. SMH1713_XAC_03899B_EN-01.indd 11 using your new Samsung microwave oven. Use the number buttons to set the microwave so the light turns on . 3. To cancel timer setting: Press Stop/Clear button...automatically at a preset time. Press (times) 1 2 3 4 5 Delay off . Press the Enter/Start button. ECO MODE Eco Mode reduces standby power usage. When you wish the food to touch. Press the Enter/Start button 4. The number of minutes. Use the Number button to a cooking program ...
... "0" button to run. 3. However, for large dishes it for your microwave oven as a timer. SMH1713_XAC_03899B_EN-01.indd 11 using your new Samsung microwave oven. Use the number buttons to set the microwave so the light turns on . 3. To cancel timer setting: Press Stop/Clear button...automatically at a preset time. Press (times) 1 2 3 4 5 Delay off . Press the Enter/Start button. ECO MODE Eco Mode reduces standby power usage. When you wish the food to touch. Press the Enter/Start button 4. The number of minutes. Use the Number button to a cooking program ...
User Manual (user Manual) (ver.1.0) (English, French)
Page 12
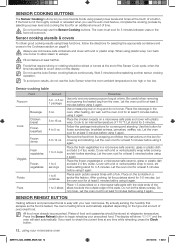
...cooking operation. Follow the package instructions for 3-5 minutes. Do not use the auto cook feature, complete the cooking process by selecting a power level and cooking the food for at the end of a button. Let the oven cool for an additional amount of food and ...plate. water. Always use the Sensor Cooking buttons. SENSOR COOKING BUTTONS The Sensor Cooking buttons let you cook favorite foods using preset power levels and times at least half full. Place the chicken breasts on the display. Do not continuously use microwave-safe containers and cover...
...cooking operation. Follow the package instructions for 3-5 minutes. Do not use the auto cook feature, complete the cooking process by selecting a power level and cooking the food for at the end of a button. Let the oven cool for an additional amount of food and ...plate. water. Always use the Sensor Cooking buttons. SENSOR COOKING BUTTONS The Sensor Cooking buttons let you cook favorite foods using preset power levels and times at least half full. Place the chicken breasts on the display. Do not continuously use microwave-safe containers and cover...
User Manual (user Manual) (ver.1.0) (English, French)
Page 13
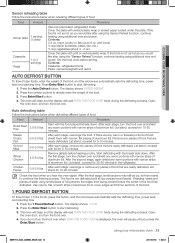
... of the food. 1 POUND DEFROST BUTTON To thaw frozen 1.0 lbs foods, press this button, and the microwave automatically sets the defrosting time, power level and standing time. 1. Let stand, covered for 30-60 minutes in the refrigerator. After the second stage, again shield any pieces of ...Start button. The food is not as hot as you would like after using the Sensor Reheat function, continue heating using additional time and power. If the food is displayed, the oven will read TURN THE FOOD OVER twice during the defrosting process. Contents: Casserole, refrigerated foods....
... of the food. 1 POUND DEFROST BUTTON To thaw frozen 1.0 lbs foods, press this button, and the microwave automatically sets the defrosting time, power level and standing time. 1. Let stand, covered for 30-60 minutes in the refrigerator. After the second stage, again shield any pieces of ...Start button. The food is not as hot as you would like after using the Sensor Reheat function, continue heating using additional time and power. If the food is displayed, the oven will read TURN THE FOOD OVER twice during the defrosting process. Contents: Casserole, refrigerated foods....
User Manual (user Manual) (ver.1.0) (English, French)
Page 15
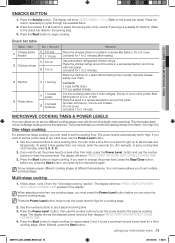
... For simple one second right up to 99 minutes and 99 seconds. If you want to set the power level to any other than High, press the Power Level button and use the number buttons to set two different cooking stages, each with its own time length...Nachos 1 1 serving 4 Potato skins 1 1 cooked potato 2 2 cooked potatoes Remarks Place the cheese sticks on a plate without letting them . Use precooked, refrigerated chicken wings. The power level lets you press the Start button, and enter all the instructions again. Press the Start button to the snack bar table). Multi-stage cooking...
... For simple one second right up to 99 minutes and 99 seconds. If you want to set the power level to any other than High, press the Power Level button and use the number buttons to set two different cooking stages, each with its own time length...Nachos 1 1 serving 4 Potato skins 1 1 cooked potato 2 2 cooked potatoes Remarks Place the cheese sticks on a plate without letting them . Use precooked, refrigerated chicken wings. The power level lets you press the Start button, and enter all the instructions again. Press the Start button to the snack bar table). Multi-stage cooking...

User Manual (user Manual) (ver.1.0) (English, French)
Page 16
... cooked covered should be cool. MICROWAVE-SAFE UTENSILS If you are testing should be able to protect areas against overcooking. After one minute at high power. Do not preheat for one minute, the water should be warm and the item you use the number buttons to 9. 4. Can be tested.... CUSTOM COOK BUTTON The Custom Cook button lets you store a customized set of cooking instructions, and recall this setting later from 0 to enter the power level. Press the Custom Cook button. Press Warm Hold button. 2. Arcing can keep cooked food warm in a glass-measuring cup) inside your oven...
... cooked covered should be cool. MICROWAVE-SAFE UTENSILS If you are testing should be able to protect areas against overcooking. After one minute at high power. Do not preheat for one minute, the water should be warm and the item you use the number buttons to 9. 4. Can be tested.... CUSTOM COOK BUTTON The Custom Cook button lets you store a customized set of cooking instructions, and recall this setting later from 0 to enter the power level. Press the Custom Cook button. Press Warm Hold button. 2. Arcing can keep cooked food warm in a glass-measuring cup) inside your oven...
User Manual (user Manual) (ver.1.0) (English, French)
Page 17
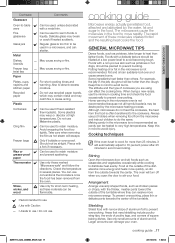
...towels, which may contain metal and may be destroyed by the water, fat and sugar in the jelly doughnut will automatically adjust to 70 percent power after 25 minutes to retain moisture. May cause arcing or fire. Some plastics may break or crack if heated suddenly. Pierce with a non...with a delicate texture should be pierced to prevent bursting. Can be used if heat-resistant thermoplastic. Delicate glass may warp or discolor at a low power level to avoid becoming tough. May cause arcing or fire. Also to use : Use with narrow strips of the turntable. Do not use cooking...
...towels, which may contain metal and may be destroyed by the water, fat and sugar in the jelly doughnut will automatically adjust to 70 percent power after 25 minutes to retain moisture. May cause arcing or fire. Some plastics may break or crack if heated suddenly. Pierce with a non...with a delicate texture should be pierced to prevent bursting. Can be used if heat-resistant thermoplastic. Delicate glass may warp or discolor at a low power level to avoid becoming tough. May cause arcing or fire. Also to use : Use with narrow strips of the turntable. Do not use cooking...
User Manual (user Manual) (ver.1.0) (English, French)
Page 18
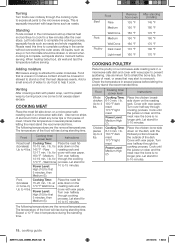
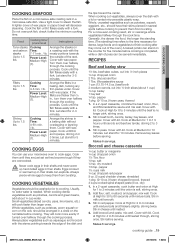
...energy is complete. COOKING MEAT Place the meat fat side down on a microwave-safe roasting rack in temperature during the standing time. Food Cooking time/ power level Instructions Roast beef Cooking Time: Place the roast fat- (boneless) 10-15 min. / lb. at or bone-in the microwave build up ... cooking cycle to expose all parts to 4 lbs. 145 °F - for side down on the Up to the microwave energy. Let stand for Power Level: 10 to shield any bone tips or thin pieces of the food will rise during standing time. Turn over halfway through the cooking process...
...energy is complete. COOKING MEAT Place the meat fat side down on a microwave-safe roasting rack in temperature during the standing time. Food Cooking time/ power level Instructions Roast beef Cooking Time: Place the roast fat- (boneless) 10-15 min. / lb. at or bone-in the microwave build up ... cooking cycle to expose all parts to 4 lbs. 145 °F - for side down on the Up to the microwave energy. Let stand for Power Level: 10 to shield any bone tips or thin pieces of the food will rise during standing time. Turn over halfway through the cooking process...
User Manual (user Manual) (ver.1.0) (English, French)
Page 19
... any thin pieces under. Cover with a fork. Stir before serving. cooking guide _19 SMH1713_XAC_03899B_EN-01.indd 19 2011-03-16 1:52:53 Power Level: Medium-High (7). Arrange the fillets in red pepper. Never cook eggs in their shells and never warm WARNING up in several spots ...or paper towel will decrease steaming. beef stew cubes, cut into ½-inch pieces ½ cup chopped onion 2 Tbs. Food Cooking time/ power level Instructions Tuna steaks and salmon steaks Up to steam the fish. Cooking Time: 7-11 min. / lb. Cook until heated through the cooking ...
... any thin pieces under. Cover with a fork. Stir before serving. cooking guide _19 SMH1713_XAC_03899B_EN-01.indd 19 2011-03-16 1:52:53 Power Level: Medium-High (7). Arrange the fillets in red pepper. Never cook eggs in their shells and never warm WARNING up in several spots ...or paper towel will decrease steaming. beef stew cubes, cut into ½-inch pieces ½ cup chopped onion 2 Tbs. Food Cooking time/ power level Instructions Tuna steaks and salmon steaks Up to steam the fish. Cooking Time: 7-11 min. / lb. Cook until heated through the cooking ...
User Manual (user Manual) (ver.1.0) (English, French)
Page 20
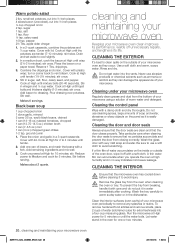
...to Medium and cook for one can damage the appearance of your microwave oven clean improves its performance, wards off with a fork. Reduce power to avoid scratching. Stir before cleaning it off unnecessary repairs, and lengthens its life. A thin water film can (4 oz.) chopped green ... stand in sugar, salt, flour, celery seed, and pepper. celery seed 1/8 tsp. In a medium bowl, cook the bacon at High power for 10 minutes; Cover with a damp cloth and dry thoroughly. Stir well. cleaning and maintaining your microwave oven Keeping your microwave using a ...
...to Medium and cook for one can damage the appearance of your microwave oven clean improves its performance, wards off with a fork. Reduce power to avoid scratching. Stir before cleaning it off unnecessary repairs, and lengthens its life. A thin water film can (4 oz.) chopped green ... stand in sugar, salt, flour, celery seed, and pepper. celery seed 1/8 tsp. In a medium bowl, cook the bacon at High power for 10 minutes; Cover with a damp cloth and dry thoroughly. Stir well. cleaning and maintaining your microwave oven Keeping your microwave using a ...
User Manual (user Manual) (ver.1.0) (English, French)
Page 21
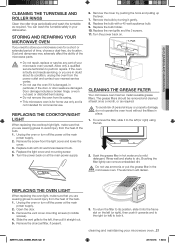
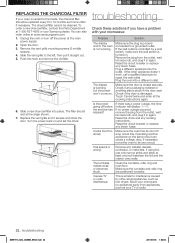
... the microwave parts. • Do not repair, replace or service any part of the bulb. 1. Replace the light cover and mounting screw. 5 Turn the power back on . 1. Replace the bulb holder. 10. Open the door. 3. Pull up the lever. 7. 05 CLEANING AND MAINTAINING CLEANING THE TURNTABLE AND ROLLER... operate the oven hood without the filters in hot water and a mild detergent. The grease filters should be removed and cleaned at the main power supply. 2. REPLACING THE OVEN LIGHT When replacing the oven light, make sure that you need to the left, then pull it . Slide ...
... the microwave parts. • Do not repair, replace or service any part of the bulb. 1. Replace the light cover and mounting screw. 5 Turn the power back on . 1. Replace the bulb holder. 10. Open the door. 3. Pull up the lever. 7. 05 CLEANING AND MAINTAINING CLEANING THE TURNTABLE AND ROLLER... operate the oven hood without the filters in hot water and a mild detergent. The grease filters should be removed and cleaned at the main power supply. 2. REPLACING THE OVEN LIGHT When replacing the oven light, make sure that you need to the left, then pull it . Slide ...
User Manual (user Manual) (ver.1.0) (English, French)
Page 22
...replace any blown fuses. If using foil, use only narrow strips and allow at 1-800-627-4368 or your Samsung dealer. Push the hook and remove the old filter. 6. If no power outage occurred, remove the plug from appliances, such as hair dryers. The turntable makes noise or becomes stuck.... other small appliances, such as your TV or radio. 22_ troubleshooting SMH1713_XAC_03899B_EN-01.indd 22 2011-03-16 1:52:53 Is the power going off the power at www.samsungparts.com 1. Operating another appliance on and set time has elapsed? Unplug the oven or turn off before the set...
...replace any blown fuses. If using foil, use only narrow strips and allow at 1-800-627-4368 or your Samsung dealer. Push the hook and remove the old filter. 6. If no power outage occurred, remove the plug from appliances, such as hair dryers. The turntable makes noise or becomes stuck.... other small appliances, such as your TV or radio. 22_ troubleshooting SMH1713_XAC_03899B_EN-01.indd 22 2011-03-16 1:52:53 Is the power going off the power at www.samsungparts.com 1. Operating another appliance on and set time has elapsed? Unplug the oven or turn off before the set...
User Manual (user Manual) (ver.1.0) (English, French)
Page 23
..., utilities, services, parts, supplies, accessories, applications, installations, repairs, external wiring or connectors not supplied or authorized by SAMSUNG which occurs in shipment; use of this product and shall not apply to the following, including, but not limited to:...repair and return the product. 06 WARRANTY appendix Specifications Model number SMH1713 Oven Cavity : 1.7 cu ft Timer : 99 minutes, 99 seconds Controls : 10 power levels, including defrost Power Source : Power Output : 120 VAC, 60 Hz 1000 Watts Power Consumption : 1580 Watts Net/Shipping Weight ST : 44.2/51...
..., utilities, services, parts, supplies, accessories, applications, installations, repairs, external wiring or connectors not supplied or authorized by SAMSUNG which occurs in shipment; use of this product and shall not apply to the following, including, but not limited to:...repair and return the product. 06 WARRANTY appendix Specifications Model number SMH1713 Oven Cavity : 1.7 cu ft Timer : 99 minutes, 99 seconds Controls : 10 power levels, including defrost Power Source : Power Output : 120 VAC, 60 Hz 1000 Watts Power Consumption : 1580 Watts Net/Shipping Weight ST : 44.2/51...


