
Quick Guide (easy Manual) (ver.1.0) (English)
Page 49
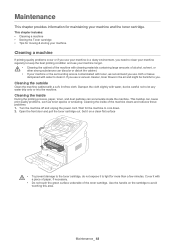
Cover it with water, but be harmful to avoid touching this area. Turn the machine off and unplug the power cord. Open the front door and pull the toner cartridge out. Set it on the cartridge to you use cloth or tissue dampened with a soft, lint-free cloth. Dampen the ...
Cover it with water, but be harmful to avoid touching this area. Turn the machine off and unplug the power cord. Open the front door and pull the toner cartridge out. Set it on the cartridge to you use cloth or tissue dampened with a soft, lint-free cloth. Dampen the ...
Quick Guide (easy Manual) (ver.1.0) (English)
Page 50
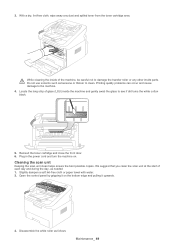
... inside of the machine, be careful not to clean. Reinsert the toner cartridge and close the front door. 6. We suggest that you clean the scan unit at the start of glass (LSU) inside parts. Open the control panel by gripping it upwards. 3. Locate the long strip of each day and during the...
... inside of the machine, be careful not to clean. Reinsert the toner cartridge and close the front door. 6. We suggest that you clean the scan unit at the start of glass (LSU) inside parts. Open the control panel by gripping it upwards. 3. Locate the long strip of each day and during the...
Quick Guide (easy Manual) (ver.1.0) (English)
Page 54
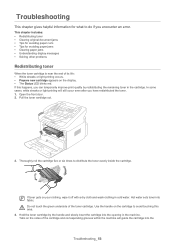
...If toner gets on the display. • The Status LED blinks red. Use the handle on the sides of the toner cartridge. Open the front door. 2. Thoroughly roll the cartridge five or six times to avoid touching this happens, you encounter an error. Troubleshooting 8. Pull the toner... cartridge out. 3. Hot water sets toner into the opening in the machine. If this area. 4. Hold the toner cartridge by redistributing the ...
...If toner gets on the display. • The Status LED blinks red. Use the handle on the sides of the toner cartridge. Open the front door. 2. Thoroughly roll the cartridge five or six times to avoid touching this happens, you encounter an error. Troubleshooting 8. Pull the toner... cartridge out. 3. Hot water sets toner into the opening in the machine. If this area. 4. Hold the toner cartridge by redistributing the ...

Quick Guide (easy Manual) (ver.1.0) (English)
Page 56
Open the control panel by gripping it . 3. Tips for avoiding paper curls 1. Only use when the printout has more than 20 mm curl. 1 Pressure lever Troubleshooting_ 55 Pull down the pressure lever on the bottom edge and pulling it on each side. Close the control panel. Open the rear door. 2. Then load the documents back into the document feeder. Keep the rear cover opened during printing. Exit Misfeed 1. Pull the document gently out of the document feeder. 4. Remove any remaining pages from the document feeder. 2.
Open the control panel by gripping it . 3. Tips for avoiding paper curls 1. Only use when the printout has more than 20 mm curl. 1 Pressure lever Troubleshooting_ 55 Pull down the pressure lever on the bottom edge and pulling it on each side. Close the control panel. Open the rear door. 2. Then load the documents back into the document feeder. Keep the rear cover opened during printing. Exit Misfeed 1. Pull the document gently out of the document feeder. 4. Remove any remaining pages from the document feeder. 2.

Quick Guide (easy Manual) (ver.1.0) (English)
Page 57
...jam occurs, refer to the next guidelines. • Ensure that the adjustable guides are positioned correctly (See "Loading paper in this link to open and close the front door. To avoid tearing the paper, pull the jammed paper out slowly and gently. Pull out tray 1 . 3. If the paper does not move...Ensure that the recommended side of the print media is below the paper capacity mark on page29). • Do not overload the tray. Open and close the front door. Insert tray 1 back into place. If the paper does not exit, go to clear the jam. Remove the jammed paper by gently ...
...jam occurs, refer to the next guidelines. • Ensure that the adjustable guides are positioned correctly (See "Loading paper in this link to open and close the front door. To avoid tearing the paper, pull the jammed paper out slowly and gently. Pull out tray 1 . 3. If the paper does not move...Ensure that the recommended side of the print media is below the paper capacity mark on page29). • Do not overload the tray. Open and close the front door. Insert tray 1 back into place. If the paper does not exit, go to clear the jam. Remove the jammed paper by gently ...

Quick Guide (easy Manual) (ver.1.0) (English)
Page 58
... by gently pulling it down. 2. Printing automatically resumes. If you do not see the jammed paper, go to open an animation about clearing a jam. Open the front door and pull the toner cartridge out, lightly pushing it straight out. 3. The jammed paper is hot. Take care ...when removing paper from the machine. Inside the machine Click this link to open an animation about clearing a jam. 1. Open and close the front door. Troubleshooting_ 57 In exit area Click this link to next step. The fuser area is automatically ejected from ...
... by gently pulling it down. 2. Printing automatically resumes. If you do not see the jammed paper, go to open an animation about clearing a jam. Open the front door and pull the toner cartridge out, lightly pushing it straight out. 3. The jammed paper is hot. Take care ...when removing paper from the machine. Inside the machine Click this link to open an animation about clearing a jam. 1. Open and close the front door. Troubleshooting_ 57 In exit area Click this link to next step. The fuser area is automatically ejected from ...

Quick Guide (easy Manual) (ver.1.0) (English)
Page 59
...do not see the jammed paper or if there is hot. Pull the pressure levers down and remove he paper. Close the rear door. 7. Open and close front door, printing automatically resumes. Return the pressure levers to their original position. 1 Pressure lever The fuser area is any resistance when you... do not see the jammed paper, go to next step. 5. Troubleshooting_ 58 If you pull, stop and go to the next step. 3. Open the rear door. 4. Pull the fuser cover levers down and remove the paper. 2. Take care when removing paper from the machine. 6. Gently pull the paper...
...do not see the jammed paper or if there is hot. Pull the pressure levers down and remove he paper. Close the rear door. 7. Open and close front door, printing automatically resumes. Return the pressure levers to their original position. 1 Pressure lever The fuser area is any resistance when you... do not see the jammed paper, go to next step. 5. Troubleshooting_ 58 If you pull, stop and go to the next step. 3. Open the rear door. 4. Pull the fuser cover levers down and remove the paper. 2. Take care when removing paper from the machine. 6. Gently pull the paper...
Quick Guide (easy Manual) (ver.1.0) (English)
Page 60
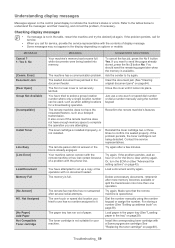
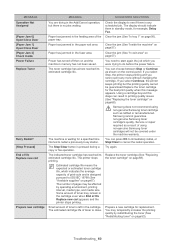
Error] Document Jam [Door Open] Group Not Available [Incompatible] Install Toner Line Busy [Line Error] Load Document Memory Full [No Answer] NO. The front or rear cover is available. The ...] Add Paper Not Compatible Toner cartridge MEANING SUGGESTED SOLUTIONS Your machine's memory has become full while documents were being detected. Your machine cannot connect with a Samsung-genuine cartridge (See "Replacing the toner cartridge" on page 68). The toner cartridge is not suitable for your machine. Dial the number manually using the...
Error] Document Jam [Door Open] Group Not Available [Incompatible] Install Toner Line Busy [Line Error] Load Document Memory Full [No Answer] NO. The front or rear cover is available. The ...] Add Paper Not Compatible Toner cartridge MEANING SUGGESTED SOLUTIONS Your machine's memory has become full while documents were being detected. Your machine cannot connect with a Samsung-genuine cartridge (See "Replacing the toner cartridge" on page 68). The toner cartridge is not suitable for your machine. Dial the number manually using the...
Quick Guide (easy Manual) (ver.1.0) (English)
Page 61
... cart appears and the printer stops printing. SUGGESTED SOLUTIONS Check the display to cancel the redial operation. Troubleshooting_ 60 Samsung cannot guarantee non-genuine Samsung toner cartridge's quality. Try again. Replace the toner cartridge (See "Replacing the toner cartridge" on page 57)....Stop/Clear to see if there is any more without changing the cartridge. MESSAGE Operation Not Assigned [Paper Jam 0] Open/Close Door [Paper Jam 1] Open/Close Door [Paper Jam 2] Check Inside Power Failure Replace Toner Retry Redial? [Stop Pressed] End of print-outs and is...
... cart appears and the printer stops printing. SUGGESTED SOLUTIONS Check the display to cancel the redial operation. Troubleshooting_ 60 Samsung cannot guarantee non-genuine Samsung toner cartridge's quality. Try again. Replace the toner cartridge (See "Replacing the toner cartridge" on page 57)....Stop/Clear to see if there is any more without changing the cartridge. MESSAGE Operation Not Assigned [Paper Jam 0] Open/Close Door [Paper Jam 1] Open/Close Door [Paper Jam 2] Check Inside Power Failure Replace Toner Retry Redial? [Stop Pressed] End of print-outs and is...
Quick Guide (easy Manual) (ver.1.0) (English)
Page 62
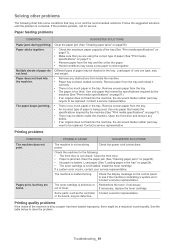
...recommended solutions. Remove excess paper from the tray and reload it correctly. • There is indicating a system error. Open the front door and remove any obstructions from the tray. • An incorrect type of the machine is corrected. Close the front.... POSSIBLE CAUSE SUGGESTED SOLUTIONS The machine is jammed. The toner cartridge is malfunctioning. Solving other problems The following : • The front door is loaded. Paper sticks together. • Check the maximum paper capacity of the tray (See "Print media specifications" on page 71)....
...recommended solutions. Remove excess paper from the tray and reload it correctly. • There is indicating a system error. Open the front door and remove any obstructions from the tray. • An incorrect type of the machine is corrected. Close the front.... POSSIBLE CAUSE SUGGESTED SOLUTIONS The machine is jammed. The toner cartridge is malfunctioning. Solving other problems The following : • The front door is loaded. Paper sticks together. • Check the maximum paper capacity of the tray (See "Print media specifications" on page 71)....

Quick Guide (easy Manual) (ver.1.0) (English)
Page 69
...not cover the replacement of life Replace new cart appears on page 67). 1. When a toner cartridge has reached its package. 4. Open the front door. 2. Remove the paper protecting the toner cartridge by an authorized service provider, dealer, or the retailer where you bought the machine... parts, contact the source where you bought the machine. Replacing the toner cartridge Click this stage, the toner cartridge needs to open an animation about replacing a toner cartridge. Supplies and accessories_ 68 At this link to be replaced. Replacing maintenance parts can be...
...not cover the replacement of life Replace new cart appears on page 67). 1. When a toner cartridge has reached its package. 4. Open the front door. 2. Remove the paper protecting the toner cartridge by an authorized service provider, dealer, or the retailer where you bought the machine... parts, contact the source where you bought the machine. Replacing the toner cartridge Click this stage, the toner cartridge needs to open an animation about replacing a toner cartridge. Supplies and accessories_ 68 At this link to be replaced. Replacing maintenance parts can be...

Quick Guide (easy Manual) (ver.1.0) (English)
Page 70
... paper. 6. Do not touch the green underside of the toner cartridge. Make sure that the cover is securely closed. Hot water sets toner into the opening in cold water. Use the handle on the sides of the cartridge and discard it from the cartridge. Close the front... door. If this area. 7. Tabs on the cartridge to distribute the toner evenly inside the cartridge. 5. Hold the toner cartridge by the handle and slowly insert ...
... paper. 6. Do not touch the green underside of the toner cartridge. Make sure that the cover is securely closed. Hot water sets toner into the opening in cold water. Use the handle on the sides of the cartridge and discard it from the cartridge. Close the front... door. If this area. 7. Tabs on the cartridge to distribute the toner evenly inside the cartridge. 5. Hold the toner cartridge by the handle and slowly insert ...


