

User Manual (ENGLISH)
Page 7
... Drum 5.7 Ignoring the Toner Empty Message 5.8 Consumables and Replacement Parts 5.8 Replacing the ADF Rubber Pad 5.9 Chapter 6: TROUBLESHOOTING Clearing Document Jams 6.2 Input Misfeed 6.2 Exit Misfeed 6.2 Clearing Paper Jams 6.3 In the Paper Tray 6.3 In the Paper Exit Area 6.3 In the Fuser Area or Around the Toner Cartridge 6.4 In the Manual Feeder 6.5 Tips for Avoiding...
... Drum 5.7 Ignoring the Toner Empty Message 5.8 Consumables and Replacement Parts 5.8 Replacing the ADF Rubber Pad 5.9 Chapter 6: TROUBLESHOOTING Clearing Document Jams 6.2 Input Misfeed 6.2 Exit Misfeed 6.2 Clearing Paper Jams 6.3 In the Paper Tray 6.3 In the Paper Exit Area 6.3 In the Fuser Area or Around the Toner Cartridge 6.4 In the Manual Feeder 6.5 Tips for Avoiding...

User Manual (ENGLISH)
Page 18
... ventilation) • Right: 100 mm • Left: 100 mm (enough space for air circulation. Clearance Space • Front: 482.6 mm (enough space so that the paper tray can be well-ventilated and away from the front, back and sides of the machine. 1 Selecting a Location Select a level, stable place with adequate space for...
... ventilation) • Right: 100 mm • Left: 100 mm (enough space for air circulation. Clearance Space • Front: 482.6 mm (enough space so that the paper tray can be well-ventilated and away from the front, back and sides of the machine. 1 Selecting a Location Select a level, stable place with adequate space for...

User Manual (ENGLISH)
Page 19
Understanding the Component Location These are the main components of your machine: Front View Document Input Automatic Document Support Feeder Control Panel (See page 1.5) Document Output Tray Document Guides Front Output Tray (Face down) Front Cover Paper Output Extension Handset Paper Level Indicator Manual Feeder Paper Tray Manual Feeder Guides Toner Cartridge Rear View Rear Cover EXT Jack* Line Jack Rear Output Slot (Face up) Power Switch AC Power Cord Connector * If your country has a different telephone connection system, this socket may be blocked. 1.4 GETTING STARTED
Understanding the Component Location These are the main components of your machine: Front View Document Input Automatic Document Support Feeder Control Panel (See page 1.5) Document Output Tray Document Guides Front Output Tray (Face down) Front Cover Paper Output Extension Handset Paper Level Indicator Manual Feeder Paper Tray Manual Feeder Guides Toner Cartridge Rear View Rear Cover EXT Jack* Line Jack Rear Output Slot (Face up) Power Switch AC Power Cord Connector * If your country has a different telephone connection system, this socket may be blocked. 1.4 GETTING STARTED

User Manual (ENGLISH)
Page 21
... you to store frequently-dialed fax numbers using less toner to print a document. 6 Allows you to save on both sides of the paper output tray. Attaching Accessories Document Output Support Insert the two tabs on the supplied document output support into a fax number in Edit mode. A X...job. Fold out the extender, if necessary. Engages the telephone line. NOTE: When detaching the document output tray, detach it by pressing the front portion of document output tray as seen from damge. 1.6 GETTING STARTED As this feature, you can take advantage of lower long distance ...
... you to store frequently-dialed fax numbers using less toner to print a document. 6 Allows you to save on both sides of the paper output tray. Attaching Accessories Document Output Support Insert the two tabs on the supplied document output support into a fax number in Edit mode. A X...job. Fold out the extender, if necessary. Engages the telephone line. NOTE: When detaching the document output tray, detach it by pressing the front portion of document output tray as seen from damge. 1.6 GETTING STARTED As this feature, you can take advantage of lower long distance ...

User Manual (ENGLISH)
Page 24
...Then tap the stack on the pressure plate until it up. 4 Insert the paper stack into the paper tray with the side you want to load a different size of paper, you need to print facing up your machine for the paper type and size you want to set up . GETTING STARTED 1.9 See page... 1.16. To load a stack of Letter-sized paper: 1 Pull open the paper tray and remove it from the machine. 2 Push down on a flat surface to even it locks into the machine. Paper overloading may cause paper jams. 6 Insert and slide the paper tray back into place. 3 Fan the edges of the...
...Then tap the stack on the pressure plate until it up. 4 Insert the paper stack into the paper tray with the side you want to load a different size of paper, you need to print facing up your machine for the paper type and size you want to set up . GETTING STARTED 1.9 See page... 1.16. To load a stack of Letter-sized paper: 1 Pull open the paper tray and remove it from the machine. 2 Push down on a flat surface to even it locks into the machine. Paper overloading may cause paper jams. 6 Insert and slide the paper tray back into place. 3 Fan the edges of the...

User Manual (ENGLISH)
Page 25
...lightly touches the side of paper until it may cause paper jams. 1.10 GETTING STARTED NOTES: • Do not push the paper width guide far enough to cause the materials to warp. • If you need to adjust the paper guides to extend the paper tray. 1 After pressing and unlatching... the guide lock, slide the paper length guide out completely to extend the paper tray to its full length. 2 After inserting paper into the tray, slide in the Paper Tray To load longer sizes of paper, such as shown, move...
...lightly touches the side of paper until it may cause paper jams. 1.10 GETTING STARTED NOTES: • Do not push the paper width guide far enough to cause the materials to warp. • If you need to adjust the paper guides to extend the paper tray. 1 After pressing and unlatching... the guide lock, slide the paper length guide out completely to extend the paper tray to its full length. 2 After inserting paper into the tray, slide in the Paper Tray To load longer sizes of paper, such as shown, move...
User Manual (ENGLISH)
Page 31
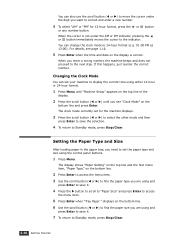
... enter a wrong number, the machine beeps and does not proceed to 24-hour format (e.g. 01:00 PM as 13:00). Setting the Paper Type and Size After loading paper in the paper tray, you are using and press Enter to save it . 7 To return to Standby mode, press Stop/Clear. 1.16 GETTING STARTED When... then press Enter to save it . 4 Press the X button to scroll to "Paper Size" and press Enter to access the menu item. 5 Press Enter when "Tray Paper " displays on the bottom line. 6 Use the scroll button (W or X) to find the paper size you need to set for 12-hour format, press the or button...
... enter a wrong number, the machine beeps and does not proceed to 24-hour format (e.g. 01:00 PM as 13:00). Setting the Paper Type and Size After loading paper in the paper tray, you are using and press Enter to save it . 7 To return to Standby mode, press Stop/Clear. 1.16 GETTING STARTED When... then press Enter to save it . 4 Press the X button to scroll to "Paper Size" and press Enter to access the menu item. 5 Press Enter when "Tray Paper " displays on the bottom line. 6 Use the scroll button (W or X) to find the paper size you need to set for 12-hour format, press the or button...
User Manual (ENGLISH)
Page 35
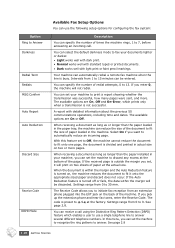
... machine rings, 1 to automatically reduce an incoming page. See page 2.8. When receiving a document as long as or longer than the paper installed in the paper tray, the machine can reduce the size of the document to 13. The Receive Code allows you set the machine to recognize the ring...9 at the factory. A report with light print or faint pencil markings. Select On if you can set , it onto the appropriate sized paper and discard does not occur. You can receive a call . Option Ring to Answer Darkness Redial Term Redials MSG Confirm Auto Report Auto Reduction Discard...
... machine rings, 1 to automatically reduce an incoming page. See page 2.8. When receiving a document as long as or longer than the paper installed in the paper tray, the machine can reduce the size of the document to 13. The Receive Code allows you set the machine to recognize the ring...9 at the factory. A report with light print or faint pencil markings. Select On if you can set , it onto the appropriate sized paper and discard does not occur. You can receive a call . Option Ring to Answer Darkness Redial Term Redials MSG Confirm Auto Report Auto Reduction Discard...
User Manual (ENGLISH)
Page 41
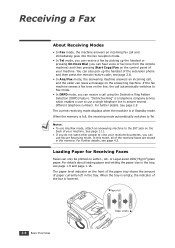
... Receiving mode. For details about loading paper and setting the paper size in Standby mode. In this mode, all of the extension phone and then press the remote receive code; See page 2.8 The current receiving mode displays when the machine is in the tray, see page 1.9 and page 1.16..., attach an answering machine to view your machine. Loading Paper for Receiving Faxes Faxes can leave a message on the front of the paper tray shows the amount of the bar is empty, the indicator of paper currently left in the memory. The paper level indicator on the answering machine. When the...
... Receiving mode. For details about loading paper and setting the paper size in Standby mode. In this mode, all of the extension phone and then press the remote receive code; See page 2.8 The current receiving mode displays when the machine is in the tray, see page 1.9 and page 1.16..., attach an answering machine to view your machine. Loading Paper for Receiving Faxes Faxes can leave a message on the front of the paper tray shows the amount of the bar is empty, the indicator of paper currently left in the memory. The paper level indicator on the answering machine. When the...

User Manual (ENGLISH)
Page 45
... you are faxing or copying. NOTE: When printing on previously printed paper from your finders can also use , see page 1.9 for loading print materials into the center of the print material. To load paper in the paper tray. Oils from the manual feeder, the printed side should be facing ...down with the print side face up and into the paper tray are the same whether you experience problems with paper feed, turn the paper around. 2.10 BASIC FUNCTIONS For further details, see page A.5. For transparencies, hold them by the edges...
... you are faxing or copying. NOTE: When printing on previously printed paper from your finders can also use , see page 1.9 for loading print materials into the center of the print material. To load paper in the paper tray. Oils from the manual feeder, the printed side should be facing ...down with the print side face up and into the paper tray are the same whether you experience problems with paper feed, turn the paper around. 2.10 BASIC FUNCTIONS For further details, see page A.5. For transparencies, hold them by the edges...

User Manual (ENGLISH)
Page 80
... to locate and clear the paper jam. The jammed paper automatically exits the machine. The jammed paper automatically exits the machine. In the Paper Tray 1 Open and close the front cover. Clearing Paper Jams When a paper jam occurs, "Paper Jam" appears on the next pages to clear the jam. See page 6.4. 4 Insert the paper tray into place. 5 Open and close...
... to locate and clear the paper jam. The jammed paper automatically exits the machine. The jammed paper automatically exits the machine. In the Paper Tray 1 Open and close the front cover. Clearing Paper Jams When a paper jam occurs, "Paper Jam" appears on the next pages to clear the jam. See page 6.4. 4 Insert the paper tray into place. 5 Open and close...

User Manual (ENGLISH)
Page 81
... the Toner Cartridge NOTE: The fuser area is any resistance and the paper does not move when you pull or if you cannot see the paper in the front output tray, continue to step 3. 3 Open the rear cover. 4 Remove the jammed paper by gently pulling it straight out. 5 Close the rear cover. 6 Open ...and close the front cover. If there is hot. Take care when removing paper from the machine. 1 Open the ...
... the Toner Cartridge NOTE: The fuser area is any resistance and the paper does not move when you pull or if you cannot see the paper in the front output tray, continue to step 3. 3 Open the rear cover. 4 Remove the jammed paper by gently pulling it straight out. 5 Close the rear cover. 6 Open ...and close the front cover. If there is hot. Take care when removing paper from the machine. 1 Open the ...

User Manual (ENGLISH)
Page 82
... pages later when the memory is facing down in the paper tray and facing up in the paper tray. • Use only recommended print materials. Ensure that the print side of the paper tray. • Do not remove the paper from the tray while your machine is below the paper capacity mark on page 1.9 when you want to send...
... pages later when the memory is facing down in the paper tray and facing up in the paper tray. • Use only recommended print materials. Ensure that the print side of the paper tray. • Do not remove the paper from the tray while your machine is below the paper capacity mark on page 1.9 when you want to send...

User Manual (ENGLISH)
Page 84
...redial, or Stop/Clear to do before the power failure. Try again. The toner cartridge has run out of the paper tray. • Paper has jammed in the paper exit area. • A paper jam has occurred in Standby mode, for a specified time interval to use has no jobs waiting. Take out the ...if there is pressed during a copy or fax operation. The One-touch or speed dial location you tried to redial a previously busy station. The paper tray has run Replace with a new toner cartridge. Check the display to it . The machine is no number assigned to see page 2.15. By doing...
...redial, or Stop/Clear to do before the power failure. Try again. The toner cartridge has run out of the paper tray. • Paper has jammed in the paper exit area. • A paper jam has occurred in Standby mode, for a specified time interval to use has no jobs waiting. Take out the ...if there is pressed during a copy or fax operation. The One-touch or speed dial location you tried to redial a previously busy station. The paper tray has run Replace with a new toner cartridge. Check the display to it . The machine is no number assigned to see page 2.15. By doing...
User Manual (ENGLISH)
Page 85
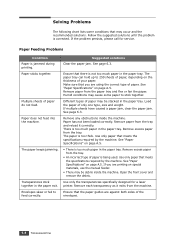
... much paper in the paper tray. The paper keeps jamming. Envelopes skew or fail to 250 sheets of paper, depending on the thickness of your paper. Ensure that meets the specifications required by the machine. See "Paper Specifications" on page A.5. Load the paper of paper do not feed. Remove excess paper from the paper tray and flex or fan the paper. See "Paper Specifications...
... much paper in the paper tray. The paper keeps jamming. Envelopes skew or fail to 250 sheets of paper, depending on the thickness of your paper. Ensure that meets the specifications required by the machine. See "Paper Specifications" on page A.5. Load the paper of paper do not feed. Remove excess paper from the paper tray and flex or fan the paper. See "Paper Specifications...

User Manual (ENGLISH)
Page 86
... the original document, press the Darkness button to lighten the background of paper, then turn it over in the tray with paper from the toner cartridge than expected prints out. Image rubs off . Frequent copy paper jams occurs. Replace the paper in the paper tray. Faxing Problems Condition Suggested solutions The machine is not working, • Unplug...
... the original document, press the Darkness button to lighten the background of paper, then turn it over in the tray with paper from the toner cartridge than expected prints out. Image rubs off . Frequent copy paper jams occurs. Replace the paper in the paper tray. Faxing Problems Condition Suggested solutions The machine is not working, • Unplug...

User Manual (ENGLISH)
Page 87
... and then restore the document. Replace the toner cartridge, referring to see if the display shows "Memory Full." • Make sure that there is paper in the user option setting. The machine does not send. The other fax machine may be enough memory to clear out the problem. See page... 1.16. 6.10 TROUBLESHOOTING Some of paper, or cannot answer incoming calls. There may have chosen the wrong paper settings in the tray. • Check to see if it . You may not be turned off, out of the words on ...
... and then restore the document. Replace the toner cartridge, referring to see if the display shows "Memory Full." • Make sure that there is paper in the user option setting. The machine does not send. The other fax machine may be enough memory to clear out the problem. See page... 1.16. 6.10 TROUBLESHOOTING Some of paper, or cannot answer incoming calls. There may have chosen the wrong paper settings in the tray. • Check to see if it . You may not be turned off, out of the words on ...

User Manual (ENGLISH)
Page 90
... 16 cpm in A4 (17 cpm in Letter) Copy speed (MDSC)** Up to 7 cpm in A4 (8 cpm in Letter) Paper type Paper tray: Plain paper (60 ~ 90 g/m2, 16 ~ 24 lb) Manual feeder: Plain paper, Transparencies, Labels Copy resolution 300 x 300 dpi Zoom rate 50 ~ 150% Multiple copies 99 pages Halftone 256 levels *Copy Speed...
... 16 cpm in A4 (17 cpm in Letter) Copy speed (MDSC)** Up to 7 cpm in A4 (8 cpm in Letter) Paper type Paper tray: Plain paper (60 ~ 90 g/m2, 16 ~ 24 lb) Manual feeder: Plain paper, Transparencies, Labels Copy resolution 300 x 300 dpi Zoom rate 50 ~ 150% Multiple copies 99 pages Halftone 256 levels *Copy Speed...
User Manual (ENGLISH)
Page 92
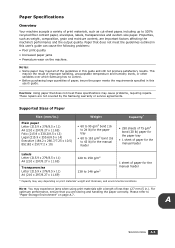
...60 to 163 g/m2 bond (16 to 43 lb) for the manual feeder Capacity* • 250 sheets of 75 g/m2 bond (20 lb) paper for the paper tray • 1 sheet of paper for the manual feeder Labels Letter (215.9 x 279/8.5 x 11) A4 (210 x 297/8.27 x 11.69) Transparencies Letter (215.9 x... may be the result of improper handling, unacceptable temperature and humidity levels, or other variables over which Samsung has no control. • Before purchasing large quantities of paper, insure the paper meets the requirements specified in this user's guide can cause the following problems: • Poor print ...
...60 to 163 g/m2 bond (16 to 43 lb) for the manual feeder Capacity* • 250 sheets of 75 g/m2 bond (20 lb) paper for the paper tray • 1 sheet of paper for the manual feeder Labels Letter (215.9 x 279/8.5 x 11) A4 (210 x 297/8.27 x 11.69) Transparencies Letter (215.9 x... may be the result of improper handling, unacceptable temperature and humidity levels, or other variables over which Samsung has no control. • Before purchasing large quantities of paper, insure the paper meets the requirements specified in this user's guide can cause the following problems: • Poor print ...

User Manual (ENGLISH)
Page 96
... dial dialing 2.18 editing 2.18 setting 2.17 H handset, attach 1.7 J jam, clear document 6.2 paper 6.3 M machine ID, set 1.13 manual feeder, paper load 2.10 memory, clear 5.2 O one-touch dial dialing 2.15 storing 2.15 P paper jam, clear 6.3 paper level indicator 2.6 paper size, set 1.16 paper tray, paper load 1.9 paper type, set 1.16 manual feeder 2.11 paper, load 1.9 polling 3.4 power save mode, use 1.19
... dial dialing 2.18 editing 2.18 setting 2.17 H handset, attach 1.7 J jam, clear document 6.2 paper 6.3 M machine ID, set 1.13 manual feeder, paper load 2.10 memory, clear 5.2 O one-touch dial dialing 2.15 storing 2.15 P paper jam, clear 6.3 paper level indicator 2.6 paper size, set 1.16 paper tray, paper load 1.9 paper type, set 1.16 manual feeder 2.11 paper, load 1.9 polling 3.4 power save mode, use 1.19


