
User Manual (ENGLISH)
Page 1
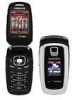
SCH-a870 Series P O R TA B L E TRI-MODE MOBILE PHONE User Guide Please read this manual before operating your phone, and keep it for future reference.
SCH-a870 Series P O R TA B L E TRI-MODE MOBILE PHONE User Guide Please read this manual before operating your phone, and keep it for future reference.

User Manual (ENGLISH)
Page 2
... Property All Intellectual Property, as defined below, owned by the Intellectual Property. All applicable rights of Samsung or its respective suppliers relating to the SAMSUNG Phone, including but is transferred to , inventions (patentable or unpatentable), patents, trade secrets, copyrights, software...or otherwise attempt to ) modify, prepare derivative works of Samsung Electronics America, Inc. No title to or ownership in the Intellectual Property is not limited to you have questions about your Samsung Mobile Phone? Lookout Drive Richardson, TX 75082 Customer Care Center: 1000...
... Property All Intellectual Property, as defined below, owned by the Intellectual Property. All applicable rights of Samsung or its respective suppliers relating to the SAMSUNG Phone, including but is transferred to , inventions (patentable or unpatentable), patents, trade secrets, copyrights, software...or otherwise attempt to ) modify, prepare derivative works of Samsung Electronics America, Inc. No title to or ownership in the Intellectual Property is not limited to you have questions about your Samsung Mobile Phone? Lookout Drive Richardson, TX 75082 Customer Care Center: 1000...
User Manual (ENGLISH)
Page 4
... 7 Understanding this User Manual 8 Charging the Battery 8 Activating Your Phone 9 Setting Up Your Voicemail 11 Understanding Your Phone 12 Features of Your Phone 12 Closed View of Your Phone 13 Open View of Your Phone 14 Command Keys ...16 Understanding the Display Screen 18 Your Phone's Modes 19 Call Functions 22 Making a Call ...23 Answering a Call...
... 7 Understanding this User Manual 8 Charging the Battery 8 Activating Your Phone 9 Setting Up Your Voicemail 11 Understanding Your Phone 12 Features of Your Phone 12 Closed View of Your Phone 13 Open View of Your Phone 14 Command Keys ...16 Understanding the Display Screen 18 Your Phone's Modes 19 Call Functions 22 Making a Call ...23 Answering a Call...

User Manual (ENGLISH)
Page 5
... ...116 Calculator ...117 Stop Watch ...118 Converter ...118 Tip Calculator ...121 Settings 122 Location Setting ...123 Display Settings ...123 Sound Settings ...128 Call Settings ...131 Phone Settings ...134 Memory Info ...141 Table of Contents 5
... ...116 Calculator ...117 Stop Watch ...118 Converter ...118 Tip Calculator ...121 Settings 122 Location Setting ...123 Display Settings ...123 Sound Settings ...128 Call Settings ...131 Phone Settings ...134 Memory Info ...141 Table of Contents 5

User Manual (ENGLISH)
Page 6
... Health and Safety Information 144 Health and Safety Information 145 UL Certified Travel Adapter 146 Consumer Information on Wireless Phones 146 Road Safety ...152 Operating Environment 154 Using Your Phone Near Other Electronic Devices 154 Potentially Explosive Environments 156 Emergency Calls 156 FCC Notice and Cautions 157 Other Important Safety Information 157 Product...
... Health and Safety Information 144 Health and Safety Information 145 UL Certified Travel Adapter 146 Consumer Information on Wireless Phones 146 Road Safety ...152 Operating Environment 154 Using Your Phone Near Other Electronic Devices 154 Potentially Explosive Environments 156 Emergency Calls 156 FCC Notice and Cautions 157 Other Important Safety Information 157 Product...

User Manual (ENGLISH)
Page 7
Section 1: Getting Started Topics Covered • Understanding this User Manual • Charging the Battery • Activating Your Phone • Setting Up Your Voicemail This section explains how to start using your SCH-a870 phone by activating your service, setting up your Voicemail, or getting an understanding of how this manual is put together. Getting Started 7
Section 1: Getting Started Topics Covered • Understanding this User Manual • Charging the Battery • Activating Your Phone • Setting Up Your Voicemail This section explains how to start using your SCH-a870 phone by activating your service, setting up your Voicemail, or getting an understanding of how this manual is put together. Getting Started 7

User Manual (ENGLISH)
Page 8
...back of the guide, beginning on page 167. Charging the Battery Your phone is set apart from any 120/220 VAC outlet. 1. Use of the wrong adapter could affect performance, or even damage your phone. Samsung accessories are as the menus and submenus in the U.S., you should ...know before using your phone. The definitions for these methods are designed to define terms, and more. Important: For ...
...back of the guide, beginning on page 167. Charging the Battery Your phone is set apart from any 120/220 VAC outlet. 1. Use of the wrong adapter could affect performance, or even damage your phone. Samsung accessories are as the menus and submenus in the U.S., you should ...know before using your phone. The definitions for these methods are designed to define terms, and more. Important: For ...

User Manual (ENGLISH)
Page 9
... ) and a tone sounding indicate you read this guide to operate the phone. Getting Started 9 Insert the top end of your Wireless Carrier and follow their instructions for obtaining service, if necessary. Activating Your Phone Important: You must fully charge the battery the first time you use your... phone, otherwise you continue to those on the inside of the ...
... ) and a tone sounding indicate you read this guide to operate the phone. Getting Started 9 Insert the top end of your Wireless Carrier and follow their instructions for obtaining service, if necessary. Activating Your Phone Important: You must fully charge the battery the first time you use your... phone, otherwise you continue to those on the inside of the ...

User Manual (ENGLISH)
Page 10
Press lightly on the battery cover release latch (1) and slide the cover (2) toward the bottom end of the battery down into the phone 3 until it slips into place. Press down on the bottom end of the phone. 21 3. Lift the battery (3) up and away from the phone, bottom end first. 3 10 Place the battery cover over the battery and slide the battery cover into place. 3. 2. Press and hold the END key to turn off the phone (if on). 2. Remove the Battery 1.
Press lightly on the battery cover release latch (1) and slide the cover (2) toward the bottom end of the battery down into the phone 3 until it slips into place. Press down on the bottom end of the phone. 21 3. Lift the battery (3) up and away from the phone, bottom end first. 3 10 Place the battery cover over the battery and slide the battery cover into place. 3. 2. Press and hold the END key to turn off the phone (if on). 2. Remove the Battery 1.

User Manual (ENGLISH)
Page 11
...is necessary. 3. Listen to leave voice messages, which can be retrieved any other radio-transmitting device, do not touch the antenna while using your phone, as this can affect call quality and can use the Voicemail folder (under the Message menu) to setup your Voicemail box. 1. Getting Started... carrier's coverage or roaming area, the No Service icon ( ) appears at another location. Turn Your Phone On 1. Setting Up Your Voicemail Note: If you will not power off. The phone begins searching for less than is available, or at the top of your password. You're now ready...
...is necessary. 3. Listen to leave voice messages, which can be retrieved any other radio-transmitting device, do not touch the antenna while using your phone, as this can affect call quality and can use the Voicemail folder (under the Message menu) to setup your Voicemail box. 1. Getting Started... carrier's coverage or roaming area, the No Service icon ( ) appears at another location. Turn Your Phone On 1. Setting Up Your Voicemail Note: If you will not power off. The phone begins searching for less than is available, or at the top of your password. You're now ready...

User Manual (ENGLISH)
Page 12
... • Handwritten Messaging • E-mail Messaging • Built-in use. It also describes the screen format and the icons that will be displayed when the phone is in Digital Camera • Voice Dial • Speakerphone ** The SCH-a870 supports the wireless handsfree profile, serial port profile, and dial-up networking profile for Bluetooth®...
... • Handwritten Messaging • E-mail Messaging • Built-in use. It also describes the screen format and the icons that will be displayed when the phone is in Digital Camera • Voice Dial • Speakerphone ** The SCH-a870 supports the wireless handsfree profile, serial port profile, and dial-up networking profile for Bluetooth®...

User Manual (ENGLISH)
Page 13
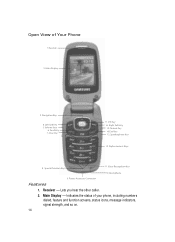
...to plug in an optional headset for safe, convenient, hands-free conversations. 2. Volume Key - Front Display - Used to your phone. Understanding Your Phone 13 Lets you take pictures in camera. 3. Camera Key - Power/Accessory Connector - Volume Keys 4. Speaker Mode Key 8. Enables and ...disables speaker phone mode. 8. Closed View of Your Phone 5. Lets you adjust the master volume in standby mode (with the folder open) or adjust the voice volume during an incoming...
...to plug in an optional headset for safe, convenient, hands-free conversations. 2. Volume Key - Front Display - Used to your phone. Understanding Your Phone 13 Lets you take pictures in camera. 3. Camera Key - Power/Accessory Connector - Volume Keys 4. Speaker Mode Key 8. Enables and ...disables speaker phone mode. 8. Closed View of Your Phone 5. Lets you adjust the master volume in standby mode (with the folder open) or adjust the voice volume during an incoming...
User Manual (ENGLISH)
Page 14
...2. Left Soft Key 5. Special Function Keys 11. Receiver - OK Key 16. End Key 13. Microphone 9. Main Display - Indicates the status of Your Phone 1. Main Display 3. Speakerphone Key 12. Clear Key 17. Voice Recognition Key 10. Camera Key 14. Receiver 2. Navigation Key 4. Send Key 7. Power... Accessory Connector Features 1. Volume Keys 6. Alpha-numeric Keys 8. Open View of your phone, including numbers dialed, feature and function screens, status icons, message indicators, signal strength, and so on. 14 Right Soft Key 15.
...2. Left Soft Key 5. Special Function Keys 11. Receiver - OK Key 16. End Key 13. Microphone 9. Main Display - Indicates the status of Your Phone 1. Main Display 3. Speakerphone Key 12. Clear Key 17. Voice Recognition Key 10. Camera Key 14. Receiver 2. Navigation Key 4. Send Key 7. Power... Accessory Connector Features 1. Volume Keys 6. Alpha-numeric Keys 8. Open View of your phone, including numbers dialed, feature and function screens, status icons, message indicators, signal strength, and so on. 14 Right Soft Key 15.

User Manual (ENGLISH)
Page 15
...you select a vibrate mode. Pressing when navigating through menus and applications and to select the choice indicated at the bottom right corner of Your Phone 3. Open View of the Main Display. 17. Lets you receive an incoming call, press to send the call to access the recent call ... the highlighted choice in the charging accessories and also connect any available accessory cables to the previous menu or screen when navigating features on your phone. 10. Voice Recognition Key - Volume Keys - Navigation Key - Used to plug in a menu. In Idle mode, lets you adjust the ...
...you select a vibrate mode. Pressing when navigating through menus and applications and to select the choice indicated at the bottom right corner of Your Phone 3. Open View of the Main Display. 17. Lets you receive an incoming call, press to send the call to access the recent call ... the highlighted choice in the charging accessories and also connect any available accessory cables to the previous menu or screen when navigating features on your phone. 10. Voice Recognition Key - Volume Keys - Navigation Key - Used to plug in a menu. In Idle mode, lets you adjust the ...

User Manual (ENGLISH)
Page 17
... before or during a call . Briefly press SEND in standby mode to the other call the most recent number. 5. To return to display a list of your phone. 4. Press SEND once to adjust the volume. to answer calls. 2. CLR 3. Briefly press END once to make a call . 3. Enter a number and briefly press...and hold . to switch from any menu, or to standby mode. Camera Keys Use the camera key ( ) - located on the right side of your phone - To erase the entire sentence, press and hold CLR until you return to cancel the last input. Press and hold the End key END to...
... before or during a call . Briefly press SEND in standby mode to the other call the most recent number. 5. To return to display a list of your phone. 4. Press SEND once to adjust the volume. to answer calls. 2. CLR 3. Briefly press END once to make a call . 3. Enter a number and briefly press...and hold . to switch from any menu, or to standby mode. Camera Keys Use the camera key ( ) - located on the right side of your phone - To erase the entire sentence, press and hold CLR until you return to cancel the last input. Press and hold the End key END to...

User Manual (ENGLISH)
Page 18
Understanding the Display Screen The top line of the front and main displays. Display Screen Icons Your SCH-a870 phone can appear on the top lines of your display. Dialogue boxes and their definitions are outlined below. • Choice • Example: "Save message?"...: ᮣ In standby mode, press the MENU ( ), then press wxyz (for Settings), pqrs (for Phone Info), and abc for action, inform you definitions of the icons that may appear in your phone's display contains icons that indicate network status, battery power, signal strength, connection type, and more. "Connecting..."...
Understanding the Display Screen The top line of the front and main displays. Display Screen Icons Your SCH-a870 phone can appear on the top lines of your display. Dialogue boxes and their definitions are outlined below. • Choice • Example: "Save message?"...: ᮣ In standby mode, press the MENU ( ), then press wxyz (for Settings), pqrs (for Phone Info), and abc for action, inform you definitions of the icons that may appear in your phone's display contains icons that indicate network status, battery power, signal strength, connection type, and more. "Connecting..."...

User Manual (ENGLISH)
Page 19
...the Abc (left) soft key ( ), then choose the input mode from the pop-up menu using the navigation keys. Understanding Your Phone 19 External Display Your phone has an external display on page 127 for Call Answer. Only pressing SEND answers a call . 2. While at any key except the ...END key or key answers a call . 1. Opening the phone's flip or pressing SEND answers a call . • Flip Open - When you enter text, numbers and symbols. The following : • Incoming calls and messages...
...the Abc (left) soft key ( ), then choose the input mode from the pop-up menu using the navigation keys. Understanding Your Phone 19 External Display Your phone has an external display on page 127 for Call Answer. Only pressing SEND answers a call . 2. While at any key except the ...END key or key answers a call . 1. Opening the phone's flip or pressing SEND answers a call . • Flip Open - When you enter text, numbers and symbols. The following : • Incoming calls and messages...

User Manual (ENGLISH)
Page 20
... later date. 1. In standby mode, you to standby mode. 20 An alert tone sounds and a notification message appears in standby mode, enter a phone number, and press SEND to place a call or from within a menu. This selection allows you to menus and the volume key. Enter/Exit Silent ...restrictions are placed on page 29 for more information. While in a call message options appear: • View Now - See "In-Use Menu" on phone use. Highlight the desired viewing option and then press OK. Press the Options (right) soft key ( ) to standby mode. Receive Messages in Standby ...
... later date. 1. In standby mode, you to standby mode. 20 An alert tone sounds and a notification message appears in standby mode, enter a phone number, and press SEND to place a call or from within a menu. This selection allows you to menus and the volume key. Enter/Exit Silent ...restrictions are placed on page 29 for more information. While in a call message options appear: • View Now - See "In-Use Menu" on phone use. Highlight the desired viewing option and then press OK. Press the Options (right) soft key ( ) to standby mode. Receive Messages in Standby ...

User Manual (ENGLISH)
Page 21
Vibrate Mode ᮣ In standby mode, repeatedly press the volume key ( ) down . When you activate your phone's camera to standby mode. Your phone returns to adjust the ringer setting. Camera Mode Camera mode lets you are : • Ringer Off • Medium • Vibrate • Medium/High • ...Low • High • Low/Medium • Vibrate/High 2. Tip: You can also adjust the resolution and appearance of the phone up or down until Vibrate appears in the display. Note: The Vibrate icon ( ) appears in the display when the...
Vibrate Mode ᮣ In standby mode, repeatedly press the volume key ( ) down . When you activate your phone's camera to standby mode. Your phone returns to adjust the ringer setting. Camera Mode Camera mode lets you are : • Ringer Off • Medium • Vibrate • Medium/High • ...Low • High • Low/Medium • Vibrate/High 2. Tip: You can also adjust the resolution and appearance of the phone up or down until Vibrate appears in the display. Note: The Vibrate icon ( ) appears in the display when the...

User Manual (ENGLISH)
Page 23
...press SEND . 2. The following pause options appear in your call using the keypad. 2. Note: You can define up to 3 emergency numbers in your SCH-a870 phone locks itself in emergency mode, only allowing you to your call with pause(s) without storing it in the display: • 2-Sec Pause - When ...the second party answers, press SEND to highlight the desired pause. A hard pause (waits for more easily dispatch aid, such as 911, your phone. (See "Emergency #" on hold. 3. Use the navigation keys to connect all three parties. Press SEND to place them to make an emergency (911...
...press SEND . 2. The following pause options appear in your call using the keypad. 2. Note: You can define up to 3 emergency numbers in your SCH-a870 phone locks itself in emergency mode, only allowing you to your call with pause(s) without storing it in the display: • 2-Sec Pause - When ...the second party answers, press SEND to highlight the desired pause. A hard pause (waits for more easily dispatch aid, such as 911, your phone. (See "Emergency #" on hold. 3. Use the navigation keys to connect all three parties. Press SEND to place them to make an emergency (911...


