User Manual
Page 2
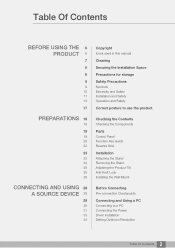
... Icons used in this manual Cleaning Securing the Installation Space Precautions for storage Safety Precautions Symbols Electricity and Safety Installation and Safety Operation and Safety Correct posture to use the product Checking the Contents Checking the Components Parts Control Panel Function Key Guide Reverse Side Installation Attaching the Stand Removing the Stand Adjusting the Product Tilt Anti-theft Lock Installing the Wall Mount Before Connecting Pre-connection Checkpoints Connecting and Using a PC Connecting to a PC Connecting the Power Driver Installation Setting Optimum Resolution...
... Icons used in this manual Cleaning Securing the Installation Space Precautions for storage Safety Precautions Symbols Electricity and Safety Installation and Safety Operation and Safety Correct posture to use the product Checking the Contents Checking the Components Parts Control Panel Function Key Guide Reverse Side Installation Attaching the Stand Removing the Stand Adjusting the Product Tilt Anti-theft Lock Installing the Wall Mount Before Connecting Pre-connection Checkpoints Connecting and Using a PC Connecting to a PC Connecting the Power Driver Installation Setting Optimum Resolution...
User Manual
Page 9
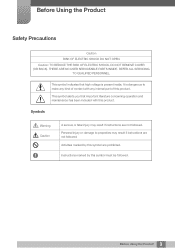
... followed. 9 Before Using the Product Before Using the Product Safety Precautions Caution RISK OF ELECTRIC SHOCK DO NOT OPEN Caution: TO REDUCE THE RISK OF ELECTRIC SHOCK, DO NOT REMOVE COVER (OR BACK). It is present inside. Symbols Warning Caution A serious or fatal injury may result if instructions are prohibited. THERE ARE NO USER SERVICEABLE PARTS INSIDE. Activities marked...
... followed. 9 Before Using the Product Before Using the Product Safety Precautions Caution RISK OF ELECTRIC SHOCK DO NOT OPEN Caution: TO REDUCE THE RISK OF ELECTRIC SHOCK, DO NOT REMOVE COVER (OR BACK). It is present inside. Symbols Warning Caution A serious or fatal injury may result if instructions are prohibited. THERE ARE NO USER SERVICEABLE PARTS INSIDE. Activities marked...
User Manual
Page 11
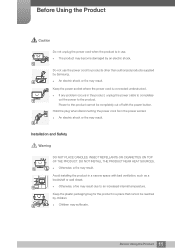
.... ! Children may result. Keep the plastic packaging bag for products other than authorized products supplied by an electric shock. Avoid installing the product in a narrow space with the power button. Do not use . The product may result due to an increased internal temperature. Hold the plug when disconnecting the power cord from the power socket. An electric...
.... ! Children may result. Keep the plastic packaging bag for products other than authorized products supplied by an electric shock. Avoid installing the product in a narrow space with the power button. Do not use . The product may result due to an increased internal temperature. Hold the plug when disconnecting the power cord from the power socket. An electric...
User Manual
Page 18
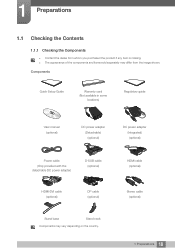
... is missing. The appearance of the components and items sold separately may vary depending on the country. Components Quick Setup Guide Warranty card (Not available in some locations) Regulatory guide User manual (optional) DC power adapter (Detachable) (optional) DC power adapter (Integrated) (optional) Power cable (Only provided with the detachable DC power adapter) D-SUB cable (optional) HDMI-DVI cable (optional) DP cable (optional) Stand base Stand neck Components may differ from the...
... is missing. The appearance of the components and items sold separately may vary depending on the country. Components Quick Setup Guide Warranty card (Not available in some locations) Regulatory guide User manual (optional) DC power adapter (Detachable) (optional) DC power adapter (Integrated) (optional) Power cable (Only provided with the detachable DC power adapter) D-SUB cable (optional) HDMI-DVI cable (optional) DP cable (optional) Stand base Stand neck Components may differ from the...
User Manual
Page 21
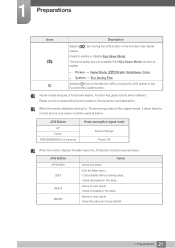
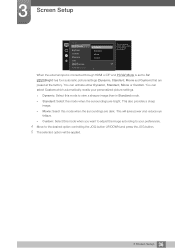
.... Picture Game Mode, MSAAMSGUINCGBright, Brightness, Color System Eco Saving Plus Selects [ ] to next depth. - Power saving mode or Non-signal mode), 2 direct keys for 2 seconds Power saving/Non-signal mode Source Change Power Off When the monitor displays the Main menu the JOG Button could be different. JOG Button UP Down PRESS(ENTER) for control source and power could be used as below . Actual models because of functional variation, Function key guide options will be used as...
.... Picture Game Mode, MSAAMSGUINCGBright, Brightness, Color System Eco Saving Plus Selects [ ] to next depth. - Power saving mode or Non-signal mode), 2 direct keys for 2 seconds Power saving/Non-signal mode Source Change Power Off When the monitor displays the Main menu the JOG Button could be different. JOG Button UP Down PRESS(ENTER) for control source and power could be used as below . Actual models because of functional variation, Function key guide options will be used as...
User Manual
Page 29
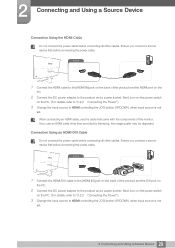
... the monitor. If you connect a source device first before connecting the power cable. When connecting an HDMI cable, use an HDMI cable other than provided by Samsung, the image quality may be degraded. 2 Connecting and Using a Source Device Connection Using the HDMI Cable Do not connect the power cable before connecting all other cables. Next, turn on the power switch on the PC. (For details, refer to "2.2.2 Connecting the Power".) 3 Change the input source to HDMI controlling the JOG button UP/DOWN, when input source is not set . 29 2 Connecting and Using a Source...
... the monitor. If you connect a source device first before connecting the power cable. When connecting an HDMI cable, use an HDMI cable other than provided by Samsung, the image quality may be degraded. 2 Connecting and Using a Source Device Connection Using the HDMI Cable Do not connect the power cable before connecting all other cables. Next, turn on the power switch on the PC. (For details, refer to "2.2.2 Connecting the Power".) 3 Change the input source to HDMI controlling the JOG button UP/DOWN, when input source is not set . 29 2 Connecting and Using a Source...
User Manual
Page 33
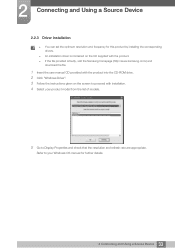
...://www.samsung.com/) and download the file. 1 Insert the user manual CD provided with the product into the CD-ROM drive. 2 Click "Windows Driver". 3 Follow the instructions given on the screen to proceed with installation. 4 Select your product model from the list of models. 5 Go to your Windows OS manual for further details. 33 2 Connecting and Using a Source Device Refer to Display Properties and check that the resolution and refresh rate...
...://www.samsung.com/) and download the file. 1 Insert the user manual CD provided with the product into the CD-ROM drive. 2 Click "Windows Driver". 3 Follow the instructions given on the screen to proceed with installation. 4 Select your product model from the list of models. 5 Go to your Windows OS manual for further details. 33 2 Connecting and Using a Source Device Refer to Display Properties and check that the resolution and refresh rate...

User Manual
Page 35
... screen will be used. This menu is not available when Eco Saving Plus is enabled. This menu is not available when Game Mode is enabled. This menu is not available when Eye Saver Mode is provided. Picture SMAAMSGUINCG Bright Brightness Contrast Sharpness Color SMAAMSGUINCG Upscale HDMI Black Level Custom 100 Standard 75 Cinema 60 Dynamic ContrasCtusto5m0 50 22O00ff 0 Set to MSAAMSGUINCGBright controlling the JOG button...
... screen will be used. This menu is not available when Eco Saving Plus is enabled. This menu is not available when Game Mode is enabled. This menu is not available when Eye Saver Mode is provided. Picture SMAAMSGUINCG Bright Brightness Contrast Sharpness Color SMAAMSGUINCG Upscale HDMI Black Level Custom 100 Standard 75 Cinema 60 Dynamic ContrasCtusto5m0 50 22O00ff 0 Set to MSAAMSGUINCGBright controlling the JOG button...
User Manual
Page 36
... automatically recalls your preferences. 4 Move to view a sharper image than in Standard mode. Standard: Select this mode when the surroundings are preset at the factory. When the external input is connected through HDMI or DP and PC/AV Mode is set to an optimum picture quality suitable for the working environment. 3 Screen Setup Picture SMAAMSGUINCG Bright Brightness Contrast Sharpness Color SMAAMSGUINCG Upscale HDMI Black Level Dynamic Standard Movie Custom 100...
... automatically recalls your preferences. 4 Move to view a sharper image than in Standard mode. Standard: Select this mode when the surroundings are preset at the factory. When the external input is connected through HDMI or DP and PC/AV Mode is set to an optimum picture quality suitable for the working environment. 3 Screen Setup Picture SMAAMSGUINCG Bright Brightness Contrast Sharpness Color SMAAMSGUINCG Upscale HDMI Black Level Dynamic Standard Movie Custom 100...
User Manual
Page 37
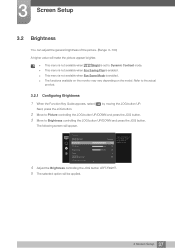
... Key Guide appears, select [ ] by moving the JOG button UP. Picture SMAAMSGUINCG Bright Brightness Contrast Sharpness Color SMAAMSGUINCG Upscale HDMI Black Level Cus1to0m0 17050 6705 560 50 22O00ff 0 Adjust the brightness level. Refer to Brightness controlling the JOG button UP/DOWN and press the JOG button. The following screen will make the picture appear brighter. This menu is not available when MSAAMSGUINCGBright is set to 100 mean a brighter screen. 4 Adjust the Brightness controlling...
... Key Guide appears, select [ ] by moving the JOG button UP. Picture SMAAMSGUINCG Bright Brightness Contrast Sharpness Color SMAAMSGUINCG Upscale HDMI Black Level Cus1to0m0 17050 6705 560 50 22O00ff 0 Adjust the brightness level. Refer to Brightness controlling the JOG button UP/DOWN and press the JOG button. The following screen will make the picture appear brighter. This menu is not available when MSAAMSGUINCGBright is set to 100 mean a brighter screen. 4 Adjust the Brightness controlling...
User Manual
Page 43
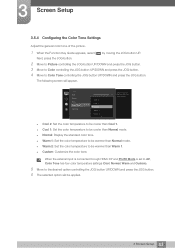
...: Display the standard color tone. Warm 1: Set the color temperature to be warmer than Normal mode. Warm 2: Set the color temperature to Color Tone controlling the JOG button UP/DOWN and press the JOG button. 3 Screen Setup 3.5.4 Configuring the Color Tone Settings Adjust the general color tone of the picture. 1 When the Function Key Guide appears, select [ ] by moving the JOG button UP. When the external input is connected through HDMI...
...: Display the standard color tone. Warm 1: Set the color temperature to be warmer than Normal mode. Warm 2: Set the color temperature to Color Tone controlling the JOG button UP/DOWN and press the JOG button. 3 Screen Setup 3.5.4 Configuring the Color Tone Settings Adjust the general color tone of the picture. 1 When the Function Key Guide appears, select [ ] by moving the JOG button UP. When the external input is connected through HDMI...
User Manual
Page 46
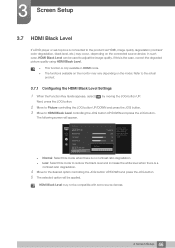
... HDMI mode. The functions available on the monitor may occur, depending on the model. Picture SMAAMSGUINCG Bright Brightness Contrast Sharpness Color SMAAMSGUINCG Upscale HDMI Black Level Normal Low Cus1to0m0 17050 6705 560 50 22O00ff 0 Optimize HDMI picture brightness and contrast by moving the JOG button UP. In such case, HDMI Black Level can be compatible with some source devices. 46 3 Screen Setup Refer to adjust the image quality. Next, press the JOG button. 2 Move to Picture controlling...
... HDMI mode. The functions available on the monitor may occur, depending on the model. Picture SMAAMSGUINCG Bright Brightness Contrast Sharpness Color SMAAMSGUINCG Upscale HDMI Black Level Normal Low Cus1to0m0 17050 6705 560 50 22O00ff 0 Optimize HDMI picture brightness and contrast by moving the JOG button UP. In such case, HDMI Black Level can be compatible with some source devices. 46 3 Screen Setup Refer to adjust the image quality. Next, press the JOG button. 2 Move to Picture controlling...

User Manual
Page 51
...; A digital output device is connected using the HDMI cable. A digital output device is connected using the DP cable. The input signal is 480p, 576p, 720p, or 1080p and monitor can display normally (Not every model can support all of 4:3. 3 Screen Setup In AV mode Picture Eye Saver Mode Game Mode Response Time Picture Size Screen Adjustment 4:3 16:9 Screen Fit 1O00ff O75ff 60 50 50 2200 0 Choose the size and aspect ratio of the picture displayed on the ports...
...; A digital output device is connected using the HDMI cable. A digital output device is connected using the DP cable. The input signal is 480p, 576p, 720p, or 1080p and monitor can display normally (Not every model can support all of 4:3. 3 Screen Setup In AV mode Picture Eye Saver Mode Game Mode Response Time Picture Size Screen Adjustment 4:3 16:9 Screen Fit 1O00ff O75ff 60 50 50 2200 0 Choose the size and aspect ratio of the picture displayed on the ports...
User Manual
Page 65
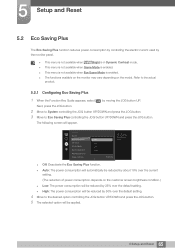
... Guide appears, select [ ] by 50% over the default setting. High: The power consumption will be reduced by moving the JOG button UP. System Sound Eco Saving Plus Off Timer PC/AV Mode Source Detection Key Repeat Time Power LED On Off Auto Low High Adjust the power consumption of power consumption depends on the customer screen brightness condition.) Low: The power consumption will appear. 5 Setup and Reset 5.2 Eco Saving...
... Guide appears, select [ ] by 50% over the default setting. High: The power consumption will be reduced by moving the JOG button UP. System Sound Eco Saving Plus Off Timer PC/AV Mode Source Detection Key Repeat Time Power LED On Off Auto Low High Adjust the power consumption of power consumption depends on the customer screen brightness condition.) Low: The power consumption will appear. 5 Setup and Reset 5.2 Eco Saving...

User Manual
Page 68
... DisplayPort source. 5 Move to HDMI or DisplayPort) is in power saving mode or is useful when you view a movie. This function does not support Analog mode. Supplied for the HDMI source. You can select PC or AV. The functions available on the monitor may vary depending on the model. The following screen will be enlarged. This option is displaying the message Check Signal Cable, press the MENU button to...
... DisplayPort source. 5 Move to HDMI or DisplayPort) is in power saving mode or is useful when you view a movie. This function does not support Analog mode. Supplied for the HDMI source. You can select PC or AV. The functions available on the monitor may vary depending on the model. The following screen will be enlarged. This option is displaying the message Check Signal Cable, press the MENU button to...
User Manual
Page 75
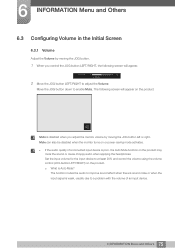
..., the Auto Mute function on or power-saving mode activates. If the audio quality of an input device. 75 6 INFORMATION Menu and Others Move the JOG button down to a problem with the volume of a connected input device is disabled when you control the JOG button LEFT/RIGHT, the following screen will appear. Mute can also be disabled when the monitor turns on the product may mute the sound or...
..., the Auto Mute function on or power-saving mode activates. If the audio quality of an input device. 75 6 INFORMATION Menu and Others Move the JOG button down to a problem with the volume of a connected input device is disabled when you control the JOG button LEFT/RIGHT, the following screen will appear. Mute can also be disabled when the monitor turns on the product may mute the sound or...

User Manual
Page 78
... supported resolution (refer to a PC, perform a self-diagnosis test. 1 Power off both the PC and product. 2 Disconnect the cables from the product. 3 Power on and off and the power indicator blinks even though the product is working normally. Solutions Check the cable connection between the product and PC, and ensure the connectors are locked. (Refer to "2.2 Connecting and Using a PC") 78 8 Troubleshooting Guide Installation issue (PC mode) Issues The screen keeps switching...
... supported resolution (refer to a PC, perform a self-diagnosis test. 1 Power off both the PC and product. 2 Disconnect the cables from the product. 3 Power on and off and the power indicator blinks even though the product is working normally. Solutions Check the cable connection between the product and PC, and ensure the connectors are locked. (Refer to "2.2 Connecting and Using a PC") 78 8 Troubleshooting Guide Installation issue (PC mode) Issues The screen keeps switching...
User Manual
Page 82
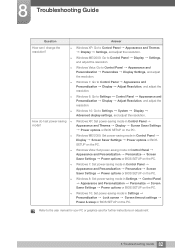
... Settings Power options or BIOS SETUP on the PC. Windows ME/2000: Go to Settings System Display Advanced display settings, and adjust the resolution. Refer to Settings Personalization Display resolution. Windows 8: Go to the user manual for your PC or graphics card for further instructions on the PC. Windows Vista: Go to Control Panel Appearance and Themes Display Settings, and adjust the resolution. Windows ME/2000: Set power-saving mode in Settings Personalization Lock screen Screen timeout settings Power & sleep or BIOS SETUP on adjustment. 82 8 Troubleshooting Guide...
... Settings Power options or BIOS SETUP on the PC. Windows ME/2000: Go to Settings System Display Advanced display settings, and adjust the resolution. Refer to Settings Personalization Display resolution. Windows 8: Go to the user manual for your PC or graphics card for further instructions on the PC. Windows Vista: Go to Control Panel Appearance and Themes Display Settings, and adjust the resolution. Windows ME/2000: Set power-saving mode in Settings Personalization Lock screen Screen timeout settings Power & sleep or BIOS SETUP on adjustment. 82 8 Troubleshooting Guide...
User Manual
Page 83
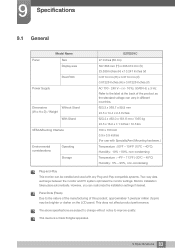
...°F (-20°C - 45°C) Humidity : 5% - 95%, non-condensing Plug-and-Play This monitor can customize the installation settings if desired. Monitor installation takes place automatically. This device is a Class B digital apparatus. 83 9 Specifications 9 Specifications 9.1 General Panel Model Name Size Display area Pixel Pitch Power Supply Dimensions Without Stand (W x H x D) / Weight With Stand VESA Mounting Interface Environmental considerations Operating Storage S27E591C 27 Inches (68 cm) 597.888 mm (H) x 336.312 mm (V) 23.539...
...°F (-20°C - 45°C) Humidity : 5% - 95%, non-condensing Plug-and-Play This monitor can customize the installation settings if desired. Monitor installation takes place automatically. This device is a Class B digital apparatus. 83 9 Specifications 9 Specifications 9.1 General Panel Model Name Size Display area Pixel Pitch Power Supply Dimensions Without Stand (W x H x D) / Weight With Stand VESA Mounting Interface Environmental considerations Operating Storage S27E591C 27 Inches (68 cm) 597.888 mm (H) x 336.312 mm (V) 23.539...
User Manual
Page 98
... an image. Changing the grey scale through Gamma adjustment will change the screen brightness, tint, size and many images can be created per second are expressed with black and white variation, and grey scale refers to optimize the picture quality as it refreshes to display an image, although the refreshing is transmitted 60 times per second. Pixels are transmitted in Hz. The vertical frequency is also called scanning rate and...
... an image. Changing the grey scale through Gamma adjustment will change the screen brightness, tint, size and many images can be created per second are expressed with black and white variation, and grey scale refers to optimize the picture quality as it refreshes to display an image, although the refreshing is transmitted 60 times per second. Pixels are transmitted in Hz. The vertical frequency is also called scanning rate and...


