
User Manual (English)
Page 2
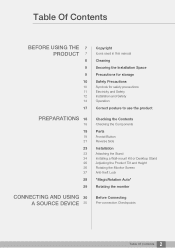
... and Safety Operation Correct posture to use the product Checking the Contents Checking the Components Parts Frontal Button Reverse Side Installation Attaching the Stand Installing a Wall-mount Kit or Desktop Stand Adjusting the Product Tilt and Height Rotating the Monitor Screen Anti-theft Lock "MagicRotation Auto" Rotating the monitor Before Connecting Pre...
... and Safety Operation Correct posture to use the product Checking the Contents Checking the Components Parts Frontal Button Reverse Side Installation Attaching the Stand Installing a Wall-mount Kit or Desktop Stand Adjusting the Product Tilt and Height Rotating the Monitor Screen Anti-theft Lock "MagicRotation Auto" Rotating the monitor Before Connecting Pre...

User Manual (English)
Page 18
... locations) User manual (optional) Power cable DVI cable (optional) HDMI cable (optional) HDMI-DVI cable (optional) DP cable (optional) USB 3.0 cable (optional) Stereo cable (optional) Wall-mount bracket (optional) Mini DP to use a DP cable that is DP 1.2 certified or an HDMI cable that is HDMI 1.4 certified. 18 1 Preparations z The optimal resolution...
... locations) User manual (optional) Power cable DVI cable (optional) HDMI cable (optional) HDMI-DVI cable (optional) DP cable (optional) USB 3.0 cable (optional) Stereo cable (optional) Wall-mount bracket (optional) Mini DP to use a DP cable that is DP 1.2 certified or an HDMI cable that is HDMI 1.4 certified. 18 1 Preparations z The optimal resolution...

User Manual (English)
Page 24
... rear cover by the arrows. Unfasten the screw from what is shown. Next, place the product with the face down on a flat surface. 1 Preparations 1.3.2 Installing a Wall-mount Kit or Desktop Stand The color and shape of parts may differ from the back of the product. Place a protective cloth or cushion on top...
... rear cover by the arrows. Unfasten the screw from what is shown. Next, place the product with the face down on a flat surface. 1 Preparations 1.3.2 Installing a Wall-mount Kit or Desktop Stand The color and shape of parts may differ from the back of the product. Place a protective cloth or cushion on top...

User Manual (English)
Page 25
... kit other than the standard length can be installed 10 cm or farther away from an attempt to install the wall-mount kit on your own. z Samsung shall not be held liable for a wall mount that does not comply with the VESA standards may get damaged or fall and cause personal injury. Notes z Using a screw...
... kit other than the standard length can be installed 10 cm or farther away from an attempt to install the wall-mount kit on your own. z Samsung shall not be held liable for a wall mount that does not comply with the VESA standards may get damaged or fall and cause personal injury. Notes z Using a screw...
User Manual (English)
Page 95
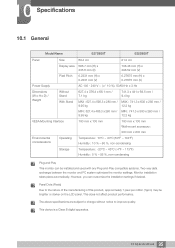
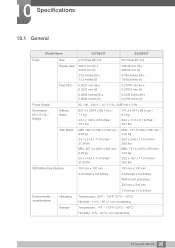
... Plug-and-Play compatible systems. Two-way data exchange between the monitor and PC system optimizes the monitor settings. 10 Specifications 10.1 General Model Name S27D850T S32D850T Panel Size 68.4 cm 81.2 cm Display area 596.7 mm (H) x 335.6 mm (V) 708.48 mm (H) x 398.52 mm (V) ... 12.2 kg MIN : 627.4 x 466.3 x 280 mm / MIN : 741.3 x 500 x 280 mm / 9.95 kg 12.2 kg VESA Mounting Interface 100 mm x 100 mm 100 mm x 100 mm Wall-mount accessory : 200 mm x 200 mm Environmental considerations Operating Temperature : 10°C ~ 40°C (50°F ~ 104°F) Humidity : 10 %...
... Plug-and-Play compatible systems. Two-way data exchange between the monitor and PC system optimizes the monitor settings. 10 Specifications 10.1 General Model Name S27D850T S32D850T Panel Size 68.4 cm 81.2 cm Display area 596.7 mm (H) x 335.6 mm (V) 708.48 mm (H) x 398.52 mm (V) ... 12.2 kg MIN : 627.4 x 466.3 x 280 mm / MIN : 741.3 x 500 x 280 mm / 9.95 kg 12.2 kg VESA Mounting Interface 100 mm x 100 mm 100 mm x 100 mm Wall-mount accessory : 200 mm x 200 mm Environmental considerations Operating Temperature : 10°C ~ 40°C (50°F ~ 104°F) Humidity : 10 %...

User Manual Ver.1.0 (English)
Page 2
... and Safety Operation Correct posture to use the product Checking the Contents Checking the Components Parts Frontal Button Reverse Side Installation Attaching the Stand Installing a Wall-mount Kit or Desktop Stand Adjusting the Product Tilt and Height Rotating the Monitor Screen Anti-theft Lock "MagicRotation Auto" Rotating the monitor Before Connecting Pre...
... and Safety Operation Correct posture to use the product Checking the Contents Checking the Components Parts Frontal Button Reverse Side Installation Attaching the Stand Installing a Wall-mount Kit or Desktop Stand Adjusting the Product Tilt and Height Rotating the Monitor Screen Anti-theft Lock "MagicRotation Auto" Rotating the monitor Before Connecting Pre...

User Manual Ver.1.0 (English)
Page 18
... locations) User manual (optional) Power cable DVI cable (optional) HDMI cable (optional) HDMI-DVI cable (optional) DP cable (optional) USB 3.0 cable (optional) Stereo cable (optional) Wall-mount bracket (optional) Mini DP to use a DP cable that is DP 1.2 certified or an HDMI cable that is missing. 1 Preparations 1.1 Checking the Contents 1.1.1 Checking the...
... locations) User manual (optional) Power cable DVI cable (optional) HDMI cable (optional) HDMI-DVI cable (optional) DP cable (optional) USB 3.0 cable (optional) Stereo cable (optional) Wall-mount bracket (optional) Mini DP to use a DP cable that is DP 1.2 certified or an HDMI cable that is missing. 1 Preparations 1.1 Checking the Contents 1.1.1 Checking the...

User Manual Ver.1.0 (English)
Page 24
... shown. Place a protective cloth or cushion on top of the cloth or cushion. indicated by pulling Detach the cover from the power socket. 1 Preparations 1.3.2 Installing a Wall-mount Kit or Desktop Stand The color and shape of parts may differ from the back of the product. Specifications are subject to change without notice...
... shown. Place a protective cloth or cushion on top of the cloth or cushion. indicated by pulling Detach the cover from the power socket. 1 Preparations 1.3.2 Installing a Wall-mount Kit or Desktop Stand The color and shape of parts may differ from the back of the product. Specifications are subject to change without notice...

User Manual Ver.1.0 (English)
Page 25
...complies with the standards. Do not attach the wall-mount kit or desktop stand using the wall-mount kit, remove the stand. 25 1 Preparations z To mount the product on a wall, ensure you want to attach. z Samsung shall not be held liable for a wall mount that does not comply with the VESA standards ... Notes z Using a screw longer than the one specified or from the wall. Samsung shall not be held liable for any product damage or personal injury caused by using improper screws or attaching the wall-mount kit or desktop stand using a wallmount kit other than the standard length ...
...complies with the standards. Do not attach the wall-mount kit or desktop stand using the wall-mount kit, remove the stand. 25 1 Preparations z To mount the product on a wall, ensure you want to attach. z Samsung shall not be held liable for a wall mount that does not comply with the VESA standards ... Notes z Using a screw longer than the one specified or from the wall. Samsung shall not be held liable for any product damage or personal injury caused by using improper screws or attaching the wall-mount kit or desktop stand using a wallmount kit other than the standard length ...
User Manual Ver.1.0 (English)
Page 95
10 Specifications 10.1 General Model Name S27D850T S32D850T Panel Power Supply Dimensions (W x H x D) / Weight Size 27 Inches (68 cm) 32 Inches (81 cm) Display area 596.7 mm (H) x 335.6 mm (V) 708.48 mm (H) x 398.... kg 12.2 kg 24.7 x 18.4 x 11.0 Inches / 21.94 lbs 29.2 x 19.7 x 11.0 Inches / 26.9 lbs VESA Mounting Interface Environmental considerations Operating Storage 100 mm x 100 mm 100 mm x 100 mm 3.9 Inches x 3.9 Inches 3.9 Inches x 3.9 Inches Wall-mount accessory : 200 mm x 200 mm 7.9 Inches x 7.9 Inches Temperature : 50°F ~ 104°F (10°C ~ 40°...
10 Specifications 10.1 General Model Name S27D850T S32D850T Panel Power Supply Dimensions (W x H x D) / Weight Size 27 Inches (68 cm) 32 Inches (81 cm) Display area 596.7 mm (H) x 335.6 mm (V) 708.48 mm (H) x 398.... kg 12.2 kg 24.7 x 18.4 x 11.0 Inches / 21.94 lbs 29.2 x 19.7 x 11.0 Inches / 26.9 lbs VESA Mounting Interface Environmental considerations Operating Storage 100 mm x 100 mm 100 mm x 100 mm 3.9 Inches x 3.9 Inches 3.9 Inches x 3.9 Inches Wall-mount accessory : 200 mm x 200 mm 7.9 Inches x 7.9 Inches Temperature : 50°F ~ 104°F (10°C ~ 40°...


