
User Manual (English)
Page 3
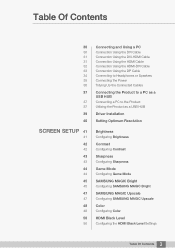
...the HDMI Cable Connection Using the HDMI-DVI Cable Connection Using the DP Cable Connecting to Headphones or Speakers Connecting the Power Tidying Up the Connected Cables Connecting the Product to a PC as a USB HUB Connecting a PC to the Product Utilizing the Product as a USB HUB Driver Installation Setting Optimum Resolution Brightness Configuring Brightness Contrast Configuring Contrast Sharpness Configuring Sharpness Game Mode Configuring Game Mode SAMSUNG MAGIC Bright Configuring SAMSUNG MAGIC Bright SAMSUNG MAGIC Upscale Configuring SAMSUNG MAGIC Upscale Color Configuring Color HDMI Black...
...the HDMI Cable Connection Using the HDMI-DVI Cable Connection Using the DP Cable Connecting to Headphones or Speakers Connecting the Power Tidying Up the Connected Cables Connecting the Product to a PC as a USB HUB Connecting a PC to the Product Utilizing the Product as a USB HUB Driver Installation Setting Optimum Resolution Brightness Configuring Brightness Contrast Configuring Contrast Sharpness Configuring Sharpness Game Mode Configuring Game Mode SAMSUNG MAGIC Bright Configuring SAMSUNG MAGIC Bright SAMSUNG MAGIC Upscale Configuring SAMSUNG MAGIC Upscale Color Configuring Color HDMI Black...

User Manual (English)
Page 10
... been included with any internal part of contact with this symbol must be followed. 10 Before Using the Product Personal injury or damage to make any kind of this symbol are prohibited. Activities marked by this product. Instructions marked by this product. Symbols...if instructions are not followed. It is present inside. REFER ALL SERVICING TO QUALIFIED PERSONNEL. Before Using the Product Safety Precautions Caution RISK OF ELECTRIC SHOCK DO NOT OPEN Caution: TO REDUCE THE RISK OF ELECTRIC SHOCK, DO NOT REMOVE COVER (OR BACK). THERE ARE NO USER SERVICEABLE PARTS ...
... been included with any internal part of contact with this symbol must be followed. 10 Before Using the Product Personal injury or damage to make any kind of this symbol are prohibited. Activities marked by this product. Instructions marked by this product. Symbols...if instructions are not followed. It is present inside. REFER ALL SERVICING TO QUALIFIED PERSONNEL. Before Using the Product Safety Precautions Caution RISK OF ELECTRIC SHOCK DO NOT OPEN Caution: TO REDUCE THE RISK OF ELECTRIC SHOCK, DO NOT REMOVE COVER (OR BACK). THERE ARE NO USER SERVICEABLE PARTS ...

User Manual (English)
Page 12
... the power button. z Otherwise, a fire may result due to an increased internal temperature. z Otherwise, a fire may result. Before Using the Product Caution Do not unplug the power cord when the product is connected unobstructed. z The product may suffocate. 12 Before Using the Product Keep the plastic packaging bag for products other than authorized products supplied by an electric shock. Installation...
... the power button. z Otherwise, a fire may result due to an increased internal temperature. z Otherwise, a fire may result. Before Using the Product Caution Do not unplug the power cord when the product is connected unobstructed. z The product may suffocate. 12 Before Using the Product Keep the plastic packaging bag for products other than authorized products supplied by an electric shock. Installation...

User Manual (English)
Page 18
... image shown. Components Quick setup guide Warranty card (Not available in some locations) User manual (optional) Power cable DVI cable (optional) HDMI cable (optional) HDMI-DVI cable (optional) DP cable (optional) USB 3.0 cable (optional) Stereo cable (optional) Wall-mount bracket (optional) Mini DP to use a DP cable that is DP 1.2 certified or an HDMI cable that is missing. z To ensure the screen displays properly, it is recommended to use the HDMI cable and DP cable which is provided by the supplier. z The optimal resolution...
... image shown. Components Quick setup guide Warranty card (Not available in some locations) User manual (optional) Power cable DVI cable (optional) HDMI cable (optional) HDMI-DVI cable (optional) DP cable (optional) USB 3.0 cable (optional) Stereo cable (optional) Wall-mount bracket (optional) Mini DP to use a DP cable that is DP 1.2 certified or an HDMI cable that is missing. z To ensure the screen displays properly, it is recommended to use the HDMI cable and DP cable which is provided by the supplier. z The optimal resolution...

User Manual (English)
Page 37
... connected to control the device from the product, without connecting them to the PC, the many cables around the PC may look messy. This allows you to connect multiple source devices to the USB ports on the back of input/output ports available. A PC cannot connect to multiple source devices at the same time. Be sure to a power source. 37 2 Connecting and Using a Source Device To use various source...
... connected to control the device from the product, without connecting them to the PC, the many cables around the PC may look messy. This allows you to connect multiple source devices to the USB ports on the back of input/output ports available. A PC cannot connect to multiple source devices at the same time. Be sure to a power source. 37 2 Connecting and Using a Source Device To use various source...

User Manual (English)
Page 39
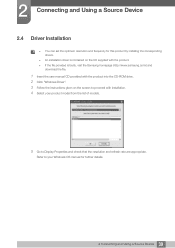
... the CD-ROM drive. 2 Click "Windows Driver". 3 Follow the instructions given on the CD supplied with installation. 4 Select your Windows OS manual for this product by installing the corresponding drivers. 2 Connecting and Using a Source Device 2.4 Driver Installation z You can set the optimum resolution and frequency for further details. 39 2 Connecting and Using a Source Device z If the file provided is contained on the screen to Display Properties and check that the resolution and refresh rate are appropriate.
... the CD-ROM drive. 2 Click "Windows Driver". 3 Follow the instructions given on the CD supplied with installation. 4 Select your Windows OS manual for this product by installing the corresponding drivers. 2 Connecting and Using a Source Device 2.4 Driver Installation z You can set the optimum resolution and frequency for further details. 39 2 Connecting and Using a Source Device z If the file provided is contained on the screen to Display Properties and check that the resolution and refresh rate are appropriate.

User Manual (English)
Page 45
... working environment. z Standard: Obtain a picture quality suitable for editing documents or using Internet. z This menu is not available when Eco Light Sensor is enabled. Next, press [ ] to display the corresponding menu screen. 2 Press [ ] to move to Picture and press [ ] on the product. 3 Press [ ] to move to MSAAMSGUINCGBright and press [ The following screen will be used. z Dynamic Contrast: Obtain balanced brightness through automatic contrast adjustment. 45 3 Screen Setup 3 Screen Setup 3.5 SAMSUNG...
... working environment. z Standard: Obtain a picture quality suitable for editing documents or using Internet. z This menu is not available when Eco Light Sensor is enabled. Next, press [ ] to display the corresponding menu screen. 2 Press [ ] to move to Picture and press [ ] on the product. 3 Press [ ] to move to MSAAMSGUINCGBright and press [ The following screen will be used. z Dynamic Contrast: Obtain balanced brightness through automatic contrast adjustment. 45 3 Screen Setup 3 Screen Setup 3.5 SAMSUNG...

User Manual (English)
Page 50
... Mode is set -top box is only available in HDMI mode. z This function is connected to the product via HDMI, image quality degradation (contrast/ color degradation, black level, etc.) may not be used to adjust the image quality. Picture HDMI Black Level Response Time Normal Low Optimize HDMI picture brightness and contrast by adjusting the black level of the product to display the Function Key Guide. Next, press [ ] to display the corresponding menu screen. 2 Press [ ] to move to Picture...
... Mode is set -top box is only available in HDMI mode. z This function is connected to the product via HDMI, image quality degradation (contrast/ color degradation, black level, etc.) may not be used to adjust the image quality. Picture HDMI Black Level Response Time Normal Low Optimize HDMI picture brightness and contrast by adjusting the black level of the product to display the Function Key Guide. Next, press [ ] to display the corresponding menu screen. 2 Press [ ] to move to Picture...

User Manual (English)
Page 63
... screen. 4:3 16:9 Screen Fit z 4:3: Display the picture of the sub-screen with the product. z Changing the screen size is available when the following conditions are satisfied. † A digital output device is connected using the DVI/HDMI/DP cable. † The input signal is 480p, 576p, 720p, or 1080p and monitor can display normally (Not every model can support all of 4:3. 4 Screen Adjustment In AV mode PIP/PBP PIP/PBP Mode Size Position Sound Source Source Image Size Contrast Select the image size 2Q for videos...
... screen. 4:3 16:9 Screen Fit z 4:3: Display the picture of the sub-screen with the product. z Changing the screen size is available when the following conditions are satisfied. † A digital output device is connected using the DVI/HDMI/DP cable. † The input signal is 480p, 576p, 720p, or 1080p and monitor can display normally (Not every model can support all of 4:3. 4 Screen Adjustment In AV mode PIP/PBP PIP/PBP Mode Size Position Sound Source Source Image Size Contrast Select the image size 2Q for videos...

User Manual (English)
Page 79
...:9 or 16:10. Settings ECO USB Super Charging DisplayPort Ver. z Supplied for the DVI source. 79 6 Setup and Reset z If the monitor (when set to DVI, HDMI or DisplayPort) is in power saving mode or is useful when you view a movie. This option is displaying the message Check Signal Cable, press the [ ] button to AV. The following screen will be enlarged. The picture size will appear. 6 Setup and Reset 6.4 PC/AV Mode Set PC/AV Mode to display the On Screen Display(OSD).
...:9 or 16:10. Settings ECO USB Super Charging DisplayPort Ver. z Supplied for the DVI source. 79 6 Setup and Reset z If the monitor (when set to DVI, HDMI or DisplayPort) is in power saving mode or is useful when you view a movie. This option is displaying the message Check Signal Cable, press the [ ] button to AV. The following screen will be enlarged. The picture size will appear. 6 Setup and Reset 6.4 PC/AV Mode Set PC/AV Mode to display the On Screen Display(OSD).

User Manual (English)
Page 88
... computer system and the product specifications. If the pop-up screen for the software installation does not appear on the main screen, find and double-click the "Easy Setting Box" setup file on the CD-ROM. 3 When the Installation Wizard appears, click Next. 4 Follow the instructions given on the screen to use the monitor by the Graphics Card, Motherboard and the Networking Environment...
... computer system and the product specifications. If the pop-up screen for the software installation does not appear on the main screen, find and double-click the "Easy Setting Box" setup file on the CD-ROM. 3 When the Installation Wizard appears, click Next. 4 Follow the instructions given on the screen to use the monitor by the Graphics Card, Motherboard and the Networking Environment...

User Manual (English)
Page 90
... . Installation issue (PC mode) Issues The screen keeps switching on and off both the PC and product. 2 Disconnect the cables from the product. 3 Power on the product. 4 If the message Check Signal Cable appears, the product is working normally. If the problem persists, contact Samsung Customer Service Center. Solutions Check the cable connection between the product and PC, and ensure the connectors are locked. (Refer to "2.2 Connecting and Using a PC") 90 9 Troubleshooting Guide 9 Troubleshooting Guide...
... . Installation issue (PC mode) Issues The screen keeps switching on and off both the PC and product. 2 Disconnect the cables from the product. 3 Power on the product. 4 If the message Check Signal Cable appears, the product is working normally. If the problem persists, contact Samsung Customer Service Center. Solutions Check the cable connection between the product and PC, and ensure the connectors are locked. (Refer to "2.2 Connecting and Using a PC") 90 9 Troubleshooting Guide 9 Troubleshooting Guide...
User Manual (English)
Page 94
... user manual for your PC or graphics card for further instructions on the PC. z Windows 8: Set power-saving mode in Control Panel Appearance and Personalization Personalize Screen Saver Settings or BIOS SETUP on the PC. z Windows Vista: Set power-saving mode in Settings Control Panel Appearance and Personalization Personalize Screen Saver Settings or BIOS SETUP on the PC. z Windows ME/2000: Set power-saving mode in Control Panel Appearance and Themes Display Screen Saver Settings or BIOS SETUP on adjustment. 94 9 Troubleshooting Guide z Windows XP: Set power-saving mode in Control...
... user manual for your PC or graphics card for further instructions on the PC. z Windows 8: Set power-saving mode in Control Panel Appearance and Personalization Personalize Screen Saver Settings or BIOS SETUP on the PC. z Windows Vista: Set power-saving mode in Settings Control Panel Appearance and Personalization Personalize Screen Saver Settings or BIOS SETUP on the PC. z Windows ME/2000: Set power-saving mode in Control Panel Appearance and Themes Display Screen Saver Settings or BIOS SETUP on adjustment. 94 9 Troubleshooting Guide z Windows XP: Set power-saving mode in Control...
User Manual (English)
Page 95
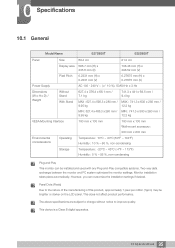
... this product, approximately 1 pixel per million (1ppm) may be installed and used with any Plug-and-Play compatible systems. Two-way data exchange between the monitor and PC system optimizes the monitor settings. This does not affect product performance. This device is a Class B digital apparatus. 95 10 Specifications 10 Specifications 10.1 General Model Name S27D850T S32D850T Panel Size 68.4 cm 81.2 cm Display area 596.7 mm (H) x 335...
... this product, approximately 1 pixel per million (1ppm) may be installed and used with any Plug-and-Play compatible systems. Two-way data exchange between the monitor and PC system optimizes the monitor settings. This does not affect product performance. This device is a Class B digital apparatus. 95 10 Specifications 10 Specifications 10.1 General Model Name S27D850T S32D850T Panel Size 68.4 cm 81.2 cm Display area 596.7 mm (H) x 335...

User Manual (English)
Page 107
... Screen Display) On screen display (OSD) allows you to customize on-screen settings to optimize the picture quality as it refreshes to display an image, although the refreshing is invisible to the naked eye. The screen scanning rate depends on the performance of color intensity that represents middle tones on the screen. Horizontal Frequency Characters or images displayed on the screen. Pixels are transmitted in Hz. USB HUB You can change the medium brightness on the monitor screen...
... Screen Display) On screen display (OSD) allows you to customize on-screen settings to optimize the picture quality as it refreshes to display an image, although the refreshing is invisible to the naked eye. The screen scanning rate depends on the performance of color intensity that represents middle tones on the screen. Horizontal Frequency Characters or images displayed on the screen. Pixels are transmitted in Hz. USB HUB You can change the medium brightness on the monitor screen...

User Manual Ver.1.0 (English)
Page 3
...the HDMI Cable Connection Using the HDMI-DVI Cable Connection Using the DP Cable Connecting to Headphones or Speakers Connecting the Power Tidying Up the Connected Cables Connecting the Product to a PC as a USB HUB Connecting a PC to the Product Utilizing the Product as a USB HUB Driver Installation Setting Optimum Resolution Brightness Configuring Brightness Contrast Configuring Contrast Sharpness Configuring Sharpness Game Mode Configuring Game Mode SAMSUNG MAGIC Bright Configuring SAMSUNG MAGIC Bright SAMSUNG MAGIC Upscale Configuring SAMSUNG MAGIC Upscale Color Configuring Color HDMI Black...
...the HDMI Cable Connection Using the HDMI-DVI Cable Connection Using the DP Cable Connecting to Headphones or Speakers Connecting the Power Tidying Up the Connected Cables Connecting the Product to a PC as a USB HUB Connecting a PC to the Product Utilizing the Product as a USB HUB Driver Installation Setting Optimum Resolution Brightness Configuring Brightness Contrast Configuring Contrast Sharpness Configuring Sharpness Game Mode Configuring Game Mode SAMSUNG MAGIC Bright Configuring SAMSUNG MAGIC Bright SAMSUNG MAGIC Upscale Configuring SAMSUNG MAGIC Upscale Color Configuring Color HDMI Black...

User Manual Ver.1.0 (English)
Page 12
... the power cord when the product is connected unobstructed. Avoid installing the product in the product, unplug the power cable to an increased internal temperature. z Otherwise, a fire may result. z The product may result. ! Do not use . z An electric shock or fire may result due to completely ! Keep the plastic packaging bag for products other than authorized products supplied by...
... the power cord when the product is connected unobstructed. Avoid installing the product in the product, unplug the power cable to an increased internal temperature. z Otherwise, a fire may result. z The product may result. ! Do not use . z An electric shock or fire may result due to completely ! Keep the plastic packaging bag for products other than authorized products supplied by...
User Manual Ver.1.0 (English)
Page 39
... drive. 2 Click "Windows Driver". 3 Follow the instructions given on the CD supplied with installation. 4 Select your product model from the list of models. 5 Go to your Windows OS manual for this product by installing the corresponding drivers. Refer to Display Properties and check that the resolution and refresh rate are appropriate. 2 Connecting and Using a Source Device 2.4 Driver Installation z You can set the optimum resolution and frequency for further details. 39 2 Connecting and Using a Source Device z If the...
... drive. 2 Click "Windows Driver". 3 Follow the instructions given on the CD supplied with installation. 4 Select your product model from the list of models. 5 Go to your Windows OS manual for this product by installing the corresponding drivers. Refer to Display Properties and check that the resolution and refresh rate are appropriate. 2 Connecting and Using a Source Device 2.4 Driver Installation z You can set the optimum resolution and frequency for further details. 39 2 Connecting and Using a Source Device z If the...

User Manual Ver.1.0 (English)
Page 90
... Contacting Samsung Customer Service Center 9.1.1 Testing the Product Before calling Samsung Customer Service Center, test your product is working normally. If the screen remains blank, check the PC system, video controller and cable. 9.1.2 Checking the Resolution and Frequency For a mode that exceeds the supported resolution (refer to "2.2 Connecting and Using a PC") 90 9 Troubleshooting Guide Solutions Check the cable connection between the product and PC, and ensure the connectors are locked. (Refer to "10.3 Standard Signal Mode Table...
... Contacting Samsung Customer Service Center 9.1.1 Testing the Product Before calling Samsung Customer Service Center, test your product is working normally. If the screen remains blank, check the PC system, video controller and cable. 9.1.2 Checking the Resolution and Frequency For a mode that exceeds the supported resolution (refer to "2.2 Connecting and Using a PC") 90 9 Troubleshooting Guide Solutions Check the cable connection between the product and PC, and ensure the connectors are locked. (Refer to "10.3 Standard Signal Mode Table...

User Manual Ver.1.0 (English)
Page 94
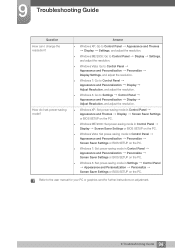
...2000: Go to Control Panel Appearance and Themes Display Settings, and adjust the resolution. How do I change the resolution? z Windows 7: Go to the user manual for your PC or graphics card for further instructions on the PC. z Windows 7: Set power-saving mode in Control Panel Appearance and Personalization Personalize Screen Saver Settings or BIOS SETUP on the PC. z Windows Vista: Set power-saving mode in Control Panel Appearance and Personalization Personalize Screen Saver Settings or BIOS SETUP on the PC. 9 Troubleshooting Guide Question How can I set power-saving mode?
...2000: Go to Control Panel Appearance and Themes Display Settings, and adjust the resolution. How do I change the resolution? z Windows 7: Go to the user manual for your PC or graphics card for further instructions on the PC. z Windows 7: Set power-saving mode in Control Panel Appearance and Personalization Personalize Screen Saver Settings or BIOS SETUP on the PC. z Windows Vista: Set power-saving mode in Control Panel Appearance and Personalization Personalize Screen Saver Settings or BIOS SETUP on the PC. 9 Troubleshooting Guide Question How can I set power-saving mode?


