User Manual
Page 8
... products in the refrigerator for removing bad odours. - A spark may result in Refrigerator, pull out power plug and contact your nearest Samsung Electronics service center. - Products that require strict temperature controls must not be stored in which prevents the shelf from suffocation by the manufacturer...candle in the refrigerator. - Do not fill the tank with food. - This may also result in upside down. Do not put fridge shelves in an electric shock, fire, or problems with water on the appliance. Clearances between the doors and cabinet are necessarily small. Do...
... products in the refrigerator for removing bad odours. - A spark may result in Refrigerator, pull out power plug and contact your nearest Samsung Electronics service center. - Products that require strict temperature controls must not be stored in which prevents the shelf from suffocation by the manufacturer...candle in the refrigerator. - Do not fill the tank with food. - This may also result in upside down. Do not put fridge shelves in an electric shock, fire, or problems with water on the appliance. Clearances between the doors and cabinet are necessarily small. Do...
User Manual
Page 24
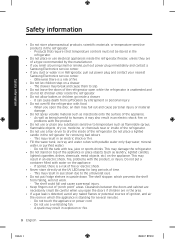
Installation 24 English Untitled-4 24 2020-03-17 7:03:20 Insert two door guards each to the freezer and the fridge. Door guards There are four door guards provided with this refrigerator are properly packed for transportation and safety reasons. Installation STEP 5 Unpack and put them in place The accessories that ship with the product. Unpack those accessories and put accessories in place.
Installation 24 English Untitled-4 24 2020-03-17 7:03:20 Insert two door guards each to the freezer and the fridge. Door guards There are four door guards provided with this refrigerator are properly packed for transportation and safety reasons. Installation STEP 5 Unpack and put them in place The accessories that ship with the product. Unpack those accessories and put accessories in place.

User Manual
Page 29
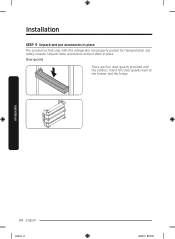
Operations Feature panel Type A 02 03 01 05 Type B 02 04 05 03 01 05 04 05 01 Power Freeze / Ice Maker (applicable models only) 03 Fridge / Fridge On/Off 05 Sabbath mode 02 Freezer / Freezer Convert 04 Power Cool Operations Untitled-4 29 English 29 2020-03-17 7:03:21
Operations Feature panel Type A 02 03 01 05 Type B 02 04 05 03 01 05 04 05 01 Power Freeze / Ice Maker (applicable models only) 03 Fridge / Fridge On/Off 05 Sabbath mode 02 Freezer / Freezer Convert 04 Power Cool Operations Untitled-4 29 English 29 2020-03-17 7:03:21
User Manual
Page 31
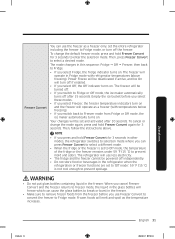
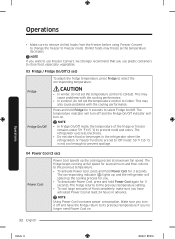
... freezer (with refrigerator temperatures (above . Empty the ice bucket before you select Off, the Off indicator turns on and the freezer will operate in Fridge mode with temperatures below freezing). • If you can use the freezer as the temperature increases. Then, follow the instructions above freezing). NOTE &#... refrigeration or freezer functions are set to 'Off mode'. 59 °F (15 °C) is set to Off mode, the temperature of the fridge or the freezer remains under 59 °F (15 °C) to prevent mold and odors. When you cancel Freezer Convert and the freezer returns ...
... freezer (with refrigerator temperatures (above . Empty the ice bucket before you select Off, the Off indicator turns on and the freezer will operate in Fridge mode with temperatures below freezing). • If you can use the freezer as the temperature increases. Then, follow the instructions above freezing). NOTE &#... refrigeration or freezer functions are set to 'Off mode'. 59 °F (15 °C) is set to Off mode, the temperature of the fridge or the freezer remains under 59 °F (15 °C) to prevent mold and odors. When you cancel Freezer Convert and the freezer returns ...
User Manual
Page 32
...8226; In winter, do not set the temperature control to its previous temperature if you . • To deactivate Power Cool, press and hold Fridge for 3 seconds to prevent spoilage. 04 Power Cool (3 sec) Power Cool Power Cool speeds up the cooling process for 3 seconds. The ... 2020-03-17 7:03:22 Make sure you use plastic containers to store food, especially vegetables. 03 Fridge / Fridge On/Off (3 sec) Fridge Fridge On/Off To adjust the fridge temperature, press Fridge to prevent mold and odors. The corresponding indicator ( ) lights up, and the refrigerator will turn off...
...8226; In winter, do not set the temperature control to its previous temperature if you . • To deactivate Power Cool, press and hold Fridge for 3 seconds to prevent spoilage. 04 Power Cool (3 sec) Power Cool Power Cool speeds up the cooling process for 3 seconds. The ... 2020-03-17 7:03:22 Make sure you use plastic containers to store food, especially vegetables. 03 Fridge / Fridge On/Off (3 sec) Fridge Fridge On/Off To adjust the fridge temperature, press Fridge to prevent mold and odors. The corresponding indicator ( ) lights up, and the refrigerator will turn off...
User Manual
Page 33
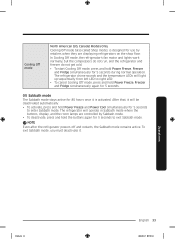
... will light up sequentially from left LED to right LED. • To cancel Cooling Off mode, press and hold Power Freeze, Freezer and Fridge simultaneously for use by retailers when they are controlled by Sabbath mode. • To deactivate, press and hold Power Freeze and Power Cool simultaneously...run, and the refrigerator and freezer do not get cold. • To start Cooling Off mode, press and hold Power Freeze, Freezer and Fridge simultaneously again for 5 seconds. 05 Sabbath mode The Sabbath mode stays active for 85 hours once it . NOTE Even after the refrigerator powers off...
... will light up sequentially from left LED to right LED. • To cancel Cooling Off mode, press and hold Power Freeze, Freezer and Fridge simultaneously for use by retailers when they are controlled by Sabbath mode. • To deactivate, press and hold Power Freeze and Power Cool simultaneously...run, and the refrigerator and freezer do not get cold. • To start Cooling Off mode, press and hold Power Freeze, Freezer and Fridge simultaneously again for 5 seconds. 05 Sabbath mode The Sabbath mode stays active for 85 hours once it . NOTE Even after the refrigerator powers off...

User Manual
Page 38
Gently slide the fridge door out of the hinge shaft, and then pull up to loosen the bolts and remove the middle hinge. 6. Maintenance 38 English Untitled-4 38 2020-03-17 7:03:24 Use the screwdriver and the wrench to remove. Maintenance 5.
Gently slide the fridge door out of the hinge shaft, and then pull up to loosen the bolts and remove the middle hinge. 6. Maintenance 38 English Untitled-4 38 2020-03-17 7:03:24 Use the screwdriver and the wrench to remove. Maintenance 5.
User Manual
Page 40
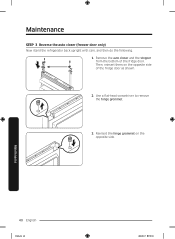
Maintenance STEP 3 Reverse the auto closer (freezer door only) Now stand the refrigerator back upright with care, and then do the following. 1. Reinsert the hinge grommet on the opposite side of the fridge door. Use a flat-head screwdriver to remove the hinge grommet. 3. Maintenance 40 English Untitled-4 40 2020-03-17 7:03:25 Remove the auto closer and the stopper from the bottom of the fridge door as shown. 2. Then, reinsert them on the opposite side.
Maintenance STEP 3 Reverse the auto closer (freezer door only) Now stand the refrigerator back upright with care, and then do the following. 1. Reinsert the hinge grommet on the opposite side of the fridge door. Use a flat-head screwdriver to remove the hinge grommet. 3. Maintenance 40 English Untitled-4 40 2020-03-17 7:03:25 Remove the auto closer and the stopper from the bottom of the fridge door as shown. 2. Then, reinsert them on the opposite side.

User Manual
Page 44
Reverse the middle hinge and insert it on the other side. Use the flat-head screwdriver to remove both the hinge grommet on one side and the hinge-hole cap on the opposite side. Gently slide the freezer door into the correction position so that it fits. 7. Maintenance 44 English Untitled-4 44 2020-03-17 7:03:27 Then, tighten the hinge with the screws. 5. Reinsert them on their respective opposite side. 6. Maintenance 4. Gently slide the fridge door into the correction position so that it fits.
Reverse the middle hinge and insert it on the other side. Use the flat-head screwdriver to remove both the hinge grommet on one side and the hinge-hole cap on the opposite side. Gently slide the freezer door into the correction position so that it fits. 7. Maintenance 44 English Untitled-4 44 2020-03-17 7:03:27 Then, tighten the hinge with the screws. 5. Reinsert them on their respective opposite side. 6. Maintenance 4. Gently slide the fridge door into the correction position so that it fits.

User Manual
Page 48
Maintenance 7. Insert the bar cover. 8. Turn them clockwise by 180 degrees, and then reattach them. NOTE In the future, you might want to return the doors to their initial position (before the doors were reversed). Maintenance 48 English Untitled-4 48 2020-03-17 7:03:29 Remove the fridge door and freezer door gaskets. In that case, refer to the instructions on the previous pages, but switch the doors, hinges, and covers back to their initial positions.
Maintenance 7. Insert the bar cover. 8. Turn them clockwise by 180 degrees, and then reattach them. NOTE In the future, you might want to return the doors to their initial position (before the doors were reversed). Maintenance 48 English Untitled-4 48 2020-03-17 7:03:29 Remove the fridge door and freezer door gaskets. In that case, refer to the instructions on the previous pages, but switch the doors, hinges, and covers back to their initial positions.
User Manual
Page 49
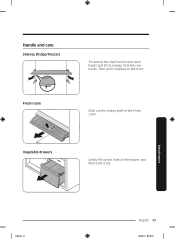
Handle and care Shelves (fridge/freezer) To remove the shelf, hold it with both hands and lift to the front. Maintenance Untitled-4 49 English 49 2020-03-17 7:03:29 Fresh room Slide out the sliding shelf of the drawer, and then slide it halfway to release from the rear hooks. Vegetable drawers Gently lift up the front of the Fresh room. Then, pull it out.
Handle and care Shelves (fridge/freezer) To remove the shelf, hold it with both hands and lift to the front. Maintenance Untitled-4 49 English 49 2020-03-17 7:03:29 Fresh room Slide out the sliding shelf of the drawer, and then slide it halfway to release from the rear hooks. Vegetable drawers Gently lift up the front of the Fresh room. Then, pull it out.
User Manual
Page 52
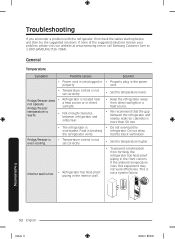
Fridge/freezer is hot. Interior wall is over-cooling. This is ... sunlight. • Not enough clearance between the refrigerator and nearby walls (or cabinets) is not a system failure. Fridge/freezer temperature is overloaded. Food is blocking the refrigerator vents. • Temperature control is not set correctly. •... Refrigerator is located near a heat source or in the interior wall. General Temperature Symptom Fridge/freezer does not operate. Troubleshooting If you encounter a problem with the refrigerator, first check the tables starting below...
Fridge/freezer is hot. Interior wall is over-cooling. This is ... sunlight. • Not enough clearance between the refrigerator and nearby walls (or cabinets) is not a system failure. Fridge/freezer temperature is overloaded. Food is blocking the refrigerator vents. • Temperature control is not set correctly. •... Refrigerator is located near a heat source or in the interior wall. General Temperature Symptom Fridge/freezer does not operate. Troubleshooting If you encounter a problem with the refrigerator, first check the tables starting below...


