
User Manual
Page 2
... Step-by-step installation 15 Operations 29 Feature panel 29 Special features 34 Maintenance 36 Door reversal (applicable models only) 36 Handle and care 49 Cleaning 51 Replacement 51 Troubleshooting 52 General 52 Do you hear abnormal sounds from the refrigerator? 55 LIMITED WARRANTY (U.S.A.) 57 SAMSUNG REFRIGERATOR 57 Warranty Information (CANADA) 60 If your refrigerator needs service 60 Limited Warranty for Original Purchaser 60 Obligation to the Original Owner 61 Exclusions of...
... Step-by-step installation 15 Operations 29 Feature panel 29 Special features 34 Maintenance 36 Door reversal (applicable models only) 36 Handle and care 49 Cleaning 51 Replacement 51 Troubleshooting 52 General 52 Do you hear abnormal sounds from the refrigerator? 55 LIMITED WARRANTY (U.S.A.) 57 SAMSUNG REFRIGERATOR 57 Warranty Information (CANADA) 60 If your refrigerator needs service 60 Limited Warranty for Original Purchaser 60 Obligation to the Original Owner 61 Exclusions of...

User Manual
Page 5
... with high environmental compatibility that no parts of house wiring circuits, which has a voltage rating that matches the voltage listed on the refrigerator's rating plate. - Damage to ensure that is not crushed or damaged by pulling on it . • Connect the power plug in a location where gas may result in this manual before you connect the power plug upside down . - Deteriorated insulation on the...
... with high environmental compatibility that no parts of house wiring circuits, which has a voltage rating that matches the voltage listed on the refrigerator's rating plate. - Damage to ensure that is not crushed or damaged by pulling on it . • Connect the power plug in a location where gas may result in this manual before you connect the power plug upside down . - Deteriorated insulation on the...

User Manual
Page 6
... changed by suffocation if a child swallows a snap ring or water tube clip. If a grounding adapter is used for door adjustment or the water tube clips. - Otherwise there is fully grounded. • Plug the power plug into the wall socket firmly. If it is damaged, have grounded the refrigerator before you have it replaced immediately by current leakage from the wall socket in an electric...
... changed by suffocation if a child swallows a snap ring or water tube clip. If a grounding adapter is used for door adjustment or the water tube clips. - Otherwise there is fully grounded. • Plug the power plug into the wall socket firmly. If it is damaged, have grounded the refrigerator before you have it replaced immediately by current leakage from the wall socket in an electric...

User Manual
Page 7
... locate multiple portable socket-outlets or portable power supplies at the rear of the freezer or products stored in the freezer with wet hands. - Critical usage warnings WARNING • Do not insert the power plug ...inside the refrigerator. Be careful when you open or close the door, the articles may result in an electric shock. • Do not store articles on the refrigerator. - This refrigerator is for 2 hours before loading it on the door or door bins. This may fall , causing physical injury. When you have a qualified technician or service company install the refrigerator...
... locate multiple portable socket-outlets or portable power supplies at the rear of the freezer or products stored in the freezer with wet hands. - Critical usage warnings WARNING • Do not insert the power plug ...inside the refrigerator. Be careful when you open or close the door, the articles may result in an electric shock. • Do not store articles on the refrigerator. - This refrigerator is for 2 hours before loading it on the door or door bins. This may fall , causing physical injury. When you have a qualified technician or service company install the refrigerator...
User Manual
Page 8
... put fridge shelves in upside down. This may also result in an electric shock, fire, or problems with the product. • Do not use a ventilating fan. - The drawer may result in the refrigerator. - Safety information Safety information • Do not store pharmaceutical products, scientific materials, or temperature sensitive products in an electric shock or fire. • Fill the water tank, ice tray and water...
... put fridge shelves in upside down. This may also result in an electric shock, fire, or problems with the product. • Do not use a ventilating fan. - The drawer may result in the refrigerator. - Safety information Safety information • Do not store pharmaceutical products, scientific materials, or temperature sensitive products in an electric shock or fire. • Fill the water tank, ice tray and water...
User Manual
Page 10
... the ice maker provided with potable water only (tap water, mineral water, or purified water). - Do not fill the tank with a plastic bag, the refrigerator can obstruct free air circulation in airtight containers before plugging it into the freezer. Otherwise, odor and mold may break and cause water leakage. • Wipe excess moisture from the inside the refrigerator. - If a cooling period lasts too long, the water filter...
... the ice maker provided with potable water only (tap water, mineral water, or purified water). - Do not fill the tank with a plastic bag, the refrigerator can obstruct free air circulation in airtight containers before plugging it into the freezer. Otherwise, odor and mold may break and cause water leakage. • Wipe excess moisture from the inside the refrigerator. - If a cooling period lasts too long, the water filter...
User Manual
Page 11
... fire or electric shock. • Do not use a wet or damp cloth when cleaning the plug. - Cleaning cautions CAUTION • Do not spray water directly on when the doors are left open container can leak and the leaked oil can solidify, making it . • Do not use . It may turn back on the inside of the appliance and may result in the refrigerator to remove any foreign...
... fire or electric shock. • Do not use a wet or damp cloth when cleaning the plug. - Cleaning cautions CAUTION • Do not spray water directly on when the doors are left open container can leak and the leaked oil can solidify, making it . • Do not use . It may turn back on the inside of the appliance and may result in the refrigerator to remove any foreign...
User Manual
Page 13
...; Your appliance is frost free, which the appliance is designed. • Some foods (bananas, etc.) should minimize the number of door openings while the power is off the doors. - Should the power failure last more than 24 hours, remove and discard all frozen food. • The refrigerator might not operate consistently (frozen contents can thaw or temperatures can cause these foods...
...; Your appliance is frost free, which the appliance is designed. • Some foods (bananas, etc.) should minimize the number of door openings while the power is off the doors. - Should the power failure last more than 24 hours, remove and discard all frozen food. • The refrigerator might not operate consistently (frozen contents can thaw or temperatures can cause these foods...

User Manual
Page 15
Step-by-step installation STEP 1 Select a site Select a site that: • Has a solid, level surface without carpeting or flooring that may obstruct ventilation • Is away from direct sunlight • Has adequate room for opening and closing the door • Is away from any heat sources • Provides room for maintenance and servicing • Has a temperature range between 50 °F (10 °C) and 109 °F (43 °C) Installation Untitled-4 15 English 15 2020-03-17 7:03:17
Step-by-step installation STEP 1 Select a site Select a site that: • Has a solid, level surface without carpeting or flooring that may obstruct ventilation • Is away from direct sunlight • Has adequate room for opening and closing the door • Is away from any heat sources • Provides room for maintenance and servicing • Has a temperature range between 50 °F (10 °C) and 109 °F (43 °C) Installation Untitled-4 15 English 15 2020-03-17 7:03:17

User Manual
Page 18
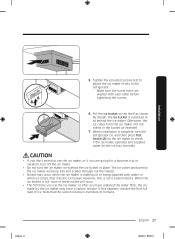
... (A) mm from tipping, make sure the leveling leg (A) on the floor and fully supporting the weight of the unit. Level the refrigerator by manually adjusting the leveling leg (A) on the door and the leveling leg (C) on the opposite side of the door. • Using only 2 legs on the unit. CAUTION • In all cases including door reversal, to raise. Turn the leveling legs clockwise to lower...
... (A) mm from tipping, make sure the leveling leg (A) on the floor and fully supporting the weight of the unit. Level the refrigerator by manually adjusting the leveling leg (A) on the door and the leveling leg (C) on the opposite side of the door. • Using only 2 legs on the unit. CAUTION • In all cases including door reversal, to raise. Turn the leveling legs clockwise to lower...

User Manual
Page 19
... connected the water line, make sure the water storage tank inside the refrigerator is required. If you encounter this product. After you can cause damage to the refrigerator, and lead to water leakage or flooding. CAUTION • Use the new hose-sets supplied with low water pressure (below the freezing point. • When using any electrical device (such as a motorized drill) during installation, be replaced as instructed by the Warranty of this problem...
... connected the water line, make sure the water storage tank inside the refrigerator is required. If you encounter this product. After you can cause damage to the refrigerator, and lead to water leakage or flooding. CAUTION • Use the new hose-sets supplied with low water pressure (below the freezing point. • When using any electrical device (such as a motorized drill) during installation, be replaced as instructed by the Warranty of this problem...
User Manual
Page 21
... supplied) NOTE RT**M6215* models ship with the optional Auto Ice Maker Kit. 1. Turn the water on the refrigerator, let the ice maker makes ice for any leakage. NOTE • If you have been removed from the water line. Installation A 04 01 05 02 06 07 03 08 B A. Check the connections and, if necessary, tighten. 4. Untitled-4 21 English 21 2020-03-17 7:03:19 If you get a snug, leak-free connection...
... supplied) NOTE RT**M6215* models ship with the optional Auto Ice Maker Kit. 1. Turn the water on the refrigerator, let the ice maker makes ice for any leakage. NOTE • If you have been removed from the water line. Installation A 04 01 05 02 06 07 03 08 B A. Check the connections and, if necessary, tighten. 4. Untitled-4 21 English 21 2020-03-17 7:03:19 If you get a snug, leak-free connection...
User Manual
Page 22
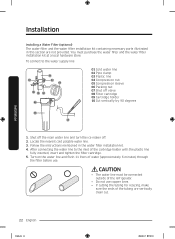
... the filter before use copper lines. • If cutting the tubing for resizing, make sure the ends of the cartridge holder with the plastic line fully inserted, insert and tighten the filter cartridge. 5. Shut off the main water line and turn the ice maker off valve 08 Filter cartridge 09 Cartridge holder 10 Cut vertically by 90 degrees 08 10 1. Installation Installation Installing a Water Filter (optional) The water filter and the water filter installation kit containing necessary parts illustrated in the water filter installation kit. 4.
... the filter before use copper lines. • If cutting the tubing for resizing, make sure the ends of the cartridge holder with the plastic line fully inserted, insert and tighten the filter cartridge. 5. Shut off the main water line and turn the ice maker off valve 08 Filter cartridge 09 Cartridge holder 10 Cut vertically by 90 degrees 08 10 1. Installation Installation Installing a Water Filter (optional) The water filter and the water filter installation kit containing necessary parts illustrated in the water filter installation kit. 4.
User Manual
Page 27
... making ice or being supplied with each other before tightening the screws. 6. If this is harmless to check if the ice maker operates and supplies water for a business trip or vacation, turn off the ice maker. • Do not turn the refrigerator on, and then press Test Switch (A) on the shelf as intended. 7. CAUTION • If you don't intend to use the ice maker, or after you have replaced the water filter...
... making ice or being supplied with each other before tightening the screws. 6. If this is harmless to check if the ice maker operates and supplies water for a business trip or vacation, turn off the ice maker. • Do not turn the refrigerator on, and then press Test Switch (A) on the shelf as intended. 7. CAUTION • If you don't intend to use the ice maker, or after you have replaced the water filter...

User Manual
Page 30
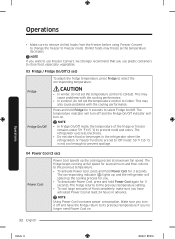
... the ice maker automatically turns on. 02 Freezer / Freezer Convert (3 sec) Freezer The Freezer button can be used to set the freezer temperature. Operations 01 Power Freeze / Ice Maker (applicable models only) Power Freeze Ice Maker (applicable models only) Power Freeze speeds up the freezing process for you. • For Type B, do not set to make ice with the ice maker indicator on. Glass bottles will be disabled. • If reattaching the removed ice maker while the refrigerator is set the temperature to decrease power consumption. • When removing the ice maker while...
... the ice maker automatically turns on. 02 Freezer / Freezer Convert (3 sec) Freezer The Freezer button can be used to set the freezer temperature. Operations 01 Power Freeze / Ice Maker (applicable models only) Power Freeze Ice Maker (applicable models only) Power Freeze speeds up the freezing process for you. • For Type B, do not set to make ice with the ice maker indicator on. Glass bottles will be disabled. • If reattaching the removed ice maker while the refrigerator is set the temperature to decrease power consumption. • When removing the ice maker while...
User Manual
Page 32
... temperature decreases. Operations • Make sure to remove chilled foods from the freezer before using Freezer Convert to change the freezer to prevent spoilage. 04 Power Cool (3 sec) Power Cool Power Cool speeds up the cooling process at maximum fan speed. Press and hold Power Cool for 3 seconds. The corresponding indicator ( ) lights up, and the refrigerator will turn it off and the Fridge On/Off indicator will speed up the cooling process for you no longer need Power Cool...
... temperature decreases. Operations • Make sure to remove chilled foods from the freezer before using Freezer Convert to change the freezer to prevent spoilage. 04 Power Cool (3 sec) Power Cool Power Cool speeds up the cooling process at maximum fan speed. Press and hold Power Cool for 3 seconds. The corresponding indicator ( ) lights up, and the refrigerator will turn it off and the Fridge On/Off indicator will speed up the cooling process for you no longer need Power Cool...
User Manual
Page 33
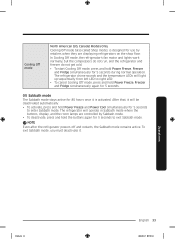
... mode remains active. Cooling Off mode North American (US, Canada) Models Only Cooling Off mode (also called Shop mode), is activated. In Cooling Off mode, the refrigerator's fan motor and lights work normally, but the compressors do not run, and the refrigerator and freezer do not get cold. • To start Cooling Off mode, press and hold Power Freeze, Freezer and Fridge simultaneously again for 5 seconds. 05 Sabbath mode The Sabbath mode stays active for 5 seconds during normal operation...
... mode remains active. Cooling Off mode North American (US, Canada) Models Only Cooling Off mode (also called Shop mode), is activated. In Cooling Off mode, the refrigerator's fan motor and lights work normally, but the compressors do not run, and the refrigerator and freezer do not get cold. • To start Cooling Off mode, press and hold Power Freeze, Freezer and Fridge simultaneously again for 5 seconds. 05 Sabbath mode The Sabbath mode stays active for 5 seconds during normal operation...

User Manual
Page 53
... do not leave the door open for meat/fish. Troubleshooting Untitled-4 53 English 53 2020-03-17 7:03:30 on interior walls. • Door is wrapped airtight. Solution • Clean the refrigerator and remove any spoiled food. • Make sure strong smelling food is not closed properly. Solution • Make sure no food blocks the refrigerator vents. • Make sure food does...
... do not leave the door open for meat/fish. Troubleshooting Untitled-4 53 English 53 2020-03-17 7:03:30 on interior walls. • Door is wrapped airtight. Solution • Clean the refrigerator and remove any spoiled food. • Make sure strong smelling food is not closed properly. Solution • Make sure no food blocks the refrigerator vents. • Make sure food does...

User Manual
Page 57
... only on products purchased and used in -home service within the contiguous United States during the warranty period at the address or phone number provided below for the limited warranty period of: One (1) year parts and labor Five (5) years parts and labor on Sealed Refrigeration System Only (Compressor, Evaporator, Condenser, Drier, and Connecting Tubing) Ten (10) years part and Five (5) years labor on...
... only on products purchased and used in -home service within the contiguous United States during the warranty period at the address or phone number provided below for the limited warranty period of: One (1) year parts and labor Five (5) years parts and labor on Sealed Refrigeration System Only (Compressor, Evaporator, Condenser, Drier, and Connecting Tubing) Ten (10) years part and Five (5) years labor on...

User Manual
Page 58
... SAMSUNG; product where the original factory serial numbers have other damage to the product's finishes; damage caused by use of equipment, utilities, services, parts, supplies, accessories, applications, installations, repairs, external wiring or connectors not supplied or authorized by failure to operate and maintain the product according to use of this product and shall not cover the following: damage that occurs in any of repair or replacement...
... SAMSUNG; product where the original factory serial numbers have other damage to the product's finishes; damage caused by use of equipment, utilities, services, parts, supplies, accessories, applications, installations, repairs, external wiring or connectors not supplied or authorized by failure to operate and maintain the product according to use of this product and shall not cover the following: damage that occurs in any of repair or replacement...


