Quick Guide (easy Manual) (ver.1.0) (English)
Page 1
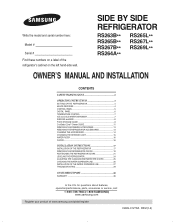
... INSTALLATION CONTENTS SAFETY WARNING SIGNS 2 OPERATING INSTRUCTIONS 4 SETTING UP THE REFRIGERATOR 4 MAJOR FEATURES 4 CONTROL PANEL 5 DIGITAL PANEL 6 TEMPERATURE CONTROL ... REMOVING THE FREEZER ACCESSORIES 13 REMOVING THE REFRIGERATOR ACCESSORIES 13 CLEANING THE ACCESSORIES 14 CHANGING THE INTERIOR LIGHT 15 WATER...INSTALLATION OF THE REFRIGERATOR 17 REMOVING THE REFRIGERATOR DOORS 18 REATTACHING THE REFRIGERATOR DOORS 21 LEVELING THE REFRIGERATOR 24 ADJUSTING THE ...Serial # Find these numbers on a label of the refrigerator's cabinet on the left hand-side wall. for questions about features,...
... INSTALLATION CONTENTS SAFETY WARNING SIGNS 2 OPERATING INSTRUCTIONS 4 SETTING UP THE REFRIGERATOR 4 MAJOR FEATURES 4 CONTROL PANEL 5 DIGITAL PANEL 6 TEMPERATURE CONTROL ... REMOVING THE FREEZER ACCESSORIES 13 REMOVING THE REFRIGERATOR ACCESSORIES 13 CLEANING THE ACCESSORIES 14 CHANGING THE INTERIOR LIGHT 15 WATER...INSTALLATION OF THE REFRIGERATOR 17 REMOVING THE REFRIGERATOR DOORS 18 REATTACHING THE REFRIGERATOR DOORS 21 LEVELING THE REFRIGERATOR 24 ADJUSTING THE ...Serial # Find these numbers on a label of the refrigerator's cabinet on the left hand-side wall. for questions about features,...
Quick Guide (easy Manual) (ver.1.0) (English)
Page 2
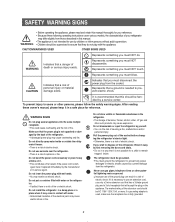
...multiple receptacle. • This could cause overheating and the risk of causing a fire, malfunctions and/or personal injury. Do not install the refrigerator in a damp place or a place where it . • This constitutes a fire hazard. Do not store volatile or flammable substances in... a safe place for reference. After reading these following operating instructions cover various models, the characteristics of your refrigerator may differ slightly from those described in this should be AC 115V~120V, 10A, or more. Represents something you must disconnect...
...multiple receptacle. • This could cause overheating and the risk of causing a fire, malfunctions and/or personal injury. Do not install the refrigerator in a damp place or a place where it . • This constitutes a fire hazard. Do not store volatile or flammable substances in... a safe place for reference. After reading these following operating instructions cover various models, the characteristics of your refrigerator may differ slightly from those described in this should be AC 115V~120V, 10A, or more. Represents something you must disconnect...
Quick Guide (easy Manual) (ver.1.0) (English)
Page 3
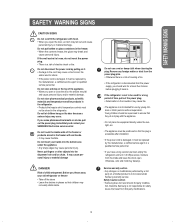
...open or close the door, the articles may cause frostbite. Remove any foreign matter or dust from the power supply, you throw away your SAMSUNG Electronics service center. Otherwise, odor and mold may cause a short-circuit, fire and/or electric shock. • If the power cord ...be supervised to be stored in the freezer. • When the contents freeze, the glass may break and cause personal injury. If the refrigerator is not responsible for a long period of child entrapment. Service warranty section • Any changes or modifications performed by young children or ...
...open or close the door, the articles may cause frostbite. Remove any foreign matter or dust from the power supply, you throw away your SAMSUNG Electronics service center. Otherwise, odor and mold may cause a short-circuit, fire and/or electric shock. • If the power cord ...be supervised to be stored in the freezer. • When the contents freeze, the glass may break and cause personal injury. If the refrigerator is not responsible for a long period of child entrapment. Service warranty section • Any changes or modifications performed by young children or ...
Quick Guide (easy Manual) (ver.1.0) (English)
Page 4
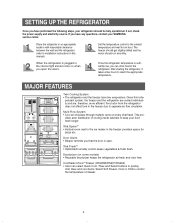
... control the temperature of cooling inside cabinets to keep your SAMSUNG service center. Deodorizer (on when you open . If not, check the power supply and electricity source. pendent system, the freezer and the refrigerator are cooled individually and are, therefore, more efficient. The...the motor should be fully operational. MAJOR FEATURES Twin Cooling System • The refrigerator and the freezer have performed the following steps, your refrigerator should run smoothly. Food odor from the refrigerator does not affect food in , the interior light should come on some models)...
... control the temperature of cooling inside cabinets to keep your SAMSUNG service center. Deodorizer (on when you open . If not, check the power supply and electricity source. pendent system, the freezer and the refrigerator are cooled individually and are, therefore, more efficient. The...the motor should be fully operational. MAJOR FEATURES Twin Cooling System • The refrigerator and the freezer have performed the following steps, your refrigerator should run smoothly. Food odor from the refrigerator does not affect food in , the interior light should come on some models)...
Quick Guide (easy Manual) (ver.1.0) (English)
Page 5
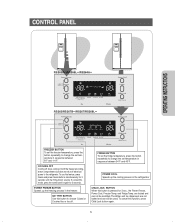
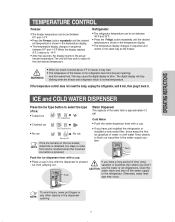
... LOCK BUTTON When this button to choose Cubed or Crushed Ice or Ice off electrical power to the refrigerator. FRIDGE BUTTON To set the fridge temperature, press the button repeatedly to change the set temperature in sequence between 8°F and -14°F. are not ... 46°F. The Water and Ice dispensers are locked and can still be modified. COOLING OFF Cooling off stops cooling in both the freezer and refrigerator compartments but does not shut off . To cancel this function, press Child Lock button again. 5
... LOCK BUTTON When this button to choose Cubed or Crushed Ice or Ice off electrical power to the refrigerator. FRIDGE BUTTON To set the fridge temperature, press the button repeatedly to change the set temperature in sequence between 8°F and -14°F. are not ... 46°F. The Water and Ice dispensers are locked and can still be modified. COOLING OFF Cooling off stops cooling in both the freezer and refrigerator compartments but does not shut off . To cancel this function, press Child Lock button again. 5
Quick Guide (easy Manual) (ver.1.0) (English)
Page 6
... Drawer Power Freeze • This light goes on some models the filter has 1 month left. Press this button to quickly return the refrigerator to its set temperature. • Press this function, energy consumption will increase. If indicator is replaced, reset the indicator by pressing the... Ice Type button and the Child Lock buttons simultaneously for 5 seconds. 6 Fridge indicates the current refrigerator temperature. If you press the Power Cool button. Cubed Ice, Crushed Ice and Ice Off • Press the Ice Type button in sequence...
... Drawer Power Freeze • This light goes on some models the filter has 1 month left. Press this button to quickly return the refrigerator to its set temperature. • Press this function, energy consumption will increase. If indicator is replaced, reset the indicator by pressing the... Ice Type button and the Child Lock buttons simultaneously for 5 seconds. 6 Fridge indicates the current refrigerator temperature. If you press the Power Cool button. Cubed Ice, Crushed Ice and Ice Off • Press the Ice Type button in sequence...
Quick Guide (easy Manual) (ver.1.0) (English)
Page 7
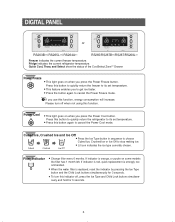
... prevent If you have a long period of water or until the desired temperature is approximately 0.3 gal. When the display reaches • The refrigerator temperature can be set between 8°F and -14°F. • Press the Freezer. WARNING • When ice cream is pressed. vacation...water filter, throw away the first six glassfuls of time (long ice from warm food. This may occur. OPERATING INSTRUCTIONS TEMPERATURE CONTROL Freezer Refrigerator • The freezer temperature can be set between 46°F and 34°F. • Press the Fridge. To avoid injury, ...
... prevent If you have a long period of water or until the desired temperature is approximately 0.3 gal. When the display reaches • The refrigerator temperature can be set between 8°F and -14°F. • Press the Freezer. WARNING • When ice cream is pressed. vacation...water filter, throw away the first six glassfuls of time (long ice from warm food. This may occur. OPERATING INSTRUCTIONS TEMPERATURE CONTROL Freezer Refrigerator • The freezer temperature can be set between 46°F and 34°F. • Press the Fridge. To avoid injury, ...
Quick Guide (easy Manual) (ver.1.0) (English)
Page 8
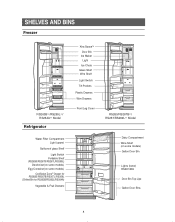
SHELVES AND BINS Freezer RS263B**/RS265L**/ RS264A** Model Refrigerator Water Filter Compartment Light (upper) Spill-proof glass Shelf Light Switch Foldable Shelf (RS265B/RS267B/RS267L/RS269L) Deodorizer(on some models) Egg Container(on some ...
SHELVES AND BINS Freezer RS263B**/RS265L**/ RS264A** Model Refrigerator Water Filter Compartment Light (upper) Spill-proof glass Shelf Light Switch Foldable Shelf (RS265B/RS267B/RS267L/RS269L) Deodorizer(on some models) Egg Container(on some ...
Quick Guide (easy Manual) (ver.1.0) (English)
Page 10
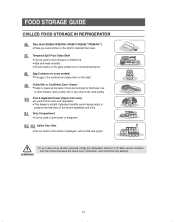
...Is used to store foods in the container and place them on the shelf. WARNING • If you have a long vacation planned, empty the refrigerator and turn it off. Use to store cheese, meat, poultry, fish or any other foods used to store butter or margarine. Wipe excess moisture ...from the inside and leave the doors open. Otherwise, odor and mold may develop. 10 FOOD STORAGE GUIDE CHILLED FOOD STORAGE IN REFRIGERATOR Wine Shelf (RS265 / RS267B**/ RS267/ RS269L**/RS264A**) • Place your wine bottles on the shelf to store all types of chilled food. &#...
...Is used to store foods in the container and place them on the shelf. WARNING • If you have a long vacation planned, empty the refrigerator and turn it off. Use to store cheese, meat, poultry, fish or any other foods used to store butter or margarine. Wipe excess moisture ...from the inside and leave the doors open. Otherwise, odor and mold may develop. 10 FOOD STORAGE GUIDE CHILLED FOOD STORAGE IN REFRIGERATOR Wine Shelf (RS265 / RS267B**/ RS267/ RS269L**/RS264A**) • Place your wine bottles on the shelf to store all types of chilled food. &#...
Quick Guide (easy Manual) (ver.1.0) (English)
Page 12
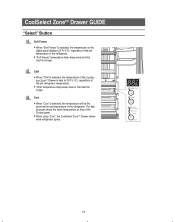
...the Control panel. • When using "Cool", the CoolSelect ZoneTM Drawer allows extra refrigerator space. 12 Cool • When "Cool" is selected, the temperature will be the same as that of the refrigerator. lect ZoneTM Drawer is kept at 30°F(-1oC), regardless of the CoolSe- Chill... • When "Chill" is selected, the temperature of the set refrigerator temperature. • "Chill" temperature helps keep meat and fish fresh for longer. CoolSelect ZoneTM Drawer GUIDE "Select" Button Soft Freeze •...
...the Control panel. • When using "Cool", the CoolSelect ZoneTM Drawer allows extra refrigerator space. 12 Cool • When "Cool" is selected, the temperature will be the same as that of the refrigerator. lect ZoneTM Drawer is kept at 30°F(-1oC), regardless of the CoolSe- Chill... • When "Chill" is selected, the temperature of the set refrigerator temperature. • "Chill" temperature helps keep meat and fish fresh for longer. CoolSelect ZoneTM Drawer GUIDE "Select" Button Soft Freeze •...
Quick Guide (easy Manual) (ver.1.0) (English)
Page 13
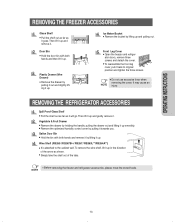
... it up in the direction of the arrow as shown. • Simply take the shelf out of the tabs. • Before removing the freezer and refrigerator accessories, please move the stored foods. Plastic Drawer (Wire Drawer) • Remove the drawer by pulling it towards you. It may cause an NOTE injury... the shelf out as far as it will go. Ice Maker Bucket • Remove the bucket by lifting it up and pulling out. REMOVING THE REFRIGERATOR ACCESSORIES Spill Proof Glass Shelf • Pull the shelf out as far as it up . Then lift it goes. Wine Shelf (RS265 / RS267B**/ RS267/ ...
... it up in the direction of the arrow as shown. • Simply take the shelf out of the tabs. • Before removing the freezer and refrigerator accessories, please move the stored foods. Plastic Drawer (Wire Drawer) • Remove the drawer by pulling it towards you. It may cause an NOTE injury... the shelf out as far as it will go. Ice Maker Bucket • Remove the bucket by lifting it up and pulling out. REMOVING THE REFRIGERATOR ACCESSORIES Spill Proof Glass Shelf • Pull the shelf out as far as it up . Then lift it goes. Wine Shelf (RS265 / RS267B**/ RS267/ ...
Quick Guide (easy Manual) (ver.1.0) (English)
Page 14
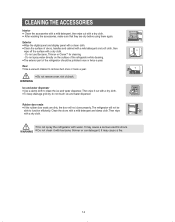
...off the surface with a dry cloth. • After washing the accessories, make sure that they are dirty, the door will not close properly, The refrigerator will not be polished once or twice a year. Then wipe it with a mild detergent and damp cloth. Clean the doors with benzene, thinner or car...water. Do not use Benzene, Thinner or CloroxTM for cleaning - Do not spray water directly on the surface of the refrigerator while cleaning. • The exterior part of the refrigerator should be able to clean the ice and water dispenser. Rubber door seals • If the rubber door seals are ...
...off the surface with a dry cloth. • After washing the accessories, make sure that they are dirty, the door will not close properly, The refrigerator will not be polished once or twice a year. Then wipe it with a mild detergent and damp cloth. Clean the doors with benzene, thinner or car...water. Do not use Benzene, Thinner or CloroxTM for cleaning - Do not spray water directly on the surface of the refrigerator while cleaning. • The exterior part of the refrigerator should be able to clean the ice and water dispenser. Rubber door seals • If the rubber door seals are ...

Quick Guide (easy Manual) (ver.1.0) (English)
Page 15
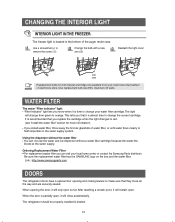
.... • Take out the cartridge from the cover and soak it in clean and warm water for at least 4 hrs. WARNING INTERIOR LIGHT IN THE REFRIGERATOR . Pull the cover in the direction of the arrow. E17 30W Replacement bulbs for both freezer and fridge are available from your local home improvement... the light cover hooks and push in a confined area, there may be some odor. CHANGING THE INTERIOR LIGHT Before changing the interior light, unplug the refrigerator from contaminated water.
.... • Take out the cartridge from the cover and soak it in clean and warm water for at least 4 hrs. WARNING INTERIOR LIGHT IN THE REFRIGERATOR . Pull the cover in the direction of the arrow. E17 30W Replacement bulbs for both freezer and fridge are available from your local home improvement... the light cover hooks and push in a confined area, there may be some odor. CHANGING THE INTERIOR LIGHT Before changing the interior light, unplug the refrigerator from contaminated water.
Quick Guide (easy Manual) (ver.1.0) (English)
Page 16
...time to flush impurities in the bottom of water filter, or until water flows clearly to change your local home center or contact the Samsung Parts distributor. Change the bulb with a new one (➁) Reattach the light cover E26 40W NOTE Replacement bulbs for more information)...both freezer and fridge are securely sealed. When the door is partially open, it is recommended that it will change the current cartridge. The refrigerator should be properly installed & leveled. 16 This tells you know when it will only open . WATER FILTER The water "Filter Indicator" light...
...time to flush impurities in the bottom of water filter, or until water flows clearly to change your local home center or contact the Samsung Parts distributor. Change the bulb with a new one (➁) Reattach the light cover E26 40W NOTE Replacement bulbs for more information)...both freezer and fridge are securely sealed. When the door is partially open, it is recommended that it will change the current cartridge. The refrigerator should be properly installed & leveled. 16 This tells you know when it will only open . WATER FILTER The water "Filter Indicator" light...
Quick Guide (easy Manual) (ver.1.0) (English)
Page 17
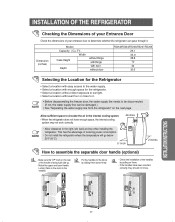
.../RS265/RS267/RS269 26.1 35.9 68.8 70 34 30.5 Selecting the Location for the Refrigerator • Select a location with easy access to the water supply. • Select a location with enough space for the refrigerator. • Select a location without direct exposure to sunlight. • Select a location ...with level floor or close to the right, left, back and top when installing the refrigerator. Do not install the refrigerator where the temperature will go below 50°F(10°C). 0.1inch 2 inches How to be disconnected. (If not, the water...
.../RS265/RS267/RS269 26.1 35.9 68.8 70 34 30.5 Selecting the Location for the Refrigerator • Select a location with easy access to the water supply. • Select a location with enough space for the refrigerator. • Select a location without direct exposure to sunlight. • Select a location ...with level floor or close to the right, left, back and top when installing the refrigerator. Do not install the refrigerator where the temperature will go below 50°F(10°C). 0.1inch 2 inches How to be disconnected. (If not, the water...
Quick Guide (easy Manual) (ver.1.0) (English)
Page 18
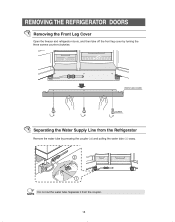
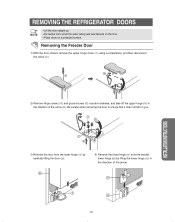
Separate it from the Refrigerator Remove the water tube by turning the three screws counter-clockwise. Do not cut the water tube. REMOVING THE REFRIGERATOR DOORS Removing the Front Leg Cover Open the freezer and refrigerator doors, and then take off the front leg cover by pressing the coupler (➁) and pulling the water tube (➀) away. FRONT LEG COVER SCREW Separating the Water Supply Line from the coupler. NOTE 18
Separate it from the Refrigerator Remove the water tube by turning the three screws counter-clockwise. Do not cut the water tube. REMOVING THE REFRIGERATOR DOORS Removing the Front Leg Cover Open the freezer and refrigerator doors, and then take off the front leg cover by pressing the coupler (➁) and pulling the water tube (➀) away. FRONT LEG COVER SCREW Separating the Water Supply Line from the coupler. NOTE 18
Quick Guide (easy Manual) (ver.1.0) (English)
Page 19
...;). 4) Remove the lower hinge (➈) from the bracket lower hinge (➉) by lifting the lower hinge (➈) in the direction of the arrow. REMOVING THE REFRIGERATOR DOORS NOTE • Lift the door straight up. • Be careful not to ensure that it does not fall on a protected surface. Removing the Freezer...
...;). 4) Remove the lower hinge (➈) from the bracket lower hinge (➉) by lifting the lower hinge (➈) in the direction of the arrow. REMOVING THE REFRIGERATOR DOORS NOTE • Lift the door straight up. • Be careful not to ensure that it does not fall on a protected surface. Removing the Freezer...
Quick Guide (easy Manual) (ver.1.0) (English)
Page 20
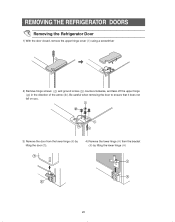
Be careful when removing the door to ensure that it does not fall on you. 3) Remove the door from the lower hinge (➅) by lifting the door (➆). 4) Remove the lower hinge (➇) from the bracket (➈) by lifting the lower hinge (➇) 20 REMOVING THE REFRIGERATOR DOORS Removing the Refrigerator Door 1) With the door closed, remove the upper hinge cover (➀) using a screwdriver 2) Remove hinge screws ( ) and ground screw ( ) counter-clockwise, and take off the upper hinge ( ) in the direction of the arrow ( ).
Be careful when removing the door to ensure that it does not fall on you. 3) Remove the door from the lower hinge (➅) by lifting the door (➆). 4) Remove the lower hinge (➇) from the bracket (➈) by lifting the lower hinge (➇) 20 REMOVING THE REFRIGERATOR DOORS Removing the Refrigerator Door 1) With the door closed, remove the upper hinge cover (➀) using a screwdriver 2) Remove hinge screws ( ) and ground screw ( ) counter-clockwise, and take off the upper hinge ( ) in the direction of the arrow ( ).
Quick Guide (easy Manual) (ver.1.0) (English)
Page 21
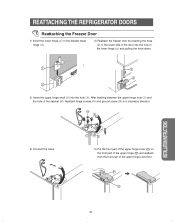
INSTALLATION INSTRUCTIONS 21 REATTACHING THE REFRIGERATOR DOORS Reattaching the Freezer Door 1) Insert the lower hinge (➀) in the bracket lower hinge (➁). 2) Reattach the freezer door by inserting the hose (➂) ...
INSTALLATION INSTRUCTIONS 21 REATTACHING THE REFRIGERATOR DOORS Reattaching the Freezer Door 1) Insert the lower hinge (➀) in the bracket lower hinge (➁). 2) Reattach the freezer door by inserting the hose (➂) ...
Quick Guide (easy Manual) (ver.1.0) (English)
Page 22
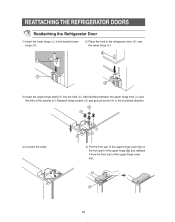
After levelling between the upper hinge hole (➆) and the hole of the upper hinge cover first. 22 REATTACHING THE REFRIGERATOR DOORS Reattaching the Refrigerator Door 1) Insert the lower hinge (➀) in the bracket lower hinge (➁). 2) Place the hole in the clockwise direction. 4) Connect the wires. ...12 ) and reattach it from the front part of the cabinet (➇). Reattach hinge screws (➈) and ground screw (➉) in the refrigerator door (➂) over the lower hinge (➃). 3) Insert the upper hinge shaft (➄) into the hole (➅).
After levelling between the upper hinge hole (➆) and the hole of the upper hinge cover first. 22 REATTACHING THE REFRIGERATOR DOORS Reattaching the Refrigerator Door 1) Insert the lower hinge (➀) in the bracket lower hinge (➁). 2) Place the hole in the clockwise direction. 4) Connect the wires. ...12 ) and reattach it from the front part of the cabinet (➇). Reattach hinge screws (➈) and ground screw (➉) in the refrigerator door (➂) over the lower hinge (➃). 3) Insert the upper hinge shaft (➄) into the hole (➅).

