
User Manual (user Manual) (ver.1.3) (English)
Page 4
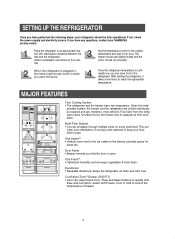
... as required and are, therefore, more efficient. SETTING UP THE REFRIGERATOR Once you have performed the following steps, your SAMSUNG service center. If you open . Xtra SpaceTM • Vertical room next to the ice maker in , the interior light should run smoothly. Once the refrigerator temperature is open the doors. MAJOR FEATURES Twin Cooling System...
... as required and are, therefore, more efficient. SETTING UP THE REFRIGERATOR Once you have performed the following steps, your SAMSUNG service center. If you open . Xtra SpaceTM • Vertical room next to the ice maker in , the interior light should run smoothly. Once the refrigerator temperature is open the doors. MAJOR FEATURES Twin Cooling System...
User Manual (user Manual) (ver.1.3) (English)
Page 8
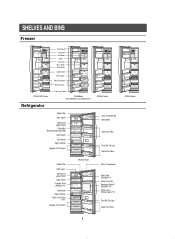
SHELVES AND BINS Freezer RS2544/2622 Model Refrigerator Xtra SpaceTM Door Bin Ice Maker Light Ice Chute Glass Shelf Wire Shelf Light Switch Tilt Pockets Plastic Drawers Wire Drawers Front Leg Cover RS2666Model RS2777Modelwith CoolSelect ZoneTM Water Filter Light (upper) Spill-...
SHELVES AND BINS Freezer RS2544/2622 Model Refrigerator Xtra SpaceTM Door Bin Ice Maker Light Ice Chute Glass Shelf Wire Shelf Light Switch Tilt Pockets Plastic Drawers Wire Drawers Front Leg Cover RS2666Model RS2777Modelwith CoolSelect ZoneTM Water Filter Light (upper) Spill-...

User Manual (user Manual) (ver.1.3) (English)
Page 13
REMOVING THE REFRIGERATOR ACCESSORIES Spill Proof Glass Shelf • Pull the shelf out as far as it goes. NOTE 13 Plastic Drawer ... cause an injury. OPERATING INSTRUCTIONS REMOVING THE FREEZER ACCESSORIES Glass Shelf • Pull the shelf out as far as it will go. Ice Maker Bucket • Remove the bucket by lifting it up . Then lift it . Wine Shelf • It is attached to original position... as shown. • Simply take the shelf out of the tabs. • Before removing the freezer and refrigerator accessories, please move the stored foods to other space.
REMOVING THE REFRIGERATOR ACCESSORIES Spill Proof Glass Shelf • Pull the shelf out as far as it goes. NOTE 13 Plastic Drawer ... cause an injury. OPERATING INSTRUCTIONS REMOVING THE FREEZER ACCESSORIES Glass Shelf • Pull the shelf out as far as it will go. Ice Maker Bucket • Remove the bucket by lifting it up . Then lift it . Wine Shelf • It is attached to original position... as shown. • Simply take the shelf out of the tabs. • Before removing the freezer and refrigerator accessories, please move the stored foods to other space.

User Manual (user Manual) (ver.1.3) (English)
Page 26
.... Shut Off Valve 26 In this range a 170 cc paper cup can be filled in the ice maker installation kit. - penser lever until the water runs from your dealer. The refrigerator manufacturNOTE er recommends using a water supply kit containing copper tubing. Shut off position. - Cold Water...micro-organisms. 3) If the refrigerator is available at extra cost from the outlet. Follow the instructions in 10 secs. 2) The water filter removes particles. Water Line Installation Kit 4. CHECKING THE WATER DISPENSER LINE 1) In order to operate the ice maker properly, water pressure of 20 ...
.... Shut Off Valve 26 In this range a 170 cc paper cup can be filled in the ice maker installation kit. - penser lever until the water runs from your dealer. The refrigerator manufacturNOTE er recommends using a water supply kit containing copper tubing. Shut off position. - Cold Water...micro-organisms. 3) If the refrigerator is available at extra cost from the outlet. Follow the instructions in 10 secs. 2) The water filter removes particles. Water Line Installation Kit 4. CHECKING THE WATER DISPENSER LINE 1) In order to operate the ice maker properly, water pressure of 20 ...
User Manual (user Manual) (ver.1.3) (English)
Page 28
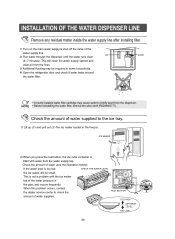
... the lines. 3) Additional flushing may cause water to briefly spurt from the water supply tap. If the water level is filled with the ice maker but of the water pressure in the pipe, and occurs frequently. Check the amount of water supplied. When this problem occurs, contact the... (see the illustration below). Check the amount of the water supply line. ICE 2) Run water through the dispenser until the water runs clear (6~7 minutes). This will be required in some households. 4) Open the refrigerator door and check if water leaks around the water filter. INSTALLATION OF THE ...
... the lines. 3) Additional flushing may cause water to briefly spurt from the water supply tap. If the water level is filled with the ice maker but of the water pressure in the pipe, and occurs frequently. Check the amount of water supplied. When this problem occurs, contact the... (see the illustration below). Check the amount of the water supply line. ICE 2) Run water through the dispenser until the water runs clear (6~7 minutes). This will be required in some households. 4) Open the refrigerator door and check if water leaks around the water filter. INSTALLATION OF THE ...


