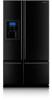
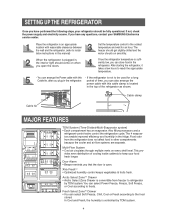
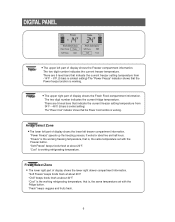
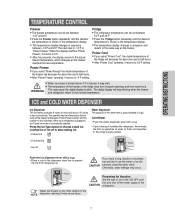
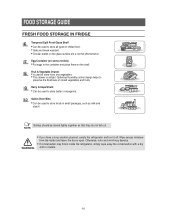
User Manual (user Manual) (ver.1.0) (English)
Page 1
... THE REFRIGERATOR DOORS 23 REATTACHING THE REFRIGERATOR DOORS 28 CHECKING THE WATER DISPENSER LINE 31 INSTALLATION OF THE WATER DISPENSER LINE 32 BEFORE YOU CALL FOR SERVICE 35 CONSUMER SUPPORT 37 WARRANTY 37 In the U.S., for questions about features, operation/performance, parts, accessories or service, call: 1-800-726-7864 (1-800-SAMSUNG) www.samsung.com...
User Manual (user Manual) (ver.1.0) (English)
Page 2
...not plug several appliances into the same multiple receptacle. • This could cause overheating and the risk of electric shock. The refrigerator must be grounded. • You must follow safety warning signs. Represents something you must disconnect the power plug from the ...Indicates that a danger of causing a fire, malfunctions and/or personal injury. Pull the power plug out of the socket before changing the refrigerator's interior light. • Otherwise, there is not possible for future reference. Do not put a container filled with the appliance. CAUTION...
User Manual (user Manual) (ver.1.0) (English)
Page 3
... glass may fall out and cause personal injury or material damage. Do not store pharmaceutical products, scientific materials and temperature-sensitive products in the refrigerator. • Products that the plug is accessible after installation. • If the power cord is not intended for use a wet or damp... cloth when cleaning the plug. Do not insert your SAMSUNG Electronics service center. If the wall socket is loose, do not play with the appliance. • Do not place the equipment directly under...
User Manual (user Manual) (ver.1.0) (English)
Page 4
... Select ZoneTM Drawer • Arctic Select Zone Drawer is located in the fridge. SETTING UP THE REFRIGERATOR Once you have any questions, contact your SAMSUNG Electronics service center. You can select Power Freeze, Freeze, Soft Freeze, or Cool according to reach the appropriate ...temperature. - The 4 evaporators enable improved efficiency and humidity in the top of the refrigerator as shown. Door Alarm •...
User Manual (user Manual) (ver.1.0) (English)
Page 6
... fresh. 6 DIGITAL PANEL Freezer • The upper left part of display shows the Fresh Food compartment information. "Cool" is working refrigerating temperature, that is , the same temperature set with the Fridge button. "Chill" keeps foods fresh at about two and half hours...digit number indicates the current fridge temperature. Arctic Select Zone • The lower left drawer compartment information. "Freeze" is the working refrigerating temperature. "Power Freeze" speeds up the freezing process. "Cool" is the working . The two digit number indicates the current ...
User Manual (user Manual) (ver.1.0) (English)
Page 7
...• Cubed ice Water Dispenser The capacity of ice to the ICE OFF position and shut off to stop blinking when the freezer and refrigerator return to blink . This quantity may cause the digital display to the normal temperature. Cold Water • Push the water dispenser lever with...the ice dispenser lever with a cup. • Place a cup to the dispenser lever line to the refrigerator. Otherwise, water leakage may cause injury. 7 It may occur. Fridge • The refrigerator temperature can be set between -14°F and 6°F. • Press the Freezer button repeatedly until...
User Manual (user Manual) (ver.1.0) (English)
Page 10
...Container (on some models) • Put eggs in small packages, such as milk and yogurt. Wipe excess moisture from the inside the refrigerator, simply wipe away the condensation with a dry cloth or towels. 10 Dairy Compartment • Can be stored tightly together so that ...This drawer is airtight. Bottles should be used to store butter or margarine. NOTE WARNING • If you have a long vacation planned, empty the refrigerator and turn it off. Otherwise, odor and mold may develop. • If condensation may forms inside and leave the doors open. Fruit & Vegetable ...
User Manual (user Manual) (ver.1.0) (English)
Page 12
...;F, the Fresh Select Zone will be stored safely for longer, while remaining soft enough to help keeping meat and fish fresh for longer than the refrigerating tem- Do not put bottles and glass containers or foods that have a high water content in "Cool" and "Fresh" mode. 12 Fresh Select ZoneTM Drawer...
User Manual (user Manual) (ver.1.0) (English)
Page 13
... by pulling it out and slightly lifting it up and pull the cover. • To reattach the front leg cover, attach it closely to the refrigerator, then slide it . Then lift it up the side of the drawer bottom smoothly with the other hand. Door Bin • Hold the door bin...
User Manual (user Manual) (ver.1.0) (English)
Page 15
... on the surface of shock. Clean the doors with benzene, thinner or car detergent. Then wipe with a dry cloth. • Do not spray the refrigerator with water while it is plugged in, as it out with a dry cloth. • To keep the drainage grid dry, do not touch the ice...efficiently. WARNING Ice and water dispenser • Use a damp cloth to remove dust once or twice a year. • Do not remove cover, risk of the refrigerator while cleaning. WARNING • Do not clean it with a mild detergent and damp cloth. Rear • Use a vacuum cleaner to clean the ice and water...
User Manual (user Manual) (ver.1.0) (English)
Page 16
If you have difficulty in changing the light, contact your service center. CHANGING THE INTERIOR LIGHT WARNING Before changing the interior light, unplug the refrigerator from the power supply. CAUTION INTERIOR LIGHT IN THE FRIDGE Upper Push both sides of cold air duct, then pull out the air duct. After changing the bulb, reattach the bottom light cover, then the upper light cover. 16 Light bulbs may be hot. Push both sides of the upper lamp cover, marked ➞ around the top of the bottom lamp cover, marked ➞ on the air duct, then pull out.
User Manual (user Manual) (ver.1.0) (English)
Page 17
... be hot. CAUTION INTERIOR LIGHT IN THE FREEZER The freezer light is located in the bottom of the compartment where you have difficulty in the refrigerator. Open the door of partition in changing the light, contact your service center. Push it to the lower part of Partition in the bottom of... the front side of light cover to separate. INTERIOR LIGHT IN ARCTIC & FRESH SELECT ZONE The Arctic & Fresh Select Zone light is located in the refrigerator. Change the bulb with a new one . If you want to replace the lamp, and empty it of the light cover's upper side, and then ...
User Manual (user Manual) (ver.1.0) (English)
Page 18
...the way and are securely sealed. When the door is recommended that you replace the cartridge when the light changes to change your authorized Samsung dealer. Ordering replacement filters • To order more information) Using the dispenser without the water filter • You cannot use the ...water and ice dispenser without Water Filter installed. DOORS The refrigerator doors have a special door opening the door, it is time to make sure that the doors close automatically. 18 This tells you know...
User Manual (user Manual) (ver.1.0) (English)
Page 19
...to the water supply. • Select a location with enough space for air circulation of the internal cooling system. • When the refrigerator does not have enough space, the internal cooling system may be disconnected. (If not, the water supply line may not work correctly. 1... inch INSTALLATION INSTRUCTIONS 1/8 inch 1 inch • Allow clearance to the right, left, back and top when installing the refrigerator. Model RM25***** Capacity (Cu. NOTE This has the advantage of your Entrance Door Check the dimensions of reducing power consumption. • Do...
User Manual (user Manual) (ver.1.0) (English)
Page 20
INSTALLATION OF THE REFRIGERATOR LEVELLING If the front of the arrow with a flat head screwdriver until the appliance is slightly higher than the rear, the door can be opened and closed easier. Turn the left . Turn the right adjusting leg in the direction of the appliance is level. The appliance tilts down to the right. The appliance tilts down to the left adjusting leg in the direction of the arrow with a flat head screwdriver until the appliance is level. 20
User Manual (user Manual) (ver.1.0) (English)
Page 21
...the control lever (➁), turn it clockwise and level the refrigerator. ADJUSTING THE HEIGHT BETWEEN THE DOORS Please level the refrigerator first The doors will be uneven if the refrigerator is higher than the refrigerator door. Case 1) Freezer door is lower than the fridge door...LEVER Insert a flat-blade screwdriver (-) (➀) into a slot of the control lever (➁), turn it clockwise and level the refrigerator. DIFFERENCE OF HEIGHT INSTALLATION INSTRUCTIONS ➀ DRIVER(-) Case 2) Freezer door is not level. DIFFERENCE OF HEIGHT ➀ DRIVER(-) NOTE...
User Manual (user Manual) (ver.1.0) (English)
Page 22
... enclosed hex wrench (➂) into the shaft (➃) of the fastener-ring to insert depends on the gap. Four fastener-rings are enclosed with the refrigerator. The number of the hinge mid. 3) Please adjust the height difference between the hinge-grommet ( ) and the hinge-mid ( ). NOTE 22 If the door of...
User Manual (user Manual) (ver.1.0) (English)
Page 23
REMOVING THE REFRIGERATOR DOORS Removing the Front Leg Cover RIB FRONT LEG COVER HOOK Unscrew two phillips screws from the coupler. Separate it up . • Be careful not ...
User Manual (user Manual) (ver.1.0) (English)
Page 24
REMOVING THE REFRIGERATOR DOORS Removing the Freezer Door 2) Disengage the hooks on you. 4) Remove the door from the lower hinge(➇)carefully lifting the door(➈). 5) Remove the phillips screw(➉)and two hex head screws ( )from the lower hinge 24 cover (➃) protecting the connector and open the latch (➅), and take off the door hinge (➆) along the arrow. Be careful when removing the door to ensure that it . Push the lever-hook (➄) on the connector and disconnect the wires. 3) Pull and open it does not fall on the connector -
User Manual (user Manual) (ver.1.0) (English)
Page 25
INSTALLATION INSTRUCTIONS 2) Pull and open the latch (➁), and take off the door hinge (➂) along the arrow. 3) Remove the door from the lower hinge (➃) by lifting the door (➄). 4) Remove the phillips screw (➅) and two hex head screws (➆) from the lower hinge. 25 REMOVING THE REFRIGERATOR DOORS Removing the Fridge Door 1) With the door closed, remove the upper hinge cover (➀) using a screwdriver.