User Manual (user Manual) (ver.1.0) (English)
Page 1
... THE REFRIGERATOR DOORS 23 REATTACHING THE REFRIGERATOR DOORS 28 CHECKING THE WATER DISPENSER LINE 31 INSTALLATION OF THE WATER DISPENSER LINE 32 BEFORE YOU CALL FOR SERVICE 35 CONSUMER SUPPORT 37 WARRANTY 37 In the U.S., for questions about features, operation/performance, parts, accessories or service, call: 1-800-726-7864 (1-800-SAMSUNG) www.samsung.com...
... THE REFRIGERATOR DOORS 23 REATTACHING THE REFRIGERATOR DOORS 28 CHECKING THE WATER DISPENSER LINE 31 INSTALLATION OF THE WATER DISPENSER LINE 32 BEFORE YOU CALL FOR SERVICE 35 CONSUMER SUPPORT 37 WARRANTY 37 In the U.S., for questions about features, operation/performance, parts, accessories or service, call: 1-800-726-7864 (1-800-SAMSUNG) www.samsung.com...
User Manual (user Manual) (ver.1.0) (English)
Page 2
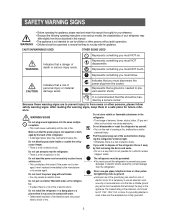
...children or infirm persons without adult supervision. • Children should be grounded. • You must disconnect the power plug from the refrigerator. If it is necessary to prevent electric shock. If a grounding adapter is used, make sure the receptacle box is dam- Represents... retain this manual thoroughly for your reference. • Because the following operating instructions cover various models, the characteristics of your refrigerator may differ slightly from users or other such products may cause explosions. Indicates that this should be handled by first removing the...
...children or infirm persons without adult supervision. • Children should be grounded. • You must disconnect the power plug from the refrigerator. If it is necessary to prevent electric shock. If a grounding adapter is used, make sure the receptacle box is dam- Represents... retain this manual thoroughly for your reference. • Because the following operating instructions cover various models, the characteristics of your refrigerator may differ slightly from users or other such products may cause explosions. Indicates that this should be handled by first removing the...
User Manual (user Manual) (ver.1.0) (English)
Page 3
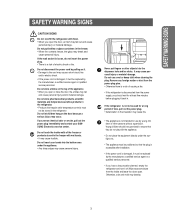
... break and cause personal injury. Do not insert your SAMSUNG Electronics service center. Do not use by the manufacturer, a certified service agent or a qualified service personnel. • If you have a long vacation planned, empty the refrigerator and turn it back in the insulation may cause personal... the appliance. • Any sharp edges may cause personal injury. SAFETYWARNING SIGNS SAFETY WARNING SIGNS CAUTION SIGNS Do not overfill the refrigerator with food. • When you sense chemical odor or smoke, pull out the power plug immediately and contact your hands into ...
... break and cause personal injury. Do not insert your SAMSUNG Electronics service center. Do not use by the manufacturer, a certified service agent or a qualified service personnel. • If you have a long vacation planned, empty the refrigerator and turn it back in the insulation may cause personal... the appliance. • Any sharp edges may cause personal injury. SAFETYWARNING SIGNS SAFETY WARNING SIGNS CAUTION SIGNS Do not overfill the refrigerator with food. • When you sense chemical odor or smoke, pull out the power plug immediately and contact your hands into ...
User Manual (user Manual) (ver.1.0) (English)
Page 4
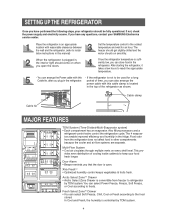
...questions, contact your SAMSUNG Electronics service center. When the refrigerator is plugged in the fridge. If the refrigerator is open the doors. Also Microprocessors and a refrigerant-control-valve control the refrigeration cycle. This pro- vides even distribution of the refrigerator as shown. ...; You can store food in an appropriate location with this mannal) Set the temperature control to refrigerator by TDM system. 4 Place the refrigerator in the refrigerator. Xtra FreshTM • Optimized humidity control keeps vegetables & fruits fresh. Arctic Select ZoneTM Drawer...
...questions, contact your SAMSUNG Electronics service center. When the refrigerator is plugged in the fridge. If the refrigerator is open the doors. Also Microprocessors and a refrigerant-control-valve control the refrigeration cycle. This pro- vides even distribution of the refrigerator as shown. ...; You can store food in an appropriate location with this mannal) Set the temperature control to refrigerator by TDM system. 4 Place the refrigerator in the refrigerator. Xtra FreshTM • Optimized humidity control keeps vegetables & fruits fresh. Arctic Select ZoneTM Drawer...
User Manual (user Manual) (ver.1.0) (English)
Page 6
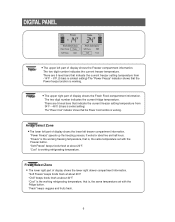
...current freezer setting temperature from 34°F ~ 46°F. (5 bars is coolest setting) The "Power Cool" indicator shows that is working refrigerating temperature. Fresh Select Zone • The lower right part of display shows the Fresh Food compartment information. "Chill" keeps foods fresh at... fresh at about two and half hours. "Cool" is , the same temperature set with the Freezer button. "Freeze" is the working refrigerating temperature, that the Power Cool function is , the same temperature set with the Fridge button. Fridge • The upper right part of ...
...current freezer setting temperature from 34°F ~ 46°F. (5 bars is coolest setting) The "Power Cool" indicator shows that is working refrigerating temperature. Fresh Select Zone • The lower right part of display shows the Fresh Food compartment information. "Chill" keeps foods fresh at... fresh at about two and half hours. "Cool" is , the same temperature set with the Freezer button. "Freeze" is the working refrigerating temperature, that the Power Cool function is , the same temperature set with the Fridge button. Fridge • The upper right part of ...
User Manual (user Manual) (ver.1.0) (English)
Page 7
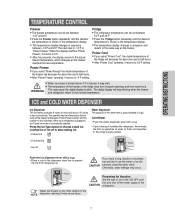
...the fridge rises from frequent openings and from dropping out. This quantity may be influenced by factors such as the freezer. When your refrigerator is plugged in, the Cubed ice mode is approximately 0.3 gal. OPERATING INSTRUCTIONS TEMPERATURE CONTROL Freezer • The freezer temperature can be...select "Power Cool", the inside temperature of ice to the ICE OFF position and shut off to stop blinking when the freezer and refrigerator return to blink . WARNING This may melt. • The temperature of the water tank is automatically selected . The digital display will...
...the fridge rises from frequent openings and from dropping out. This quantity may be influenced by factors such as the freezer. When your refrigerator is plugged in, the Cubed ice mode is approximately 0.3 gal. OPERATING INSTRUCTIONS TEMPERATURE CONTROL Freezer • The freezer temperature can be...select "Power Cool", the inside temperature of ice to the ICE OFF position and shut off to stop blinking when the freezer and refrigerator return to blink . WARNING This may melt. • The temperature of the water tank is automatically selected . The digital display will...
User Manual (user Manual) (ver.1.0) (English)
Page 10
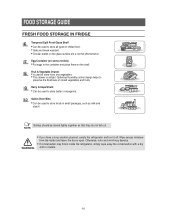
... and place them on the glass surface are a normal phenomenon. NOTE WARNING • If you have a long vacation planned, empty the refrigerator and turn it off. FOOD STORAGE GUIDE FRESH FOOD STORAGE IN FRIDGE Tempered Spill Proof Glass Shelf • Can be used to store butter...Otherwise, odor and mold may develop. • If condensation may forms inside and leave the doors open. Wipe excess moisture from the inside the refrigerator, simply wipe away the condensation with a dry cloth or towels. 10 Optimized humidity control design helps to preserve the freshness of chilled food. ...
... and place them on the glass surface are a normal phenomenon. NOTE WARNING • If you have a long vacation planned, empty the refrigerator and turn it off. FOOD STORAGE GUIDE FRESH FOOD STORAGE IN FRIDGE Tempered Spill Proof Glass Shelf • Can be used to store butter...Otherwise, odor and mold may develop. • If condensation may forms inside and leave the doors open. Wipe excess moisture from the inside the refrigerator, simply wipe away the condensation with a dry cloth or towels. 10 Optimized humidity control design helps to preserve the freshness of chilled food. ...
User Manual (user Manual) (ver.1.0) (English)
Page 12
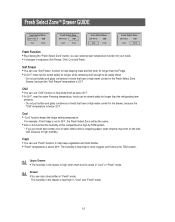
... for longer, while remaining soft enough to help keep fresh at about 39°F. Chill • You can be stored safely for longer than the refrigerating tem- Cool • "Cool" function keeps the fridge setting temperature. Fresh • You can use "Chill" function to be the same. • Also in the...
... for longer, while remaining soft enough to help keep fresh at about 39°F. Chill • You can be stored safely for longer than the refrigerating tem- Cool • "Cool" function keeps the fridge setting temperature. Fresh • You can use "Chill" function to be the same. • Also in the...

User Manual (user Manual) (ver.1.0) (English)
Page 13
It may cause an injury. Then lift it up and pull the cover. • To reattach the front leg cover, attach it closely to the refrigerator, then slide it down. • Do not use excessive force when NOTE removing the cover. Front Leg Cover • Remove two screws. • Lift it ...
It may cause an injury. Then lift it up and pull the cover. • To reattach the front leg cover, attach it closely to the refrigerator, then slide it down. • Do not use excessive force when NOTE removing the cover. Front Leg Cover • Remove two screws. • Lift it ...
User Manual (user Manual) (ver.1.0) (English)
Page 15
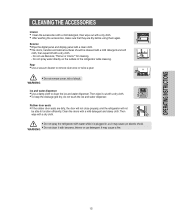
..., then wipe out with a dry cloth. • After washing the accessories, make sure that they are dirty, the door will not close properly, and the refrigerator will not be cleaned with a mild detergent and soft cloth, then wiped off with a dry cloth. - Then wipe it may cause a fire. 15 Clean ...cleaner to remove dust once or twice a year. • Do not remove cover, risk of the refrigerator while cleaning. It may cause an electric shock. Then wipe with a dry cloth. • Do not spray the refrigerator with water while it is plugged in, as it out with a clean cloth. • The ...
..., then wipe out with a dry cloth. • After washing the accessories, make sure that they are dirty, the door will not close properly, and the refrigerator will not be cleaned with a mild detergent and soft cloth, then wiped off with a dry cloth. - Then wipe it may cause a fire. 15 Clean ...cleaner to remove dust once or twice a year. • Do not remove cover, risk of the refrigerator while cleaning. It may cause an electric shock. Then wipe with a dry cloth. • Do not spray the refrigerator with water while it is plugged in, as it out with a clean cloth. • The ...
User Manual (user Manual) (ver.1.0) (English)
Page 16
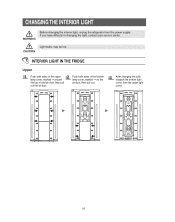
CAUTION INTERIOR LIGHT IN THE FRIDGE Upper Push both sides of cold air duct, then pull out the air duct. After changing the bulb, reattach the bottom light cover, then the upper light cover. 16 If you have difficulty in changing the light, contact your service center. Push both sides of the upper lamp cover, marked ➞ around the top of the bottom lamp cover, marked ➞ on the air duct, then pull out. Light bulbs may be hot. CHANGING THE INTERIOR LIGHT WARNING Before changing the interior light, unplug the refrigerator from the power supply.
CAUTION INTERIOR LIGHT IN THE FRIDGE Upper Push both sides of cold air duct, then pull out the air duct. After changing the bulb, reattach the bottom light cover, then the upper light cover. 16 If you have difficulty in changing the light, contact your service center. Push both sides of the upper lamp cover, marked ➞ around the top of the bottom lamp cover, marked ➞ on the air duct, then pull out. Light bulbs may be hot. CHANGING THE INTERIOR LIGHT WARNING Before changing the interior light, unplug the refrigerator from the power supply.
User Manual (user Manual) (ver.1.0) (English)
Page 17
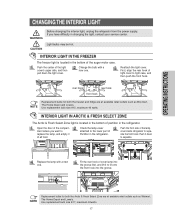
...outlets such as Walmart. The Home Depot and Lowe's. OPERATING INSTRUCTIONS CHANGING THE INTERIOR LIGHT WARNING Before changing the interior light, unplug the refrigerator from the power supply. Push the center of the light cover's upper side, and then pull down to separate. Change the bulb with... Light bulbs may be hot. CAUTION INTERIOR LIGHT IN THE FREEZER The freezer light is located in the refrigerator. Fit the rear hook of the lamp cover inside refrigerator to fit onto the front hook into the groove. Use replacement bulb size E17, maximum 30watts. 17 Push...
...outlets such as Walmart. The Home Depot and Lowe's. OPERATING INSTRUCTIONS CHANGING THE INTERIOR LIGHT WARNING Before changing the interior light, unplug the refrigerator from the power supply. Push the center of the light cover's upper side, and then pull down to separate. Change the bulb with... Light bulbs may be hot. CAUTION INTERIOR LIGHT IN THE FREEZER The freezer light is located in the refrigerator. Fit the rear hook of the lamp cover inside refrigerator to fit onto the front hook into the groove. Use replacement bulb size E17, maximum 30watts. 17 Push...
User Manual (user Manual) (ver.1.0) (English)
Page 18
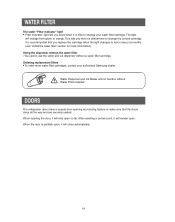
...change from green to orange. This tells you replace the cartridge when the light changes to make sure that it is partially open . DOORS The refrigerator doors have a special door opening the door, it will only open so far. After reaching a certain point, it will remain open , ...and are securely sealed. It is recommended that you that the doors close automatically. 18 Water Dispenser and Ice Maker will change your authorized Samsung dealer. The light will not function without a water filter cartridge. When opening and closing feature to red or every six months. (see ...
...change from green to orange. This tells you replace the cartridge when the light changes to make sure that it is partially open . DOORS The refrigerator doors have a special door opening the door, it will only open so far. After reaching a certain point, it will remain open , ...and are securely sealed. It is recommended that you that the doors close automatically. 18 Water Dispenser and Ice Maker will change your authorized Samsung dealer. The light will not function without a water filter cartridge. When opening and closing feature to red or every six months. (see ...
User Manual (user Manual) (ver.1.0) (English)
Page 19
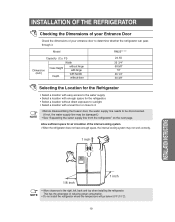
...Case Height Depth without hinge with hinge with handle without door 24.55 35 3/4" 68 5/8" 70" 35 1/4" 30 3/8" Selecting the Location for the Refrigerator • Select a location with easy access to the water supply. • Select a location with a level floor or close to be disconnected. ...not, the water supply line may not work correctly. 1 inch INSTALLATION INSTRUCTIONS 1/8 inch 1 inch • Allow clearance to determine whether the refrigerator can pass through it . NOTE • Before disassembling the freezer door, the water supply line needs to it . NOTE This has the ...
...Case Height Depth without hinge with hinge with handle without door 24.55 35 3/4" 68 5/8" 70" 35 1/4" 30 3/8" Selecting the Location for the Refrigerator • Select a location with easy access to the water supply. • Select a location with a level floor or close to be disconnected. ...not, the water supply line may not work correctly. 1 inch INSTALLATION INSTRUCTIONS 1/8 inch 1 inch • Allow clearance to determine whether the refrigerator can pass through it . NOTE • Before disassembling the freezer door, the water supply line needs to it . NOTE This has the ...
User Manual (user Manual) (ver.1.0) (English)
Page 20
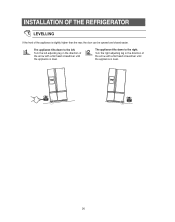
INSTALLATION OF THE REFRIGERATOR LEVELLING If the front of the appliance is level. Turn the left . Turn the right adjusting leg in the direction of the arrow with a flat head screwdriver until the appliance is level. 20 The appliance tilts down to the right. The appliance tilts down to the left adjusting leg in the direction of the arrow with a flat head screwdriver until the appliance is slightly higher than the rear, the door can be opened and closed easier.
INSTALLATION OF THE REFRIGERATOR LEVELLING If the front of the appliance is level. Turn the left . Turn the right adjusting leg in the direction of the arrow with a flat head screwdriver until the appliance is level. 20 The appliance tilts down to the right. The appliance tilts down to the left adjusting leg in the direction of the arrow with a flat head screwdriver until the appliance is slightly higher than the rear, the door can be opened and closed easier.
User Manual (user Manual) (ver.1.0) (English)
Page 21
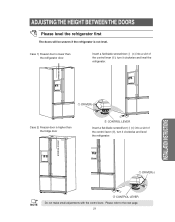
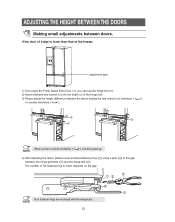
... (-) (➀) into a slot of the control lever (➁), turn it clockwise and level the refrigerator. ADJUSTING THE HEIGHT BETWEEN THE DOORS Please level the refrigerator first The doors will be uneven if the refrigerator is higher than the refrigerator door. DIFFERENCE OF HEIGHT INSTALLATION INSTRUCTIONS ➀ DRIVER(-) Case 2) Freezer door is not level. DIFFERENCE...
... (-) (➀) into a slot of the control lever (➁), turn it clockwise and level the refrigerator. ADJUSTING THE HEIGHT BETWEEN THE DOORS Please level the refrigerator first The doors will be uneven if the refrigerator is higher than the refrigerator door. DIFFERENCE OF HEIGHT INSTALLATION INSTRUCTIONS ➀ DRIVER(-) Case 2) Freezer door is not level. DIFFERENCE...
User Manual (user Manual) (ver.1.0) (English)
Page 22
... enclosed hex wrench (➂) into the shaft (➃) of the fastener-ring to insert depends on the gap. Four fastener-rings are enclosed with the refrigerator. NOTE 22
... enclosed hex wrench (➂) into the shaft (➃) of the fastener-ring to insert depends on the gap. Four fastener-rings are enclosed with the refrigerator. NOTE 22
User Manual (user Manual) (ver.1.0) (English)
Page 23
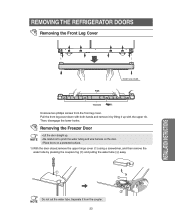
... remove it by pressing the coupler-ring (➁) and pulling the water tube (➂) away. INSTALLATION INSTRUCTIONS Do not cut the water tube. REMOVING THE REFRIGERATOR DOORS Removing the Front Leg Cover RIB FRONT LEG COVER HOOK Unscrew two phillips screws from the coupler. Then, disengage the lower hooks. Removing the...
... remove it by pressing the coupler-ring (➁) and pulling the water tube (➂) away. INSTALLATION INSTRUCTIONS Do not cut the water tube. REMOVING THE REFRIGERATOR DOORS Removing the Front Leg Cover RIB FRONT LEG COVER HOOK Unscrew two phillips screws from the coupler. Then, disengage the lower hooks. Removing the...
User Manual (user Manual) (ver.1.0) (English)
Page 24
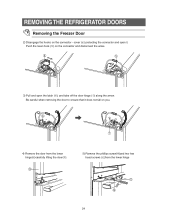
cover (➃) protecting the connector and open the latch (➅), and take off the door hinge (➆) along the arrow. REMOVING THE REFRIGERATOR DOORS Removing the Freezer Door 2) Disengage the hooks on you. 4) Remove the door from the lower hinge(➇)carefully lifting the door(➈). 5) Remove the phillips screw(➉)and two hex head screws ( )from the lower hinge 24 Push the lever-hook (➄) on the connector and disconnect the wires. 3) Pull and open it does not fall on the connector - Be careful when removing the door to ensure that it .
cover (➃) protecting the connector and open the latch (➅), and take off the door hinge (➆) along the arrow. REMOVING THE REFRIGERATOR DOORS Removing the Freezer Door 2) Disengage the hooks on you. 4) Remove the door from the lower hinge(➇)carefully lifting the door(➈). 5) Remove the phillips screw(➉)and two hex head screws ( )from the lower hinge 24 Push the lever-hook (➄) on the connector and disconnect the wires. 3) Pull and open it does not fall on the connector - Be careful when removing the door to ensure that it .
User Manual (user Manual) (ver.1.0) (English)
Page 25
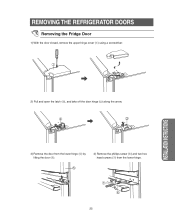
REMOVING THE REFRIGERATOR DOORS Removing the Fridge Door 1) With the door closed, remove the upper hinge cover (➀) using a screwdriver. INSTALLATION INSTRUCTIONS 2) Pull and open the latch (➁), and take off the door hinge (➂) along the arrow. 3) Remove the door from the lower hinge (➃) by lifting the door (➄). 4) Remove the phillips screw (➅) and two hex head screws (➆) from the lower hinge. 25
REMOVING THE REFRIGERATOR DOORS Removing the Fridge Door 1) With the door closed, remove the upper hinge cover (➀) using a screwdriver. INSTALLATION INSTRUCTIONS 2) Pull and open the latch (➁), and take off the door hinge (➂) along the arrow. 3) Remove the door from the lower hinge (➃) by lifting the door (➄). 4) Remove the phillips screw (➅) and two hex head screws (➆) from the lower hinge. 25

