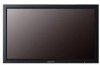

Owners Instructions
Page 10
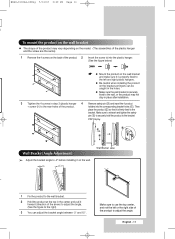
...Installation Notes ◆ Contact a technician for installing the wall bracket. ◆ ◆ Samsung Electronics is for any damages to the product or harm to drill holes deeper than 35 mm. When done, mount the wall bracket on plaster or wood. Use the correct one. Match each anchor in the..., check if the length between the two locking holes ➢ 3 Check the installation diagram and mark the drill points on the Wall Attachment Panel ➢ Refer to the correct installation guide according to your wall bracket. Fix each of the 4 screws on cement walls. Components ◆...
...Installation Notes ◆ Contact a technician for installing the wall bracket. ◆ ◆ Samsung Electronics is for any damages to the product or harm to drill holes deeper than 35 mm. When done, mount the wall bracket on plaster or wood. Use the correct one. Match each anchor in the..., check if the length between the two locking holes ➢ 3 Check the installation diagram and mark the drill points on the Wall Attachment Panel ➢ Refer to the correct installation guide according to your wall bracket. Fix each of the 4 screws on cement walls. Components ◆...
Owners Instructions
Page 11
BN68-01304A-00Eng 5/31/07 3:49 PM Page 11 t. English - 11 holders into the plastic hanger. (See the figure below) ☛ ◆ Mount the product on the bracket as fingers can adjust the bracket angle between -2° and 15°. Wall Bracket Wall 1 Fix the product to the ... on the wall. Make sure to reinsert and tighten the safety pin (#) to securely hold the product to the rear holes of the product. To mount the product on the wall bracket ◆ The shape of the product may not stay in place after installation. 3 Tighten the 4 screws in the holes...
BN68-01304A-00Eng 5/31/07 3:49 PM Page 11 t. English - 11 holders into the plastic hanger. (See the figure below) ☛ ◆ Mount the product on the bracket as fingers can adjust the bracket angle between -2° and 15°. Wall Bracket Wall 1 Fix the product to the ... on the wall. Make sure to reinsert and tighten the safety pin (#) to securely hold the product to the rear holes of the product. To mount the product on the wall bracket ◆ The shape of the product may not stay in place after installation. 3 Tighten the 4 screws in the holes...

