Instruction Manual
Page 1
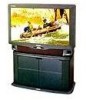
Projection TV INSTRUCTION MANUAL Projection Color Television PLH403W
Projection TV INSTRUCTION MANUAL Projection Color Television PLH403W
Instruction Manual
Page 2
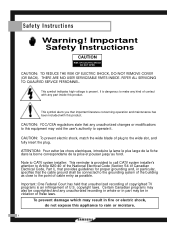
.... Note to CATV system installer: This reminder is dangerous to make any part inside this equipment may be connected to the grounding system of copyrighted TV programs is present. Important Safety Instructions CAUTION RISK OF ELECTRIC SHOCK DO NOT OPEN CAUTION: TO REDUCE THE RISK OF ELECTRIC SHOCK, DO NOT REMOVE...
.... Note to CATV system installer: This reminder is dangerous to make any part inside this equipment may be connected to the grounding system of copyrighted TV programs is present. Important Safety Instructions CAUTION RISK OF ELECTRIC SHOCK DO NOT OPEN CAUTION: TO REDUCE THE RISK OF ELECTRIC SHOCK, DO NOT REMOVE...

Instruction Manual
Page 3
...8 Rear Panel Jacks 9 Remote Control 10 Connections 14 Connecting VHF and UHF Antennas 14 Connecting Cable TV 16 Connecting a VCR 18 Connecting a Camcorder 20 Connecting Component Video 21 Operation 24 Turning the TV On and Off 24 Selecting the Menu Language 24 Viewing the Menus and Displays 25 Channel Memory 26... Wireless Headphones 47 Changing the Screen Size 48 Viewing Picture-in-Picture 49 Appendix 54 Troubleshooting 54 Care and Maintenance 55 Using Your TV in Another Country 55 Specifications 55 Rear Panel Air Vent 56 Demonstration Mode 57 1
...8 Rear Panel Jacks 9 Remote Control 10 Connections 14 Connecting VHF and UHF Antennas 14 Connecting Cable TV 16 Connecting a VCR 18 Connecting a Camcorder 20 Connecting Component Video 21 Operation 24 Turning the TV On and Off 24 Selecting the Menu Language 24 Viewing the Menus and Displays 25 Channel Memory 26... Wireless Headphones 47 Changing the Screen Size 48 Viewing Picture-in-Picture 49 Appendix 54 Troubleshooting 54 Care and Maintenance 55 Using Your TV in Another Country 55 Specifications 55 Rear Panel Air Vent 56 Demonstration Mode 57 1

Instruction Manual
Page 4
... the unit and cart unsteady and more likely to overturn. • The TV is adequate ventilation and that will provide convenient, dependable service and enjoyment for choosing Samsung! Your new Samsung projection TV represents the latest in the cabinet for future reference. • Heed all ...the type of fire, electrical shock, and other S A M similar surface. Use a damp cloth; I n t ro d u c t i o n Thank You for Choosing Samsung Thank you for years to the appliance. S 2 We are not sure of the type of the manufacturer. Quick stops, excessive force, and uneven surfaces can...
... the unit and cart unsteady and more likely to overturn. • The TV is adequate ventilation and that will provide convenient, dependable service and enjoyment for choosing Samsung! Your new Samsung projection TV represents the latest in the cabinet for future reference. • Heed all ...the type of fire, electrical shock, and other S A M similar surface. Use a damp cloth; I n t ro d u c t i o n Thank You for Choosing Samsung Thank you for years to the appliance. S 2 We are not sure of the type of the manufacturer. Quick stops, excessive force, and uneven surfaces can...
Instruction Manual
Page 5
...8226; Use only a grounded or polarized outlet. If the plug still does not fit, contact an electrician to replace your safety, this TV, ask the service technician to perform safety checks to determine that they won't be sure the service technician uses replacement parts specified by ...damaged - When installing an outside antenna or cable system is needed If you are covered by following the operating instructions - The TV does not operate normally by the operating instructions. Unauthorized substitutions may result in the vicinity of time. Pay particular attention to cords ...
...8226; Use only a grounded or polarized outlet. If the plug still does not fit, contact an electrician to replace your safety, this TV, ask the service technician to perform safety checks to determine that they won't be sure the service technician uses replacement parts specified by ...damaged - When installing an outside antenna or cable system is needed If you are covered by following the operating instructions - The TV does not operate normally by the operating instructions. Unauthorized substitutions may result in the vicinity of time. Pay particular attention to cords ...
Instruction Manual
Page 8
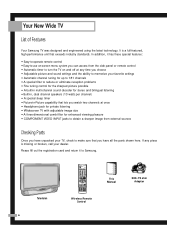
... exceeds industry standards. It is a full-featured, high-performance unit that lets you watch two channels at any piece is missing or broken, call your TV, check to reduce or eliminate reception problems • Fine tuning control for the sharpest picture possible • A built-in multi-channel sound decoder for up... to 181 channels • A special filter to make sure that you have unpacked your dealer. Your New Wide TV List of Features Your Samsung TV was designed and engineered using the latest technology.
... exceeds industry standards. It is a full-featured, high-performance unit that lets you watch two channels at any piece is missing or broken, call your TV, check to reduce or eliminate reception problems • Fine tuning control for the sharpest picture possible • A built-in multi-channel sound decoder for up... to 181 channels • A special filter to make sure that you have unpacked your dealer. Your New Wide TV List of Features Your Samsung TV was designed and engineered using the latest technology.

Instruction Manual
Page 9
... is used only occasionally (a camcorder or video game, for example) . Press to mute the sound. T V / V I D E O Press to change channels and move between viewing TV programs and signals from a camcorder or video game. M U T E Press to open . AUDIO IN JACKS Connect the audio signal from ther connected components. M E N U Press to... w CHANNEL v Press to switch between items on the on -screen menu. Side Panel Buttons The buttons on the side panel control your TV's basic features, including the on -screen menu. To use the more advanced features, you must use the remote control.
... is used only occasionally (a camcorder or video game, for example) . Press to mute the sound. T V / V I D E O Press to change channels and move between viewing TV programs and signals from a camcorder or video game. M U T E Press to open . AUDIO IN JACKS Connect the audio signal from ther connected components. M E N U Press to... w CHANNEL v Press to switch between items on the on -screen menu. Side Panel Buttons The buttons on the side panel control your TV's basic features, including the on -screen menu. To use the more advanced features, you must use the remote control.

Instruction Manual
Page 10
... time or off time is set . On time or off time is set . Normal operation. Turn the TV off and clean the air vent cover on the back of your TV. Air vent cover at the rear of the TV is Off Indicator Light Timer Lamp Temperature Indication Normal operation. Lamp inside the... overheating occassionally you'll hear it working. 8 The normal picture comes on in about 30 seconds for the TV to warm up . Turn the TV on after 1 hour. Lamp is not properly installed. Your New Wide TV Front Panel LED Indicators The three lights on the front panel indicate the status of the...
... time or off time is set . On time or off time is set . Normal operation. Turn the TV off and clean the air vent cover on the back of your TV. Air vent cover at the rear of the TV is Off Indicator Light Timer Lamp Temperature Indication Normal operation. Lamp inside the... overheating occassionally you'll hear it working. 8 The normal picture comes on in about 30 seconds for the TV to warm up . Turn the TV on after 1 hour. Lamp is not properly installed. Your New Wide TV Front Panel LED Indicators The three lights on the front panel indicate the status of the...

Instruction Manual
Page 11
...Connections". COMPONENT VIDEO INPUT jacks Use these jacks to headphones (not included). HEADPHONE jack Connects to connect the component video signals from the TV to an external source like VCRs or laserdisc players. VIDEO MONITOR OUT jack Sends a video signal from a DVD player. 9 AUDIO... INPUT jacks Connect audio signals from a DVD player when using the component video jacks, these jacks to your TV. EXTERNAL SPEAKER jacks VHF/UHF terminal Connects antenna or cable system to connect the audio signals from external sources like a VCR. COMPONENT...
...Connections". COMPONENT VIDEO INPUT jacks Use these jacks to headphones (not included). HEADPHONE jack Connects to connect the component video signals from the TV to an external source like VCRs or laserdisc players. VIDEO MONITOR OUT jack Sends a video signal from a DVD player. 9 AUDIO... INPUT jacks Connect audio signals from a DVD player when using the component video jacks, these jacks to your TV. EXTERNAL SPEAKER jacks VHF/UHF terminal Connects antenna or cable system to connect the audio signals from external sources like a VCR. COMPONENT...

Instruction Manual
Page 12
...the onscreen menus + 1 0 0 p. 28 Select channels over 100. The remote control can use the remote control up to a distance of about 23 feet from the TV. PIP CH (PIP Channel) p. 50 LOCATE (PIP Locate) p. 51 10 M U T E p. 30 SURR (Surround Sound) p. 44 MTS (Multichannel Stereo) ... (PIP size) p. 51 REMOTE CONTROL Selects what the remote controls: TV, VCR or CABLE. NUMBER BUTTONS p. 28 Select TV channels directly or enter data when using the remote, always point it directly at the TV. Your New Wide TV Remote Control You can also operate your VCR and cable box. and ...
...the onscreen menus + 1 0 0 p. 28 Select channels over 100. The remote control can use the remote control up to a distance of about 23 feet from the TV. PIP CH (PIP Channel) p. 50 LOCATE (PIP Locate) p. 51 10 M U T E p. 30 SURR (Surround Sound) p. 44 MTS (Multichannel Stereo) ... (PIP size) p. 51 REMOTE CONTROL Selects what the remote controls: TV, VCR or CABLE. NUMBER BUTTONS p. 28 Select TV channels directly or enter data when using the remote, always point it directly at the TV. Your New Wide TV Remote Control You can also operate your VCR and cable box. and ...

Instruction Manual
Page 16
... connect an antenna to tighten the screws. 2 Plug the adapter into the VHF/UHF terminal on the back panel of the TV. Antennas with 300-ohm Flat Twin Leads If your TV. Antennas with 75-ohm round leads. 14 Use a screwdriver to your antenna looks like this : it is an antenna with... 75-ohm Round Leads If your antenna looks like this : 1 Plug the antenna lead into the VHF/UHF terminal on the back panel of the TV.
... connect an antenna to tighten the screws. 2 Plug the adapter into the VHF/UHF terminal on the back panel of the TV. Antennas with 300-ohm Flat Twin Leads If your TV. Antennas with 75-ohm round leads. 14 Use a screwdriver to your antenna looks like this : it is an antenna with... 75-ohm Round Leads If your antenna looks like this : 1 Plug the antenna lead into the VHF/UHF terminal on the back panel of the TV.

Instruction Manual
Page 17
Separate VHF and UHF Antennas If you have two separate antennas for your TV (one VHF and one UHF), you can buy at an electronics store. 1 Connect both antenna leads to the TV. This requires a combiner attachment, which you must combine the two antenna signals before connecting them to the combiner. 2 Plug the combiner into the VHF/UHF terminal on the rear panel of the TV. 15
Separate VHF and UHF Antennas If you have two separate antennas for your TV (one VHF and one UHF), you can buy at an electronics store. 1 Connect both antenna leads to the TV. This requires a combiner attachment, which you must combine the two antenna signals before connecting them to the combiner. 2 Plug the combiner into the VHF/UHF terminal on the rear panel of the TV. 15

Instruction Manual
Page 18
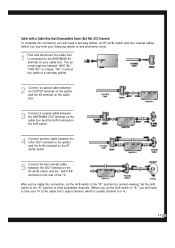
C o n n e c t i o n s Connecting Cable TV Cable without a Cable Box If you want to connect cable, and you do not need to use a cable box: 1 Plug the incoming cable into the VHF/UHF antenna terminal on the back of the TV. 16 This terminal might be labeled "ANT OUT," "VHF OUT," or simply, "OUT." 2 Connect the other end of this cable to the ANTENNA OUT terminal on the back of the TV. Cable with a Cable Box that Descrambles All Channels 1 Find the cable that is connected to the VHF/UHF antenna terminal on your cable box.
C o n n e c t i o n s Connecting Cable TV Cable without a Cable Box If you want to connect cable, and you do not need to use a cable box: 1 Plug the incoming cable into the VHF/UHF antenna terminal on the back of the TV. 16 This terminal might be labeled "ANT OUT," "VHF OUT," or simply, "OUT." 2 Connect the other end of this cable to the ANTENNA OUT terminal on the back of the TV. Cable with a Cable Box that Descrambles All Channels 1 Find the cable that is connected to the VHF/UHF antenna terminal on your cable box.
Instruction Manual
Page 19
... terminal might be labeled "ANT IN," "VHF IN," or simply, "IN." After you've made this connection, set the A/B switch to "B," you buy from your Samsung dealer or any electronics store). 1 Find and disconnect the cable that Descrambles Some (But Not All) Channels To complete this cable to a two-way splitter... terminal on the RF (A/B) switch. 5 Connect the last coaxial cable between the OUT terminal on the RF (A/B) switch and the VHF/UHF terminal on your TV to the cable box's output channel, which you will need to the ANTENNA IN terminal on the rear of the...
... terminal might be labeled "ANT IN," "VHF IN," or simply, "IN." After you've made this connection, set the A/B switch to "B," you buy from your Samsung dealer or any electronics store). 1 Find and disconnect the cable that Descrambles Some (But Not All) Channels To complete this cable to a two-way splitter... terminal on the RF (A/B) switch. 5 Connect the last coaxial cable between the OUT terminal on the RF (A/B) switch and the VHF/UHF terminal on your TV to the cable box's output channel, which you will need to the ANTENNA IN terminal on the rear of the...

Instruction Manual
Page 20
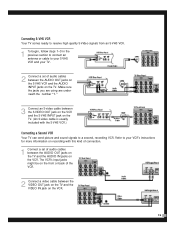
... Connect a coaxial cable between the ANTENNA OUT terminal on the VCR and the antenna terminal on the TV. If you must connect two separate sets of audio cables between the VIDEO OUT jack on the VCR... and the VIDEO IN jack on the TV. If your VCR is usually included with the VCR. 4 Connect a set of cables. 5 Connect ...a video cable between the AUDIO OUT jacks on the VCR and the AUDIO jacks on the TV. 18 A coaxial cable is stereo, you have a "mono" (not stereo) VCR, use the Y-connector (supplied) to...
... Connect a coaxial cable between the ANTENNA OUT terminal on the VCR and the antenna terminal on the TV. If you must connect two separate sets of audio cables between the VIDEO OUT jack on the VCR... and the VIDEO IN jack on the TV. If your VCR is usually included with the VCR. 4 Connect a set of cables. 5 Connect ...a video cable between the AUDIO OUT jacks on the VCR and the AUDIO jacks on the TV. 18 A coaxial cable is stereo, you have a "mono" (not stereo) VCR, use the Y-connector (supplied) to...
Instruction Manual
Page 21
... to a second, recording VCR. The VCR's input jacks might be on the front or back of audio cables between the VIDEO OUT jack on the TV and the VIDEO IN jack on the VCR. 19 Make sure the jacks you are using are underneath the number "1." 3 Connect an S-video cable between... the AUDIO OUT jacks on the TV and the AUDIO IN jacks on the TV. Refer to your TV. 2 Connect a set of audio cables between the S-VIDEO OUT jack on the VCR and the S-VHS INPUT jack on the...
... to a second, recording VCR. The VCR's input jacks might be on the front or back of audio cables between the VIDEO OUT jack on the TV and the VIDEO IN jack on the VCR. 19 Make sure the jacks you are using are underneath the number "1." 3 Connect an S-video cable between... the AUDIO OUT jacks on the TV and the AUDIO IN jacks on the TV. Refer to your TV. 2 Connect a set of audio cables between the S-VIDEO OUT jack on the VCR and the S-VHS INPUT jack on the...

Instruction Manual
Page 22
... usually included with the camcorder.) To watch a tape, follow your camcorder to your TV. If your camcorder is stereo, you must connect two separate cables. (The audio ... OUTPUT jack on the camcorder and the VIDEO terminal on the side of the TV. You can use your camera's instructions and the section on your TV make it easy to connect a camcorder to view tapes without using a VCR.... 1 Locate the A/V output jacks on the side of the TV. (A video cable is usually included with the camcorder.) 3 Connect a video cable between the AUDIO OUTPUT ...
... usually included with the camcorder.) To watch a tape, follow your camcorder to your TV. If your camcorder is stereo, you must connect two separate cables. (The audio ... OUTPUT jack on the camcorder and the VIDEO terminal on the side of the TV. You can use your camera's instructions and the section on your TV make it easy to connect a camcorder to view tapes without using a VCR.... 1 Locate the A/V output jacks on the side of the TV. (A video cable is usually included with the camcorder.) 3 Connect a video cable between the AUDIO OUTPUT ...

Instruction Manual
Page 23
If you want to use PIP while viewing DVD, select VIDEO 2 after connecting the DVD VIDEO OUT jack to your TV. 1 Connect a set of audio cables between the AUDIO IN 2 jacks on the TV and the AUDIO OUT jacks on the DVD player. 2 Connect a video cable between the VIDEO IN jack on the... TV and the VIDEO OUT jack on your TV make it easy to connect a DVD player to V2. If a DVD disc (applying Caption) is viewed in the Component mode, perform the DVDP Caption ON...
If you want to use PIP while viewing DVD, select VIDEO 2 after connecting the DVD VIDEO OUT jack to your TV. 1 Connect a set of audio cables between the AUDIO IN 2 jacks on the TV and the AUDIO OUT jacks on the DVD player. 2 Connect a video cable between the VIDEO IN jack on the... TV and the VIDEO OUT jack on your TV make it easy to connect a DVD player to V2. If a DVD disc (applying Caption) is viewed in the Component mode, perform the DVDP Caption ON...

Instruction Manual
Page 26
The Setup menu appears. Selecting the Menu Language Choose a language for the on and off. POWER 1 Press the MENU button on the remote control to display the on-screen menu. 2 Press CHw to exit the menu. 24 Press VOL +. Press the MENU button on the remote control to select Setup. O p e r a t i o n Turning the TV On and Off Press the POWER button on the remote control or on the front panel to select the language. MENU CH/ VOL 3 Press CHw to highlight "Language." 4 Press VOL + to turn your TV on -screen menus: English, Spanish or French.
The Setup menu appears. Selecting the Menu Language Choose a language for the on and off. POWER 1 Press the MENU button on the remote control to display the on-screen menu. 2 Press CHw to exit the menu. 24 Press VOL +. Press the MENU button on the remote control to select Setup. O p e r a t i o n Turning the TV On and Off Press the POWER button on the remote control or on the front panel to select the language. MENU CH/ VOL 3 Press CHw to highlight "Language." 4 Press VOL + to turn your TV on -screen menus: English, Spanish or French.

Instruction Manual
Page 27
... move between menu items, select menu items, and make some adjustments using the TV's side panel buttons. The Video menu is selected. The TV will display the channel, current time, audio signal you to control the settings of your TV. Displaying the Menus 1 With the power on, press the MENU button on -screen...
... move between menu items, select menu items, and make some adjustments using the TV's side panel buttons. The Video menu is selected. The TV will display the channel, current time, audio signal you to control the settings of your TV. Displaying the Menus 1 With the power on, press the MENU button on -screen...


