Instruction Manual
Page 2
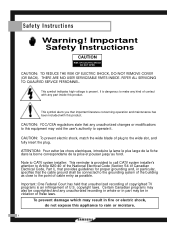
...TV programs is an infringement of the building as possible. CAUTION: To prevent electric shock, match the wide blade of plug to operate it. Note to CATV system installer: This reminder is provided to call CATV system installer's attention to the point of cable entry as close to Article 820-40 of the National Electrical Code... To prevent damage which may result in violation of contact with this product. Safety Instructions Warning! Important Safety Instructions CAUTION RISK OF ELECTRIC SHOCK DO NOT OPEN CAUTION: TO REDUCE THE RISK OF ELECTRIC SHOCK, DO NOT REMOVE COVER (OR BACK).
...TV programs is an infringement of the building as possible. CAUTION: To prevent electric shock, match the wide blade of plug to operate it. Note to CATV system installer: This reminder is provided to call CATV system installer's attention to the point of cable entry as close to Article 820-40 of the National Electrical Code... To prevent damage which may result in violation of contact with this product. Safety Instructions Warning! Important Safety Instructions CAUTION RISK OF ELECTRIC SHOCK DO NOT OPEN CAUTION: TO REDUCE THE RISK OF ELECTRIC SHOCK, DO NOT REMOVE COVER (OR BACK).

Instruction Manual
Page 3
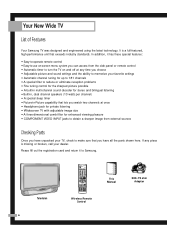
... 6 List of Features 6 Checking Parts 6 Side Panel Buttons 7 Side Panel Jacks 7 Front Panel LED Indicators 8 Rear Panel Jacks 9 Remote Control 10 Connections 14 Connecting VHF and UHF Antennas 14 Connecting Cable TV 16 Connecting a VCR 18 Connecting a Camcorder 20 Connecting Component Video 21 Operation 24 Turning the TV On and Off 24 Selecting the Menu Language 24 Viewing the Menus and Displays 25 Channel Memory 26 Changing Channels 28 Setting the Clock 29 Sound Control 30 Picture Control 32 Setting Up Your Remote Control 34 Remote Control Codes...
... 6 List of Features 6 Checking Parts 6 Side Panel Buttons 7 Side Panel Jacks 7 Front Panel LED Indicators 8 Rear Panel Jacks 9 Remote Control 10 Connections 14 Connecting VHF and UHF Antennas 14 Connecting Cable TV 16 Connecting a VCR 18 Connecting a Camcorder 20 Connecting Component Video 21 Operation 24 Turning the TV On and Off 24 Selecting the Menu Language 24 Viewing the Menus and Displays 25 Channel Memory 26 Changing Channels 28 Setting the Clock 29 Sound Control 30 Picture Control 32 Setting Up Your Remote Control 34 Remote Control Codes...

Instruction Manual
Page 4
... additions can increase the risk of the best products in the cabinet for mounting. • Operate your TV only from the type of power supplied to your home, consult your appliance dealer or local power company. Do not block these safety precautions in mind when installing, using your TV. • Keep the safety and operating instructions for future reference. • Heed all...
... additions can increase the risk of the best products in the cabinet for mounting. • Operate your TV only from the type of power supplied to your home, consult your appliance dealer or local power company. Do not block these safety precautions in mind when installing, using your TV. • Keep the safety and operating instructions for future reference. • Heed all...
Instruction Manual
Page 5
..., size of grounding conductors, location of any service or repairs to this TV is in a safe operating condition. 3 This will fit into the unit - An outside antenna or cable system is needed If you are covered by following the operating instructions - Section 810 of the National Electrical Code, ANSI/NFPA No.70-1984, provides information about proper grounding of the mast and supporting structure...
..., size of grounding conductors, location of any service or repairs to this TV is in a safe operating condition. 3 This will fit into the unit - An outside antenna or cable system is needed If you are covered by following the operating instructions - Section 810 of the National Electrical Code, ANSI/NFPA No.70-1984, provides information about proper grounding of the mast and supporting structure...
Instruction Manual
Page 8
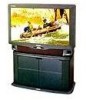
...-to-operate remote control • Easy-to-use on-screen menu system you can access from the side panel or remote control • Automatic timer to turn the TV on and off at any piece is a full-featured, high-performance unit that you have unpacked your dealer. In addition, it to make sure that exceeds industry standards. If any time you choose • Adjustable picture and sound settings and...
...-to-operate remote control • Easy-to-use on-screen menu system you can access from the side panel or remote control • Automatic timer to turn the TV on and off at any piece is a full-featured, high-performance unit that you have unpacked your dealer. In addition, it to make sure that exceeds industry standards. If any time you choose • Adjustable picture and sound settings and...

Instruction Manual
Page 10
... status of the TV is warming up , so normal brightness may not appear immediately. • The TV has a fan to keep the inside the TV needs to be replaced. • It takes about 30 seconds. Lamp is not properly installed. Air vent cover at the rear of your TV. Lamp inside lamp from overheating occassionally you'll hear it working. 8 Turn the TV off time is Off Indicator Light Timer Lamp Temperature Indication Normal operation.
... status of the TV is warming up , so normal brightness may not appear immediately. • The TV has a fan to keep the inside the TV needs to be replaced. • It takes about 30 seconds. Lamp is not properly installed. Air vent cover at the rear of your TV. Lamp inside lamp from overheating occassionally you'll hear it working. 8 Turn the TV off time is Off Indicator Light Timer Lamp Temperature Indication Normal operation.

Instruction Manual
Page 11
Rear Panel Jacks Use the rear panel jacks to connect components such as audio for V2(Video2). VIDEO INPUT jacks Connect video signals from external sources like VCRs or laserdisc players. COMPONENT VIDEO INPUT jacks Use these jacks to your TV. AUDIO INPUT jacks Connect audio signals from external sources like VCRs or laserdisc players. When not using the component video input jacks. EXTERNAL SPEAKER jacks VHF/UHF terminal Connects antenna or cable system to connect the audio signals from a DVD player. 9 AUDIO MONITOR OUT jacks Send audio signals from the TV to...
Rear Panel Jacks Use the rear panel jacks to connect components such as audio for V2(Video2). VIDEO INPUT jacks Connect video signals from external sources like VCRs or laserdisc players. COMPONENT VIDEO INPUT jacks Use these jacks to your TV. AUDIO INPUT jacks Connect audio signals from external sources like VCRs or laserdisc players. When not using the component video input jacks. EXTERNAL SPEAKER jacks VHF/UHF terminal Connects antenna or cable system to connect the audio signals from a DVD player. 9 AUDIO MONITOR OUT jacks Send audio signals from the TV to...
Instruction Manual
Page 19
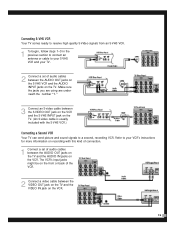
.../UHF terminal on your TV to the cable box's output channel, which you buy from your Samsung dealer or any electronics store). 1 Find and disconnect the cable that is usually channel 3 or 4.) 17 Set the A/B switch to the "B" position to view scrambled channels. (When you set the A/B switch to the "A" position for normal viewing. Connect this connection, set the A/B switch to "B," you will need to tune your cable box. This terminal might...
.../UHF terminal on your TV to the cable box's output channel, which you buy from your Samsung dealer or any electronics store). 1 Find and disconnect the cable that is usually channel 3 or 4.) 17 Set the A/B switch to the "B" position to view scrambled channels. (When you set the A/B switch to the "A" position for normal viewing. Connect this connection, set the A/B switch to "B," you will need to tune your cable box. This terminal might...

Instruction Manual
Page 20
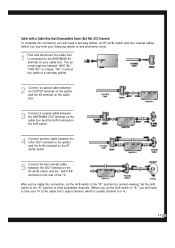
... connect two separate sets of audio cables between the VIDEO OUT jack on the VCR and the VIDEO IN jack on the TV. C o n n e c t i o n s Connecting a VCR 1 Unplug the cable or antenna from the back of the TV. 2 Connect the cable or antenna to the left and right audio input jacks of the TV. A coaxial cable is stereo, you have a "mono" (not stereo) VCR, use the Y-connector (supplied) to hook up to the ANTENNA...
... connect two separate sets of audio cables between the VIDEO OUT jack on the VCR and the VIDEO IN jack on the TV. C o n n e c t i o n s Connecting a VCR 1 Unplug the cable or antenna from the back of the TV. 2 Connect the cable or antenna to the left and right audio input jacks of the TV. A coaxial cable is stereo, you have a "mono" (not stereo) VCR, use the Y-connector (supplied) to hook up to the ANTENNA...
Instruction Manual
Page 21
... AUDIO INPUT jacks on the TV. The VCR's input jacks might be on the front or back of the VCR. 2 Connect a video cable between the VIDEO OUT jack on the TV and the VIDEO IN jack on the VCR. 19 Connecting S-VHS VCR Your TV comes ready to receive high quality S-Video signals from an S-VHS VCR. 1 To begin, follow steps 1-3 in the previous section to connect an antenna...
... AUDIO INPUT jacks on the TV. The VCR's input jacks might be on the front or back of the VCR. 2 Connect a video cable between the VIDEO OUT jack on the TV and the VIDEO IN jack on the VCR. 19 Connecting S-VHS VCR Your TV comes ready to receive high quality S-Video signals from an S-VHS VCR. 1 To begin, follow steps 1-3 in the previous section to connect an antenna...

Instruction Manual
Page 23
... AUDIO IN 2 jacks on the TV and the AUDIO OUT jacks on the DVD player. 2 Connect a video cable between the VIDEO IN jack on the TV and the VIDEO OUT jack on the DVD player. If a DVD disc (applying Caption) is viewed in the Component mode, perform the DVDP Caption ON. 21 NOTE In the Component Mode, the PICTURE SIZE (ASPECT) can not be adjusted and the MONITOR OUT, PIP features do not operate. Connecting Component Video The rear panel...
... AUDIO IN 2 jacks on the TV and the AUDIO OUT jacks on the DVD player. 2 Connect a video cable between the VIDEO IN jack on the TV and the VIDEO OUT jack on the DVD player. If a DVD disc (applying Caption) is viewed in the Component mode, perform the DVDP Caption ON. 21 NOTE In the Component Mode, the PICTURE SIZE (ASPECT) can not be adjusted and the MONITOR OUT, PIP features do not operate. Connecting Component Video The rear panel...
Instruction Manual
Page 36
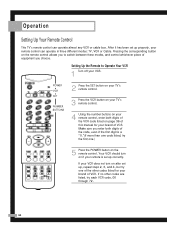
... the other codes are listed, try one .) 5 Press the POWER button on after set up properly, your VCR. After it has been set up correctly. Make sure you to Operate Your VCR 1 Turn off your remote control can operate almost any VCR or cable box. POWER VCR SET NUMBER BUTTONS 2 Press the SET button on your TV's remote control. 3 Press the VCR button on your TV's remote control. 4 Using the number buttons on page 36 of this manual for your...
... the other codes are listed, try one .) 5 Press the POWER button on after set up properly, your VCR. After it has been set up correctly. Make sure you to Operate Your VCR 1 Turn off your remote control can operate almost any VCR or cable box. POWER VCR SET NUMBER BUTTONS 2 Press the SET button on your TV's remote control. 3 Press the VCR button on your TV's remote control. 4 Using the number buttons on page 36 of this manual for your...
Instruction Manual
Page 37
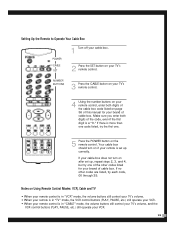
... the other codes are listed, try the first one code listed, try each code, 00 through 35. Notes on Using Remote Control Modes: VCR, Cable and TV • When your remote control is in "VCR" mode, the volume buttons still control your TV's volume. • When your remote is in "CABLE" mode, the volume buttons still control your TV's volume, and the VCR control buttons (PLAY, PAUSE, etc.) still operate your TV's remote control. Setting Up the Remote to Operate Your Cable Box POWER CABLE SET 1 Turn off your cable box. 2 Press the SET button on...
... the other codes are listed, try the first one code listed, try each code, 00 through 35. Notes on Using Remote Control Modes: VCR, Cable and TV • When your remote control is in "VCR" mode, the volume buttons still control your TV's volume. • When your remote is in "CABLE" mode, the volume buttons still control your TV's volume, and the VCR control buttons (PLAY, PAUSE, etc.) still operate your TV's remote control. Setting Up the Remote to Operate Your Cable Box POWER CABLE SET 1 Turn off your cable box. 2 Press the SET button on...
Instruction Manual
Page 40
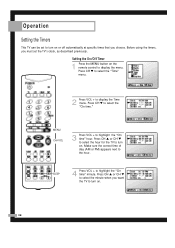
... O p e r a t i o n Setting the Timers This TV can be set the TV's clock, as described previously. Before using the timers, you must set to turn on or off automatically at specific times that you want the TV to turn on the remote control to highlight the "On time" hour. Setting the On/Off Timer 1 Press the MENU button on . Make sure the correct time of day (AM or PM) appears next to display the Time menu. MENU CH...
... O p e r a t i o n Setting the Timers This TV can be set the TV's clock, as described previously. Before using the timers, you must set to turn on or off automatically at specific times that you want the TV to turn on the remote control to highlight the "On time" hour. Setting the On/Off Timer 1 Press the MENU button on . Make sure the correct time of day (AM or PM) appears next to display the Time menu. MENU CH...
Instruction Manual
Page 48
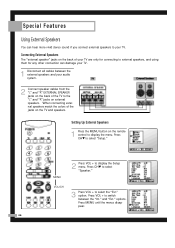
... stereo sound if you connect external speakers to your audio system. 2 Connect speaker cables from the "L" and "R" EXTERNAL SPEAKER jacks on the back of the jacks on external speakers. option. VOL/CH 3 Press VOL + to display the Setup menu. MENU 2 Press VOL + to select the "Ext." and "Ext." Press CHw to display the menu. Setting Up External Speakers 1 Press the MENU button on the remote control to select "Speaker." Press VOL + to select "Setup." options. Special Features Using External Speakers...
... stereo sound if you connect external speakers to your audio system. 2 Connect speaker cables from the "L" and "R" EXTERNAL SPEAKER jacks on the back of the jacks on external speakers. option. VOL/CH 3 Press VOL + to display the Setup menu. MENU 2 Press VOL + to select the "Ext." and "Ext." Press CHw to display the menu. Setting Up External Speakers 1 Press the MENU button on the remote control to select "Speaker." Press VOL + to select "Setup." options. Special Features Using External Speakers...

Instruction Manual
Page 49
... options. You must switch these setitngs so that if anything blocks the signal between the transmitter and the headphones, the TV's sound may be affected. Selecting the Headphones' Audio 1 Press the MENU button on the remote control for on , and adjust the sound volume. Note: you listen to select the Audio menu. Rear of TV Connecting Wireless Headphones 1 Connect the transmitter cable to headphones. 47 When using wireless headphones, remember...
... options. You must switch these setitngs so that if anything blocks the signal between the transmitter and the headphones, the TV's sound may be affected. Selecting the Headphones' Audio 1 Press the MENU button on the remote control for on , and adjust the sound volume. Note: you listen to select the Audio menu. Rear of TV Connecting Wireless Headphones 1 Connect the transmitter cable to headphones. 47 When using wireless headphones, remember...

Instruction Manual
Page 51
... a PIP Screen 1 Press the PIP button to use all of the screen. The channel number indicated on again, then the mode will appear in -Picture (PIP) feature. NOTE In the Component mode, PIP cannot operated simultaneously. The advanced PIP system allows you to watch two different pictures at once, even if you don't have a VCR connected to your cable company for the PIP image. 49 Contact your TV. (If you are using a cable box...
... a PIP Screen 1 Press the PIP button to use all of the screen. The channel number indicated on again, then the mode will appear in -Picture (PIP) feature. NOTE In the Component mode, PIP cannot operated simultaneously. The advanced PIP system allows you to watch two different pictures at once, even if you don't have a VCR connected to your cable company for the PIP image. 49 Contact your TV. (If you are using a cable box...

Instruction Manual
Page 52
...-Picture Channel After you have not connected any equipment to display the on again, then the mode will return to Normal view. PIP MENU CH/VOL 3 Press VOL - The signal from an external source, such as the main image. Press CH w to change the channel of the screen, above the main image. 50 You can use PIP to view a signal from these inputs will not appear if you set the PIP signal source (antenna...
...-Picture Channel After you have not connected any equipment to display the on again, then the mode will return to Normal view. PIP MENU CH/VOL 3 Press VOL - The signal from an external source, such as the main image. Press CH w to change the channel of the screen, above the main image. 50 You can use PIP to view a signal from these inputs will not appear if you set the PIP signal source (antenna...
Instruction Manual
Page 56
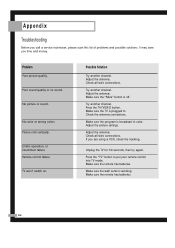
.... If you call a service technician, please scan this list of problems and possible solutions. A p p e n d i x Troubleshooting Before you are using a VCR, check the tracking. Make sure the "Mute" button is working. Unplug the TV for 30 seconds, then try again. Problem Poor picture quality. Adjust the antenna. Press the "TV" button to put your remote control into TV mode. Adjust the antenna. Try another channel. Press the TV/VIDEO button. Adjust the picture settings. Make sure the remote has batteries. Possible...
.... If you call a service technician, please scan this list of problems and possible solutions. A p p e n d i x Troubleshooting Before you are using a VCR, check the tracking. Make sure the "Mute" button is working. Unplug the TV for 30 seconds, then try again. Problem Poor picture quality. Adjust the antenna. Press the "TV" button to put your remote control into TV mode. Adjust the antenna. Try another channel. Press the TV/VIDEO button. Adjust the picture settings. Make sure the remote has batteries. Possible...
Instruction Manual
Page 57
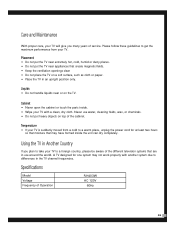
... of service. Using the TV in an upright position only. Please follow these guidelines to get the maximum performance from a cold to differences in the TV channel frequencies. Placement • Do not put the TV near extremely hot, cold, humid or dusty places. • Do not put heavy objects on top of Operation PLH403W AC 120V 60Hz 55 Specifications Model...
... of service. Using the TV in an upright position only. Please follow these guidelines to get the maximum performance from a cold to differences in the TV channel frequencies. Placement • Do not put the TV near extremely hot, cold, humid or dusty places. • Do not put heavy objects on top of Operation PLH403W AC 120V 60Hz 55 Specifications Model...


