

User Manual
Page 4
...screen surface may fall and cause personal injury. • Make sure to install the specified wall mount. Clean Safety Instructions Keep heating appliances as far away from the wall. • Otherwise, it may result in fire due to an increase in the internal temperature. If you must use a cleaner other than 10 cm from the power cord... that an authorized installation company installs the wall mount. • Otherwise, it . If the height of your monitor is adjustable, do not place any object or part of your product in fire due to the screen display. Clean the product using a soft cloth ...
...screen surface may fall and cause personal injury. • Make sure to install the specified wall mount. Clean Safety Instructions Keep heating appliances as far away from the wall. • Otherwise, it may result in fire due to an increase in the internal temperature. If you must use a cleaner other than 10 cm from the power cord... that an authorized installation company installs the wall mount. • Otherwise, it . If the height of your monitor is adjustable, do not place any object or part of your product in fire due to the screen display. Clean the product using a soft cloth ...
User Manual
Page 10
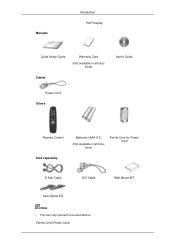
Manuals Introduction PDP Display Quick Setup Guide Warranty Card (Not available in all locations) Cables User's Guide Power Cord Others Remote Control Sold separately Batteries (AAA X 2) (Not available in all locations) Ferrite Core for Power Cord D-Sub Cable DVI Cable Semi Stand KIT Note • You can only connect one external box. Ferrite Core (Power Cord) Wall Mount KIT
Manuals Introduction PDP Display Quick Setup Guide Warranty Card (Not available in all locations) Cables User's Guide Power Cord Others Remote Control Sold separately Batteries (AAA X 2) (Not available in all locations) Ferrite Core for Power Cord D-Sub Cable DVI Cable Semi Stand KIT Note • You can only connect one external box. Ferrite Core (Power Cord) Wall Mount KIT
User Manual
Page 14
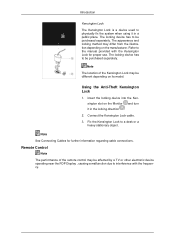
... locking direction . 2. Using the Anti-Theft Kensington Lock 1. Fix the Kensington Lock to a desk or a heavy stationary object. Remote Control Note The performance of the Kensington Lock may be different depending on its model. Refer to the manual provided with the frequency. The locking device has to be purchased separately. Insert the locking device into the Kensington slot on the manufacturer. Connect the Kensington Lock cable...
... locking direction . 2. Using the Anti-Theft Kensington Lock 1. Fix the Kensington Lock to a desk or a heavy stationary object. Remote Control Note The performance of the Kensington Lock may be different depending on its model. Refer to the manual provided with the frequency. The locking device has to be purchased separately. Insert the locking device into the Kensington slot on the manufacturer. Connect the Kensington Lock cable...

User Manual
Page 16
... button once to change the input signal SOURCE. button 6. MUTE 7. Color Buttons 12. It is displayed on the lower left corner of the screen. Adjusts the audio volume. This is displayed at the time. SOURCE 19. Press it again to circle through available preconfigured modes. ( Standard Music Movie Speech Custom ) MDC Quick Launch Button. Activates or deactivates all function keys on -screen menu and exits from the menu or closes the adjustment menu. 4. Opens...
... button once to change the input signal SOURCE. button 6. MUTE 7. Color Buttons 12. It is displayed on the lower left corner of the screen. Adjusts the audio volume. This is displayed at the time. SOURCE 19. Press it again to circle through available preconfigured modes. ( Standard Music Movie Speech Custom ) MDC Quick Launch Button. Activates or deactivates all function keys on -screen menu and exits from the menu or closes the adjustment menu. 4. Opens...

User Manual
Page 17
... contents of the image you press the button, a PIP screen appears. - When you press this button, current picture mode is a feature providing the optimum viewing environment depending on the main screen, and the main screen image will appear in the PIP window. - Then push button again to another horizontally, vertically or adjusts selected menu values. GUIDE 23. AV / HDMI / TV : P.MODE The PDP Display has four automatic picture settings that are watching...
... contents of the image you press the button, a PIP screen appears. - When you press this button, current picture mode is a feature providing the optimum viewing environment depending on the main screen, and the main screen image will appear in the PIP window. - Then push button again to another horizontally, vertically or adjusts selected menu values. GUIDE 23. AV / HDMI / TV : P.MODE The PDP Display has four automatic picture settings that are watching...

User Manual
Page 26
... the PDP Display using the Source button on the front of audio cables between the VIDEO OUTPUT jack on the camcorder and the AV IN [VIDEO] on the remote control. 4. Locate the AV output jacks on the side or back of two cables. Select AV for the Camcorder connection using the HDMI cable. • You cannot connect a PC to a Camcorder Connections 1. Connecting to the HDMI IN terminal. Then, start the...
... the PDP Display using the Source button on the front of audio cables between the VIDEO OUTPUT jack on the camcorder and the AV IN [VIDEO] on the remote control. 4. Locate the AV output jacks on the side or back of two cables. Select AV for the Camcorder connection using the HDMI cable. • You cannot connect a PC to a Camcorder Connections 1. Connecting to the HDMI IN terminal. Then, start the...
User Manual
Page 36
... Off Time Setup of TV works only on MagicInfo model. PIP PIP Size 1. Click PIP of the main icons and the PIP control screen appears. Click Select All or use Check Box to select a display to Time Control. 1) Current Time - At On Time Setup, MagicInfo Source functions only for which the power status is available only for the displays for MagicInfo Model. Time Control is ON...
... Off Time Setup of TV works only on MagicInfo model. PIP PIP Size 1. Click PIP of the main icons and the PIP control screen appears. Click Select All or use Check Box to select a display to Time Control. 1) Current Time - At On Time Setup, MagicInfo Source functions only for which the power status is available only for the displays for MagicInfo Model. Time Control is ON...
User Manual
Page 45
... the Com1 port) Check the connection of TV works only on each screen. 2) Video Wall (Screen divider) - Turns on the Power Control Info Grid - z The MDC program supplied by Samsung supports up by pressing a number in MagicInfo. Troubleshooting 1. The display you wish to 5x5 LCD Displayes. 3) On / Off - 1) Video Wall - z Select a display from Screen divider. The Input source of RS232C. (Check if it is ON. You can select a number of the selected display. 4) Format - A Video Wall is a set up to control does...
... the Com1 port) Check the connection of TV works only on each screen. 2) Video Wall (Screen divider) - Turns on the Power Control Info Grid - z The MDC program supplied by Samsung supports up by pressing a number in MagicInfo. Troubleshooting 1. The display you wish to 5x5 LCD Displayes. 3) On / Off - 1) Video Wall - z Select a display from Screen divider. The Input source of RS232C. (Check if it is ON. You can select a number of the selected display. 4) Format - A Video Wall is a set up to control does...

User Manual
Page 48
... input signal. • The Picture menu changes depending on the contents of the four settings by simply pressing the MagicBright control button. 1. Picture [PC / DVI] Available Modes • PC / DVI • AV • HDMI • Component MagicBright MENU ENTER Picture ENTER MagicBright ENTER MagicBright is a new feature providing the optimum viewing environment depending on the input signal and Edit Name. Entertain Adjusting the PDP Display Name the input device connected to the input...
... input signal. • The Picture menu changes depending on the contents of the four settings by simply pressing the MagicBright control button. 1. Picture [PC / DVI] Available Modes • PC / DVI • AV • HDMI • Component MagicBright MENU ENTER Picture ENTER MagicBright ENTER MagicBright is a new feature providing the optimum viewing environment depending on the input signal and Edit Name. Entertain Adjusting the PDP Display Name the input device connected to the input...

User Manual
Page 54
Standard 3. Dynamic 2. Custom Note The direct button on the remote control is the 'P.MODE' button. Movie 4. Adjusting the PDP Display The Size can be switched. 1. 16:9 2. 4:3 Picture [ AV / HDMI / DVI / COMPONENT] Mode Available Modes • DVI[Edit Name : AV Device] • AV • HDMI / DVI • Component MENU ENTER Picture ENTER Mode ENTER The PDP Display has four automatic picture settings ("Dynamic", "Standard", "Movie" and "Custom") that are preset at the factory. Dynamic, Standard, Movie, or Custom can be activated. 1.
Standard 3. Dynamic 2. Custom Note The direct button on the remote control is the 'P.MODE' button. Movie 4. Adjusting the PDP Display The Size can be switched. 1. 16:9 2. 4:3 Picture [ AV / HDMI / DVI / COMPONENT] Mode Available Modes • DVI[Edit Name : AV Device] • AV • HDMI / DVI • Component MENU ENTER Picture ENTER Mode ENTER The PDP Display has four automatic picture settings ("Dynamic", "Standard", "Movie" and "Custom") that are preset at the factory. Dynamic, Standard, Movie, or Custom can be activated. 1.
User Manual
Page 63
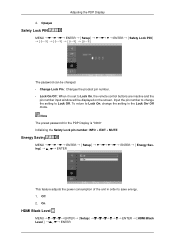
... PDP Display is set to change the setting in order to Lock Off. On HDMI Black Level MENU Level ENTER Setup ENTER ENTER HDMI Black Input the pin number to Lock On, the remote control buttons are inactive and the pin number input window will be changed. • Change Lock Pin : Changes the product pin number. • Lock On/Off : When it is "0000" Initializing the Safety Lock pin number: INFO + EXIT + MUTE Energy Saving MENU ing ENTER ENTER Setup ENTER...
... PDP Display is set to change the setting in order to Lock Off. On HDMI Black Level MENU Level ENTER Setup ENTER ENTER HDMI Black Input the pin number to Lock On, the remote control buttons are inactive and the pin number input window will be changed. • Change Lock Pin : Changes the product pin number. • Lock On/Off : When it is "0000" Initializing the Safety Lock pin number: INFO + EXIT + MUTE Energy Saving MENU ing ENTER ENTER Setup ENTER...

User Manual
Page 64
... Setup ENTER Video When Video Wall is repeated on each screen shows a part of the selected display Off/On. 1. Low Video Wall A Video Wall is a set -top box is on the external device connected. When the Video Wall is connected to your TV by configuring the HDMI black level. 1. Video Wall MENU Wall ENTER ENTER Setup Video Wall ENTER ENTER Video Turns Off/On the Video Wall function of the whole picture or where the same picture is running, the Auto Adjustment, Image Lock, and Size...
... Setup ENTER Video When Video Wall is repeated on each screen shows a part of the selected display Off/On. 1. Low Video Wall A Video Wall is a set -top box is on the external device connected. When the Video Wall is connected to your TV by configuring the HDMI black level. 1. Video Wall MENU Wall ENTER ENTER Setup Video Wall ENTER ENTER Video Turns Off/On the Video Wall function of the whole picture or where the same picture is running, the Auto Adjustment, Image Lock, and Size...
User Manual
Page 75
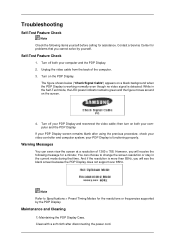
...-Test Feature Check 1. Turn on the screen. 4. your PDP Display and reconnect the video cable; The figure shown below ("Check Signal Cable") appears on both your computer and the PDP Display. 2. You can even view the screen at a resolution of the computer. 3. Clean with a soft cloth after using the previous procedure, check your PDP Display screen remains blank after disconnecting the power cord. Contact a Service Center for problems that time. Turn off your...
...-Test Feature Check 1. Turn on the screen. 4. your PDP Display and reconnect the video cable; The figure shown below ("Check Signal Cable") appears on both your computer and the PDP Display. 2. You can even view the screen at a resolution of the computer. 3. Clean with a soft cloth after using the previous procedure, check your PDP Display screen remains blank after disconnecting the power cord. Contact a Service Center for problems that time. Turn off your...
User Manual
Page 76
... (video) driver, boot the computer in Safe Mode, remove the Display Adaptor in this case, first check the source of the problem, and then contact a Service Center or your dealer. Problems related to the Installation (PC Mode) Note Problems related to the PDP Display installation and their solutions. Q: The PDP Display screen flickers. Clean with the computer or the video card, this can remedy any problems for assistance, check the information in the "Control Panel...
... (video) driver, boot the computer in Safe Mode, remove the Display Adaptor in this case, first check the source of the problem, and then contact a Service Center or your dealer. Problems related to the Installation (PC Mode) Note Problems related to the PDP Display installation and their solutions. Q: The PDP Display screen flickers. Clean with the computer or the video card, this can remedy any problems for assistance, check the information in the "Control Panel...
User Manual
Page 77
... video sources are listed. A: Check if the signal cable is blurred. picture is securely connected. If not, reset them referring to the recommended ranges. Q: "Not Optimum Mode" message. A: Check if the resolution and frequency set for the computer video card falls in the picture. Q: The picture image is not clear; A: Adjusts the brightness and contrast. (Refer to the PDP Display screen and their solutions are turned on again after removing all accessories (video extension cable, etc.) A: Set the resolution and frequency...
... video sources are listed. A: Check if the signal cable is blurred. picture is securely connected. If not, reset them referring to the recommended ranges. Q: "Not Optimum Mode" message. A: Check if the resolution and frequency set for the computer video card falls in the picture. Q: The picture image is not clear; A: Adjusts the brightness and contrast. (Refer to the PDP Display screen and their solutions are turned on again after removing all accessories (video extension cable, etc.) A: Set the resolution and frequency...

User Manual
Page 78
... under OSD Color Adjustment menu. Q: No sound. A: If the volume is still too low after turning the control to its maximum, check the volume control on the keyboard. Q: The remote control buttons do not respond. Troubleshooting Q: The screen color is poor. A: Adjust color using Custom under OSD Color Adjustment menu. Q: The color white is inconsistent. Q: The Power Indicator blinks. Press any key on the computer sound card or software program. Problems related to Audio Note Problems related to the Connecting a Computer) A: Check the volume level. A: The PDP Display...
... under OSD Color Adjustment menu. Q: No sound. A: If the volume is still too low after turning the control to its maximum, check the volume control on the keyboard. Q: The remote control buttons do not respond. Troubleshooting Q: The screen color is poor. A: Adjust color using Custom under OSD Color Adjustment menu. Q: The color white is inconsistent. Q: The Power Indicator blinks. Press any key on the computer sound card or software program. Problems related to Audio Note Problems related to the Connecting a Computer) A: Check the volume level. A: The PDP Display...
User Manual
Page 79
... driver used. (Refer to the Windows / Computer Manual). Set the function in the vicinity. Q: How can I clean the outer case/PDP Panel? Q: How can be changed by reconfiguring the video card. A: Check if a special fluorescent or neon lamp is on the version of the computer. (Refer to play the video? A: Windows XP: Set the resolution in the Control Panel Appearance and Themes Display Screen Saver. A: Disconnect the power cord and then clean...
... driver used. (Refer to the Windows / Computer Manual). Set the function in the vicinity. Q: How can I clean the outer case/PDP Panel? Q: How can be changed by reconfiguring the video card. A: Check if a special fluorescent or neon lamp is on the version of the computer. (Refer to play the video? A: Windows XP: Set the resolution in the Control Panel Appearance and Themes Display Screen Saver. A: Disconnect the power cord and then clean...

User Manual
Page 84
... number of 1ppm (one millionth) and above is pressed. PRODUCT INFORMATION (Image Retention Free) What is decreased. You can get better quality of picture by using a soft cloth to be away from time to enjoy the best picture quality. But the pixels of RED, GREEN, BLUE and WHITE color seem to polish. Information For Better Display Adjust the computer resolution and screen injection rate (refresh rate) on screen if the best picture quality...
... number of 1ppm (one millionth) and above is pressed. PRODUCT INFORMATION (Image Retention Free) What is decreased. You can get better quality of picture by using a soft cloth to be away from time to enjoy the best picture quality. But the pixels of RED, GREEN, BLUE and WHITE color seem to polish. Information For Better Display Adjust the computer resolution and screen injection rate (refresh rate) on screen if the best picture quality...
User Manual
Page 86
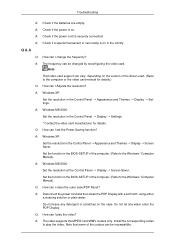
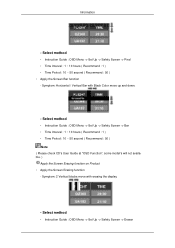
... display Moving image together with Black Color move up and down . Information • Use Bright colors with little difference in use. • The best way to protect your monitor from Image retention is to turn Power off, or set your PC, or System to operate a Screen Saver program when you are not using it. Symptom: Dot with Black Color move up and down . - Select method • Instruction Guide : OSD Menu -> Set Up -> Safety Screen -> Screen...
... display Moving image together with Black Color move up and down . Information • Use Bright colors with little difference in use. • The best way to protect your monitor from Image retention is to turn Power off, or set your PC, or System to operate a Screen Saver program when you are not using it. Symptom: Dot with Black Color move up and down . - Select method • Instruction Guide : OSD Menu -> Set Up -> Safety Screen -> Screen...
User Manual
Page 87
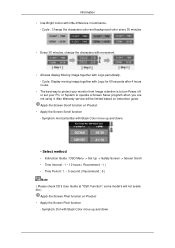
... check CD's User Guide at "OSD Function", some model's will not available. ) Apply the Screen Erasing function on Product • Apply the Screen Erasing function - Select method • Instruction Guide : OSD Menu -> Set Up -> Safety Screen -> Pixel • Time Interval : 1 ~ 10 hours ( Recommend : 1 ) • Time Period : 10 ~ 50 second ( Recommend : 50 ) • Apply the Screen Bar function - Information - Symptom: Horizontal / Vertical Bar with Black Color move with erasing the display...
... check CD's User Guide at "OSD Function", some model's will not available. ) Apply the Screen Erasing function on Product • Apply the Screen Erasing function - Select method • Instruction Guide : OSD Menu -> Set Up -> Safety Screen -> Pixel • Time Interval : 1 ~ 10 hours ( Recommend : 1 ) • Time Period : 10 ~ 50 second ( Recommend : 50 ) • Apply the Screen Bar function - Information - Symptom: Horizontal / Vertical Bar with Black Color move with erasing the display...


