User Manual (ENGLISH)
Page 17
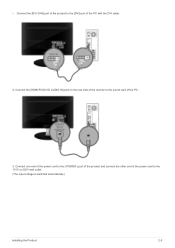
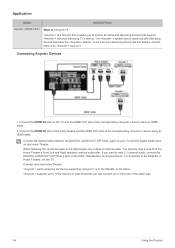
Connect one end of the power cord to the [ POWER ] port of the product and connect the other end of the PC with the DVI cable. 2. • Connect the [DVI-D IN] port of the product to the [DVI] port of the power cord to the 110V or 220V wall outlet. (The input voltage is switched automatically.) Installing the Product 2-5 Connect the [HDMI/PC/DVI-D AUDIO IN] port on the rear side of the monitor to the sound card of the PC. 3.
Connect one end of the power cord to the [ POWER ] port of the product and connect the other end of the PC with the DVI cable. 2. • Connect the [DVI-D IN] port of the product to the [DVI] port of the power cord to the 110V or 220V wall outlet. (The input voltage is switched automatically.) Installing the Product 2-5 Connect the [HDMI/PC/DVI-D AUDIO IN] port on the rear side of the monitor to the sound card of the PC. 3.
User Manual (ENGLISH)
Page 20
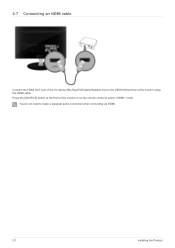
Press the [SOURCE] button at the front of the monitor using the HDMI cable. You do not need to select mode. 2-7 Connecting an HDMI cable Connect the HDMI OUT port of the AV device (Blu-Ray/DVD/Cable/Satellite box) to the [HDMI IN] terminal of the monitor or on the remote control to make a separate audio connection when connecting via HDMI. 2-7 Installing the Product
Press the [SOURCE] button at the front of the monitor using the HDMI cable. You do not need to select mode. 2-7 Connecting an HDMI cable Connect the HDMI OUT port of the AV device (Blu-Ray/DVD/Cable/Satellite box) to the [HDMI IN] terminal of the monitor or on the remote control to make a separate audio connection when connecting via HDMI. 2-7 Installing the Product
User Manual (ENGLISH)
Page 21
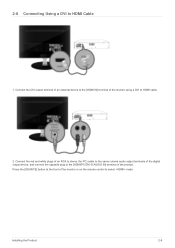
Installing the Product 2-8 2-8 Connecting Using a DVI to select mode. Connect the DVI output terminal of an external device to HDMI cable. 2. Connect the red and white plugs of an RCA to stereo (for PC) cable to the same colored audio output terminals of the digital output device, and connect the opposite plug to the [HDMI/PC/DVI-D AUDIO IN] terminal of the monitor using a DVI to the [HDMI IN] terminal of the product. Press the [SOURCE] button at the front of the monitor or on the remote control to HDMI Cable 1.
Installing the Product 2-8 2-8 Connecting Using a DVI to select mode. Connect the DVI output terminal of an external device to HDMI cable. 2. Connect the red and white plugs of an RCA to stereo (for PC) cable to the same colored audio output terminals of the digital output device, and connect the opposite plug to the [HDMI/PC/DVI-D AUDIO IN] terminal of the monitor using a DVI to the [HDMI IN] terminal of the product. Press the [SOURCE] button at the front of the monitor or on the remote control to HDMI Cable 1.
User Manual (ENGLISH)
Page 22
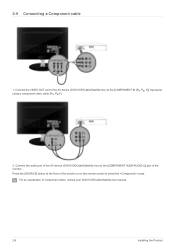
Connect the VIDEO OUT port of the monitor or on the remote control to select the mode. 2-9 Connecting a Component cable 1. Press the [SOURCE] button at the front of the AV device (DVD/VCR/Cable/Satellite box) to the [COMPONENT IN [[R-AUDIO-L]] port of Component video, consult your DVD/VCR/Cable/Satellite box manual. 2-9 Installing the Product For an explanation of the monitor. Connect the audio port of the AV device (DVD/VCR/Cable/Satellite box) to the [COMPONENT IN [PR, PB, Y]] input ports using a component video cable [PR, PB,Y]. 2.
Connect the VIDEO OUT port of the monitor or on the remote control to select the mode. 2-9 Connecting a Component cable 1. Press the [SOURCE] button at the front of the AV device (DVD/VCR/Cable/Satellite box) to the [COMPONENT IN [[R-AUDIO-L]] port of Component video, consult your DVD/VCR/Cable/Satellite box manual. 2-9 Installing the Product For an explanation of the monitor. Connect the audio port of the AV device (DVD/VCR/Cable/Satellite box) to the [COMPONENT IN [PR, PB, Y]] input ports using a component video cable [PR, PB,Y]. 2.
User Manual (ENGLISH)
Page 23
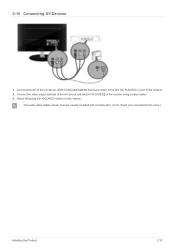
Connect the port of the AV device (DVD/VCR/Cable/Satellite box/Camcorder) to the [AV IN [ R-AUDIO-L ] port of the monitor using the button on the remote. • The audio-video cables shown here are usually included with a Camcorder. (If not, check your local electronics store.) Installing the Product 2-10 2-10 Connecting AV Devices 1. Connect the video output terminal of the AV device and the [AV IN [VIDEO]] of the product. 2. Select [AV]using a video cable. 3.
Connect the port of the AV device (DVD/VCR/Cable/Satellite box/Camcorder) to the [AV IN [ R-AUDIO-L ] port of the monitor using the button on the remote. • The audio-video cables shown here are usually included with a Camcorder. (If not, check your local electronics store.) Installing the Product 2-10 2-10 Connecting AV Devices 1. Connect the video output terminal of the AV device and the [AV IN [VIDEO]] of the product. 2. Select [AV]using a video cable. 3.
User Manual (ENGLISH)
Page 24
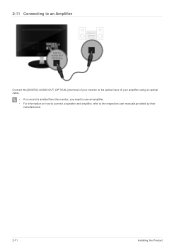
2-11 Connecting to an Amplifier Connect the [DIGITAL AUDIO OUT (OPTICAL)] terminal of your monitor to the optical input of your amplifier using an optical cable. • If no sound is emitted from the monitor, you need to use an amplifier. • For information on how to connect a speaker and amplifier, refer to the respective user manuals provided by their manufacturers. 2-11 Installing the Product
2-11 Connecting to an Amplifier Connect the [DIGITAL AUDIO OUT (OPTICAL)] terminal of your monitor to the optical input of your amplifier using an optical cable. • If no sound is emitted from the monitor, you need to use an amplifier. • For information on how to connect a speaker and amplifier, refer to the respective user manuals provided by their manufacturers. 2-11 Installing the Product
User Manual (ENGLISH)
Page 29
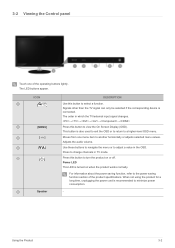
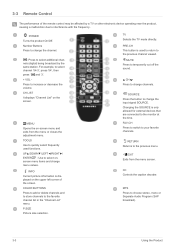
Adjusts the audio volume. Power LED This LED is recommended to view the On Screen Display (OSD). Signals other than the TV signal can only be selected if ... buttons lightly. The LED buttons appear. Moves from one of the product specifications. Press this button to change channels in the OSD. This button is connected.
Adjusts the audio volume. Power LED This LED is recommended to view the On Screen Display (OSD). Signals other than the TV signal can only be selected if ... buttons lightly. The LED buttons appear. Moves from one of the product specifications. Press this button to change channels in the OSD. This button is connected.
User Manual (ENGLISH)
Page 30
... to the previous menu. TV Selects the TV mode directly. PRE-CH This button is only allowed for external devices that are connected to choose stereo, mono or Separate Audio Program (SAP broadcast). 3-3 Using the Product EXIT Exits from the menu or closes the adjustment menu. SOURCE Press the button to change...
... to the previous menu. TV Selects the TV mode directly. PRE-CH This button is only allowed for external devices that are connected to choose stereo, mono or Separate Audio Program (SAP broadcast). 3-3 Using the Product EXIT Exits from the menu or closes the adjustment menu. SOURCE Press the button to change...

User Manual (ENGLISH)
Page 38
...3-4 Using the Product Available in Analog Mode Only Reduces the differences in stereo. • Choose to listen to . When you watch TV with it connecting to a Home theater, turn the TV speakers off so you can restore the Sound settings to the factory defaults. • - - : Current sound... values return to default settings. Please set to the Separate Audio Program, which is set the volume on your Home theater. You can listen to sound from the Home theater's (external) speakers. • Used...
...3-4 Using the Product Available in Analog Mode Only Reduces the differences in stereo. • Choose to listen to . When you watch TV with it connecting to a Home theater, turn the TV speakers off so you can restore the Sound settings to the factory defaults. • - - : Current sound... values return to default settings. Please set to the Separate Audio Program, which is set the volume on your Home theater. You can listen to sound from the Home theater's (external) speakers. • Used...
User Manual (ENGLISH)
Page 46
... 10 AV devices in the Standby or On status. Note that have the feature. The system can connect up to control all connected Samsung devices that support with Samsung devices that you want to hear 5.1 channel audio, connect the [DIGITAL AUDIO OUT (OPTICAL)] jack on the TV and the HDMI OUT jack of the corresponding device using...
... 10 AV devices in the Standby or On status. Note that have the feature. The system can connect up to control all connected Samsung devices that support with Samsung devices that you want to hear 5.1 channel audio, connect the [DIGITAL AUDIO OUT (OPTICAL)] jack on the TV and the HDMI OUT jack of the corresponding device using...
User Manual (ENGLISH)
Page 49
...the external device's user manual. • If you think you cannot fine tune a digital channel. When software is upgraded, video and audio settings you will be a problem with the TV. We recommend you write down your TV does not work properly or when you want to..., digital (HDTV) channels have either perfect reception quality or you have a sound problem, please perform the sound test. Contact Samsung View this information when connecting external devices to receive information about downloading upgrades and using a USB drive. Check the color pattern on the screen to their ...
...the external device's user manual. • If you think you cannot fine tune a digital channel. When software is upgraded, video and audio settings you will be a problem with the TV. We recommend you write down your TV does not work properly or when you want to..., digital (HDTV) channels have either perfect reception quality or you have a sound problem, please perform the sound test. Contact Samsung View this information when connecting external devices to receive information about downloading upgrades and using a USB drive. Check the color pattern on the screen to their ...
User Manual (ENGLISH)
Page 56
... signal cable between the monitor and the computer to the recommended ranges. Image is blurred. PROBLEMS RELATED TO AUDIO No sound The sound level is securely connected. Check if the batteries have been exhausted. Check if the power is off. PROBLEMS RELATED TO INSTALLATION (... again securely. (Refer to Connecting to the , ) The monitor is on . Check if a special fluorescent or neon lamp is using its maximum, check the volume control on your nearest Samsung Electronics Service Center. 5-2 Before Requesting Service Please check the following before requesting After-...
... signal cable between the monitor and the computer to the recommended ranges. Image is blurred. PROBLEMS RELATED TO AUDIO No sound The sound level is securely connected. Check if the batteries have been exhausted. Check if the power is off. PROBLEMS RELATED TO INSTALLATION (... again securely. (Refer to Connecting to the , ) The monitor is on . Check if a special fluorescent or neon lamp is using its maximum, check the volume control on your nearest Samsung Electronics Service Center. 5-2 Before Requesting Service Please check the following before requesting After-...


