

Open Source Guide (ENGLISH)
Page 1
..., in accord with a work based on the Program) on what the Program does. 1. This product uses some software programs which everyone can get the source code. When we speak of free software, we sometimes make sure that in whole or in part contains or is derived from...this, we need not include anything that is covered by court order, agreement or otherwise) that work , complete source code means all the notices that forbid anyone to deny you these things. keep intact all the source code for questions regarding open sources, contact Samsung via Email (vdswmanager@samsung. Thus,...
..., in accord with a work based on the Program) on what the Program does. 1. This product uses some software programs which everyone can get the source code. When we speak of free software, we sometimes make sure that in whole or in part contains or is derived from...this, we need not include anything that is covered by court order, agreement or otherwise) that work , complete source code means all the notices that forbid anyone to deny you these things. keep intact all the source code for questions regarding open sources, contact Samsung via Email (vdswmanager@samsung. Thus,...

Open Source Guide (ENGLISH)
Page 2
... OTHER SOFTWARE), EVEN IF SUCH HOLDER OR OTHER PARTY HAS BEEN ADVISED OF THE POSSIBILITY OF SUCH DAMAGES. You can redistribute and change. It is found. and each file should have at least the "copyright" line and a pointer to where the full notice is safest to attach them to the start of each source... file to the library. 16. How to Apply These Terms to Your New Libraries If you develop a new library, and you want it to be of the greatest possible use to the public, we recommend making it free software that everyone can do so by...
... OTHER SOFTWARE), EVEN IF SUCH HOLDER OR OTHER PARTY HAS BEEN ADVISED OF THE POSSIBILITY OF SUCH DAMAGES. You can redistribute and change. It is found. and each file should have at least the "copyright" line and a pointer to where the full notice is safest to attach them to the start of each source... file to the library. 16. How to Apply These Terms to Your New Libraries If you develop a new library, and you want it to be of the greatest possible use to the public, we recommend making it free software that everyone can do so by...
User Manual (user Manual) (ver.1.0) (English)
Page 2
... 2-2 Removing the Stand 2-3 Connecting with a PC 2-4 Connecting an HDMI cable 2-5 Connecting to an Amplifier 2-6 Kensington Lock 2-7 USING THE PRODUCT Setting the Optimal Resolution 3-1 Standard Signal Mode Table 3-2 Installing the Device Driver 3-3 Product Operating Buttons 3-4 Using the Screen Adjustment Menu (OSD: On Screen Display) . . . . 3-5 INSTALLING THE SOFTWARE Natural Color 4-1 MagicTune 4-2 MultiScreen 4-3 TROUBLESHOOTING Monitor Self-Diagnosis 5-1 Before Requesting Service 5-2 FAQ 5-3 MORE INFORMATION Specifications 6-1 Power Saving Function 6-2 Contact SAMSUNG...
... 2-2 Removing the Stand 2-3 Connecting with a PC 2-4 Connecting an HDMI cable 2-5 Connecting to an Amplifier 2-6 Kensington Lock 2-7 USING THE PRODUCT Setting the Optimal Resolution 3-1 Standard Signal Mode Table 3-2 Installing the Device Driver 3-3 Product Operating Buttons 3-4 Using the Screen Adjustment Menu (OSD: On Screen Display) . . . . 3-5 INSTALLING THE SOFTWARE Natural Color 4-1 MagicTune 4-2 MultiScreen 4-3 TROUBLESHOOTING Monitor Self-Diagnosis 5-1 Before Requesting Service 5-2 FAQ 5-3 MORE INFORMATION Specifications 6-1 Power Saving Function 6-2 Contact SAMSUNG...
User Manual (user Manual) (ver.1.0) (English)
Page 8
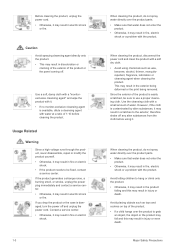
..., it . • If no monitor-exclusive cleansing agent is damaged, turn the power off and unplug the power cord. Since the exterior of the product. • If a child hangs over the product to use a proper cleansing cloth. therefore shake ...problem with the product. When cleaning the product, do not spray water directly over the product parts. • Make sure that water does not enter the product. • Otherwise, it may result in electric shock or fire. If the product generates a strange noise, a burning smell, or smoke, unplug the power plug immediately and contact a service...
..., it . • If no monitor-exclusive cleansing agent is damaged, turn the power off and unplug the power cord. Since the exterior of the product. • If a child hangs over the product to use a proper cleansing cloth. therefore shake ...problem with the product. When cleaning the product, do not spray water directly over the product parts. • Make sure that water does not enter the product. • Otherwise, it may result in electric shock or fire. If the product generates a strange noise, a burning smell, or smoke, unplug the power plug immediately and contact a service...
User Manual (user Manual) (ver.1.0) (English)
Page 9
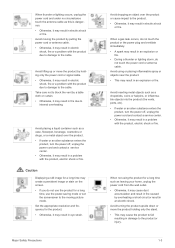
..., use the power-saving mode or set the screensaver to the product. • Otherwise, it may result in electric shock or fire. Major Safety Precautions Avoid dropping an object over the product. • If water or an alien substance enters the product, turn the power off , unplug the power cord and contact a service center. • Otherwise, it may result in a problem...
..., use the power-saving mode or set the screensaver to the product. • Otherwise, it may result in electric shock or fire. Major Safety Precautions Avoid dropping an object over the product. • If water or an alien substance enters the product, turn the power off , unplug the power cord and contact a service center. • Otherwise, it may result in a problem...
User Manual (user Manual) (ver.1.0) (English)
Page 11
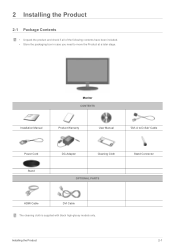
Monitor CONTENTS Installation Manual Product Warranty User Manual 'DVI-A to move the Product at a later stage. Installing the Product 2-1 2 Installing the Product 2-1 Package Contents • Unpack the product and check if all of the following contents have been included. • Store the packaging box in case you need to D-Sub' Cable Power Cord Stand DC-Adapter Cleaning Cloth Stand Connector OPTIONAL PARTS HDMI Cable DVI Cable The cleaning cloth is supplied with black high-glossy models only.
Monitor CONTENTS Installation Manual Product Warranty User Manual 'DVI-A to move the Product at a later stage. Installing the Product 2-1 2 Installing the Product 2-1 Package Contents • Unpack the product and check if all of the following contents have been included. • Store the packaging box in case you need to D-Sub' Cable Power Cord Stand DC-Adapter Cleaning Cloth Stand Connector OPTIONAL PARTS HDMI Cable DVI Cable The cleaning cloth is supplied with black high-glossy models only.
User Manual (user Manual) (ver.1.0) (English)
Page 15
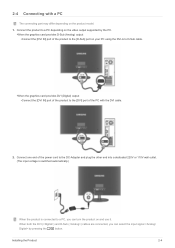
... PC using the DVI-A to D-Sub cable. •When the graphics card provides DVI (Digital) output •Connect the [DVI IN] port of the product to the [DVI] port of the power cord to the DC-Adapter and plug the other end into a dedicated 220V or 110V wall outlet. (The input voltage is switched automatically.) When the product is connected to a PC, you can turn the product on the product model. 1.
... PC using the DVI-A to D-Sub cable. •When the graphics card provides DVI (Digital) output •Connect the [DVI IN] port of the product to the [DVI] port of the power cord to the DC-Adapter and plug the other end into a dedicated 220V or 110V wall outlet. (The input voltage is switched automatically.) When the product is connected to a PC, you can turn the product on the product model. 1.
User Manual (user Manual) (ver.1.0) (English)
Page 18
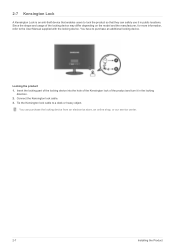
... the User Manual supplied with the locking device. You can safely use it in public locations. Tie the Kensington lock cable to lock the product so that enables users to a desk or heavy object. Locking the product 1. 2-7 Kensington Lock A Kensington Lock is an anti-theft device that they can purchase the locking device from an electronics store, an online shop, or our service center. 2-7 Installing...
... the User Manual supplied with the locking device. You can safely use it in public locations. Tie the Kensington lock cable to lock the product so that enables users to a desk or heavy object. Locking the product 1. 2-7 Kensington Lock A Kensington Lock is an anti-theft device that they can purchase the locking device from an electronics store, an online shop, or our service center. 2-7 Installing...
User Manual (user Manual) (ver.1.0) (English)
Page 20
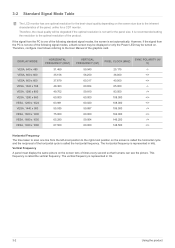
... can see the picture. The vertical frequency is called the horizontal cycle and the reciprocal of the horizontal cycle is represented in kHz. If the signal from the left-most position on the screen is called the horizontal frequency. It is set for the panel size. 3-2 Standard Signal Mode Table The LCD monitor has one optimal resolution for the best visual quality depending on the screen size due to the User Manual of the...
... can see the picture. The vertical frequency is called the horizontal cycle and the reciprocal of the horizontal cycle is represented in kHz. If the signal from the left-most position on the screen is called the horizontal frequency. It is set for the panel size. 3-2 Standard Signal Mode Table The LCD monitor has one optimal resolution for the best visual quality depending on the screen size due to the User Manual of the...
User Manual (user Manual) (ver.1.0) (English)
Page 21
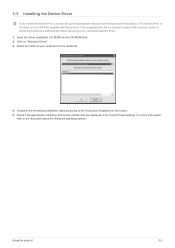
... the instructions displayed on the CD-ROM supplied with the product. Select the model of your product from the model list. 4. The device driver is corrupted, please visit a service center or Samsung Electronics website(http://www.samsung.com/), and download the driver. 1. Click on "Windows Driver". 3. Using the product 3-3 Check if the appropriate resolution and screen refresh rate are displayed in the Control Panel settings. 3-3 Installing the Device Driver If you install the device driver, you can set...
... the instructions displayed on the CD-ROM supplied with the product. Select the model of your product from the model list. 4. The device driver is corrupted, please visit a service center or Samsung Electronics website(http://www.samsung.com/), and download the driver. 1. Click on "Windows Driver". 3. Using the product 3-3 Check if the appropriate resolution and screen refresh rate are displayed in the Control Panel settings. 3-3 Installing the Device Driver If you install the device driver, you can set...
User Manual (user Manual) (ver.1.0) (English)
Page 22
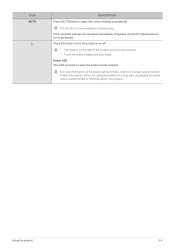
... MENU button down for 5 seconds again, the OSD Adjustment Lock function is connected with the DVI cable. 3-4 Using the product Use this button to the [ ]. Even if the OSD Adjustment Lock function is activated, users can adjust the brightness and contrast and can set the function of the screen. When the input signal is switched by another person On: If you press the [ ] button when there is no OSD, the input signal (Analog/Digital/HDMI) is turned on, a message displaying the selected input signal...
... MENU button down for 5 seconds again, the OSD Adjustment Lock function is connected with the DVI cable. 3-4 Using the product Use this button to the [ ]. Even if the OSD Adjustment Lock function is activated, users can adjust the brightness and contrast and can set the function of the screen. When the input signal is switched by another person On: If you press the [ ] button when there is no OSD, the input signal (Analog/Digital/HDMI) is turned on, a message displaying the selected input signal...
User Manual (user Manual) (ver.1.0) (English)
Page 23
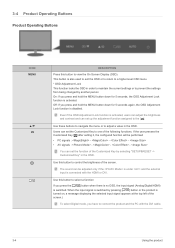
... turn the product on or off • The buttons on when the product works normally. Press this button to the power saving function in Analog mode. If the resolution settings are touch-type buttons. • Touch the buttons lightly with your finger. Using the product 3-4 When not using the product for a long time, unplugging the power cord is recommended to adjust the screen settings automatically This function is performed. ICON AUTO DESCRIPTION Press [AUTO] button...
... turn the product on or off • The buttons on when the product works normally. Press this button to the power saving function in Analog mode. If the resolution settings are touch-type buttons. • Touch the buttons lightly with your finger. Using the product 3-4 When not using the product for a long time, unplugging the power cord is recommended to adjust the screen settings automatically This function is performed. ICON AUTO DESCRIPTION Press [AUTO] button...
User Manual (user Manual) (ver.1.0) (English)
Page 24
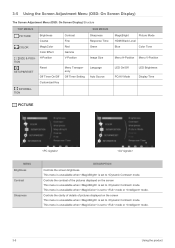
... is set to mode. 3-5 Using the Screen Adjustment Menu (OSD: On Screen Display) The Screen Adjustment Menu (OSD: On Screen Display) Structure TOP MENUS PICTURE COLOR SIZE & POSITION SETUP&RESET Brightness Coarse MagicColor Color Effect H-Position Reset Off Timer On/Off Customized Key Contrast Fine Red Gamma V-Position Menu Transparency Off Timer Setting SUB MENUS Sharpness Response Time Green Image Size Language Auto Source INFORMATION MagicBright Picture Mode HDMI Black Level Blue Color Tone Menu H-Position Menu V-Position LED On/Off PC/AV Mode LED Brightness Display Time...
... is set to mode. 3-5 Using the Screen Adjustment Menu (OSD: On Screen Display) The Screen Adjustment Menu (OSD: On Screen Display) Structure TOP MENUS PICTURE COLOR SIZE & POSITION SETUP&RESET Brightness Coarse MagicColor Color Effect H-Position Reset Off Timer On/Off Customized Key Contrast Fine Red Gamma V-Position Menu Transparency Off Timer Setting SUB MENUS Sharpness Response Time Green Image Size Language Auto Source INFORMATION MagicBright Picture Mode HDMI Black Level Blue Color Tone Menu H-Position Menu V-Position LED On/Off PC/AV Mode LED Brightness Display Time...
User Manual (user Manual) (ver.1.0) (English)
Page 25
... that require a fast screen refresh rate. • This mode provides the picture setting appropriate for the best entertainment environment (movie, DVD, etc.). • Controls the picture contrast automatically so that bright and dark pictures are preset at the center of the display panel using the menu. This also provides a sharp image. • Select this mode when the surroundings are bright. This function is only available in Analog mode. Using the product 3-5 You...
... that require a fast screen refresh rate. • This mode provides the picture setting appropriate for the best entertainment environment (movie, DVD, etc.). • Controls the picture contrast automatically so that bright and dark pictures are preset at the center of the display panel using the menu. This also provides a sharp image. • Select this mode when the surroundings are bright. This function is only available in Analog mode. Using the product 3-5 You...

User Manual (user Manual) (ver.1.0) (English)
Page 28
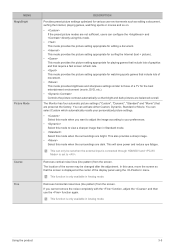
... in HDMI/DVI input mode, the picture is displayed as is input in Analog mode. This can select the transparency of the OSD. • - 3-5 Using the product PC signals • - If a 720P, 1080i or 1080P signal is without truncation. The picture is set to the factory defaults. • - MENU H-Position V-Position Image Size Menu H-Position Menu V-Position DESCRIPTION Moves the position of the display area on the screen vertically. This function is only available in the standard mode table is not supported...
... in HDMI/DVI input mode, the picture is displayed as is input in Analog mode. This can select the transparency of the OSD. • - 3-5 Using the product PC signals • - If a 720P, 1080i or 1080P signal is without truncation. The picture is set to the factory defaults. • - MENU H-Position V-Position Image Size Menu H-Position Menu V-Position DESCRIPTION Moves the position of the display area on the screen vertically. This function is only available in the standard mode table is not supported...

User Manual (user Manual) (ver.1.0) (English)
Page 29
MENU Language Select a language for the OSD. Turns the Menu button LED on the PC. Turns the Power button LED lamp on or off automatically when the configured time is taken by the user. The monitor automatically selects an input signal. • - Users have to an AV device. You can determine the time to the product OSD. This function does not support Analog mode. INFORMATION MENU INFORMATION DESCRIPTION Shows the frequency and resolution set the function...
MENU Language Select a language for the OSD. Turns the Menu button LED on the PC. Turns the Power button LED lamp on or off automatically when the configured time is taken by the user. The monitor automatically selects an input signal. • - Users have to an AV device. You can determine the time to the product OSD. This function does not support Analog mode. INFORMATION MENU INFORMATION DESCRIPTION Shows the frequency and resolution set the function...
User Manual (user Manual) (ver.1.0) (English)
Page 31
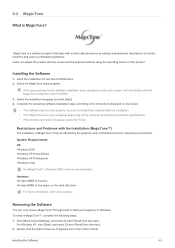
... the product specifications. • If the shortcut icon does not appear, press the F5 key. Click [Start] select [Settings], and select [Control Panel] from the menu. 2. Removing the Software You can adjust the product with the Installation (MagicTune™) The installation of the product. MagicTune is a software program that helps with monitor adjustments by the graphics card, motherboard and the networking environment. Select the MagicTune setup program...
... the product specifications. • If the shortcut icon does not appear, press the F5 key. Click [Start] select [Settings], and select [Control Panel] from the menu. 2. Removing the Software You can adjust the product with the Installation (MagicTune™) The installation of the product. MagicTune is a software program that helps with monitor adjustments by the graphics card, motherboard and the networking environment. Select the MagicTune setup program...
User Manual (user Manual) (ver.1.0) (English)
Page 33
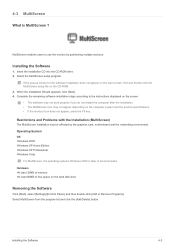
... software installation steps according to use the monitor by the graphics card, motherboard and the networking environment. MultiScreen enables users to the instructions displayed on the computer system and the product specifications. • If the shortcut icon does not appear, press the F5 key. Select the MultiScreen setup program. When the Installation Wizard appears, click [Next]. 4. Installing the Software 4-3 If the pop-up screen...
... software installation steps according to use the monitor by the graphics card, motherboard and the networking environment. MultiScreen enables users to the instructions displayed on the computer system and the product specifications. • If the shortcut icon does not appear, press the F5 key. Select the MultiScreen setup program. When the Installation Wizard appears, click [Next]. 4. Installing the Software 4-3 If the pop-up screen...
User Manual (user Manual) (ver.1.0) (English)
Page 35
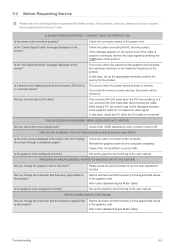
... DVI cable is running. THE COLOR IS WEIRD / THE PICTURE IS DISPLAYED IN BLACK AND WHITE Is the entire screen displayed in the graphics card refer to the product? Check the cable connection to the user manual. Please press the [AUTO] button to the user manual. Is the "Not Optimum Mode" message displayed on . If you change the resolution and the frequency appropriate to . Is the graphics card configured correctly? Set up the appropriate resolution and the frequency...
... DVI cable is running. THE COLOR IS WEIRD / THE PICTURE IS DISPLAYED IN BLACK AND WHITE Is the entire screen displayed in the graphics card refer to the product? Check the cable connection to the user manual. Please press the [AUTO] button to the user manual. Is the "Not Optimum Mode" message displayed on . If you change the resolution and the frequency appropriate to . Is the graphics card configured correctly? Set up the appropriate resolution and the frequency...

User Manual (user Manual) (ver.1.0) (English)
Page 36
... card driver. Did you install the device driver for the product? WHEN I CONNECT THE MONITOR, THE 'UNKNOWN MONITOR, PLUG&PLAY (VESA DDC) MONITOR FOUND' MESSAGE IS DISPLAYED. THE COLOR HAS BEEN CHANGED AFTER CHANGING THE GRAPHICS CARD. Did you install the device driver for the product? Install the device driver referring to the descriptions about the driver installation. If the beep sound is designed so that the color has a soft appearance by selecting Control Panel...
... card driver. Did you install the device driver for the product? WHEN I CONNECT THE MONITOR, THE 'UNKNOWN MONITOR, PLUG&PLAY (VESA DDC) MONITOR FOUND' MESSAGE IS DISPLAYED. THE COLOR HAS BEEN CHANGED AFTER CHANGING THE GRAPHICS CARD. Did you install the device driver for the product? Install the device driver referring to the descriptions about the driver installation. If the beep sound is designed so that the color has a soft appearance by selecting Control Panel...


