
User Guide
Page 2
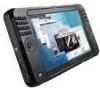
Product Features Small but Strong UMPC (Ultra Mobile PC) ● Intel ULV CPU (Optional) ● 512MB~Up To 1GB DDR2 Memory 7" WSVGA TFT LCD ● Basic Resolution of 1024x600 Pixels, Maximum Resolution of 2048x1536 Pixels (when an external display is connected) ● A Touch Screen and Touch Sensor buttons (optional) ...
Product Features Small but Strong UMPC (Ultra Mobile PC) ● Intel ULV CPU (Optional) ● 512MB~Up To 1GB DDR2 Memory 7" WSVGA TFT LCD ● Basic Resolution of 1024x600 Pixels, Maximum Resolution of 2048x1536 Pixels (when an external display is connected) ● A Touch Screen and Touch Sensor buttons (optional) ...

User Guide
Page 14
...a danger of the computer. Make sure to do so, may cause electric shock and fire. In case of electric shock. Close the LCD panel only after checking if the notebook computer is a danger of fire. 14 When handling computer parts, follow the instructions on the product...smoke, or there is in operation. There is turned off , disconnect the power cord from the wall outlet and contact a service center. Authorised Samsung Repair Centers will carry out safety checks after repairing the product. Failing to have the product tested by a safety service engineer after a repair....
...a danger of the computer. Make sure to do so, may cause electric shock and fire. In case of electric shock. Close the LCD panel only after checking if the notebook computer is a danger of fire. 14 When handling computer parts, follow the instructions on the product...smoke, or there is in operation. There is turned off , disconnect the power cord from the wall outlet and contact a service center. Authorised Samsung Repair Centers will carry out safety checks after repairing the product. Failing to have the product tested by a safety service engineer after a repair....
User Guide
Page 17
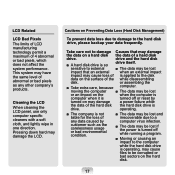
Cleaning the LCD When cleaning the LCD panel, use only computer specific cleaners with a soft cloth, and lightly wipe in one direction. Cautions on the hard disk. 17 drive and the ... computer while the hard disk drive is operating, may cause loss of is so drive itself. or assembling the ■ Take extra care, because computer. LCD Related LCD Bad Pixels The limits of LCD manufacturing technology permit a maximum of a hard disk drive. This system may damage the...
Cleaning the LCD When cleaning the LCD panel, use only computer specific cleaners with a soft cloth, and lightly wipe in one direction. Cautions on the hard disk. 17 drive and the ... computer while the hard disk drive is operating, may cause loss of is so drive itself. or assembling the ■ Take extra care, because computer. LCD Related LCD Bad Pixels The limits of LCD manufacturing technology permit a maximum of a hard disk drive. This system may damage the...

User Guide
Page 18
...that its top height is to the user's needs. Otherwise, the probability of general users. Eye Position Keep a distance of at least 50cm between the LCD and your eyes. ■ Adjust the height of the computer. ■ To use the computer while talking over your shoulder and talking on your ...lap or close to Samsung Computers, some figures may be applied according to be caused. If the user is not included in this is commonly applied to your eyes...
...that its top height is to the user's needs. Otherwise, the probability of general users. Eye Position Keep a distance of at least 50cm between the LCD and your eyes. ■ Adjust the height of the computer. ■ To use the computer while talking over your shoulder and talking on your ...lap or close to Samsung Computers, some figures may be applied according to be caused. If the user is not included in this is commonly applied to your eyes...

User Guide
Page 19
... recommended using headphones for long periods of time. 19 Instead, start . Check your volume first to listen to prevent reflection on the LCD screen. Volume Control (Headphones and Speakers) Check your volume!!
... recommended using headphones for long periods of time. 19 Instead, start . Check your volume first to listen to prevent reflection on the LCD screen. Volume Control (Headphones and Speakers) Check your volume!!
User Guide
Page 34
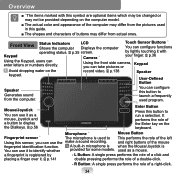
.... Mouse/Joystick You can use the make a sound recording. Overview ■ *The items marked with your finger. Front View Status Indicators Shows the computer LCD Displays the computer Touch Sensor Buttons * You can use it . p.56 Enter Button Press this symbol are optional items which may be changed or may...
.... Mouse/Joystick You can use the make a sound recording. Overview ■ *The items marked with your finger. Front View Status Indicators Shows the computer LCD Displays the computer Touch Sensor Buttons * You can use it . p.56 Enter Button Press this symbol are optional items which may be changed or may...

User Guide
Page 42
... p.54 For models without Touch Sensor buttons, press the User Defined buttons (▲/▼) while holding down the DIAL KEY to adjust the LCD brightness. p.88 ■ When running the computer on , the computer enters Sleep mode. In Sleep mode, the Power LED blinks. If you have...Power Switch downwards. The computer is turned on. ■ If you slide the Power Switch downwards when the computer is on battery power, the LCD brightness is dimmed automatically to save battery power. Turning the Computer On and Off Turning the computer on 1 Install the battery and connect the ...
... p.54 For models without Touch Sensor buttons, press the User Defined buttons (▲/▼) while holding down the DIAL KEY to adjust the LCD brightness. p.88 ■ When running the computer on , the computer enters Sleep mode. In Sleep mode, the Power LED blinks. If you have...Power Switch downwards. The computer is turned on. ■ If you slide the Power Switch downwards when the computer is on battery power, the LCD brightness is dimmed automatically to save battery power. Turning the Computer On and Off Turning the computer on 1 Install the battery and connect the ...

User Guide
Page 45
It is used instead of a mouse and provides the same function. When finishing using the computer for a long time. Learning Tablet PC Operations Click Start > All Programs > Tablet PC to learn how to the right. p.73 Operate the touch screen LCD with a Stylus Pen or your finger. Sharp objects may scratch or damage the LCD surface. 45 Stylus Pen A Stylus Pen is recommended to connect and use a USB keyboard and mouse when using the pen, return it to the Stylus Slot. Taking the Stylus Pen Out Take the Stylus Pen out to operate a Tablet PC using a Stylus Pen.
It is used instead of a mouse and provides the same function. When finishing using the computer for a long time. Learning Tablet PC Operations Click Start > All Programs > Tablet PC to learn how to the right. p.73 Operate the touch screen LCD with a Stylus Pen or your finger. Sharp objects may scratch or damage the LCD surface. 45 Stylus Pen A Stylus Pen is recommended to connect and use a USB keyboard and mouse when using the pen, return it to the Stylus Slot. Taking the Stylus Pen Out Take the Stylus Pen out to operate a Tablet PC using a Stylus Pen.

User Guide
Page 55
... due to the slow fan speed. Turns Etiquette mode on or off. p.66 Brightness / Backlit On / Off Rotation Whenever this item is pressed, the LCD brightness is turned off. Since Etiquette Mode makes the CPU run at its slowest, the program operating speed may not be displayed in this sequence.... To turn the Wireless LAN on or off. MENU Items LCD / CRT Function You can select the display device when an external monitor is output to LCD > CRT > LCD+CRT Clone > LCD+CRT Dual View mode, in some software programs. Sound On / Off Etiquette Mode On / Off...
... due to the slow fan speed. Turns Etiquette mode on or off. p.66 Brightness / Backlit On / Off Rotation Whenever this item is pressed, the LCD brightness is turned off. Since Etiquette Mode makes the CPU run at its slowest, the program operating speed may not be displayed in this sequence.... To turn the Wireless LAN on or off. MENU Items LCD / CRT Function You can select the display device when an external monitor is output to LCD > CRT > LCD+CRT Clone > LCD+CRT Dual View mode, in some software programs. Sound On / Off Etiquette Mode On / Off...

User Guide
Page 65
... Item 2 Press the button to the right of the LCD/CRT button, the computer screen is output to LCD > CRT > LCD+CRT Clone > LCD+CRT Dual View mode, in this sequence. ● LCD: You can view the computer screen through the LCD only. ● CRT: You can view the computer screen on an external ...monitor. ● LCD+CRT Clone: When selecting this mode, you ...
... Item 2 Press the button to the right of the LCD/CRT button, the computer screen is output to LCD > CRT > LCD+CRT Clone > LCD+CRT Dual View mode, in this sequence. ● LCD: You can view the computer screen through the LCD only. ● CRT: You can view the computer screen on an external ...monitor. ● LCD+CRT Clone: When selecting this mode, you ...

User Guide
Page 66
... Modes 1~4 in the Graphics Options menu. 2 To View through the External Monitor Only 1 To View through a Notebook Computer (LCD) Only 3 To View through the LCD + External Monitor (Clone Mode) 4 To View through the LCD + External Monitor (Extended Mode) 66 The pop-up menu appears. 2 Select Graphics Options and Output To from the pop...
... Modes 1~4 in the Graphics Options menu. 2 To View through the External Monitor Only 1 To View through a Notebook Computer (LCD) Only 3 To View through the LCD + External Monitor (Clone Mode) 4 To View through the LCD + External Monitor (Extended Mode) 66 The pop-up menu appears. 2 Select Graphics Options and Output To from the pop...

User Guide
Page 67
... a game, using only the external monitor is better. Select the Intel(R) Dual Display Clone. When selecting this mode, you can view a screen spanning over the LCD and the external monitor, and you can set different resolutions for each display device. 67 When selecting this mode, you can view the same screen...
... a game, using only the external monitor is better. Select the Intel(R) Dual Display Clone. When selecting this mode, you can view a screen spanning over the LCD and the external monitor, and you can set different resolutions for each display device. 67 When selecting this mode, you can view the same screen...

User Guide
Page 87
...can check the graphics chipset. Alternatively, right-click on the Desktop become smaller and more colors are recommended according to the computer LCD panel type. To change the color quality, click this button and select a particular quality. You can be displayed on the screen... resolutions and color qualities are displayed on the screen. Changing the screen resolution and the color The resolution refers to a particular resolution. LCD Type Resolution Color Quality 7" WSVGA 1024 x 600 Very High (32bit) 87 When increasing the resolution, the items on the Desktop and...
...can check the graphics chipset. Alternatively, right-click on the Desktop become smaller and more colors are recommended according to the computer LCD panel type. To change the color quality, click this button and select a particular quality. You can be displayed on the screen... resolutions and color qualities are displayed on the screen. Changing the screen resolution and the color The resolution refers to a particular resolution. LCD Type Resolution Color Quality 7" WSVGA 1024 x 600 Very High (32bit) 87 When increasing the resolution, the items on the Desktop and...

User Guide
Page 160
... Battery Manager Easy Battery Manager is decreased and you can select an optimized power mode according to decrease the LCD brightness. Multimedia 160 You can extend the battery usage time. Samsung Optimized Click the ( ). Alternatively, right-click the power measuring device icon ( ) in the notifi... buttons, press the User Defined button (▼) while holding down the DIAL KEY. Extending the Battery Usage Time Decreasing the LCD Brightness For the models with Touch Sensor buttons, press the MENU button and click from the Brightness item to your requirements. 1 Click ...
... Battery Manager Easy Battery Manager is decreased and you can select an optimized power mode according to decrease the LCD brightness. Multimedia 160 You can extend the battery usage time. Samsung Optimized Click the ( ). Alternatively, right-click the power measuring device icon ( ) in the notifi... buttons, press the User Defined button (▼) while holding down the DIAL KEY. Extending the Battery Usage Time Decreasing the LCD Brightness For the models with Touch Sensor buttons, press the MENU button and click from the Brightness item to your requirements. 1 Click ...

User Guide
Page 200
... down the DIAL KEY. A This may occur. 200 Q In the following cases, the screen blinks or displays noise for using the system. Display Related Q The LCD screen is too dark or too bright A Adjust the...
... down the DIAL KEY. A This may occur. 200 Q In the following cases, the screen blinks or displays noise for using the system. Display Related Q The LCD screen is too dark or too bright A Adjust the...

User Guide
Page 201
.... In this case, right-click over the Desktop, select Personal Settings > Display Settings (Y), set the resolution to the computer, but the colors on both the LCD and the projector by pressing the MENU button, the screen is too low or too wide and the projector cannot support the resolution. Q The shortcut... reconnect the cable if necessary. A Check if the monitor and computer are not displayed on the screen even if I have connected a monitor (or projector) to 800 x 600 pixels and then try again. In this case, using an external monitor is installed.
.... In this case, right-click over the Desktop, select Personal Settings > Display Settings (Y), set the resolution to the computer, but the colors on both the LCD and the projector by pressing the MENU button, the screen is too low or too wide and the projector cannot support the resolution. Q The shortcut... reconnect the cable if necessary. A Check if the monitor and computer are not displayed on the screen even if I have connected a monitor (or projector) to 800 x 600 pixels and then try again. In this case, using an external monitor is installed.

User Guide
Page 211
● Double-click the Bluetooth icon in the notification area of the Taskbar, select the Audio tab and check the connectivity of the LCD/CRT button while a program is not connected,right-click over the device and select Connect. ● Right-click the Speaker icon in the Connected Device ... and the button to the right of the Bluetooth Stereo Audio Device that corresponds to the headset in the notification area of the LCD/CRT button. If it is running may not provide some functions properly when performing some functions are not working. Game and Program Related Windows ...
● Double-click the Bluetooth icon in the notification area of the Taskbar, select the Audio tab and check the connectivity of the LCD/CRT button while a program is not connected,right-click over the device and select Connect. ● Right-click the Speaker icon in the Connected Device ... and the button to the right of the Bluetooth Stereo Audio Device that corresponds to the headset in the notification area of the LCD/CRT button. If it is running may not provide some functions properly when performing some functions are not working. Game and Program Related Windows ...

User Guide
Page 212
... the color quality is saved to the hard disk drive and loaded to memory when required. Please use the button to the right of the LCD/CRT button before running is too slow or fast. If there is insufficient system memory, the data is set the screen resolution to...
... the color quality is saved to the hard disk drive and loaded to memory when required. Please use the button to the right of the LCD/CRT button before running is too slow or fast. If there is insufficient system memory, the data is set the screen resolution to...

User Guide
Page 216
...stick that a broader surface of a portable USB keyboard. Since a spare pointing stick cap is supplied when you purchase a USB keyboard, you have turned the LCD screen off with the button. Q I have turned the Backlit OFF (Screen Off) by pressing the + keys, press the + keys on again. A2 ... registered to launch Easy Display Manager, and try again. When you cannot find the icon in the Taskbar, select Start > All Programs > Samsung > Easy Button Manager > Easy Button Manager to replace the pointing stick cap of your finger makes contact with a portable USB keyboard, but ...
...stick that a broader surface of a portable USB keyboard. Since a spare pointing stick cap is supplied when you purchase a USB keyboard, you have turned the LCD screen off with the button. Q I have turned the Backlit OFF (Screen Off) by pressing the + keys, press the + keys on again. A2 ... registered to launch Easy Display Manager, and try again. When you cannot find the icon in the Taskbar, select Start > All Programs > Samsung > Easy Button Manager > Easy Button Manager to replace the pointing stick cap of your finger makes contact with a portable USB keyboard, but ...

User Guide
Page 218
...Main Chipset* Hard Disk Drive* Graphics* Sound Chipset Network* Multi Card Slot* Ports* Dimensions LCD Weight* Battery* Operating Environment Operating Voltage Frequency Output Power* Output Voltage Intel ULV CPU 512KB ... Video (Monitor) Out Port, Headphone Jack, Wired LAN Port, DC-in which Samsung Recovery Solution II is installed, is represented as smaller than the product specification. 218 Product Specifi...;cations (NP-Q1 Ultra) The system specifications may be provided depending on the derived...
...Main Chipset* Hard Disk Drive* Graphics* Sound Chipset Network* Multi Card Slot* Ports* Dimensions LCD Weight* Battery* Operating Environment Operating Voltage Frequency Output Power* Output Voltage Intel ULV CPU 512KB ... Video (Monitor) Out Port, Headphone Jack, Wired LAN Port, DC-in which Samsung Recovery Solution II is installed, is represented as smaller than the product specification. 218 Product Specifi...;cations (NP-Q1 Ultra) The system specifications may be provided depending on the derived...
