
User Guide
Page 2
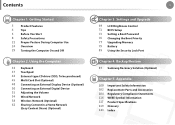
... Password 76 Changing the Boot Priority 77 Upgrading Memory 79 Battery 85 Using the Security Lock Port Chapter 4. Backup/Restore 87 Samsung Recovery Solution (Optional) Chapter 5. Using the Computer 33 Keyboard 37 Touchpad 43 External-type CD drive (ODD, To be purchased) 45 Multi Card Slot (Optional) 48 Connecting an External Display...
... Password 76 Changing the Boot Priority 77 Upgrading Memory 79 Battery 85 Using the Security Lock Port Chapter 4. Backup/Restore 87 Samsung Recovery Solution (Optional) Chapter 5. Using the Computer 33 Keyboard 37 Touchpad 43 External-type CD drive (ODD, To be purchased) 45 Multi Card Slot (Optional) 48 Connecting an External Display...
User Guide
Page 5
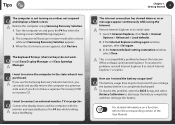
...while holding down or error Q messages appear continuously while using Samsung Recovery Solution. 1. CChhaapptteerr11. A This is completely discharged. To resolve this problem, reinstall Internet Explorer 8 or install Internet Explorer 7 or earlier. The keyboard Fn keys (shortcut keys) do not have a separate ...OS recovery DVD or recovery CD. A If you use the Samsung Recovery Solution function, you can I want to restore the computer to connect...
...while holding down or error Q messages appear continuously while using Samsung Recovery Solution. 1. CChhaapptteerr11. A This is completely discharged. To resolve this problem, reinstall Internet Explorer 8 or install Internet Explorer 7 or earlier. The keyboard Fn keys (shortcut keys) do not have a separate ...OS recovery DVD or recovery CD. A If you use the Samsung Recovery Solution function, you can I want to restore the computer to connect...

User Guide
Page 22
... user's needs. • Do not use the computer while you are lying down, but on a chair. • To use the computer while talking over the keyboard while sitting down . • Do not use a headset. Using the computer with the phone on your shoulder is to be applied according to be adjusted...
... user's needs. • Do not use the computer while you are lying down, but on a chair. • To use the computer while talking over the keyboard while sitting down . • Do not use a headset. Using the computer with the phone on your shoulder is to be applied according to be adjusted...

User Guide
Page 23
..., use a static paper holder so that the height of the paper is almost equal to that of time. Hand Position Keep your palm over the keyboard while typing. • Do not hold the mouse with excessive force. • Do not press the... keyboard, touchpad or mouse with excessive force. • It is recommended connecting an external keyboard and mouse when using the computer for long periods of the monitor. • Keep the line from your elbow to your hand...
..., use a static paper holder so that the height of the paper is almost equal to that of time. Hand Position Keep your palm over the keyboard while typing. • Do not hold the mouse with excessive force. • Do not press the... keyboard, touchpad or mouse with excessive force. • It is recommended connecting an external keyboard and mouse when using the computer for long periods of the monitor. • Keep the line from your elbow to your hand...

User Guide
Page 25
... and appearance of the computer may differ from the pictures used for the cover and the main body in the User Manual are displayed here. 3 Keyboard A device to the mouse ball and buttons. 6 Multi Card Slot (Optional) 7 Status Indicators A card slot that supports SD card, SDHC card, MMC card and SDXC...
... and appearance of the computer may differ from the pictures used for the cover and the main body in the User Manual are displayed here. 3 Keyboard A device to the mouse ball and buttons. 6 Multi Card Slot (Optional) 7 Status Indicators A card slot that supports SD card, SDHC card, MMC card and SDXC...

User Guide
Page 27
Overview Right View 12 3 4 5 6 Chapter 1 Getting Started 26 1 Headphone Jack A jack used to connect the headphones. 2 Microphone Jack A jack used to connect the microphone. 3 USB Port You can connect USB devices to the USB port such as a keyboard/mouse, digital camera, etc. 4 Monitor Port A port used to connect a monitor, TV or projector supporting a 15pin D-SUB interface. 5 Security Lock Port You can connect a Kensington lock to the Security Lock Port to prevent the computer from being stolen. 6 Power Button Turns the computer on or off.
Overview Right View 12 3 4 5 6 Chapter 1 Getting Started 26 1 Headphone Jack A jack used to connect the headphones. 2 Microphone Jack A jack used to connect the microphone. 3 USB Port You can connect USB devices to the USB port such as a keyboard/mouse, digital camera, etc. 4 Monitor Port A port used to connect a monitor, TV or projector supporting a 15pin D-SUB interface. 5 Security Lock Port You can connect a Kensington lock to the Security Lock Port to prevent the computer from being stolen. 6 Power Button Turns the computer on or off.

User Guide
Page 33
Chapter 2. Using the computer Keyboard 33 Touchpad 37 External-type CD drive (ODD, To be purchased) 43 Multi Card Slot (Optional) 45 Connecting an External Display Device (Optional) 48 Connecting an External Digital Device 50 Adjusting the Volume 51 Wired Network 54 Wireless Network (Optional) 58 Sharing Content in a Home Network (Easy Content Share) (Optional) 62
Chapter 2. Using the computer Keyboard 33 Touchpad 37 External-type CD drive (ODD, To be purchased) 43 Multi Card Slot (Optional) 45 Connecting an External Display Device (Optional) 48 Connecting an External Digital Device 50 Adjusting the Volume 51 Wired Network 54 Wireless Network (Optional) 58 Sharing Content in a Home Network (Easy Content Share) (Optional) 62
User Guide
Page 34
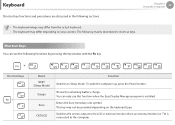
Keyboard Shortcut key functions and procedures are discussed in the following functions by pressing the keys below with the Fn key. + Shortcut Keys + Name REST (Sleep ... symbol. To wake the computer up, press the Power button. This key may differ depending on the keyboard type. Chapter 2 Using the computer 33 • The keyboard image may differ from the actual keyboard. • The keyboard may not be provided depending on your country. You can use this function when the Easy Display...
Keyboard Shortcut key functions and procedures are discussed in the following functions by pressing the keys below with the Fn key. + Shortcut Keys + Name REST (Sleep ... symbol. To wake the computer up, press the Power button. This key may differ depending on the keyboard type. Chapter 2 Using the computer 33 • The keyboard image may differ from the actual keyboard. • The keyboard may not be provided depending on your country. You can use this function when the Easy Display...

User Guide
Page 35
...with priority for maximum performance. • Speed Boot: Quick booting mode. Samsung Support Center System diagnosis, recovery and Internet consultation program, Samsung Support Center, will be launched. (Optional) For some models, Samsung Magic Doctor is installed. You can only use this function when the Easy ...Normal Mode Easy SpeedUp Manager • Speed: Maximum performance mode. The fan keeps turning ON and works in the BIOS Setup. Keyboard Chapter 2 Using the computer 34 Shortcut Keys Name Backlight Turns the LCD backlight on or off. This mode enables quick booting when ...
...with priority for maximum performance. • Speed Boot: Quick booting mode. Samsung Support Center System diagnosis, recovery and Internet consultation program, Samsung Support Center, will be launched. (Optional) For some models, Samsung Magic Doctor is installed. You can only use this function when the Easy ...Normal Mode Easy SpeedUp Manager • Speed: Maximum performance mode. The fan keeps turning ON and works in the BIOS Setup. Keyboard Chapter 2 Using the computer 34 Shortcut Keys Name Backlight Turns the LCD backlight on or off. This mode enables quick booting when ...

User Guide
Page 36
Num Lock Turns the numeric keyboard on or off . Touchpad Turns the Touchpad function on or off . Scroll Lock If you turn the Touchpad off wireless network device in some applications. When using an external mouse only, you can turn the Scroll Lock on or off . Keyboard Chapter 2 Using the computer 35 Shortcut Keys + Name Function Wireless network Turns on , you can scroll the screen up or down without changing the cursor location in a model equipped with wireless network device.
Num Lock Turns the numeric keyboard on or off . Touchpad Turns the Touchpad function on or off . Scroll Lock If you turn the Touchpad off wireless network device in some applications. When using an external mouse only, you can turn the Scroll Lock on or off . Keyboard Chapter 2 Using the computer 35 Shortcut Keys + Name Function Wireless network Turns on , you can scroll the screen up or down without changing the cursor location in a model equipped with wireless network device.

User Guide
Page 37
... pressing the + key combination, you have to turn the volume on the numeric keys. Numeric Key The numbers are printed in blue on or off. Keyboard Screen Brightness Control + Or + Chapter 2 Using the computer 36 Other Function Keys Performs the right-click mouse function (touchpad). Volume Control + Or + Alternatively, press the...
... pressing the + key combination, you have to turn the volume on the numeric keys. Numeric Key The numbers are printed in blue on or off. Keyboard Screen Brightness Control + Or + Chapter 2 Using the computer 36 Other Function Keys Performs the right-click mouse function (touchpad). Volume Control + Or + Alternatively, press the...

User Guide
Page 52
... the Volume Adjustment Program Click the Volume icon on the taskbar and select Recording Device. Adjusting the Volume using the Keyboard Using the Sound Recorder The procedures to record sound using the keyboard and the volume control program. If not, right-click over the Volume icon on the taskbar and slide the...
... the Volume Adjustment Program Click the Volume icon on the taskbar and select Recording Device. Adjusting the Volume using the Keyboard Using the Sound Recorder The procedures to record sound using the keyboard and the volume control program. If not, right-click over the Volume icon on the taskbar and slide the...
User Guide
Page 70
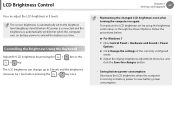
... through the Power Options, follow the procedures below. ► For Windows 7 1. Click Change the settings of the currently configured mode. 3. Controlling the Brightness Using the Keyboard Adjust the LCD brightness by pressing the + key. + key or the The LCD brightness can adjust the LCD brightness in 8 levels. Click Control Panel > Hardware...
... through the Power Options, follow the procedures below. ► For Windows 7 1. Click Change the settings of the currently configured mode. 3. Controlling the Brightness Using the Keyboard Adjust the LCD brightness by pressing the + key. + key or the The LCD brightness can adjust the LCD brightness in 8 levels. Click Control Panel > Hardware...
User Guide
Page 73
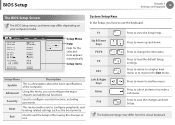
... the changes and exit Setup. Press to change the item value. System Setup Keys In the Setup, you have to view the Setup Help. The keyboard image may differ depending on your computer model. Advanced Using this menu, you to exit the Setup either saving the changes or not. F1 Up... & Down Keys F5/F6 F9 ESC Left & Right Keys Enter F10 Press to use the keyboard. Press to return to a higher level menu or to move to another menu. Press to move up and down. Press to select an item or...
... the changes and exit Setup. Press to change the item value. System Setup Keys In the Setup, you have to view the Setup Help. The keyboard image may differ depending on your computer model. Advanced Using this menu, you to exit the Setup either saving the changes or not. F1 Up... & Down Keys F5/F6 F9 ESC Left & Right Keys Enter F10 Press to use the keyboard. Press to return to a higher level menu or to move to another menu. Press to move up and down. Press to select an item or...
User Guide
Page 81
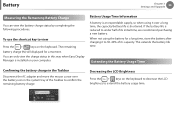
When not using it to confirm the remaining battery charge. Decreasing the LCD Brightness Press the + keys on the keyboard to decrease the LCD brightness to view Press the + keys on your computer. Battery Chapter 3 Settings and Upgrade 80 Measuring the Remaining Battery Charge You ... battery icon in the Taskbar Disconnect the AC adapter and move the mouse cursor over a long time, the capacity/battery life is installed on the keyboard. Extending the Battery Usage Time Confirming the battery charge in the system tray of its capacity.
When not using it to confirm the remaining battery charge. Decreasing the LCD Brightness Press the + keys on the keyboard to decrease the LCD brightness to view Press the + keys on your computer. Battery Chapter 3 Settings and Upgrade 80 Measuring the Remaining Battery Charge You ... battery icon in the Taskbar Disconnect the AC adapter and move the mouse cursor over a long time, the capacity/battery life is installed on the keyboard. Extending the Battery Usage Time Confirming the battery charge in the system tray of its capacity.