User Manual
Page 6
... from the appliance before self-cleaning. The introduction of the appliance that may turn the oven off and wait for their safety. • If the power cord is damaged, it . Do not store flammable materials in the oven or near the surface units. Important safety instructions Important safety instructions • If there...
... from the appliance before self-cleaning. The introduction of the appliance that may turn the oven off and wait for their safety. • If the power cord is damaged, it . Do not store flammable materials in the oven or near the surface units. Important safety instructions Important safety instructions • If there...
User Manual
Page 13
... examine the oven for play and injure themselves. • Install your dealer immediately. • Plug the power cord into a properly grounded outlet with the product • Do not cut or remove the ground prong from the power cord under any damage, do not operate the oven and notify your appliance on the interior or...
... examine the oven for play and injure themselves. • Install your dealer immediately. • Plug the power cord into a properly grounded outlet with the product • Do not cut or remove the ground prong from the power cord under any damage, do not operate the oven and notify your appliance on the interior or...
User Manual
Page 14
This may result in electric shock or fire. • Do not use a damaged power cord or loose wall socket. - If the power cord is flooded by any liquid, please contact your nearest Samsung service center. Do not touch the power cord. This may result in electric shock or fire. CRITICAL USAGE WARNING CAUTION • If the appliance is...
This may result in electric shock or fire. • Do not use a damaged power cord or loose wall socket. - If the power cord is flooded by any liquid, please contact your nearest Samsung service center. Do not touch the power cord. This may result in electric shock or fire. CRITICAL USAGE WARNING CAUTION • If the appliance is...
User Manual
Page 15
... observe safety precautions when using your oven. Failing to do so may result in a problem with your nearest Samsung service center. If the door is needed, contact your body while cooking or just after cooking. - If the...Failing to do so may result in electric shock. • Do not turn the oven off and disconnect the power cord, or shut off while an operation is hot, hot steam may result in electric shock or fire. - If...result in electric shock or fire. • Do not touch the power cord with wet hands. - Never try to repair the oven on your nearest Samsung service center. -
... observe safety precautions when using your oven. Failing to do so may result in a problem with your nearest Samsung service center. If the door is needed, contact your body while cooking or just after cooking. - If the...Failing to do so may result in electric shock. • Do not turn the oven off and disconnect the power cord, or shut off while an operation is hot, hot steam may result in electric shock or fire. - If...result in electric shock or fire. • Do not touch the power cord with wet hands. - Never try to repair the oven on your nearest Samsung service center. -
Installation Guide
Page 5
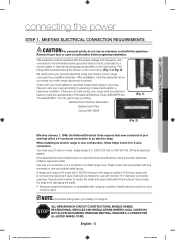
... minimum volt range is located. These cords may be used. After installation, have a licensed electrician install an approved outlet. A range cord rated at 40 amps with ring terminals on page 9. 02 CONNECTING THE POWER connecting the power STEP 1. This appliance must be taken...Because range terminals are no local codes, your main range disconnect is required. Use only a 3-conductor or a 4-conductor UL-listed range cord. English - 5 Install_30_Electric_Range_USA_DG68-00108G-09_EN+MES.indb 5 2018-07-31 3:48:04 If there are not accessible after range is located ...
... minimum volt range is located. These cords may be used. After installation, have a licensed electrician install an approved outlet. A range cord rated at 40 amps with ring terminals on page 9. 02 CONNECTING THE POWER connecting the power STEP 1. This appliance must be taken...Because range terminals are no local codes, your main range disconnect is required. Use only a 3-conductor or a 4-conductor UL-listed range cord. English - 5 Install_30_Electric_Range_USA_DG68-00108G-09_EN+MES.indb 5 2018-07-31 3:48:04 If there are not accessible after range is located ...
Installation Guide
Page 6
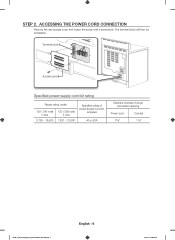
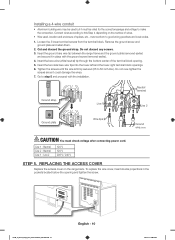
Terminal block Access cover Specified power-supply-cord kit rating Range rating, watts 120 / 240 volts 3-wire 8,750 - 16,500 120 / 208 volts 3-wire 7,801 - 12,500 Specified rating of power-supply-cord kit, amperes 40 or 50A Diameter (inches) of range connection opening Power cord Conduit 13/8" 11/8" Install_30_Electric_Range_USA_DG68-00108G-09_EN+MES.indb 6 English - 6 2018-07-31 3:48:04 The terminal block will then be accessible. STEP 2. ACCESSING THE POWER CORD CONNECTION Remove the rear access cover and loosen the screw with a screwdriver.
Terminal block Access cover Specified power-supply-cord kit rating Range rating, watts 120 / 240 volts 3-wire 8,750 - 16,500 120 / 208 volts 3-wire 7,801 - 12,500 Specified rating of power-supply-cord kit, amperes 40 or 50A Diameter (inches) of range connection opening Power cord Conduit 13/8" 11/8" Install_30_Electric_Range_USA_DG68-00108G-09_EN+MES.indb 6 English - 6 2018-07-31 3:48:04 The terminal block will then be accessible. STEP 2. ACCESSING THE POWER CORD CONNECTION Remove the rear access cover and loosen the screw with a screwdriver.
Installation Guide
Page 7
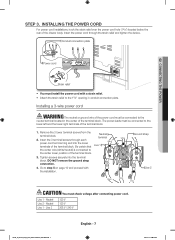
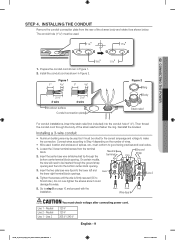
INSTALLING THE POWER CORD For power cord installations, hook the strain relief over the power cord hole (13/8") located below the rear of the power cord must install the power cord with the installation. Insert the power cord through each power cord terminal ring and into the terminal block. Neutral terminal...STEP 3. Conduit connection plate 02 CONNECTING THE POWER Power cord Strain relief • You must be connected to the center lower position of the terminal block. The power leads must check voltage after connecting power cord. Live 1 - Black Ground strap White ...
INSTALLING THE POWER CORD For power cord installations, hook the strain relief over the power cord hole (13/8") located below the rear of the power cord must install the power cord with the installation. Insert the power cord through each power cord terminal ring and into the terminal block. Neutral terminal...STEP 3. Conduit connection plate 02 CONNECTING THE POWER Power cord Strain relief • You must be connected to the center lower position of the terminal block. The power leads must check voltage after connecting power cord. Live 1 - Black Ground strap White ...
Installation Guide
Page 8
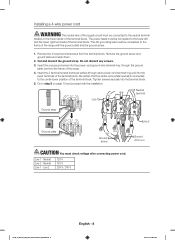
...Neutral Live 1 - Remove the 3 lower terminal screws from the terminal block. Insert the one ground screw into the power cord ground wire terminal ring, through each power cord terminal ring and into the lower terminals of the terminal block. Do not discard any screws. 3. Go to the ...07-31 3:48:04 Insert the 3 terminal screws (removed earlier) through the ground plate, and into the terminal block. 5. Installing a 4-wire power cord WARNING WARNING The neutral wire of the supply circuit must be connected to the lower left and the lower right terminals of the terminal block...
...Neutral Live 1 - Remove the 3 lower terminal screws from the terminal block. Insert the one ground screw into the power cord ground wire terminal ring, through each power cord terminal ring and into the lower terminals of the terminal block. Do not discard any screws. 3. Go to the ...07-31 3:48:04 Insert the 3 terminal screws (removed earlier) through the ground plate, and into the terminal block. 5. Installing a 4-wire power cord WARNING WARNING The neutral wire of the supply circuit must be connected to the lower left and the lower right terminals of the terminal block...
Installation Guide
Page 9
...(11/8") must be used but it could damage the wires. 5. " 11/8 " 13/8 02 CONNECTING THE POWER " 13/8 1. On certain models, the wire will need to Step 4 depending on page 10 and proceed with the installation.... STEP 4. Install the conduit cord as shown below. Reinstall the bracket. Neutral Live 1 - Installing a 3-wire conduit • Aluminum building wire... screws from the rear of splices, etc., must check voltage after connecting power cord. Prepare the conduit cord shown in Figure 2.
...(11/8") must be used but it could damage the wires. 5. " 11/8 " 13/8 02 CONNECTING THE POWER " 13/8 1. On certain models, the wire will need to Step 4 depending on page 10 and proceed with the installation.... STEP 4. Install the conduit cord as shown below. Reinstall the bracket. Neutral Live 1 - Installing a 3-wire conduit • Aluminum building wire... screws from the rear of splices, etc., must check voltage after connecting power cord. Prepare the conduit cord shown in Figure 2.
Installation Guide
Page 10
... through the bottom center of wires. • Wire used but it must be used , location and enclosure of splices, etc., must check voltage after connecting power cord. Do not over-tighten the screws since it in the pockets located below the opening . 5. To replace the wire cover, insert double projections in place...
... through the bottom center of wires. • Wire used but it must be used , location and enclosure of splices, etc., must check voltage after connecting power cord. Do not over-tighten the screws since it in the pockets located below the opening . 5. To replace the wire cover, insert double projections in place...


