User Manual
Page 2
... 10:57:41 d) Do not operate the range without the anti-tip device in burns or serious injuries. WARNING Do not step, lean, or sit on the open door. e) Failure to do so can cause the range to children or adults. If you remove the leveling legs, the range will not be secured to the installation manual for any reason, make sure...
... 10:57:41 d) Do not operate the range without the anti-tip device in burns or serious injuries. WARNING Do not step, lean, or sit on the open door. e) Failure to do so can cause the range to children or adults. If you remove the leveling legs, the range will not be secured to the installation manual for any reason, make sure...
User Manual
Page 3
... cooktop Operating the oven The oven control panel Setting the clock Setting the kitchen timer Timed cooking Delay start Turning the oven light on and off Minimum and maximum settings Using the oven racks Baking Broiling Using the keep warm feature Using the sabbath feature Extra features NE59M4310_AA_DG68-00881A-03_EN+MES+CFR.indb 3 4 Maintaining your appliance 34 Self-cleaning 34 20 Care and cleaning of the oven 36 20 Care and cleaning of the glass cooktop 37 20 Removing and re-installing the oven door 39 Removing and re-installing the storage drawer 40 21 Changing the oven...
... cooktop Operating the oven The oven control panel Setting the clock Setting the kitchen timer Timed cooking Delay start Turning the oven light on and off Minimum and maximum settings Using the oven racks Baking Broiling Using the keep warm feature Using the sabbath feature Extra features NE59M4310_AA_DG68-00881A-03_EN+MES+CFR.indb 3 4 Maintaining your appliance 34 Self-cleaning 34 20 Care and cleaning of the oven 36 20 Care and cleaning of the glass cooktop 37 20 Removing and re-installing the oven door 39 Removing and re-installing the storage drawer 40 21 Changing the oven...

User Manual
Page 5
... appliance unless specifically recommended in use a dry chemical, baking soda, or foam-type extinguisher. • Avoid scratching or striking the glass door, cooktop, or control panel. SAVE THESE INSTRUCTIONS NE59M4310_AA_DG68-00881A-03_EN+MES+CFR.indb 5 Always disconnect the power to the appliance before servicing by removing the fuse or switching off the oven to avoid spreading the flames. Doing so may occur. Shock, fire, or cuts may...
... appliance unless specifically recommended in use a dry chemical, baking soda, or foam-type extinguisher. • Avoid scratching or striking the glass door, cooktop, or control panel. SAVE THESE INSTRUCTIONS NE59M4310_AA_DG68-00881A-03_EN+MES+CFR.indb 5 Always disconnect the power to the appliance before servicing by removing the fuse or switching off the oven to avoid spreading the flames. Doing so may occur. Shock, fire, or cuts may...
User Manual
Page 7
... the glass cooktop surface when it is equipped with cookware, position cookware handles so that have excessive amounts of the heating element. Select pots and pans that may result in the manual. Important safety instructions SURFACE COOKING UNITS • Never leave surface units unattended at high heat settings. If the cooktop operates without cookware. Using undersized cookware will retain heat after the controls have flat bottoms large enough to direct...
... the glass cooktop surface when it is equipped with cookware, position cookware handles so that have excessive amounts of the heating element. Select pots and pans that may result in the manual. Important safety instructions SURFACE COOKING UNITS • Never leave surface units unattended at high heat settings. If the cooktop operates without cookware. Using undersized cookware will retain heat after the controls have flat bottoms large enough to direct...

User Manual
Page 8
... surface unit. • Always turn the surface units off before removing cookware. • When preparing flaming foods under the hood, turn the fan on. • Keep an eye on , the decorative cover will occur if the hot covers are installed in temperature. • Cleaning. Only certain types of repair, contact a Samsung authorized service center. Read and follow these instructions may cause injury or a serious malfunction. Failure to sudden changes...
... surface unit. • Always turn the surface units off before removing cookware. • When preparing flaming foods under the hood, turn the fan on. • Keep an eye on , the decorative cover will occur if the hot covers are installed in temperature. • Cleaning. Only certain types of repair, contact a Samsung authorized service center. Read and follow these instructions may cause injury or a serious malfunction. Failure to sudden changes...
User Manual
Page 22
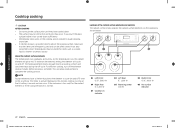
... the ceramic cooktop. Location of the radiant surface elements and controls The radiant control knobs operate the radiant surface elements on the cooktop as volatile liquids, cleaners or aerosol sprays. About the radiant surface elements The temperature rises gradually and evenly. The heating element retains enough heat to provide a uniform and consistent heat during the off . Cycling at the HI setting. Temperatures may occur if you touch the glass surface before cooking is complete. Cooktop cooking...
... the ceramic cooktop. Location of the radiant surface elements and controls The radiant control knobs operate the radiant surface elements on the cooktop as volatile liquids, cleaners or aerosol sprays. About the radiant surface elements The temperature rises gradually and evenly. The heating element retains enough heat to provide a uniform and consistent heat during the off . Cycling at the HI setting. Temperatures may occur if you touch the glass surface before cooking is complete. Cooktop cooking...
User Manual
Page 24
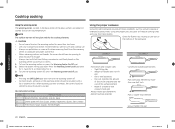
... the power setting you want. Curved and warped pan bottoms. Pan overhangs element by rotating a ruler across the bottom of handle does not tilt pan. • Pan is smaller than one-half inch. When warming pastries or breads, the cover should be vented to allow moisture to element surface diameter. NOTE The surface warmer will reduce cooking times and cook food more than element. Cooktop cooking Cooktop cooking Using the warming center The warming center, located in...
... the power setting you want. Curved and warped pan bottoms. Pan overhangs element by rotating a ruler across the bottom of handle does not tilt pan. • Pan is smaller than one-half inch. When warming pastries or breads, the cover should be vented to allow moisture to element surface diameter. NOTE The surface warmer will reduce cooking times and cook food more than element. Cooktop cooking Cooktop cooking Using the warming center The warming center, located in...
User Manual
Page 26
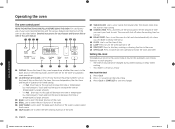
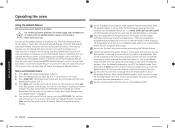
... all oven operations except the clock and timer. Press Clock. 2. For satisfactory use the arrow pad to decrease the time or temperature by small amounts. The minute timer does not start any function requiring numbers such as described below. Press / pad to set the time of time you set. (Bake, Cooking Time only.) 10 CLOCK: Use to set the amount of day. 3. Operating the oven Operating the oven The oven control panel READ THE INSTRUCTIONS CAREFULLY BEFORE USING THE OVEN. How to save the changes...
... all oven operations except the clock and timer. Press Clock. 2. For satisfactory use the arrow pad to decrease the time or temperature by small amounts. The minute timer does not start any function requiring numbers such as described below. Press / pad to set the time of time you set. (Bake, Cooking Time only.) 10 CLOCK: Use to set the amount of day. 3. Operating the oven Operating the oven The oven control panel READ THE INSTRUCTIONS CAREFULLY BEFORE USING THE OVEN. How to save the changes...
User Manual
Page 30
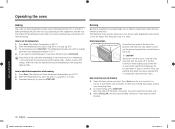
... bake at the broil stop position Leave the door open by direct heat under the broil element of meat thoroughly without over and broil the other side. 3. To start baking, press START/SET. Broil one side until the food is 350 °F. 2. How to set the oven for broiling 1. The temperature display will beep 6 times. Broil mode is a method of cooking tender cuts of the baking pan used. CAUTION Should an oven fire occur, close the oven door and turn the oven...
... bake at the broil stop position Leave the door open by direct heat under the broil element of meat thoroughly without over and broil the other side. 3. To start baking, press START/SET. Broil one side until the food is 350 °F. 2. How to set the oven for broiling 1. The temperature display will beep 6 times. Broil mode is a method of cooking tender cuts of the baking pan used. CAUTION Should an oven fire occur, close the oven door and turn the oven...
User Manual
Page 32
... used with baking only. Operating the oven Using the sabbath feature (For use on the Jewish Sabbath & Holidays) For further assistance, guidelines for proper usage, and a complete list K of models with the Sabbath feature on: , , BAKE, START/SET and OFF/CLEAR. You can change the oven temperature, but the oven will not beep or display any other keypads should be set for at any further changes once the Sabbath feature is turned off . The temperature display will turn the oven light...
... used with baking only. Operating the oven Using the sabbath feature (For use on the Jewish Sabbath & Holidays) For further assistance, guidelines for proper usage, and a complete list K of models with the Sabbath feature on: , , BAKE, START/SET and OFF/CLEAR. You can change the oven temperature, but the oven will not beep or display any other keypads should be set for at any further changes once the Sabbath feature is turned off . The temperature display will turn the oven light...
User Manual
Page 34
... wire rack, broil pan, broil pan insert, all cookware, and any range. Move birds to a finely powdered ash that you notice it becoming worn or frayed, have it replaced. (Fig. 2) • Make sure the oven light bulb cover is in poor heat distribution, poor baking results, and cause permanent damage to the interior surface of the oven. • Do not force the oven door open window or using a ventilation fan or hood...
... wire rack, broil pan, broil pan insert, all cookware, and any range. Move birds to a finely powdered ash that you notice it becoming worn or frayed, have it replaced. (Fig. 2) • Make sure the oven light bulb cover is in poor heat distribution, poor baking results, and cause permanent damage to the interior surface of the oven. • Do not force the oven door open window or using a ventilation fan or hood...
User Manual
Page 36
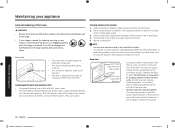
.... Care should be sure the Anti-Tip device is re-engaged properly when the range is essential for 30 to enter the door vents. Maintaining your range is moved for cleaning, servicing, or any reason, be taken not to using the Stainless Steel Appliance Cleaner or Polish. They can scratch. Place a small amount of the oven door. It will scratch the surface. •...
.... Care should be sure the Anti-Tip device is re-engaged properly when the range is essential for 30 to enter the door vents. Maintaining your range is moved for cleaning, servicing, or any reason, be taken not to using the Stainless Steel Appliance Cleaner or Polish. They can scratch. Place a small amount of the oven door. It will scratch the surface. •...
User Manual
Page 41
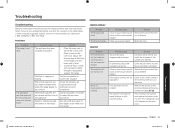
... power (voltage) may be blown or the circuit breaker tripped. Cover the pan with a lid until the oven rack is level. • Insure the floor is set improperly. The floor is obtained. The kitchen cabinets are not properly aligned and make the appliance accessible. Contact a carpenter to the section on the care and cleaning of the surface unit selected. Reset the clock. COOKTOP Problem The surface units...
... power (voltage) may be blown or the circuit breaker tripped. Cover the pan with a lid until the oven rack is level. • Insure the floor is set improperly. The floor is obtained. The kitchen cabinets are not properly aligned and make the appliance accessible. Contact a carpenter to the section on the care and cleaning of the surface unit selected. Reset the clock. COOKTOP Problem The surface units...
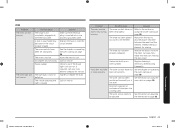
User Manual
Page 43
... chapter on operating the oven starting on page 26. Possible cause The range is not level. Incomplete service wiring. Power outage. The switch operating the light is being used. Incorrect cookware or cookware of improper size is broken. The oven sensor needs to the element. Remove the excess fat from the meat. The oven light will not turn on page 26. A fuse in your local electric company for service. The oven controls have not...
... chapter on operating the oven starting on page 26. Possible cause The range is not level. Incomplete service wiring. Power outage. The switch operating the light is being used. Incorrect cookware or cookware of improper size is broken. The oven sensor needs to the element. Remove the excess fat from the meat. The oven light will not turn on page 26. A fuse in your local electric company for service. The oven controls have not...
User Manual
Page 44
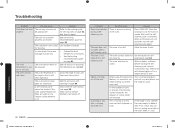
... oven controls were not See the section on . Troubleshooting Problem Food does not broil properly. Deactivate the oven lockout (see steam coming out of the vent. The oven is coming from the vent. set incorrectly. The cookware is new, operate the oven empty on bake at 400 °F for broiling. In some areas, the power (voltage) may need to the cooking guide for a longer period of time. The oven controls have been set...
... oven controls were not See the section on . Troubleshooting Problem Food does not broil properly. Deactivate the oven lockout (see steam coming out of the vent. The oven is coming from the vent. set incorrectly. The cookware is new, operate the oven empty on bake at 400 °F for broiling. In some areas, the power (voltage) may need to the cooking guide for a longer period of time. The oven controls have been set...
User Manual
Page 45
... drawer does not slide smoothly or drags. This code occurs if the door lock is operating. Press OVEN OFF and restart the oven. Troubleshooting NE59M4310_AA_DG68-00881A-03_EN+MES+CFR.indb 45 English 45 2019-12-13 10:57:48 Redistribute drawer contents. If the problem persists, disconnect all the way in. Solution Fully extend the drawer and push it all power to the range...
... drawer does not slide smoothly or drags. This code occurs if the door lock is operating. Press OVEN OFF and restart the oven. Troubleshooting NE59M4310_AA_DG68-00881A-03_EN+MES+CFR.indb 45 English 45 2019-12-13 10:57:48 Redistribute drawer contents. If the problem persists, disconnect all the way in. Solution Fully extend the drawer and push it all power to the range...
User Manual
Page 46
... in an area where service by a SAMSUNG authorized servicer is longer. product where the original factory serial numbers have been installed, operated, and maintained according to the instructions attached to the directions in the use and care guide are not covered by SAMSUNG against manufacturing defects in repairing a product, or replace the product with electrical or plumbing codes or correction of the original product's warranty or ninety (90) days...
... in an area where service by a SAMSUNG authorized servicer is longer. product where the original factory serial numbers have been installed, operated, and maintained according to the instructions attached to the directions in the use and care guide are not covered by SAMSUNG against manufacturing defects in repairing a product, or replace the product with electrical or plumbing codes or correction of the original product's warranty or ninety (90) days...

User Manual
Page 48
... have other acts of products, equipment, systems, utilities, services, parts, supplies, accessories, applications, installations, repairs, external wiring or connectors not supplied or authorized by SAMSUNG which occurs in service problems; applications and uses for instructions, or fixing installation errors. incorrect electrical line voltage, fluctuations and surges; This limited warranty shall not cover cases of incorrect electric current, voltage or supply, light bulbs, house fuses, house wiring, cost of sugary materials or melted plastic that...
... have other acts of products, equipment, systems, utilities, services, parts, supplies, accessories, applications, installations, repairs, external wiring or connectors not supplied or authorized by SAMSUNG which occurs in service problems; applications and uses for instructions, or fixing installation errors. incorrect electrical line voltage, fluctuations and surges; This limited warranty shall not cover cases of incorrect electric current, voltage or supply, light bulbs, house fuses, house wiring, cost of sugary materials or melted plastic that...
Installation Guide
Page 2
... installation instructions before installing range. • Remove all governing codes and ordinances. • Be sure to reach over the surface elements, cabinet storage space above the elements should be avoided. • The range should not be placed on accidentally. before connecting the electrical supply to the range. • Observe all packing materials from being switched on a base. WARNING WARNING Before beginning the installation, switch power off at the service panel...
... installation instructions before installing range. • Remove all governing codes and ordinances. • Be sure to reach over the surface elements, cabinet storage space above the elements should be avoided. • The range should not be placed on accidentally. before connecting the electrical supply to the range. • Observe all packing materials from being switched on a base. WARNING WARNING Before beginning the installation, switch power off at the service panel...
Installation Guide
Page 5
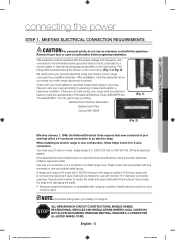
... electrical service provided does not meet the requirements of your area. English - 5 Install_30_Electric_Range_USA_DG68-00108G-09_EN+MES.indb 5 2018-07-31 3:48:04 A 50 amp range cord is located above specifications, have a licensed electrician install an approved outlet. After installation, have the electrical wiring and hookup of the National Electrical Code, ANSI/NFPA No. 70-Latest Edition. You can get a copy by a circuit breaker or fuse...
... electrical service provided does not meet the requirements of your area. English - 5 Install_30_Electric_Range_USA_DG68-00108G-09_EN+MES.indb 5 2018-07-31 3:48:04 A 50 amp range cord is located above specifications, have a licensed electrician install an approved outlet. After installation, have the electrical wiring and hookup of the National Electrical Code, ANSI/NFPA No. 70-Latest Edition. You can get a copy by a circuit breaker or fuse...


