
User Manual Ver.1.0 (English, French)
Page 4
... the cooktop surface 40 The oven control panel 41 Using the oven racks 43 Using the gliding rack 44 Using the partition 45 Twin cooking mode temperature setting ranges 46 Minimum and maximum settings 46 Chef baking 47 Convection baking 49 Convection roasting 50 Timed cooking 51 Delay start 52 Broiling 53 Using the favorite cook feature 54 Using the healthy cook feature 57 Using the keep warm function 57 Using the bread proof function 57 Using the options function 60 Using the temp probe 62 Setting the sabbath feature 63 About the warming drawer 63 Turning the warming drawer...
... the cooktop surface 40 The oven control panel 41 Using the oven racks 43 Using the gliding rack 44 Using the partition 45 Twin cooking mode temperature setting ranges 46 Minimum and maximum settings 46 Chef baking 47 Convection baking 49 Convection roasting 50 Timed cooking 51 Delay start 52 Broiling 53 Using the favorite cook feature 54 Using the healthy cook feature 57 Using the keep warm function 57 Using the bread proof function 57 Using the options function 60 Using the temp probe 62 Setting the sabbath feature 63 About the warming drawer 63 Turning the warming drawer...

User Manual Ver.1.0 (English, French)
Page 6
... guard of flame from the oven. Introduction of fresh air at self-clean temperatures may result in this CAUTION Owner's Manual. FOR YOUR SAFETY When using a multi-purpose dry chemical or foam-type fire extinguisher. User servicing - Do not repair or replace any part of interest to avoid spreading the flame. Do not store items of the appliance. Avoid scratching or impacting glass doors, cooktops or control panels. Doing so...
... guard of flame from the oven. Introduction of fresh air at self-clean temperatures may result in this CAUTION Owner's Manual. FOR YOUR SAFETY When using a multi-purpose dry chemical or foam-type fire extinguisher. User servicing - Do not repair or replace any part of interest to avoid spreading the flame. Do not store items of the appliance. Avoid scratching or impacting glass doors, cooktops or control panels. Doing so...

User Manual Ver.1.0 (English, French)
Page 7
..., and paper away from steam. If the power cord is heavy soil on hot surfaces may turn the control knobs inattentively. Do not operate the cooktop without cookware, the control knobs will become hot. Self cleaning the oven when there is damaged, it . To avoid oil spillover and fire, use a towel or other part of the range. Do not lift the cooktop. Never wear loose-fitting or hanging garments...
..., and paper away from steam. If the power cord is heavy soil on hot surfaces may turn the control knobs inattentively. Do not operate the cooktop without cookware, the control knobs will become hot. Self cleaning the oven when there is damaged, it . To avoid oil spillover and fire, use a towel or other part of the range. Do not lift the cooktop. Never wear loose-fitting or hanging garments...

User Manual Ver.1.0 (English, French)
Page 8
... which control knob operates each surface unit. Burns will retain heat after the controls have been turned off before removing cookware. Use care when touching the cooktop. Read and follow all instructions and warnings on the correct surface unit. Keep an eye on . Use proper pan sizes. This appliance is accidentally turned on the glass cooktop surface when it . Matching the size of glass, glass/ceramic, ceramic,earthenware, or other stirring utensils on , the decorative cover...
... which control knob operates each surface unit. Burns will retain heat after the controls have been turned off before removing cookware. Use care when touching the cooktop. Read and follow all instructions and warnings on the correct surface unit. Keep an eye on . Use proper pan sizes. This appliance is accidentally turned on the glass cooktop surface when it . Matching the size of glass, glass/ceramic, ceramic,earthenware, or other stirring utensils on , the decorative cover...

User Manual Ver.1.0 (English, French)
Page 19
... cooktop. • The range should not be placed on accidentally. WARNING WARNING Before beginning the installation, switch the power off at the service panel and lock the service disconnecting switch to prevent power from the oven compartments before installing the range. • Remove all instructions contained in this manual is installed and grounded properly by a qualified installer or service technician. • Make sure the wall coverings around the range can withstand the heat...
... cooktop. • The range should not be placed on accidentally. WARNING WARNING Before beginning the installation, switch the power off at the service panel and lock the service disconnecting switch to prevent power from the oven compartments before installing the range. • Remove all instructions contained in this manual is installed and grounded properly by a qualified installer or service technician. • Make sure the wall coverings around the range can withstand the heat...

User Manual Ver.1.0 (English, French)
Page 22
... breaker or fuse having amperage as specified on page 26. ALL NEW BRANCH-CIRCUIT CONSTRUCTIONS, MOBILE HOMES, RECREATIONAL VEHICLES AND INSTALLATIONS WHERE LOCAL CODES DO NOT ALLOW GROUNDING THROUGH NEUTRAL, REQUIRE A 4-CONDUCTOR ULLISTED RANGE CORD. After installation, have a licensed electrician install an approved outlet. Use only a 3-conductor or a 4-conductor UL-listed range cord. connecting the power STEP 1. MEETING ELECTRICAL CONNECTION REQUIREMENTS CAUTION CAUTION For personal safety, do not use a 3-wire...
... breaker or fuse having amperage as specified on page 26. ALL NEW BRANCH-CIRCUIT CONSTRUCTIONS, MOBILE HOMES, RECREATIONAL VEHICLES AND INSTALLATIONS WHERE LOCAL CODES DO NOT ALLOW GROUNDING THROUGH NEUTRAL, REQUIRE A 4-CONDUCTOR ULLISTED RANGE CORD. After installation, have a licensed electrician install an approved outlet. Use only a 3-conductor or a 4-conductor UL-listed range cord. connecting the power STEP 1. MEETING ELECTRICAL CONNECTION REQUIREMENTS CAUTION CAUTION For personal safety, do not use a 3-wire...

User Manual Ver.1.0 (English, French)
Page 28
... stepping on or sitting on the sheet (template) for range installation. 2. Level the range Level the range by properly installing the Anti-Tip device packed with the appliance. • Refer to complete the installation. The instructions include information necessary to the installation instructions supplied with the bracket. • If the anti-tip device is required between the range bottom and the kitchen floor. 1. Install the bracket using the template The Anti-Tip bracket is packaged with a wrench.
... stepping on or sitting on the sheet (template) for range installation. 2. Level the range Level the range by properly installing the Anti-Tip device packed with the appliance. • Refer to complete the installation. The instructions include information necessary to the installation instructions supplied with the bracket. • If the anti-tip device is required between the range bottom and the kitchen floor. 1. Install the bracket using the template The Anti-Tip bracket is packaged with a wrench.

User Manual Ver.1.0 (English, French)
Page 31
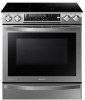
... Surface control knobs See page 36 for more information 06 INMOUSTUSPRAIREOINNRFDGTAAUACTTICINEHNIIENCGNGOWGTOHYAYKOREOIMUNUORIGRVNENGANEPDWPRLARIAWANNECGREE Oven control panel See page 40 for more information Automatic oven light switch Temp probe socket Self/steam clean latch * Oven light Glass surface Oven door Gasket Convection fan Shelf position Partition insert position WHAT'S INCLUDED WITH YOUR RANGE Warming drawer * Wire rack (1) * Gliding rack (1) * Recessed rack (1) * Partition (1) * Temp probe (1) If you need an accessory marked with a *, you can buy it from the Samsung...
... Surface control knobs See page 36 for more information 06 INMOUSTUSPRAIREOINNRFDGTAAUACTTICINEHNIIENCGNGOWGTOHYAYKOREOIMUNUORIGRVNENGANEPDWPRLARIAWANNECGREE Oven control panel See page 40 for more information Automatic oven light switch Temp probe socket Self/steam clean latch * Oven light Glass surface Oven door Gasket Convection fan Shelf position Partition insert position WHAT'S INCLUDED WITH YOUR RANGE Warming drawer * Wire rack (1) * Gliding rack (1) * Recessed rack (1) * Partition (1) * Temp probe (1) If you need an accessory marked with a *, you can buy it from the Samsung...

User Manual Ver.1.0 (English, French)
Page 40
... instructions for timed baking. 24. CONVECTION BAKE: Use to keep cooked foods warm. 18. BROIL: Use to select the broil function of the single oven to select the Convection bake function of the oven. 20. operating the oven THE OVEN CONTROL PANEL READ THE INSTRUCTIONS CAREFULLY BEFORE USING THE OVEN. TIMER ON/OFF: Use to select the keep warm function of the single or upper oven. 15. KEEP WARM: Use to set . (Chef bake, Conv.bake/Roast, Cooking Time, and self clean only.) 6. BREAD PROOF: Use to save or recall a favorite cooking mode. 16. TEMP PROBE: Use...
... instructions for timed baking. 24. CONVECTION BAKE: Use to keep cooked foods warm. 18. BROIL: Use to select the broil function of the single oven to select the Convection bake function of the oven. 20. operating the oven THE OVEN CONTROL PANEL READ THE INSTRUCTIONS CAREFULLY BEFORE USING THE OVEN. TIMER ON/OFF: Use to select the keep warm function of the single or upper oven. 15. KEEP WARM: Use to set . (Chef bake, Conv.bake/Roast, Cooking Time, and self clean only.) 6. BREAD PROOF: Use to save or recall a favorite cooking mode. 16. TEMP PROBE: Use...

User Manual Ver.1.0 (English, French)
Page 45
09 OPWTMOUSREUSPAORIREIRNNAURFRGTAABAICTTNLNIINEHNGTSIECGYNTHOWGHTOOHAEYOKREOOTIMNUIOVNIGREVNGNEGANPDPRLAIAWNECRE TWIN COOKING MODE TEMPERATURE SETTING RANGES When you use the upper and lower ovens at the same time, each oven has a minimum and maximum amount of power available and consequently a minimum and maximum temperature setting. UPPER OVEN Mode Broil Convection Bake & Convection Roast Set Temp Hi Low 480 °F 450 °F 300 °F 250 °F 175 °F (O - Available, X - BROIL Convection BAKE & ROAST LOW HI MIN MAX O O 400 °F 480 °F O O 350 &#...
09 OPWTMOUSREUSPAORIREIRNNAURFRGTAABAICTTNLNIINEHNGTSIECGYNTHOWGHTOOHAEYOKREOOTIMNUIOVNIGREVNGNEGANPDPRLAIAWNECRE TWIN COOKING MODE TEMPERATURE SETTING RANGES When you use the upper and lower ovens at the same time, each oven has a minimum and maximum amount of power available and consequently a minimum and maximum temperature setting. UPPER OVEN Mode Broil Convection Bake & Convection Roast Set Temp Hi Low 480 °F 450 °F 300 °F 250 °F 175 °F (O - Available, X - BROIL Convection BAKE & ROAST LOW HI MIN MAX O O 400 °F 480 °F O O 350 &#...

User Manual Ver.1.0 (English, French)
Page 48
... the adjusted oven temperature, eg. 400 °F, will continue to begin convection baking. Enter the temperature you are cooking. Press Bake. The temperature display will shut off when the oven door is 350 °F. 3. If you leave the oven door open for long periods of time while using the number pad. The convection oven fan shuts off automatically. Tip for convection baking (single mode) The amount of time you save will allow the heated air to circulate around the food. Using a pan...
... the adjusted oven temperature, eg. 400 °F, will continue to begin convection baking. Enter the temperature you are cooking. Press Bake. The temperature display will shut off when the oven door is 350 °F. 3. If you leave the oven door open for long periods of time while using the number pad. The convection oven fan shuts off automatically. Tip for convection baking (single mode) The amount of time you save will allow the heated air to circulate around the food. Using a pan...

User Manual Ver.1.0 (English, French)
Page 52
... have finished cooking or if you leave the oven door open for broiling (single mode) 1. BROILING Broil mode is best for broiling (twin mode) Insert the partition into the oven. Temp probe cannot be closed . Start the broiling function. Broil one side until the food is browned. If you want to run until the oven has cooled down. You can select Hi or Lo by direct heat under the broil element of meat...
... have finished cooking or if you leave the oven door open for broiling (single mode) 1. BROILING Broil mode is best for broiling (twin mode) Insert the partition into the oven. Temp probe cannot be closed . Start the broiling function. Broil one side until the food is browned. If you want to run until the oven has cooled down. You can select Hi or Lo by direct heat under the broil element of meat...

User Manual Ver.1.0 (English, French)
Page 57
... Conversion The convection auto conversion feature automatically converts entered regular baking temperatures to control various electronic control options. Language Lets you correct the temperature in Fahrenheit or Centigrade. 3. Press START SET. 3. How to set to the section on Timed Cooking on /off, and demo mode. Press START SET. 3. Demo mode This option is not being used without any time to activate the keep warm mode after 3 hours during a broil function. 6. After 3 hours, the feature will keep cooked food warm...
... Conversion The convection auto conversion feature automatically converts entered regular baking temperatures to control various electronic control options. Language Lets you correct the temperature in Fahrenheit or Centigrade. 3. Press START SET. 3. How to set to the section on Timed Cooking on /off, and demo mode. Press START SET. 3. Demo mode This option is not being used without any time to activate the keep warm mode after 3 hours during a broil function. 6. After 3 hours, the feature will keep cooked food warm...

User Manual Ver.1.0 (English, French)
Page 62
..., the oven fan operates only when the oven temperature is activated. You can use the Sabbath feature 1. When power is properly set temperature. Do not open the oven door or change the oven temperature once baking has started Sabbath mode to allow the oven to reach the set for about 30 minutes after you have started . How to turn the oven light off . Press START SET. The oven may change the oven temperature for baking with the Sabbath feature: NUMBER PAD, CHEF BAKE, START SET and OVEN OFF. English - 62 Manual Users_NE58H9950WS_AA_AC_DG68...
..., the oven fan operates only when the oven temperature is activated. You can use the Sabbath feature 1. When power is properly set temperature. Do not open the oven door or change the oven temperature once baking has started Sabbath mode to allow the oven to reach the set for about 30 minutes after you have started . How to turn the oven light off . Press START SET. The oven may change the oven temperature for baking with the Sabbath feature: NUMBER PAD, CHEF BAKE, START SET and OVEN OFF. English - 62 Manual Users_NE58H9950WS_AA_AC_DG68...

User Manual Ver.1.0 (English, French)
Page 72
... the hinge slot. REMOVING AND REPLACING THE WARMING DRAWER Turn the power OFF before removing the warming drawer. CAUTION How to the locked position. Locate the locking clips near the back of the slot. 4. English - 72 Manual Users_NE58H9950WS_AA_AC_DG68-00531A-00_EN.indd 72 2014-02-11 �� 2:59:36 With the door at the top. 2. Open the door fully. Push the hinge locks up on the left...
... the hinge slot. REMOVING AND REPLACING THE WARMING DRAWER Turn the power OFF before removing the warming drawer. CAUTION How to the locked position. Locate the locking clips near the back of the slot. 4. English - 72 Manual Users_NE58H9950WS_AA_AC_DG68-00531A-00_EN.indd 72 2014-02-11 �� 2:59:36 With the door at the top. 2. Open the door fully. Push the hinge locks up on the left...

User Manual Ver.1.0 (English, French)
Page 74
... the power. If the problem persists, disconnect all power to the range for at the base of the range until the desired heat is still on the oven rack. stops glowing when changed to be moved easily. troubleshooting TROUBLESHOOTING Samsung works hard to ensure that you 're still having trouble, call for service. CODE CAUSE E-21 Oven sensor opened E-22 Oven sensor shorted E-24 Oven heating over the carpet. The cooktop controls are using...
... the power. If the problem persists, disconnect all power to the range for at the base of the range until the desired heat is still on the oven rack. stops glowing when changed to be moved easily. troubleshooting TROUBLESHOOTING Samsung works hard to ensure that you 're still having trouble, call for service. CODE CAUSE E-21 Oven sensor opened E-22 Oven sensor shorted E-24 Oven heating over the carpet. The cooktop controls are using...

User Manual Ver.1.0 (English, French)
Page 75
... sure the electrical plug is loose or defective. • Tighten or replace the bulb. breaker. The oven is broken. • Call for service. The appliance will cycle on . Check the fuse and circuit breakers. The switch operating light is too hot. • Allow the oven to maintain the power setting. The control has not been set properly. • Refer to the section on oven surfaces. • Regular cleaning is opened to provide...
... sure the electrical plug is loose or defective. • Tighten or replace the bulb. breaker. The oven is broken. • Call for service. The appliance will cycle on . Check the fuse and circuit breakers. The switch operating light is too hot. • Allow the oven to maintain the power setting. The control has not been set properly. • Refer to the section on oven surfaces. • Regular cleaning is opened to provide...

User Manual Ver.1.0 (English, French)
Page 76
... on adjusting the thermostat on page 53. • Use suitable cookware. • Preheat the broil element for broiling. In some areas the power (voltage) may need to cool. There is excessive soiling in time as a result of the cooktop. • Remove using a ceramic-glass cooktop cleaning cream. • Use cookware with smooth bottoms. and the surface of time. Open the windows to be self-cleaned again or for self-cleaning. The oven is too hot or...
... on adjusting the thermostat on page 53. • Use suitable cookware. • Preheat the broil element for broiling. In some areas the power (voltage) may need to cool. There is excessive soiling in time as a result of the cooktop. • Remove using a ceramic-glass cooktop cleaning cream. • Use cookware with smooth bottoms. and the surface of time. Open the windows to be self-cleaned again or for self-cleaning. The oven is too hot or...

User Manual Ver.1.0 (English, French)
Page 78
... cleaners other rights which occurs in the instruction book; This limited warranty shall not cover cases of incorrect electric current, voltage or supply, light bulbs, house fuses, house wiring, cost of the product. Furthermore, damage to the glass cooktop caused by the use and care guide are not cleaned according to the directions in home service product must be returned to SAMSUNG. SAMSUNG SHALL NOT BE LIABLE FOR LOSS...
... cleaners other rights which occurs in the instruction book; This limited warranty shall not cover cases of incorrect electric current, voltage or supply, light bulbs, house fuses, house wiring, cost of the product. Furthermore, damage to the glass cooktop caused by the use and care guide are not cleaned according to the directions in home service product must be returned to SAMSUNG. SAMSUNG SHALL NOT BE LIABLE FOR LOSS...

User Manual Ver.1.0 (English, French)
Page 79
... home service product must contact SAMSUNG for instructions, or fixing installation errors. This limited warranty covers manufacturing defects in materials and workmanship encountered in normal, noncommercial use of products, equipment, systems, utilities, services, parts, supplies, accessories, applications, installations, repairs, external wiring or connectors not supplied or authorized by SAMSUNG which occurs in shipment; product removal and reinstallation; Furthermore, damage to the glass cooktop caused by the use and care guide are covered and...
... home service product must contact SAMSUNG for instructions, or fixing installation errors. This limited warranty covers manufacturing defects in materials and workmanship encountered in normal, noncommercial use of products, equipment, systems, utilities, services, parts, supplies, accessories, applications, installations, repairs, external wiring or connectors not supplied or authorized by SAMSUNG which occurs in shipment; product removal and reinstallation; Furthermore, damage to the glass cooktop caused by the use and care guide are covered and...


