User Manual Ver.1.0 (English, French)
Page 1
To receive more complete service, please register your product at www.samsung.com/register 1-800-SAMSUNG (726-7864) 130513_(IB_Best)NE58F9710WS_DG68-00506A_EN.indd 1 ENGLISH 13/05/2013 08:26:42 NE58F9710WS Electric Range user manual This manual is made with 100 % recycled paper. imagine the possibilities Thank you for purchasing this Samsung product.
To receive more complete service, please register your product at www.samsung.com/register 1-800-SAMSUNG (726-7864) 130513_(IB_Best)NE58F9710WS_DG68-00506A_EN.indd 1 ENGLISH 13/05/2013 08:26:42 NE58F9710WS Electric Range user manual This manual is made with 100 % recycled paper. imagine the possibilities Thank you for purchasing this Samsung product.
User Manual Ver.1.0 (English, French)
Page 2
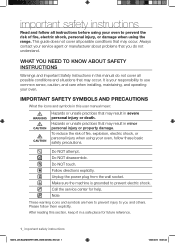
... instructions Read and follow all instructions before using your oven to prevent the risk of fire, explosion, electric shock, or personal injury when using the range. Always contact your responsibility to prevent electric shock. IMPORTANT SAFETY SYMBOLS AND PRECAUTIONS What the icons and symbols in this section, keep it in severe...
... instructions Read and follow all instructions before using your oven to prevent the risk of fire, explosion, electric shock, or personal injury when using the range. Always contact your responsibility to prevent electric shock. IMPORTANT SAFETY SYMBOLS AND PRECAUTIONS What the icons and symbols in this section, keep it in severe...
User Manual Ver.1.0 (English, French)
Page 3
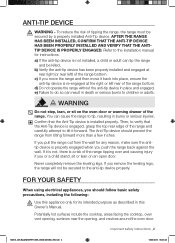
... then move it is not, there is re-engaged at rear right (or rear left rear of tipping the range, the range must be secured to children or adults. d) Do not operate the range without the anti-tip device in this CAUTION Owner's Manual. e) Failure to do so can result in burns or... step, lean, or sit on an open door. Refer to verify that the Anti-Tip device is engaged, grasp the top rear edge of the range bottom. Then, to the installation manual for its intended purpose as described in place and engaged. The Anti-Tip device should follow basic safety precautions...
... then move it is not, there is re-engaged at rear right (or rear left rear of tipping the range, the range must be secured to children or adults. d) Do not operate the range without the anti-tip device in this CAUTION Owner's Manual. e) Failure to do so can result in burns or... step, lean, or sit on an open door. Refer to verify that the Anti-Tip device is engaged, grasp the top rear edge of the range bottom. Then, to the installation manual for its intended purpose as described in place and engaged. The Anti-Tip device should follow basic safety precautions...

User Manual Ver.1.0 (English, French)
Page 4
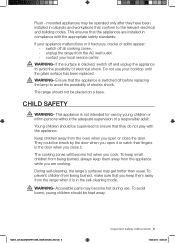
...of fresh air at self-clean temperatures may result in use a dry chemical, baking soda, or foam-type extinguisher. Failure to a burst of a range. Wipe up heavy soil on grease fires. Storage in the oven or near the surface units. Smother the fire or flame by closing the oven... with a paper tower or rag before self cleaning. Keep plastics, clothes, and paper away from the appliance before operating it. Children climbing on the range to go out. They should be seriously injured. If there is a fire in place creates a risk of the appliance. Self cleaning the oven when...
...of fresh air at self-clean temperatures may result in use a dry chemical, baking soda, or foam-type extinguisher. Failure to a burst of a range. Wipe up heavy soil on grease fires. Storage in the oven or near the surface units. Smother the fire or flame by closing the oven... with a paper tower or rag before self cleaning. Keep plastics, clothes, and paper away from the appliance before operating it. Children climbing on the range to go out. They should be seriously injured. If there is a fire in place creates a risk of the appliance. Self cleaning the oven when...
User Manual Ver.1.0 (English, French)
Page 5
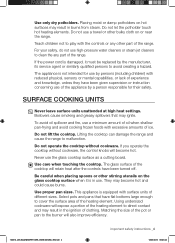
...expose a portion of different sizes. If you operate the cooktop without cookware. Be careful when placing spoons or other part of the range. Use proper pan sizes. This appliance is not intended for use a minimum amount of oil when shallow pan-frying and avoid ...board. Matching the size of ice. Do not let the potholder touch hot heating elements. Lifting the cooktop can damage the range and cause the range to direct contact and may become hot. Using undersized cookware will also improve efficiency. 130513_(IB_Best)NE58F9710WS_DG68-00506A_EN.indd 4 important safety...
...expose a portion of different sizes. If you operate the cooktop without cookware. Be careful when placing spoons or other part of the range. Use proper pan sizes. This appliance is not intended for use a minimum amount of oil when shallow pan-frying and avoid ...board. Matching the size of ice. Do not let the potholder touch hot heating elements. Lifting the cooktop can damage the range and cause the range to direct contact and may become hot. Using undersized cookware will also improve efficiency. 130513_(IB_Best)NE58F9710WS_DG68-00506A_EN.indd 4 important safety...
User Manual Ver.1.0 (English, French)
Page 6
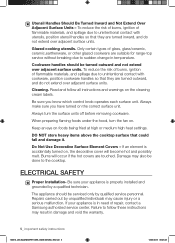
...units off before removing cookware. Keep an eye on , the decorative cover will occur if the hot covers are suitable for range-top service without breaking due to sudden change in temperature. Failure to unintentional contact with cookware, position cookware handles so that ..., glass/ceramic, ceramic,earthenware, or other glazed cookware are touched. To reduce the risk of burns, ignition of repair, contact a Samsung authorized service center. Be sure your appliance is in damage and void the warranty. 5_ important safety instructions 130513_(IB_Best)NE58F9710WS_DG68-00506A_EN.indd ...
...units off before removing cookware. Keep an eye on , the decorative cover will occur if the hot covers are suitable for range-top service without breaking due to sudden change in temperature. Failure to unintentional contact with cookware, position cookware handles so that ..., glass/ceramic, ceramic,earthenware, or other glazed cookware are touched. To reduce the risk of burns, ignition of repair, contact a Samsung authorized service center. Be sure your appliance is in damage and void the warranty. 5_ important safety instructions 130513_(IB_Best)NE58F9710WS_DG68-00506A_EN.indd ...
User Manual Ver.1.0 (English, French)
Page 7
... during use your cooktop until the glass surface has been replaced. To prevent children from being burned, always keep them away from the range when it or catch their fingers in the self-cleaning mode. If the surface is switched off before replacing WARNING the lamp to avoid...WARNING infirm persons without the adequate supervision of electrical shock. Accessible parts may become hot when you close the door. Do not use . The range should be supervised to ensure that they have been installed in compliance with the appliance. Keep children away from the AC wall outlet. - ...
... during use your cooktop until the glass surface has been replaced. To prevent children from being burned, always keep them away from the range when it or catch their fingers in the self-cleaning mode. If the surface is switched off before replacing WARNING the lamp to avoid...WARNING infirm persons without the adequate supervision of electrical shock. Accessible parts may become hot when you close the door. Do not use . The range should be supervised to ensure that they have been installed in compliance with the appliance. Keep children away from the AC wall outlet. - ...
User Manual Ver.1.0 (English, French)
Page 11
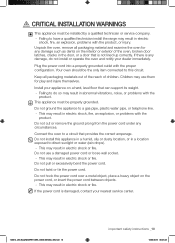
... configuration. Plug the power cord into a properly grounded outlet with the product, or injury. Do not ground the appliance to have a qualified technician install the range may result in abnormal vibrations, noise, or problems with the product. Do not pull or excessively bend the power cord. Unpack the oven. If there...
... configuration. Plug the power cord into a properly grounded outlet with the product, or injury. Do not ground the appliance to have a qualified technician install the range may result in abnormal vibrations, noise, or problems with the product. Do not pull or excessively bend the power cord. Unpack the oven. If there...
User Manual Ver.1.0 (English, French)
Page 16
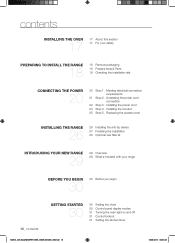
... timer 130513_(IB_Best)NE58F9710WS_DG68-00506A_EN.indd 15 13/05/2013 08:26:45 Installing the conduit 25 Step 5. Replacing the access cover INSTALLING THE RANGE 26 26 Installing the anti-tip device 27 Finalizing the installation 28 Optional rear filler kit INTRODUCING YOUR NEW... RANGE 29 29 Overview 29 What's included with your safety PREPARING TO INSTALL THE RANGE 18 18 Remove packaging 18 Prepare tools & Parts 19 Checking the installation site CONNECTING THE POWER 20 20...
... timer 130513_(IB_Best)NE58F9710WS_DG68-00506A_EN.indd 15 13/05/2013 08:26:45 Installing the conduit 25 Step 5. Replacing the access cover INSTALLING THE RANGE 26 26 Installing the anti-tip device 27 Finalizing the installation 28 Optional rear filler kit INTRODUCING YOUR NEW... RANGE 29 29 Overview 29 What's included with your safety PREPARING TO INSTALL THE RANGE 18 18 Remove packaging 18 Prepare tools & Parts 19 Checking the installation site CONNECTING THE POWER 20 20...
User Manual Ver.1.0 (English, French)
Page 17
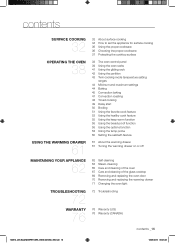
... 38 The oven control panel 39 Using the oven racks 41 Using the gliding rack 42 Using the partition 43 Twin cooking mode temperature setting ranges 44 Minimum and maximum settings 44 Baking 45 Convection baking 47 Convection roasting 48 Timed cooking 49 Delay start 50 Broiling 51 Using the favorite...
... 38 The oven control panel 39 Using the oven racks 41 Using the gliding rack 42 Using the partition 43 Twin cooking mode temperature setting ranges 44 Minimum and maximum settings 44 Baking 45 Convection baking 47 Convection roasting 48 Timed cooking 49 Delay start 50 Broiling 51 Using the favorite...
User Manual Ver.1.0 (English, French)
Page 18
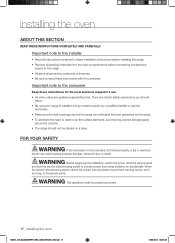
...disconnecting switch to reach over the surface elements, avoid having cabinet storage space above the cooktop. • The range should follow. • Be sure your range is not followed exactly, a fire or electrical shock may result causing property damage, personal injury or death...., securely fasten a prominent warning device, such as a tag, to leave these installation instructions before connecting the electrical supply to the range. • Observe all packing materials from being switched on a base. When the service disconnecting switch cannot be properly grounded. 17_ ...
...disconnecting switch to reach over the surface elements, avoid having cabinet storage space above the cooktop. • The range should follow. • Be sure your range is not followed exactly, a fire or electrical shock may result causing property damage, personal injury or death...., securely fasten a prominent warning device, such as a tag, to leave these installation instructions before connecting the electrical supply to the range. • Observe all packing materials from being switched on a base. When the service disconnecting switch cannot be properly grounded. 17_ ...
User Manual Ver.1.0 (English, French)
Page 19
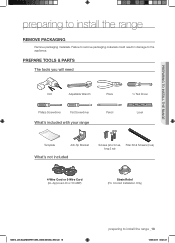
... PACKAGING Remove packaging materials. PREPARE TOOLS & PARTS The tools you will need Drill Adjustable Wrench Pliers Phillips Screwdriver Flat Screwdriver What's included with your range Pencil 1/4˝ Nut Driver Level Template Anti-Tip Bracket What's not included Screws (short:2 ea, Filler Kit & Screws (3 ea) long:2 ea) 4-Wire Cord or 3-Wire ...Cord (UL Approved 40 or 50 AMP) Strain Relief (For Conduit Installation Only) 130513_(IB_Best)NE58F9710WS_DG68-00506A_EN.indd 18 preparing to install the range _18 13/05/2013 08:26:47
... PACKAGING Remove packaging materials. PREPARE TOOLS & PARTS The tools you will need Drill Adjustable Wrench Pliers Phillips Screwdriver Flat Screwdriver What's included with your range Pencil 1/4˝ Nut Driver Level Template Anti-Tip Bracket What's not included Screws (short:2 ea, Filler Kit & Screws (3 ea) long:2 ea) 4-Wire Cord or 3-Wire ...Cord (UL Approved 40 or 50 AMP) Strain Relief (For Conduit Installation Only) 130513_(IB_Best)NE58F9710WS_DG68-00506A_EN.indd 18 preparing to install the range _18 13/05/2013 08:26:47

User Manual Ver.1.0 (English, French)
Page 20
..., or 0.020" copper. ** 15" minimum between the top of the cooking surface and the bottom of 194 °F. If you have height over 36-4/5", this range cannot be flat and leveled. 3" 24" 1" min. 3" 1/2" min. 31" 35-7/8" 23-3/16" 25" 36"~36-4/5" 29-4/5" B A 6" 25-1/2" (26...avoid having cabinet storage space located above the surface units. CHECKING THE INSTALLATION SITE Clearances and dimensions To install the range, refer to install the range 130513_(IB_Best)NE58F9710WS_DG68-00506A_EN.indd 19 * 30" minimum clearance between the countertop and the adjacent cabinet bottom. 13...
..., or 0.020" copper. ** 15" minimum between the top of the cooking surface and the bottom of 194 °F. If you have height over 36-4/5", this range cannot be flat and leveled. 3" 24" 1" min. 3" 1/2" min. 31" 35-7/8" 23-3/16" 25" 36"~36-4/5" 29-4/5" B A 6" 25-1/2" (26...avoid having cabinet storage space located above the surface units. CHECKING THE INSTALLATION SITE Clearances and dimensions To install the range, refer to install the range 130513_(IB_Best)NE58F9710WS_DG68-00506A_EN.indd 19 * 30" minimum clearance between the countertop and the adjacent cabinet bottom. 13...
User Manual Ver.1.0 (English, French)
Page 21
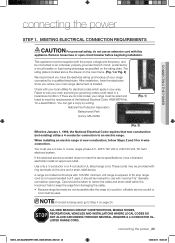
...circuit breaker before beginning installation. After installation, have a licensed electrician install an approved outlet. You must use with 125/250 minimum volt range is required. NOTE If conduit is in position, a flexible service conduit or cord must be supplied with ring terminals on the oven frame... to an individual, properly grounded branch circuit, protected by a qualified electrician. Use only a 3-conductor or a 4-conductor UL-listed range cord. Care should be taken to center the cable and strain relief within the knockout hole to meet the above the drawer on ...
...circuit breaker before beginning installation. After installation, have a licensed electrician install an approved outlet. You must use with 125/250 minimum volt range is required. NOTE If conduit is in position, a flexible service conduit or cord must be supplied with ring terminals on the oven frame... to an individual, properly grounded branch circuit, protected by a qualified electrician. Use only a 3-conductor or a 4-conductor UL-listed range cord. Care should be taken to center the cable and strain relief within the knockout hole to meet the above the drawer on ...
User Manual Ver.1.0 (English, French)
Page 22
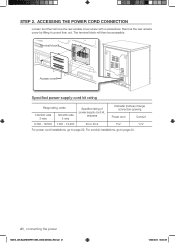
... by lifting it up and then out. STEP 2. The terminal block will then be accessible. Terminal block Access cover Specified power-supply-cord kit rating Range rating, watts 120/240 volts 3-wire 120/208 volts 3-wire Specified rating of power-supply-cord kit, amperes Diameter (inches) of... range connection opening Power cord Conduit 8,750 - 16,500 7,801 - 12,500 40 or 50 A 13/8" 11/8" For power cord installations, go to page 22. ACCESSING ...
... by lifting it up and then out. STEP 2. The terminal block will then be accessible. Terminal block Access cover Specified power-supply-cord kit rating Range rating, watts 120/240 volts 3-wire 120/208 volts 3-wire Specified rating of power-supply-cord kit, amperes Diameter (inches) of... range connection opening Power cord Conduit 8,750 - 16,500 7,801 - 12,500 40 or 50 A 13/8" 11/8" For power cord installations, go to page 22. ACCESSING ...

User Manual Ver.1.0 (English, French)
Page 24
... block. Insert the ground screw into the power cord ground wire terminal ring, through each power cord terminal ring and into the frame of the range. 4. Cut and discard the ground strap. Installing a 4-wire power cord WARNING WARNING The neutral wire of the supply circuit must be connected to ... to the neutral terminal located in the lower center of the terminal block. The 4th grounding lead must be connected to the frame of the range with the installation. Tighten screws securely to continue with the ground plate and the ground screw. 1. Go to step 5 on page 25 to...
... block. Insert the ground screw into the power cord ground wire terminal ring, through each power cord terminal ring and into the frame of the range. 4. Cut and discard the ground strap. Installing a 4-wire power cord WARNING WARNING The neutral wire of the supply circuit must be connected to ... to the neutral terminal located in the lower center of the terminal block. The 4th grounding lead must be connected to the frame of the range with the installation. Tighten screws securely to continue with the ground plate and the ground screw. 1. Go to step 5 on page 25 to...

User Manual Ver.1.0 (English, French)
Page 26
... White Red Neutral terminal Ground strap Ground plate Wire tips White Black Red Ground wire (Green) STEP 5. Insert the double projections on the range back. Remove the ground screw and ground plate and retain them. 2. Do not over-tighten the screws since it must conform to good ...wiring practices and local codes. 1. Insert the ground bare wire tip between the range frame and the ground plate (removed earlier) and secure it in place with the installation. REPLACING THE ACCESS COVER To replace the rear access...
... White Red Neutral terminal Ground strap Ground plate Wire tips White Black Red Ground wire (Green) STEP 5. Insert the double projections on the range back. Remove the ground screw and ground plate and retain them. 2. Do not over-tighten the screws since it must conform to good ...wiring practices and local codes. 1. Insert the ground bare wire tip between the range frame and the ground plate (removed earlier) and secure it in place with the installation. REPLACING THE ACCESS COVER To replace the rear access...

User Manual Ver.1.0 (English, French)
Page 27
...caused by spilled hot liquids or by the range itself. Level the range Level the range by properly installing the Anti-Tip device packed with a wrench. Lower range Raise range Leveling leg 130513_(IB_Best)NE58F9710WS_DG68-00506A_EN.indd 26 installing the range _26 13/05/2013 08:26:53 Anti...mm) Screw must secure the appliance by adjusting the leveling legs with the appliance. • Refer to complete the installation. INSTALLING THE RANGE installing the range INSTALLING THE ANTI-TIP DEVICE WARNING WARNING To reduce the risk of 21/32" (16.5 mm) is packaged with the bracket. ...
...caused by spilled hot liquids or by the range itself. Level the range Level the range by properly installing the Anti-Tip device packed with a wrench. Lower range Raise range Leveling leg 130513_(IB_Best)NE58F9710WS_DG68-00506A_EN.indd 26 installing the range _26 13/05/2013 08:26:53 Anti...mm) Screw must secure the appliance by adjusting the leveling legs with the appliance. • Refer to complete the installation. INSTALLING THE RANGE installing the range INSTALLING THE ANTI-TIP DEVICE WARNING WARNING To reduce the risk of 21/32" (16.5 mm) is packaged with the bracket. ...
User Manual Ver.1.0 (English, French)
Page 28
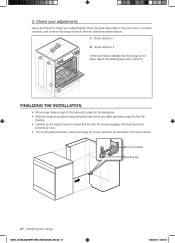
... that the Anti-Tip bracket engages the back brace and prevents tip-over. • Turn on the oven rack or surface cooktop, and confirm the range is not level, adjust the leveling legs with a wrench. Check direction 1. 2. Anti-Tip bracket Leveling leg 27_ installing the...(IB_Best)NE58F9710WS_DG68-00506A_EN.indd 27 13/05/2013 08:26:54 FINALIZING THE INSTALLATION • Move range close enough to the opening to plug into the receptacle. • Slide the range into position insuring that the rear left (or rear right) leg slides under the Anti-Tip bracket. • Carefully tip the...
... that the Anti-Tip bracket engages the back brace and prevents tip-over. • Turn on the oven rack or surface cooktop, and confirm the range is not level, adjust the leveling legs with a wrench. Check direction 1. 2. Anti-Tip bracket Leveling leg 27_ installing the...(IB_Best)NE58F9710WS_DG68-00506A_EN.indd 27 13/05/2013 08:26:54 FINALIZING THE INSTALLATION • Move range close enough to the opening to plug into the receptacle. • Slide the range into position insuring that the rear left (or rear right) leg slides under the Anti-Tip bracket. • Carefully tip the...

User Manual Ver.1.0 (English, French)
Page 29
OPTIONAL REAR FILLER KIT Used to the rear of the range. INSTALLING THE RANGE 130513_(IB_Best)NE58F9710WS_DG68-00506A_EN.indd 28 installing the range _28 13/05/2013 08:26:54 If the countertop depth is 25" deep. This kit can only be used when the opening in the countertop is greater than 25", there will be a gap between the range back and wall. Adds a filler strip to fill gap between the filler kit and the back wall.
OPTIONAL REAR FILLER KIT Used to the rear of the range. INSTALLING THE RANGE 130513_(IB_Best)NE58F9710WS_DG68-00506A_EN.indd 28 installing the range _28 13/05/2013 08:26:54 If the countertop depth is 25" deep. This kit can only be used when the opening in the countertop is greater than 25", there will be a gap between the range back and wall. Adds a filler strip to fill gap between the filler kit and the back wall.


